By Sajid Qureshi, Alibaba Cloud Tech Share Author. Tech Share is Alibaba Cloud's incentive program to encourage the sharing of technical knowledge and best practices within the cloud community.
Phabricator is a free and open source collection of web applications that helps you to build your own software development platform for better software. Phabricator is ideal when you are working with multiple teams for software development. It is built using PHP and uses MySQL to store its data. Phabricator gives you a box of solid tools for a comparatively small setup cost. It is extremely fast and the tools are easy to learn and use. The major components of Phabricator are:
In this tutorial, we will install and configure Phabricator on an Alibaba Cloud Elastic Compute Service (ECS) CentOS 7 server.
We recommend you to install any new package on a freshly updated ECS server. You can upgrade all the available packages using the following command.
yum -y updateOnce the system is updated, you can start the LAMP installation by installing Apache web server, MariaDB which will be used to store data and PHP with required modules. Execute the following command to install apache server and MariaDB.
yum -y install httpd mariadb-server mariadb mod_sslWe will install PHP version 7.1. The default yum repository contains PHP version 5.4, so you'll need to first add the EPEL repository and then install PHP version 7.1.
yum -y install epel-releaseNext, install the Webtatic repository using the following command.
rpm -Uvh https://mirror.webtatic.com/yum/el7/webtatic-release.rpmRun the following command to install PHP 7.1 with required modules.
yum -y install php71w php71w-cli php71w-mysqli php71w-gd php71w-mbstring php71w-curl php71w-iconv php71w-pcntl php71w-opcacheNext, you'll need to edit the configuration in php.ini file using any text editor. Here we are using nano text editor, you can also install it using yum -y install nano.
nano /etc/php.iniNext, find the following lines in the file and change the memory limit to the highest amount.
; Maximum amount of memory a script may consume (128MB)
; http://php.net/memory-limit
memory_limit = 128M
Next, find the following lines in the file and change the timezone according to your region and uncomment the line.
[Date]
; Defines the default timezone used by the date functions
; http://php.net/date.timezone
date.timezone =
Next, find the following lines and set their values according to instructions provided.
post_max_size = 8M #Change it to at least 32M
upload_max_filesize = 2M #Change it to at least 32M
Save the file and exit from the text editor.
Start the Apache web server and enable it to automatically launch at boot time, using the following command.
systemctl start httpd && systemctl enable httpdSimilarly, start the MariaDB and enable it to launch at the boot time.
systemctl start mariadb && systemctl enable mariadbNow, let's make sure to harden the security of MariaDB installation. Execute the following command.
mysql_secure_installationYou will be asked to enter root password and press Enter button for none and proceed further. Answer Y to all the question asked and complete the process.
Enter current password for root (enter for none): Enter
Set root password? [Y/n]: Y
New password:<your-password>
Re-enter new password:<your-password>
Remove anonymous users? [Y/n]: Y
Disallow root login remotely? [Y/n]: Y
Remove test database and access to it? [Y/n]: Y
Reload privilege tables now? [Y/n]: Y
You will need to install Git and to do so run the following command.
yum -y install gitYou have installed all the dependencies required to install the Phabricator. Now you are ready to install it from git. Create a new directory and change your current directory to that directory using the following commands.
mkdir /var/www/phabricatorcd /var/www/phabricatorClone the required Phabricator files using the following commands.
git clone https://github.com/phacility/libphutil.gitgit clone https://github.com/phacility/arcanist.gitgit clone https://github.com/phacility/phabricator.gitNext, you'll need to setup the database credentials. Execute the following commands one by one and they will do the job for you.
cd /var/www/phabricator/phabricator/./bin/config set mysql.host localhost./bin/config set mysql.port 3306./bin/config set mysql.user root./bin/config set mysql.pass <MySQL-root-password>Populate the phabricator scheme using the following command.
./bin/storage upgrade --user root --password YourMariaDBPsswordYou'll be asked the following questions, press Y to continue.
Before running storage upgrades, you should take down the Phabricator web
interface and stop any running Phabricator daemons (you can disable this
warning with --force).

    Are you ready to continue? [y/N] y

...
You should see the following result as output.
Completed applying all schema adjustments.
 ANALYZE  Analyzing tables...
Done.
 ANALYZED  Analyzed 510 table(s).
Next, change the ownership rules for the file to the Apache web server. Run the following command to do so.
chown -R apache:apache /var/www/phabricatorIt is recommended to use SSL for accessing Phabricator application through the web interface. Now we will need to generate SSL certificates from Let's Encrypt client. You can use commercial SSL certificates instead, you can purchase SSL certificates from Alibaba Cloud.
Now, temporarily stop the Apache web server for installing Certbot using the following command.
yum -y install python-certbot-apacheNext, execute the following command to obtain SSL certificates. Make sure that your domain is pointed to the server.
certbot certonly --standalone -d yourdomain.comIt may ask you which SSL configuration to use during authentication, choose ssl.conf. All the changes made to the file will be automatically restored. Finally, provide your email address and accept the terms and condition. Once the certificates are generated, they are likely to be stored in the following directory.
/etc/letsencrypt/live/yourdomain.comIn the directory, you will find fullchain.pemwhich is your domains certificate and privkey.pem which is your certificate's private key.
Let's Encrypt SSL certificates expires in 90 days, so we recommended you to set an automatic renewal for your certificates. Run the following command to open your crontab file.
crontab -eAdd the following line to the file.
30 1 * * 1 /usr/bin/certbot renew >> /var/log/le-renew.logCreate a new virtual host file for Phabricator using the following command.
nano /etc/httpd/conf.d/yourdomain.com.confReplace yourdomain.com with your actual domain. Now add the following content into the file.
<VirtualHost *:80>
    ServerName yourdomain.com
    Redirect permanent / https://yourdomain.com/
    TransferLog /var/log/httpd/yourdomain.com_access.log
    ErrorLog /var/log/httpd/yourdomain.com_error.log
</VirtualHost>

<VirtualHost *:443>
    ServerName yourdomain.com
    DocumentRoot /var/www/phabricator/phabricator/webroot
    ServerAdmin me@liptanbiswas.com
    SSLEngine On
    SSLCertificateFile /etc/letsencrypt/live/yourdomain.com/fullchain.pem
    SSLCertificateKeyFile /etc/letsencrypt/live/yourdomain.com/privkey.pem
    RewriteEngine on
    RewriteRule ^/rsrc/(.*)     -                       [L,QSA]
    RewriteRule ^/favicon.ico   -                       [L,QSA]
    RewriteRule ^(.*)$          /index.php?__path__=$1  [B,L,QSA]

    <Directory /var/www/phabricator/phabricator/webroot>
        AllowOverride All
        Require all granted
    </Directory>

    TransferLog /var/log/httpd/yourdomain.com_ssl_access.log
    ErrorLog /var/log/httpd/yourdomain.com_ssl_error.log
</VirtualHost>
In the above configuration change yourdomain.com to your actual domain.
Finally, restart the apache server and MariaDB to apply all the changes that we just configured. You can do so using the following commands.
systemctl restart httpdsystemctl restart mariadbYou will need to disable SELinux otherwise, Phabricator won't be able to connect to the database. To temporary disable SELinux without restarting the server, run the following command.
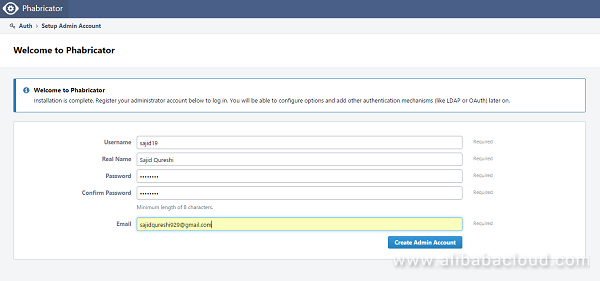
setenforce 0Open up your favorite web browser and visit https://yourdomain.com. Replace yourdomain.com with your actual domain name and you will see the following screen to set up an administrator account.

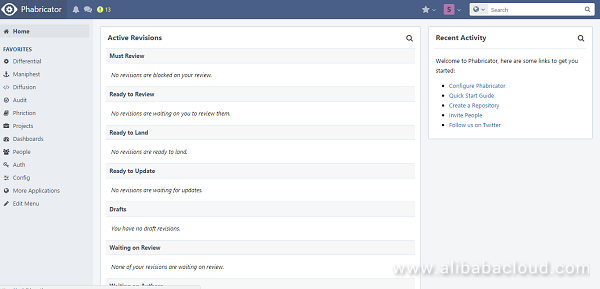
Provide the administrators details asked like username, password, and email then click Create Admin Account button. You will be now taken to your administrative dashboard.

You will need to configure a few things before you can use the Phabricator application for the production environment. First of all, start the Phabricator daemon using the following command so that Phabricator can do the required background tasks.
cd /var/www/phabricator/phabricator/./bin/phd startNext, configure the Base URI using the following command. It is important to configure the Base URI as most of the features in the application will be unavailable unless Base URI is configured.
cd /var/www/phabricator/phabricator/./bin/config set phabricator.base-uri 'https://yourdomain.com'Set the local repository path using following command.
mkdir /var/repochown -R apache:apache /var/repoNow Phabricator is completely configured and you can manage your web application from the administrative dashboard. You can add new repositories by clicking on Create Repository button.
You can review your application code using Differential component of Phabricator available on the left side of web page. You can browse all repositories using Diffusion component of Phabricator.
Congratulations! You have successfully installed Phabricator on your Alibaba Cloud Elastic Compute Service (ECS) CentOS 7 server. Now you can deploy your own software development platform using Phabricator.

2,605 posts | 747 followers
FollowAlibaba Clouder - August 16, 2019
Alibaba Clouder - May 14, 2019
Alibaba Clouder - May 13, 2019
Alibaba Clouder - July 23, 2018
Alibaba Clouder - April 12, 2019
Alibaba Clouder - May 15, 2019

2,605 posts | 747 followers
Follow ECS(Elastic Compute Service)
Elastic and secure virtual cloud servers to cater all your cloud hosting needs.
Learn More Function Compute
Alibaba Cloud Function Compute is a fully-managed event-driven compute service. It allows you to focus on writing and uploading code without the need to manage infrastructure such as servers.
Learn More API Gateway
API Gateway provides you with high-performance and high-availability API hosting services to deploy and release your APIs on Alibaba Cloud products.
Learn MoreMore Posts by Alibaba Clouder