By Sunny Jovita, Solution Architect Intern
For those who want to build a recommendation engine on cloud, there are 2 approaches. The first is to build it on our data platform built on top of DataWorks, PAI, and MaxCompute as the data warehouse (open implementation of collaborative filtering).
The second, more recommended approach is to use AI Rec. AI Rec is an open box solution for anyone who is seeking to create their own recommendation engine. This public cloud service provides pre-built templates and an SDK that adheres to the best practices that is found by experience implementing this solution for Alibaba Group's business units.
Industry types:
‒ News Industry
‒ Content Industry
‒ E-Commerce Industry
For this lab, let's use some dummy content data that can be found here. This contains transactional data from Taobao, and this training data is suitable for content sharing platforms. You can use this template to recommend content that has sharing attributes, such as liking and forwarding. The recommended content can be short text, articles, images, or a combination of them.
Note: We recommend you to deduplicate items before upload the table.
Data description
Link for table schema: https://www.alibabacloud.com/help/en/airec/latest/content-industry
For content scene, you must prepare 3 tables:
1) Item table: This table contains the items that you want to recommend to users. The item_id and item_type fields are used together to uniquely identify an item. AIRec performs model training and recommends appropriate item data to each user.
Note: we recommend that you provide an item table that contains valid data. This can avoid noise caused by invalid data and improve the recommendation effect.
2) User table: A user table contains information related to users. AIRec performs data training based on user preferences and recommends the content in which users are most interested. This table contains information related to users (for example, users who have recently logged on to the system). You can use imed field or a combination of the user_id and imei fields to identify users. For instance, for a certain case, you can use user_id to identify users who have logged on and user imei to identify users who have not logged on.
Note: AIRec performs data training based on user preferences and recommends the content in which users are most interested
(3) Behavior (events) table: A behavior table contains behavioral data related to recommendations.This is the core for model training in AIRec.
Note: If behavioral data cannot be provided due to technical reasons or no historical data is available, you can use the test data provided by AIRec. (In this case, the recommendation model may return unsatisfactory results for about two weeks. The effect gradually becomes better and gets stable at last as more data is accumulated).
AIRec supports two data upload methods.You can select a method based on your data needs. When data changes, make sure that the changes can be synchronized to AIRec in real-time.
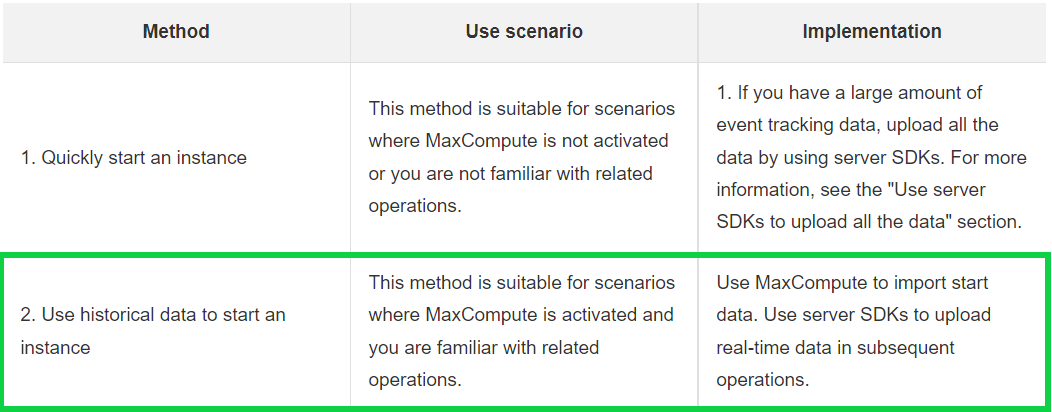
For this lab, we will use the historical data method of using AI rec.
There are 3 methods to upload data to MaxCompute:
Method 1: Use MaxCompute DDL to import the data from local.
Method 2: Use OSS -> DataWorks Data Integration -> Batch Synchronization (upload the data to the table)-> Data analytics (to create the table)
Method 3: Use MaxCompute Client and tunnel command.
In this tutorial, we will use MaxCompute DDL to upload the historical data
Create maxcompute using standard version, please make sure the region is same with your AIRec.
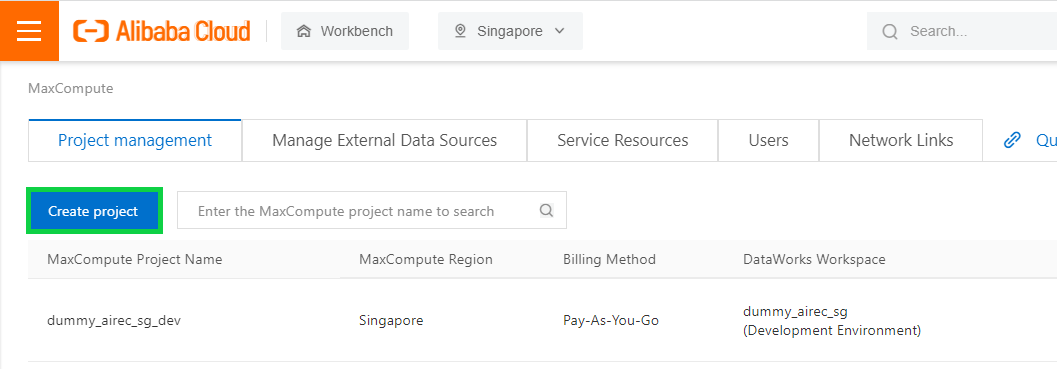
Method 1: Create MaxCompute Table
1) After creating the project, click Data Development.

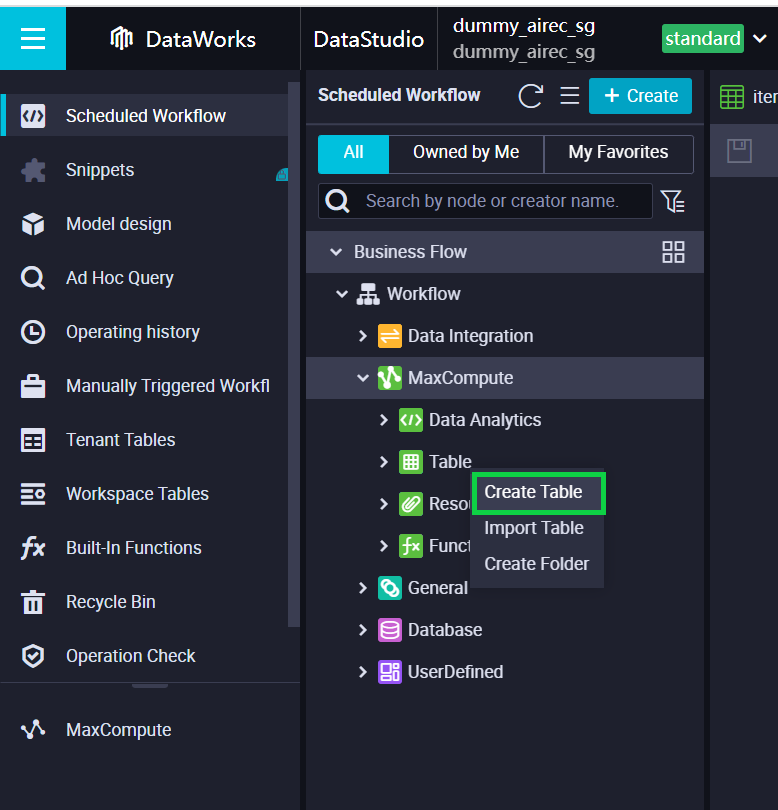
2) Click Create Table.
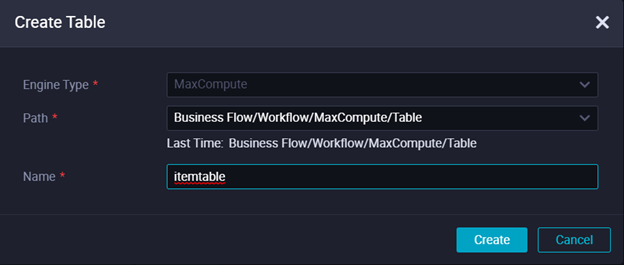
3) Fill in the required specifications.
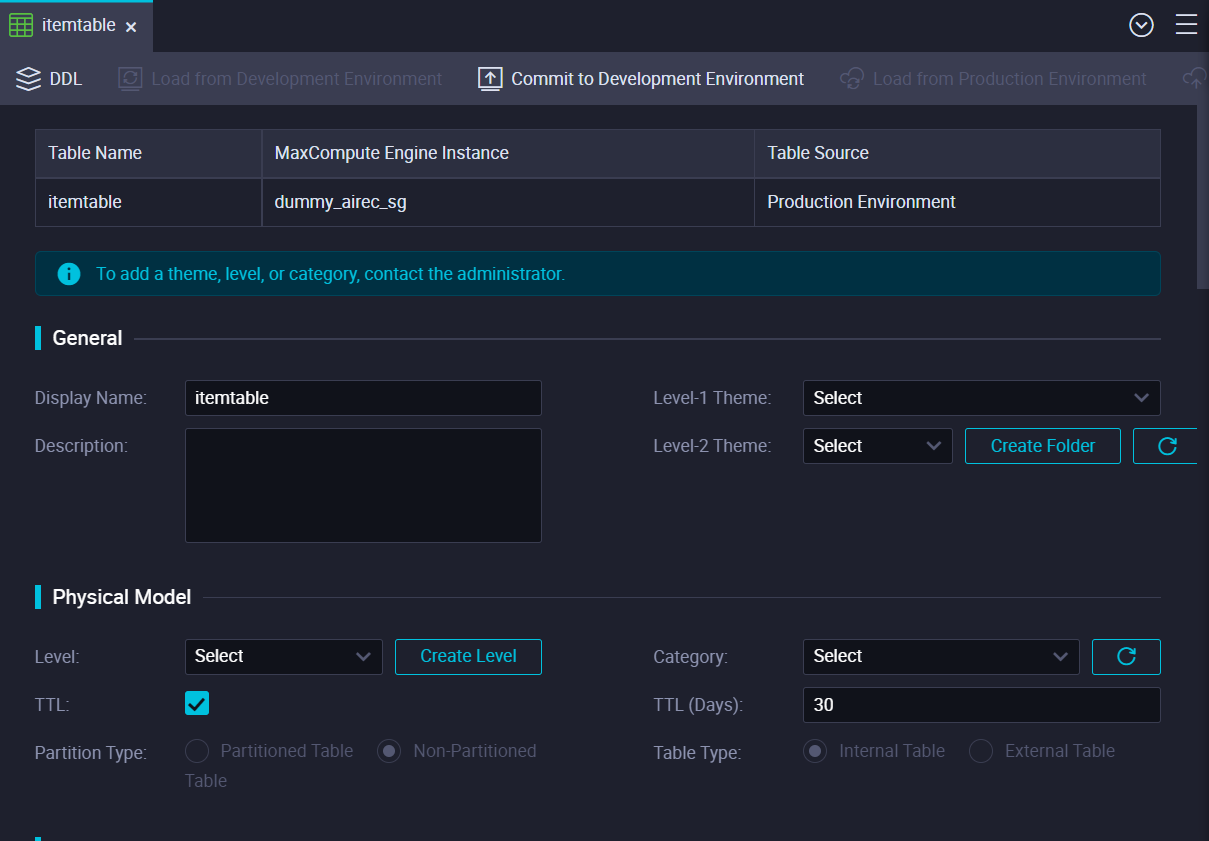
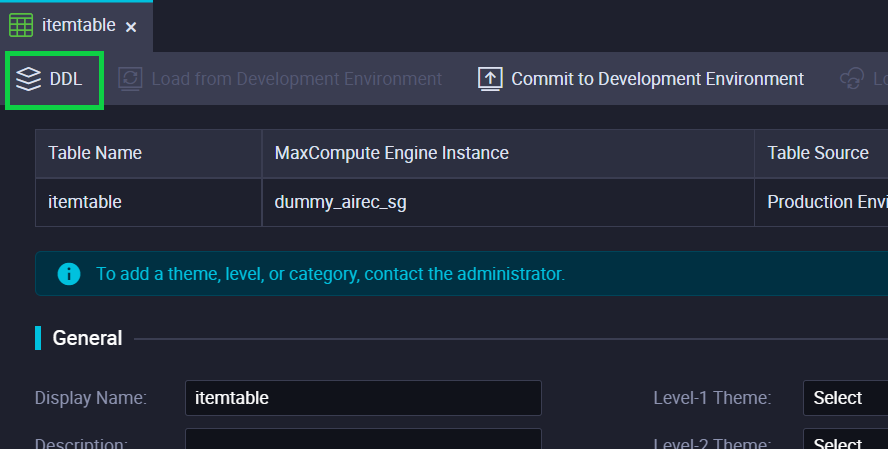
4) Click DDL.
5) Paste the SQL statement and click Generate Table Schema.
You can find the SQL statement for content industry in here. 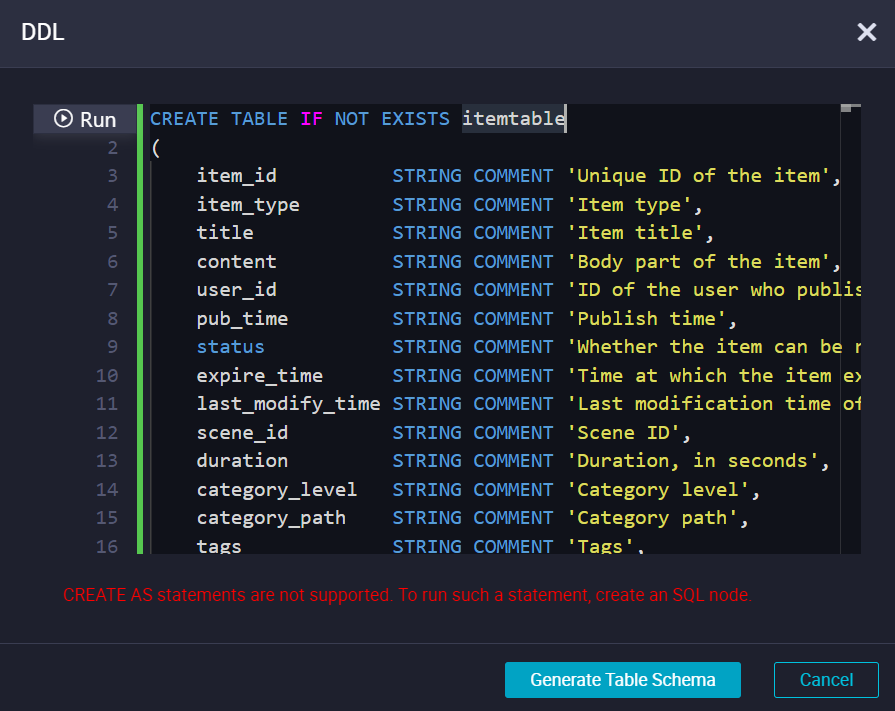
Item table
CREATE TABLE IF NOT EXISTS itemtable
(
    item_id          STRING COMMENT 'Unique ID of the item',
    item_type        STRING COMMENT 'Item type',
    title            STRING COMMENT 'Item title',
    content          STRING COMMENT 'Body part of the item',
    user_id          STRING COMMENT 'ID of the user who published the item',
    pub_time         STRING COMMENT 'Publish time',
    status           STRING COMMENT 'Whether the item can be recommended',
    expire_time      STRING COMMENT 'Time at which the item expires, accurate to the second',
    last_modify_time STRING COMMENT 'Last modification time of item information',
    scene_id         STRING COMMENT 'Scene ID',
    duration         STRING COMMENT 'Duration, in seconds',
    category_level   STRING COMMENT 'Category level',
    category_path    STRING COMMENT 'Category path',
    tags             STRING COMMENT 'Tags',
    channel          STRING COMMENT 'Channels',
    organization     STRING COMMENT 'Organizations',
    author           STRING COMMENT 'Authors',
    pv_cnt           STRING COMMENT 'Exposures',
    click_cnt        STRING COMMENT 'Clicks',
    like_cnt         STRING COMMENT 'Likes',
    unlike_cnt       STRING COMMENT 'Dislikes',
    comment_cnt      STRING COMMENT 'Comments',
    collect_cnt      STRING COMMENT 'Favorites',
    share_cnt        STRING COMMENT 'Shares',
    download_cnt     STRING COMMENT 'Downloads',
    tip_cnt          STRING COMMENT 'Rewards',
    subscribe_cnt    STRING COMMENT 'Follows',
    source_id        STRING COMMENT 'Item source',
    country          STRING COMMENT 'Country',
    city             STRING COMMENT 'City',
    features         STRING COMMENT 'Additional features',
    num_features     STRING COMMENT 'Additional features of a numeric type',
    weight           STRING COMMENT 'Weight of the item, default value: 1'
)
LIFECYCLE 30;
User table
CREATE TABLE IF NOT EXISTS usertable
(
    user_id          STRING COMMENT 'Unique user ID',
    user_id_type     STRING COMMENT 'Registration type of the user',
    third_user_name  STRING COMMENT 'Third-party user name',
    third_user_type  STRING COMMENT 'Third-party platform name',
    phone_md5        STRING COMMENT 'MD5 hash of the mobile phone number of the user.',
    imei             STRING COMMENT 'Device ID of the user',
    content          STRING COMMENT 'User content',
    gender           STRING COMMENT 'Gender',
    age              STRING COMMENT 'Age',
    age_group        STRING COMMENT 'Age group',
    country          STRING COMMENT 'Country',
    city             STRING COMMENT 'City',
    ip               STRING COMMENT 'Last logon IP address',
    device_model     STRING COMMENT 'Device model',
    register_time    STRING COMMENT 'Registration time',
    last_login_time  STRING COMMENT 'Last logon time',
    last_modify_time STRING COMMENT 'Last modification time of user information',
    tags             STRING COMMENT 'User tags',
    source           STRING COMMENT 'Source of the user',
    features         STRING COMMENT 'Additional user features of the STRING type',
    num_features     STRING COMMENT 'Additional user features of a numeric type'
)
LIFECYCLE 30;
Behavior table
CREATE TABLE IF NOT EXISTS behaviortable
(
    trace_id     STRING COMMENT 'Request tracking ID',
    trace_info   STRING COMMENT 'Request tracking information',
    platform     STRING COMMENT 'Client platform',
    device_model STRING COMMENT 'Device model',
    imei         STRING COMMENT 'Device ID',
    app_version  STRING COMMENT 'App version number',
    net_type     STRING COMMENT 'Network type',
    longitude    STRING COMMENT 'Longitude',
    latitude     STRING COMMENT 'Latitude',
    ip           STRING COMMENT 'Client IP address',
    login        STRING COMMENT 'Whether the user has logged on',
    report_src   STRING COMMENT 'Report source',
    scene_id     STRING COMMENT 'Scene ID',
    user_id      STRING COMMENT 'User ID',
    item_id      STRING COMMENT 'Item ID',
    item_type    STRING COMMENT 'Item type',
    module_id    STRING COMMENT 'Module ID',
    page_id      STRING COMMENT 'Page ID',
    position     STRING COMMENT 'Position of the item',
    bhv_type     STRING COMMENT 'Behavior type',
    bhv_value    STRING COMMENT 'Behavior details',
    bhv_time     STRING COMMENT 'Time at which the behavior occurs'
) ;
6) Click Commit to Development Environment

Import Data to MaxCompute Table
1) Click Import Data.
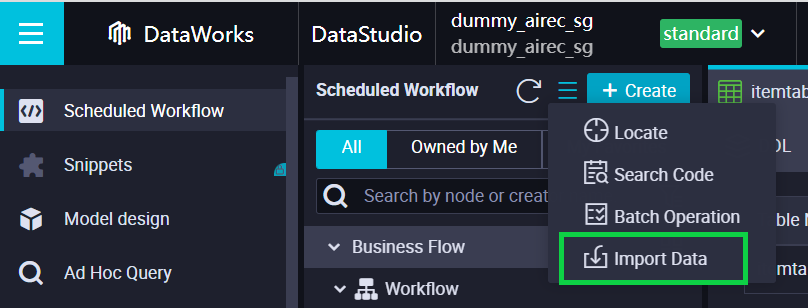
2) Type the MaxCompute Table that you want the data to be imported, click Next.

3) Click Browse to upload the data and click Next.
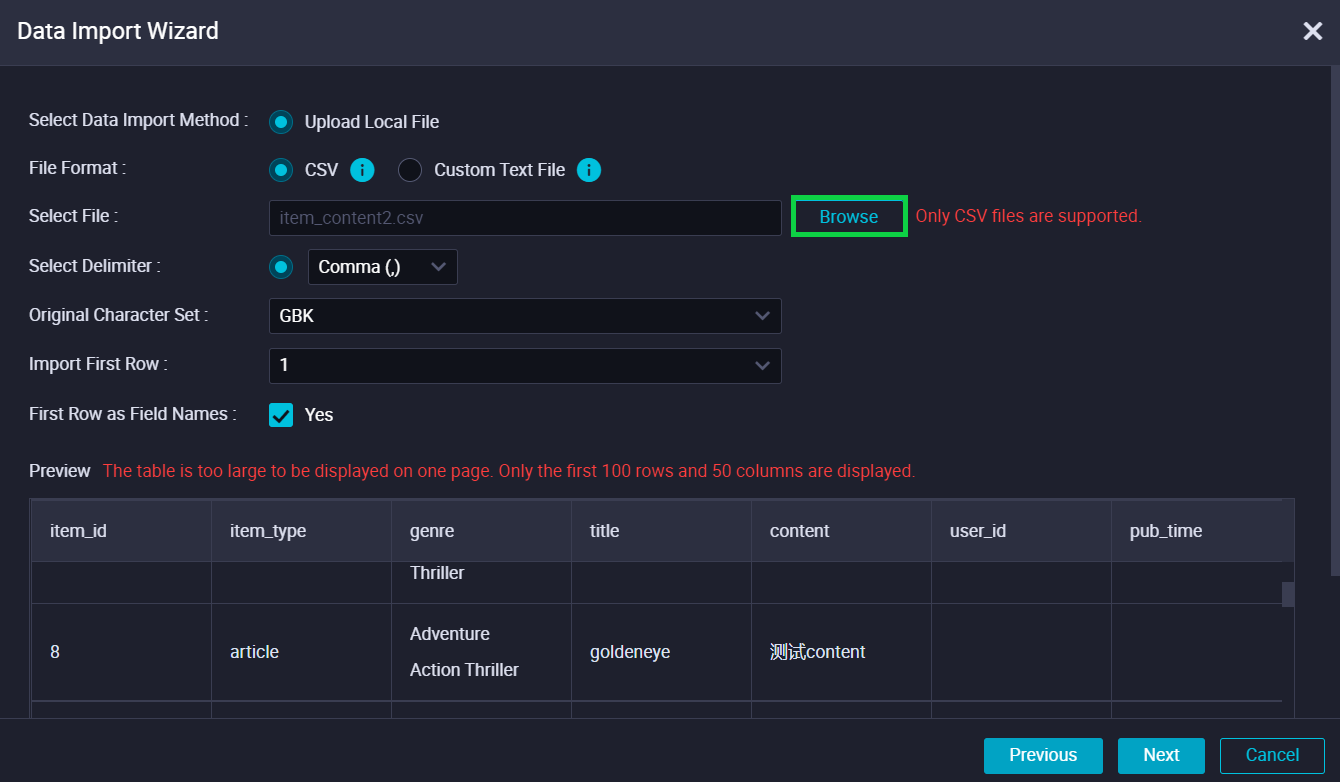
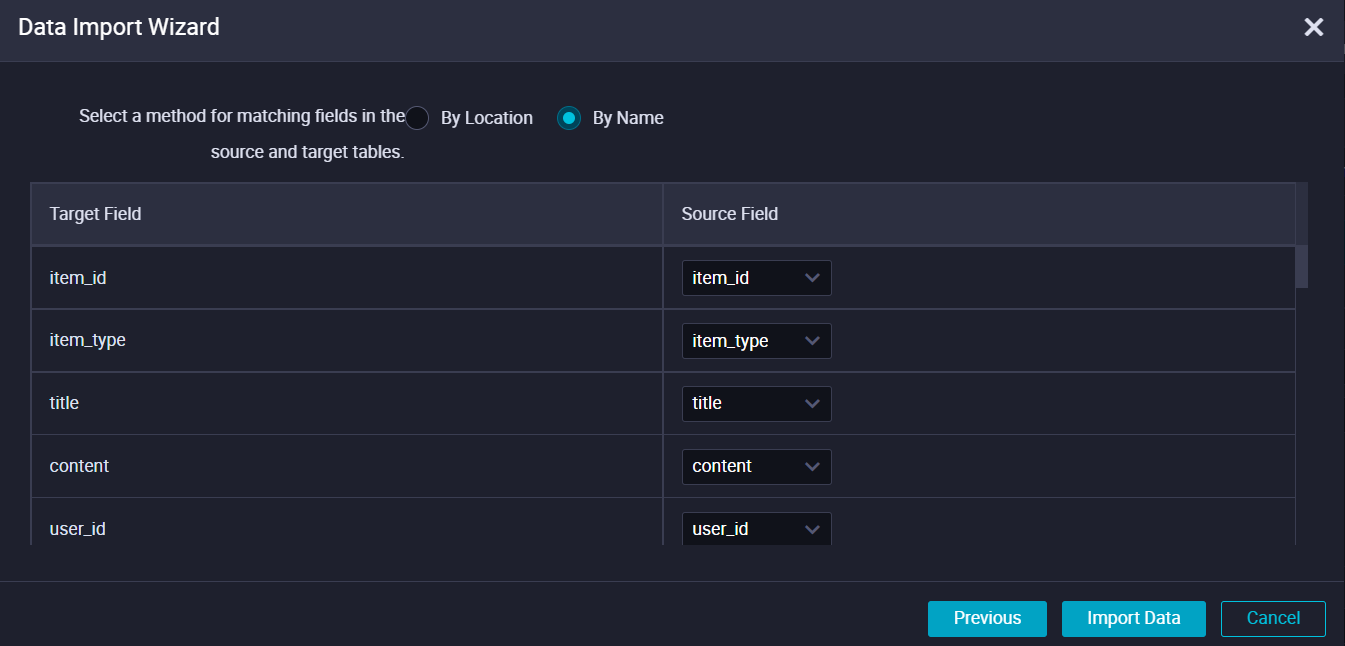
4) Click Import Data.
Create Ad Hoc Query
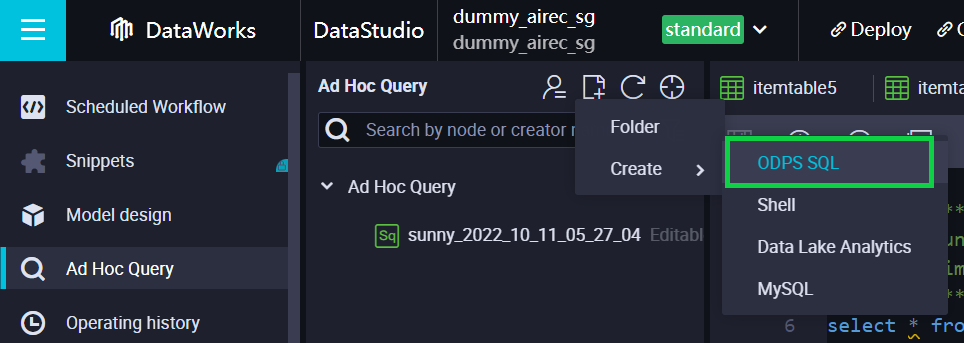
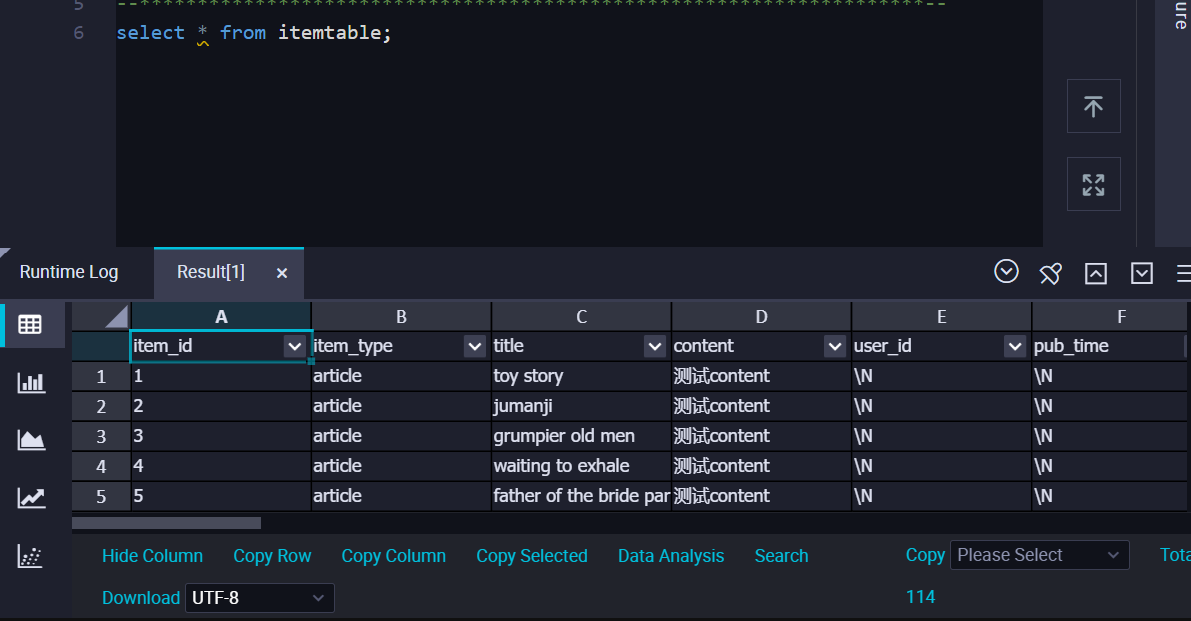
In order to make sure the data is surely imported, we can create an ad hoc query.
1) Inside the Ad Hoc Query page, click ODPS SQL.
2) Create an SQL statement.
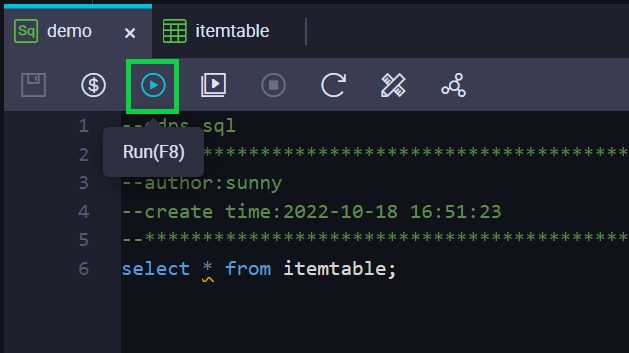
3) The data has been imported successfully.
Download and Configure MaxCompute Client
-Link to install Java 8 or later: https://www.java.com/download/ie_manual.jsp
-Link to use odpscmd/MaxCompute Client: https://www.alibabacloud.com/help/en/maxcompute/latest/maxcompute-client
1) Inside the conf folder, edit the odps_config file. Fill out the project name, access id, access key, and endpoint.
2) Run the./bin/odpscmd command to enter the MaxCompute environment.
Grant Permissions on MaxCompute to AIRec
Perform the following operations to authorize your 1619920497425387 account.
https://www.alibabacloud.com/help/en/airec/latest/grant-permissions-on-offline-storage-to-airec
Create an instance
1.Select an industry template.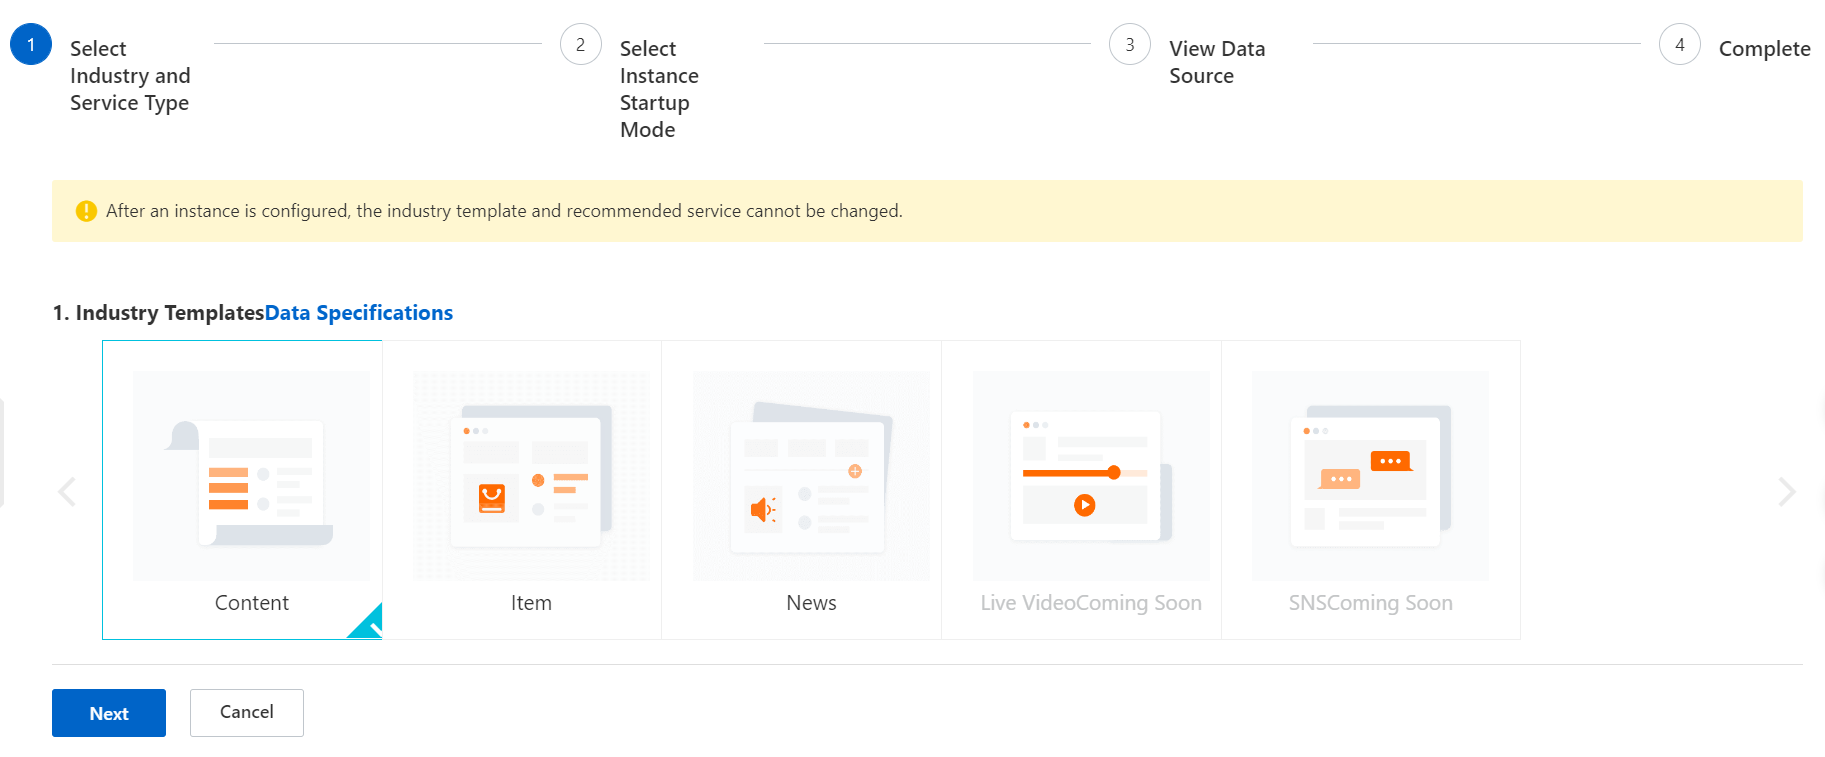
2.Select Historical Data-Based Start method to start an AIRec instance.
Note:After you use baseline data in MaxCompute to start an AIRec instance,you no longer need to
maintain data in MaxCompute.You can use server SDKs to upload incremental data. 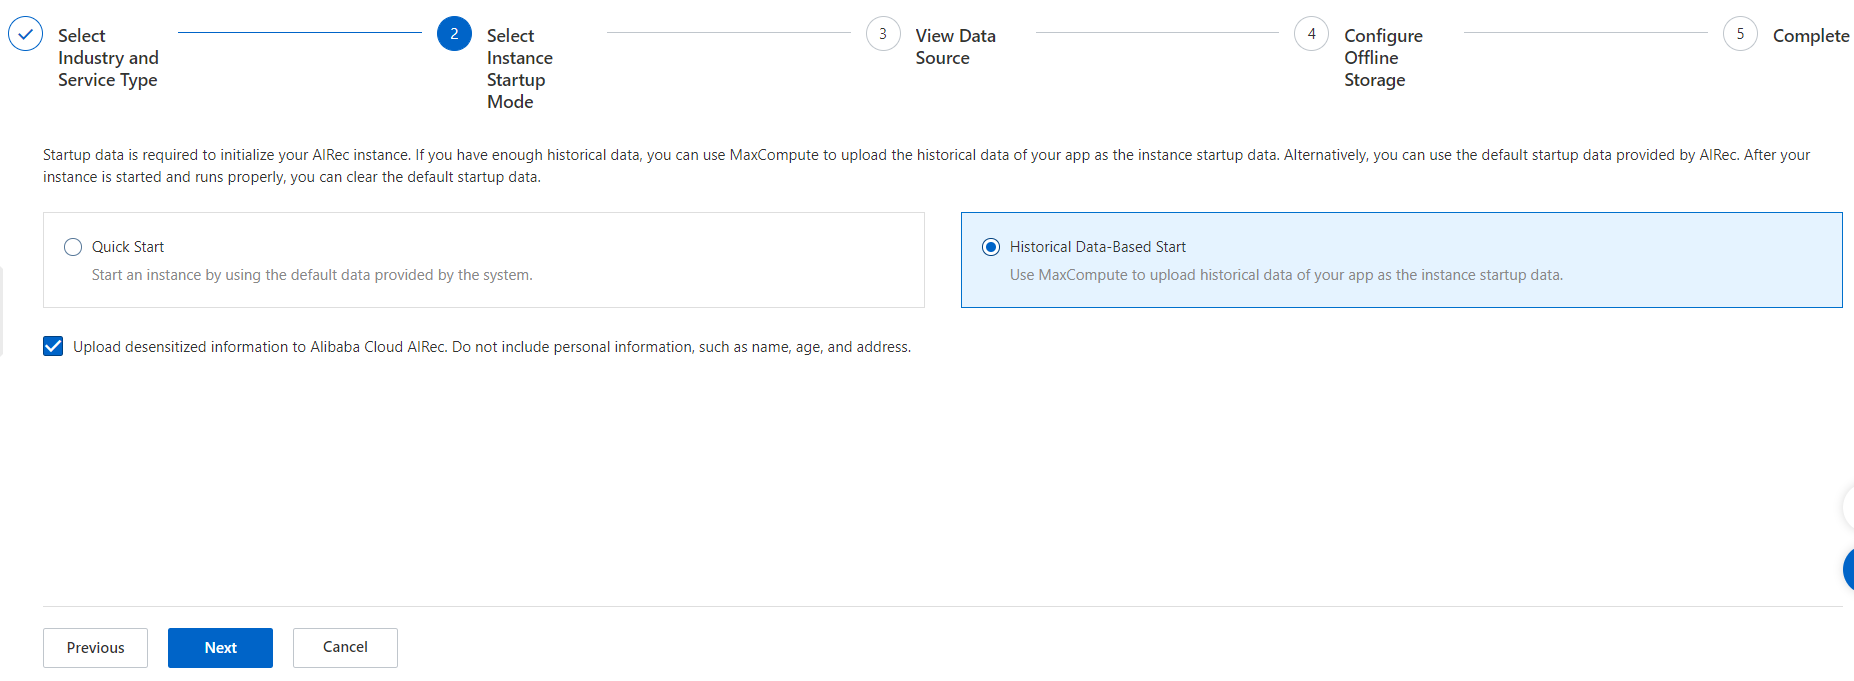
3.Configure data sources to start an AIRecinstance.
Note:before you configure data sources,you must grant permissions to AIRec in MaxCompute.
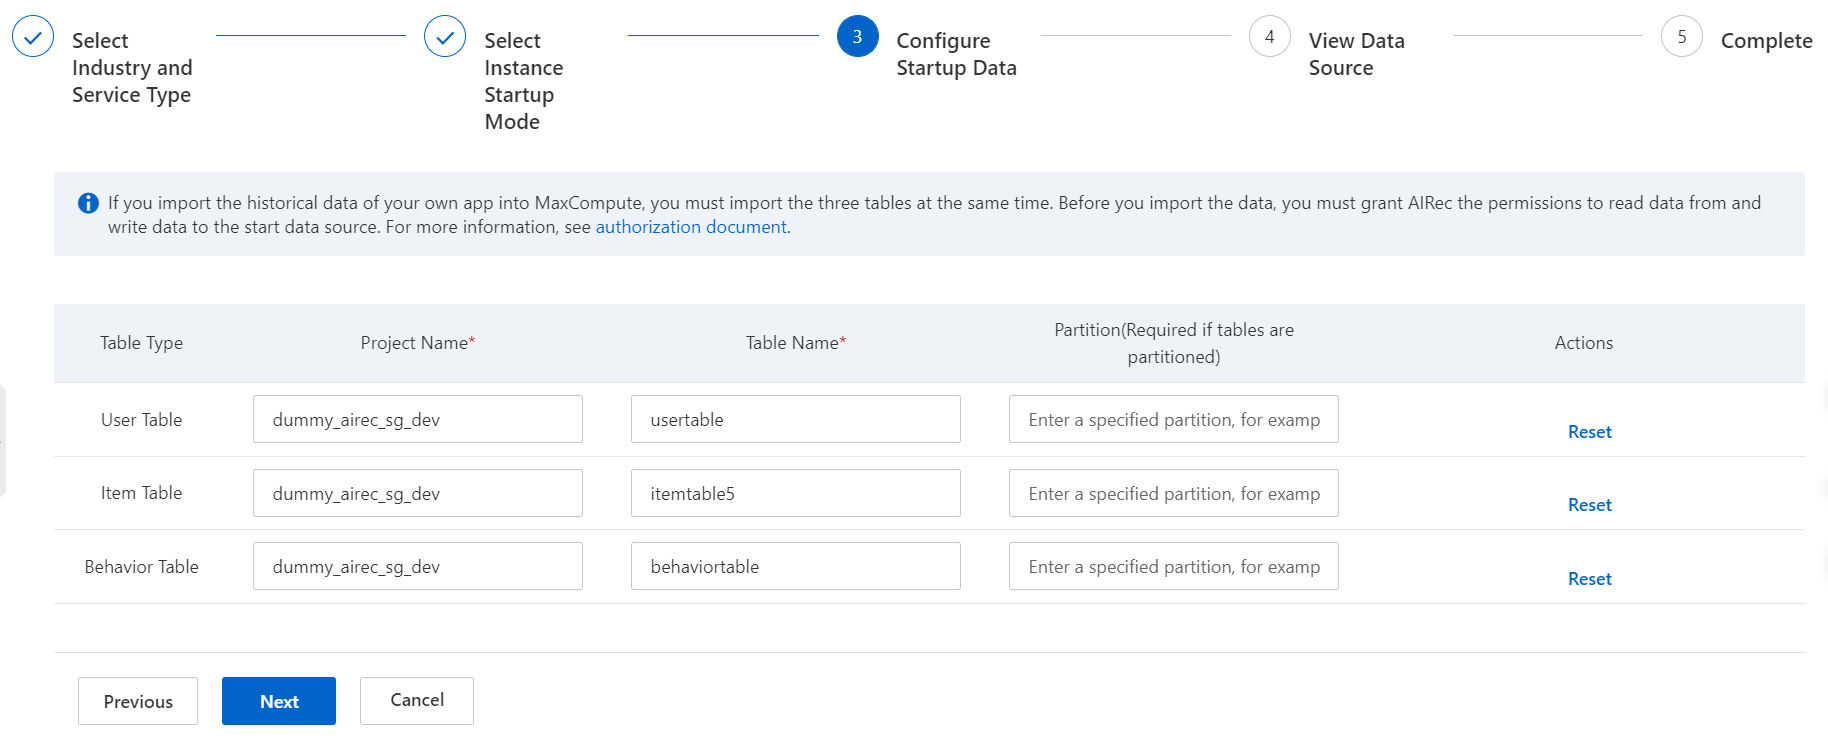
4.Clik Next.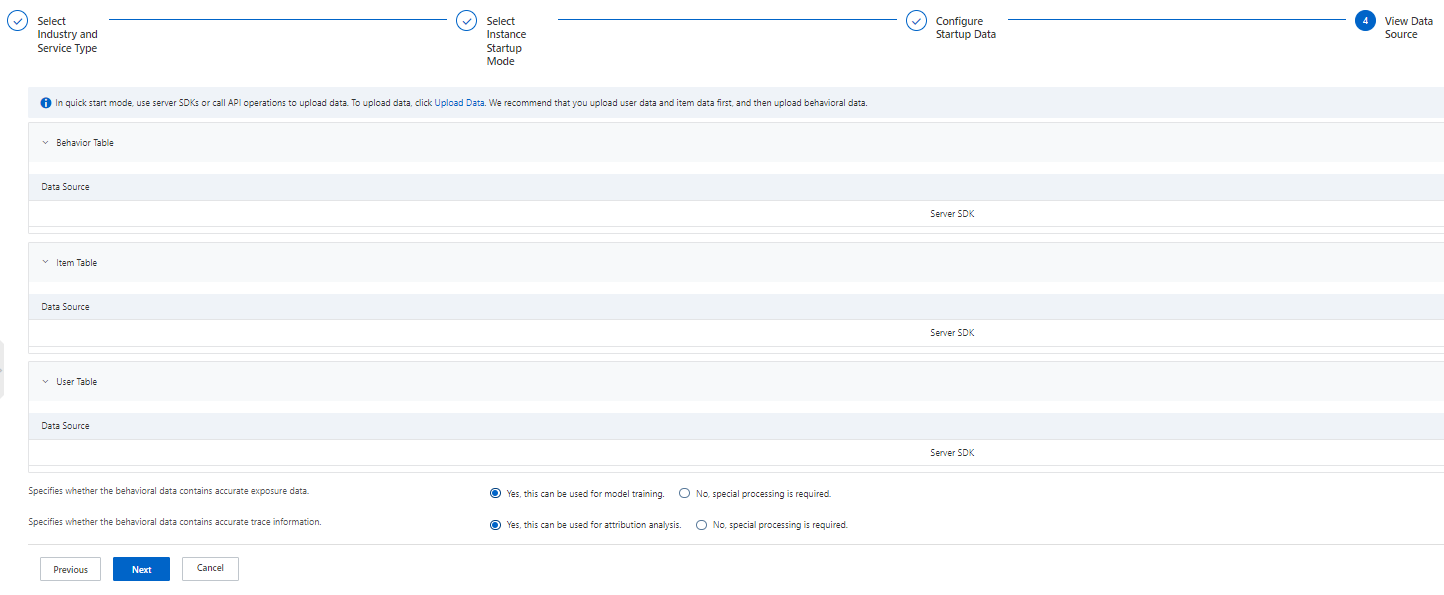
5.Start an Instance.
It takes a while to start the instance.
6.Wait until the status says running.
7.You can view the related information immediately after the instance is started.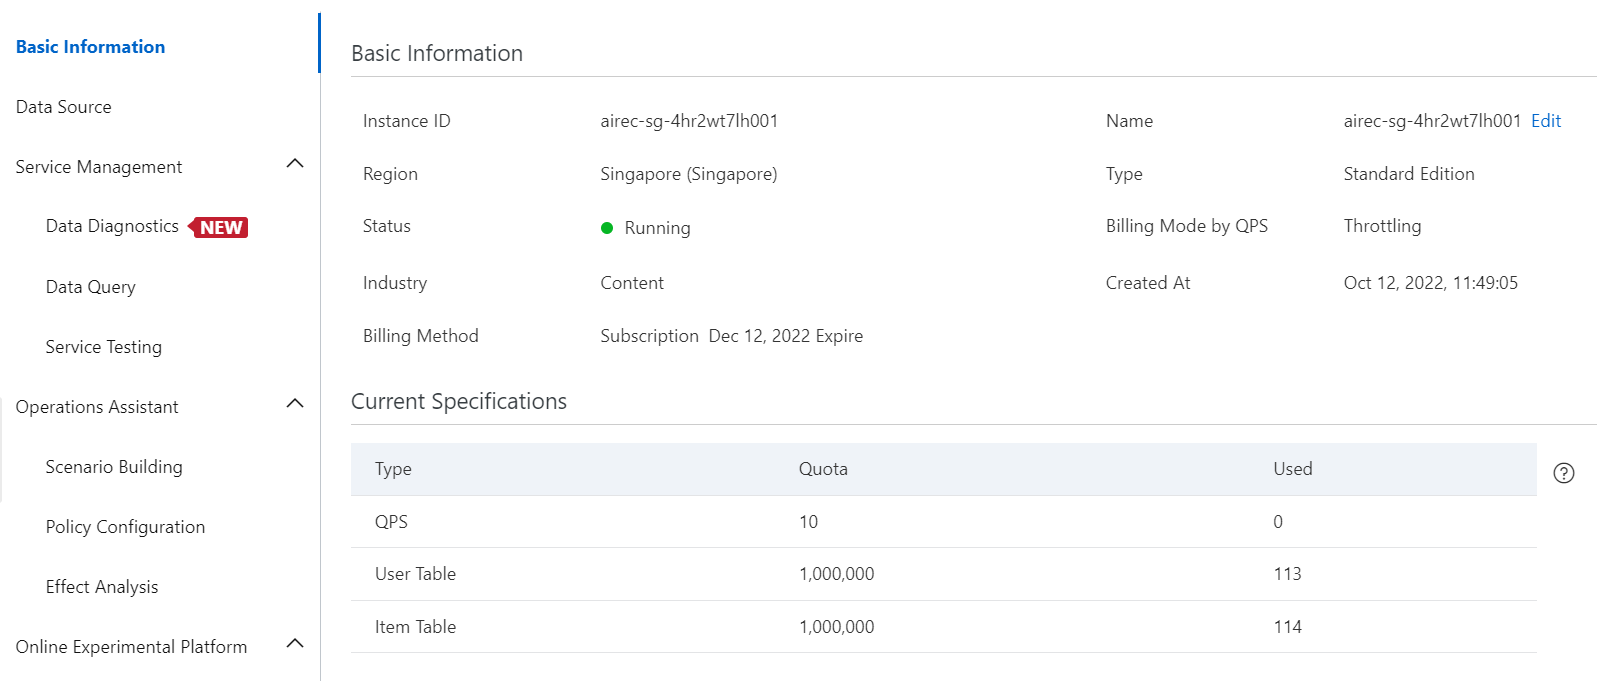
Alibaba python SDK allows you to access Alibaba Cloud services such as ECS,OSS,and Resource Access Management.You can access Alibaba Cloud services without the need to handle API related tasks,such as
signing and constucting your requests.
1.Prerequisites
-Have access key
-Activated MaxCompute
-Activated AIRec console
-Upload data to MaxCompute
2.Install Python SDK
Alibaba Cloud python SDK supports python 2.7.x and python 3.x.
‒ Check your python version
python --version
‒ Install pip.
If pip is not installed,see the pip user guide to install pip.
‒ Install the individual libraries.
Install the core library:
Python 2.x:
pip install aliyun-python-sdk-core
Python 3.x:
pip install aliyun-python-sdk-core-v3
Install the AIRec SDK for python
pip install aliyun-python-sdk-airec
3.Download the source code of AIRec SDK for Python.
https://github.com/aliyun/aliyun-openapi-python-sdk/tree/master/aliyun-python-sdk-airec?spm=a2c63.p38356.0.0.1ad02734SsmqQY
4.Use Alibaba Cloud SDK for Python
You can perform the following operations to use Alibaba Cloud SDK for Python:
‒ After you downloaded the SDK file,create a new file called push-data.py
‒ Paste this code into the new python file.
#!/usr/bin/python
#coding=utf-8
fromaliyunsdkcore.clientimportAcsClient
fromaliyunsdkcore.acs_exception.exceptionsimportClientException
fromaliyunsdkcore.acs_exception.exceptionsimportServerException
fromaliyunsdkairec.request.v20181012.PushDocumentRequestimportPushDocumentRequest
#CreateaclientoftheAcsClientclass.
client=AcsClient(
ak="AlibabaCloudAccessKeyID",
secret="AlibabaCloudAccessKeysecret",
#Entertheregion.IftheregionisChina(Beijing),entercn-beijing.
region_id="cn-hangzhou"
)
#Configuretheendpoint.
#SpecifytheregionID,servicename,andendpoint.
client.add_endpoint("cn-hangzhou","Airec","airec.cn-hangzhou.aliyuncs.com")
#Createarequestandconfigureparameters.
#CreatearequestforaspecificAPIoperation.TheclassoftherequestisnamedbyaddingRequesttothe
endoftheAPIoperationname.
#Forexample,thenameoftheAPIoperationthatisusedtoobtainpusheddocumentsisPushDocument.In
thiscase,thenameoftherequestclassisPushDocumentRequest.
request=PushDocumentRequest()
request.set_instanceId("InstanceID")
request.set_tableName("item")
#Configureparametersfortherequest.
content="JSON-formatteddata"
request.set_content(content)
request.set_content_type("application/json")
#Initiatetherequestbyusingthemethodthatissupportedbytheclient,obtaintheresponse,andhandle
theexception.
try:
response=client.do_action_with_exception(request)
print(response)
exceptClientExceptionase:
print(e)
exceptServerExceptionase:
print(e)
‒ change version aliyunsdkairec to the latest version (line 7) check version in github
https://github.com/aliyun/aliyun-openapi-python-sdk/tree/master/aliyun-python-sdk-airec/aliyunsdkairec/request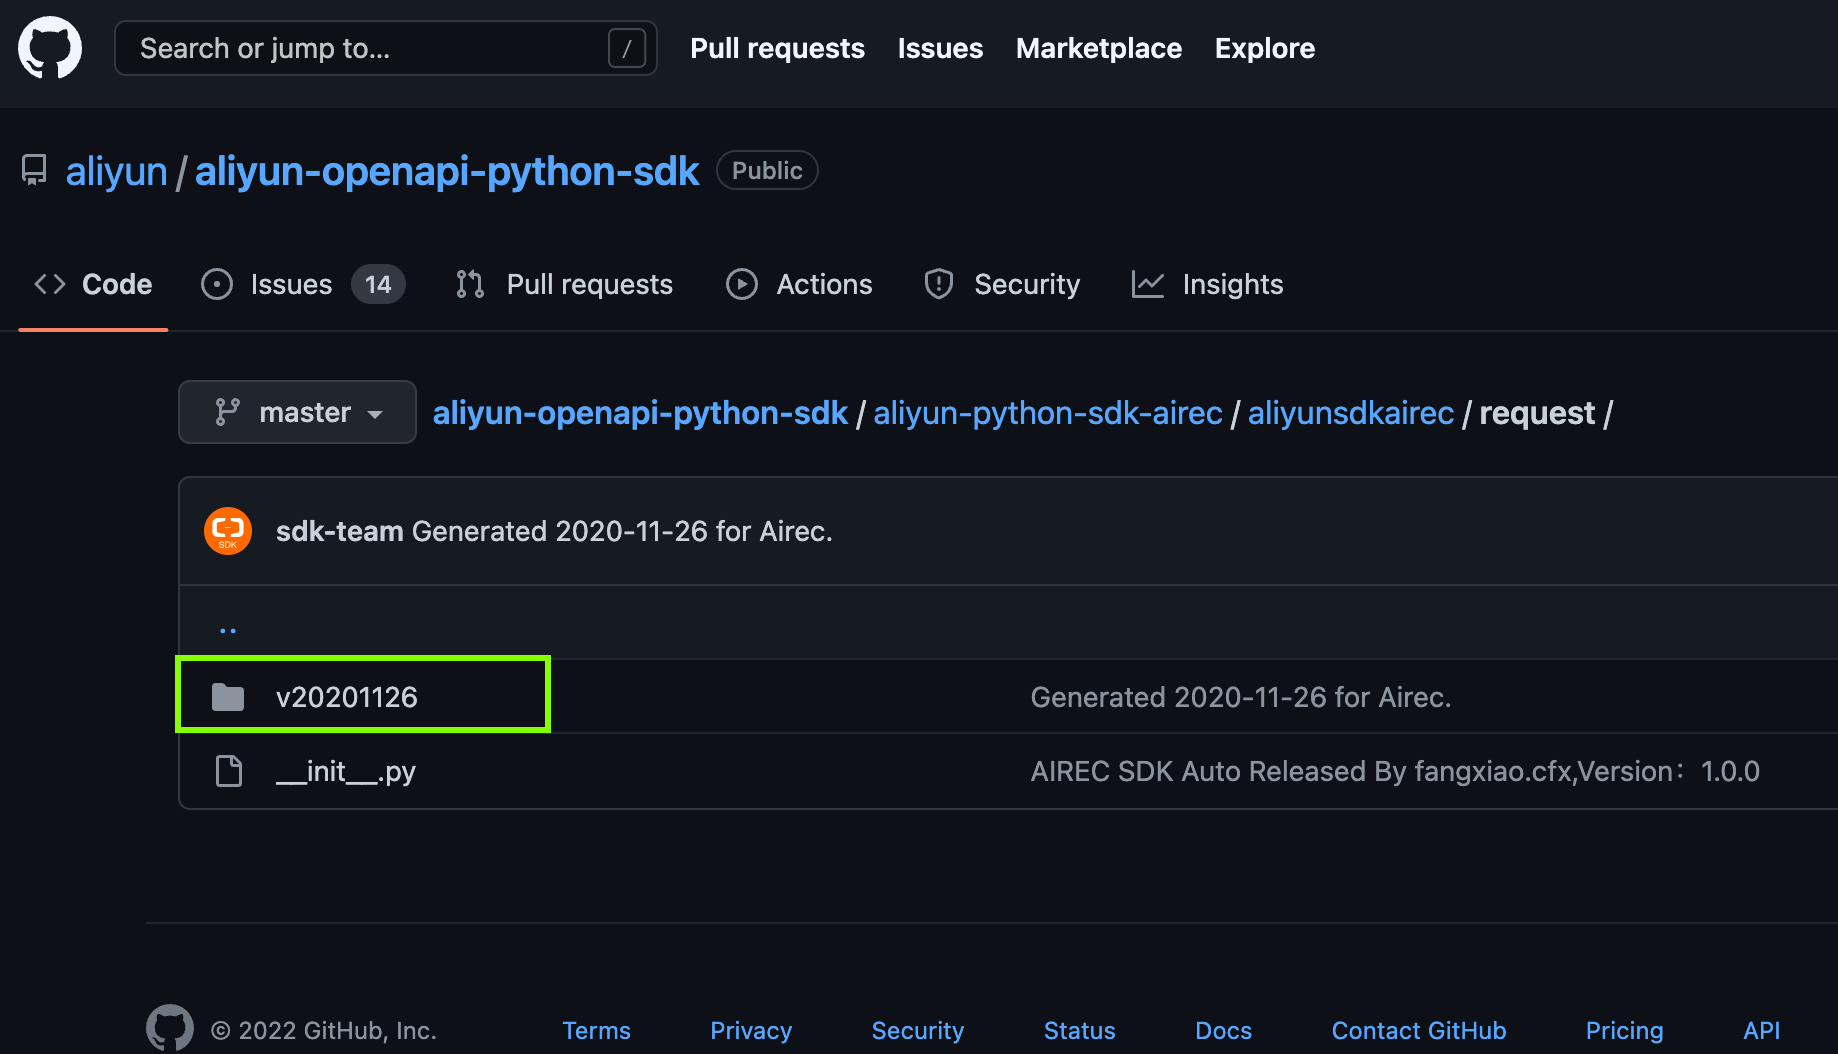
from aliyunsdkairec.request.20181012.PushDocumentRequest import PushDocumentRequest
change to
from aliyunsdkairec.request.v20201126.PushDocumentRequest import PushDocumentRequest
‒ ak : yourkeyid (line11)
‒ secret : yoursecretkey (line12)
‒ region_id : ap-southeast-1forsingapore (line14)
‒ endpoint : "ap-southeast-1","Airec","airec.ap-southeast-1.aliyuncs.com" (line18)
‒ "InstanceID" : yourairecinstanceid (line23)
‒ content : change with data you want to push (line26),for sample data you can get data specification
from this link.
Final Code
#! /usr/bin/python
# coding=utf-8

from aliyunsdkcore.client import AcsClient
from aliyunsdkcore.acs_exception.exceptions import ClientException
from aliyunsdkcore.acs_exception.exceptions import ServerException
from aliyunsdkairec.request.v20201126.PushDocumentRequest import PushDocumentRequest

# Create a client of the AcsClient class.
client = AcsClient(
    ak="Alibaba Cloud AccessKey ID",
    secret="Alibaba Cloud AccessKey secret",
    #Enter the region. If the region is China (Beijing), enter cn-beijing.
    region_id="cn-hangzhou"
)
# Configure the endpoint.
# Specify the region ID, service name, and endpoint.
client.add_endpoint("ap-southeast-1", "Airec", "airec.ap-southeast-1.aliyuncs.com")
# Create a request and configure parameters.
# Create a request for a specific API operation. The class of the request is named by adding Request to the end of the API operation name.
# For example, the name of the API operation that is used to obtain pushed documents is PushDocument. In this case, the name of the request class is PushDocumentRequest.
request = PushDocumentRequest()
request.set_instanceId("Instance ID")
request.set_tableName("item")
# Configure parameters for the request.
content = "[{ \
        \"cmd\": \"add\", \
        \"fields\": { \
            \"item_id\": \"120\", \
            \"item_type\": \"image\", \
            \"title\": \"spiderman\", \
            \"weight\": \"1\", \
            \"tags\": \"Action, Family\", \
            \"status\": \"1\", \
            \"scene_id\": \"1\", \
            \"content\": \"Content\", \
            \"pub_time\": \"1590327038\" \
        } \
    }]"

request.set_content(content)
request.set_content_type("application/json")
# Initiate the request by using the method that is supported by the client, obtain the response, and handle the exception.
try:
    response = client.do_action_with_exception(request)
    print(response)
except ClientException as e:
    print(e)
except ServerException as e:
    print(e)
5.Run the Python file.
6.View the increment data.
-In the AIRec Instance, click Data Query page, and select Item data.
-Specify the item ID that has been pushed. Click Search.
7.You will see the data is uploaded successfully to the console. 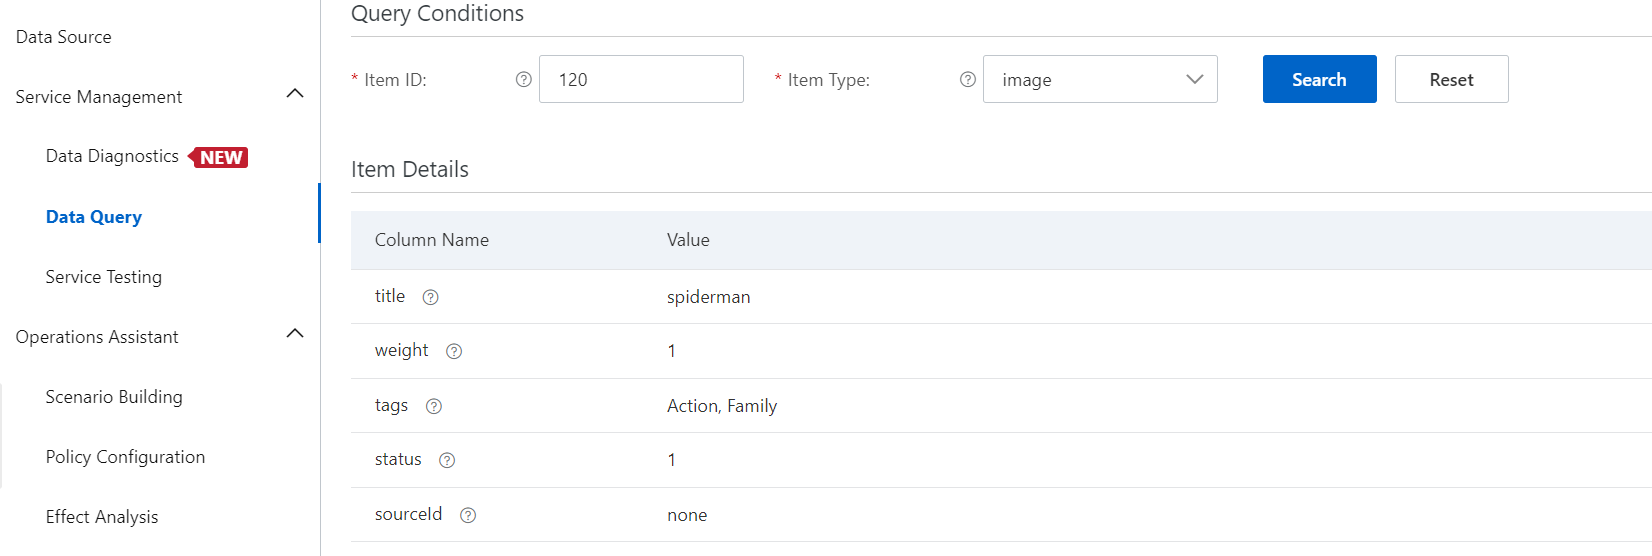
For further information about Python SDK, click link.
Scene
Scene refers to the different sections of recommendations created under the feature's policy such as "You might also like" based on all the products on the homepage, "Products you might like" by category on each product page, and related recommendations based on the products ordered on the details page.
1) On the Experiment Parameter Settings page, click Create Recommendation Scene.
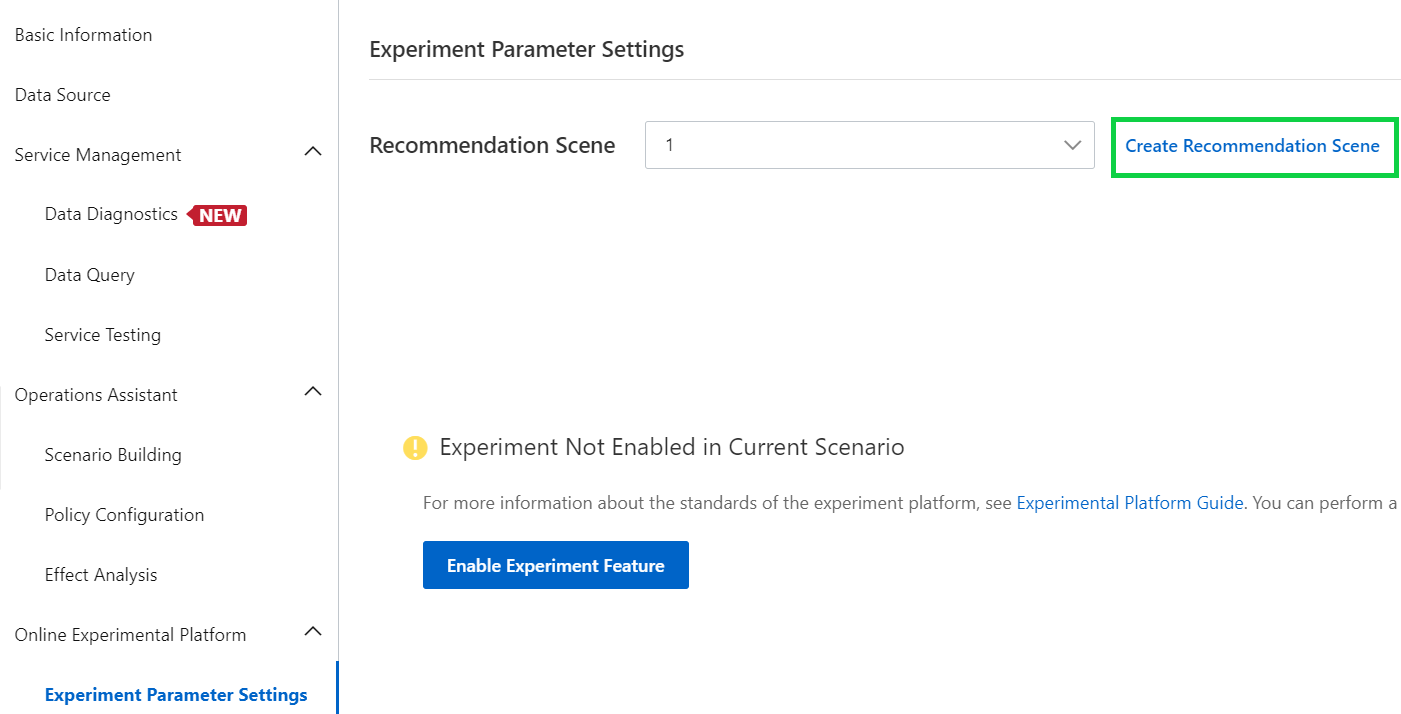
2) Click Create Scene.

3) Fill out the required details.
Note: If you are confused what Scene ID is, you can find the information through this link.
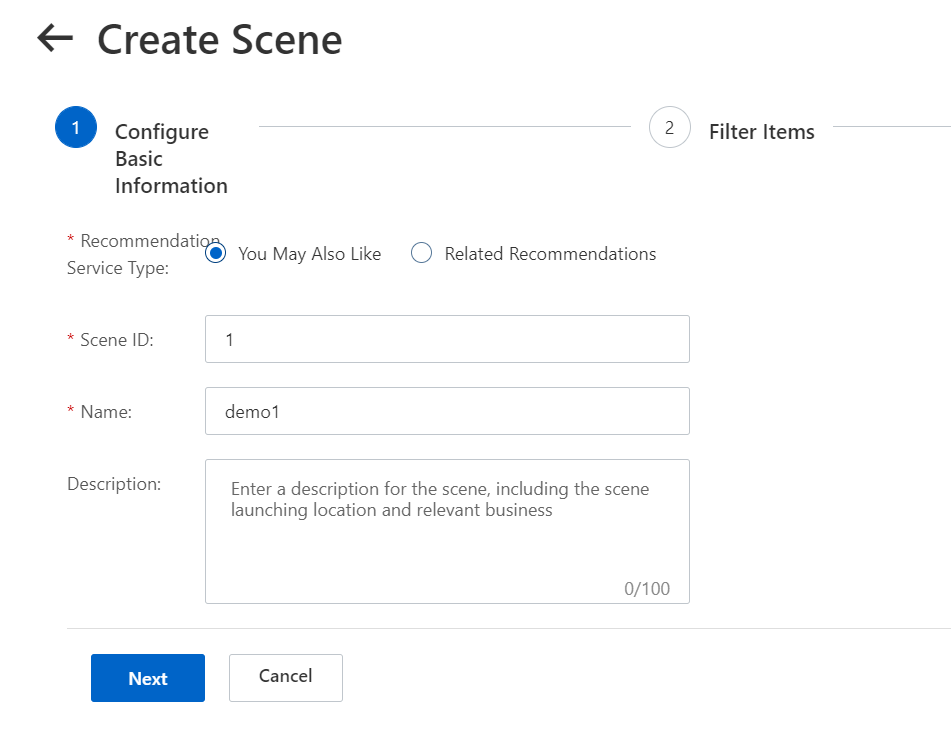
4) Select Use Field scene_id in Table item, click Next. 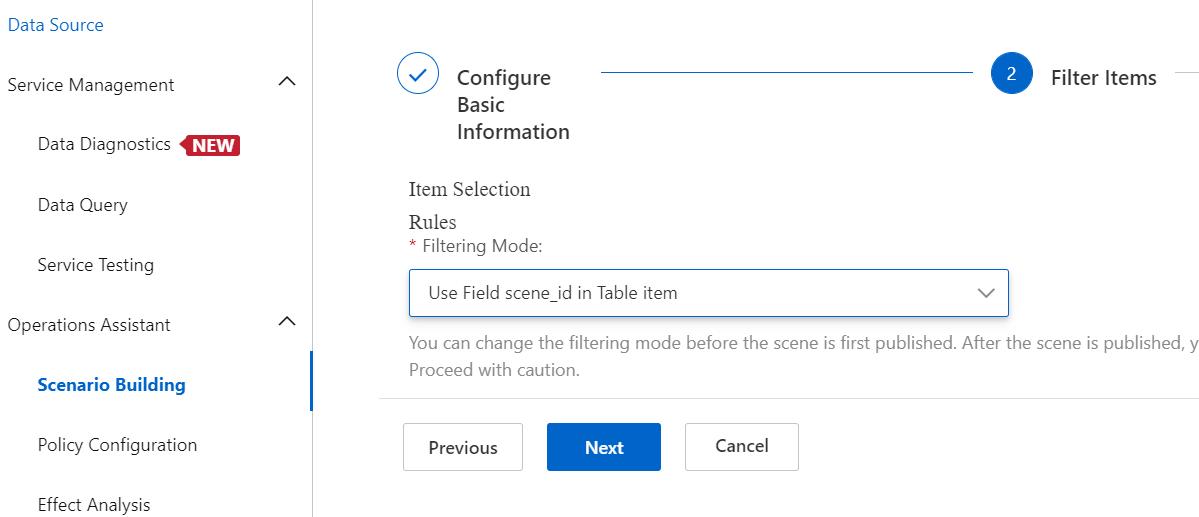
5) Click Publish.

This is the record that we are trying to get recommendations for.
1) On the scenario building page, click Test to get the recommendation. 
2) Specify the user id and how many recommendations you want to get as a result. Click Request Results.

3) You will see the related recommendation content below.
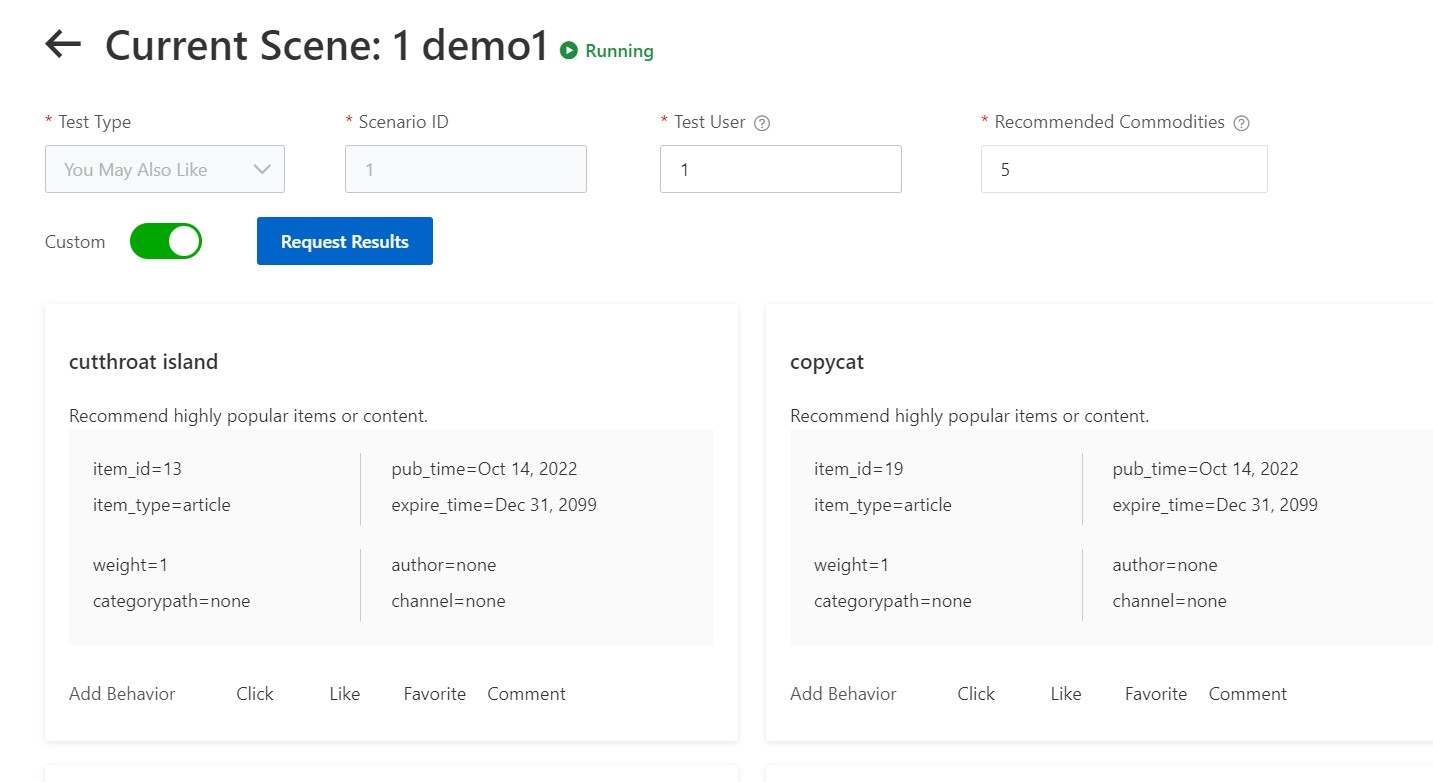
The following figure shows an example of behavior related to recommendations. After a user performs the operations shown in the preceding figure, five recommendation-related behavior entries are generated. The five behavior entries can be recorded and uploaded to AIRec as required by clicking the Add Behavior button.
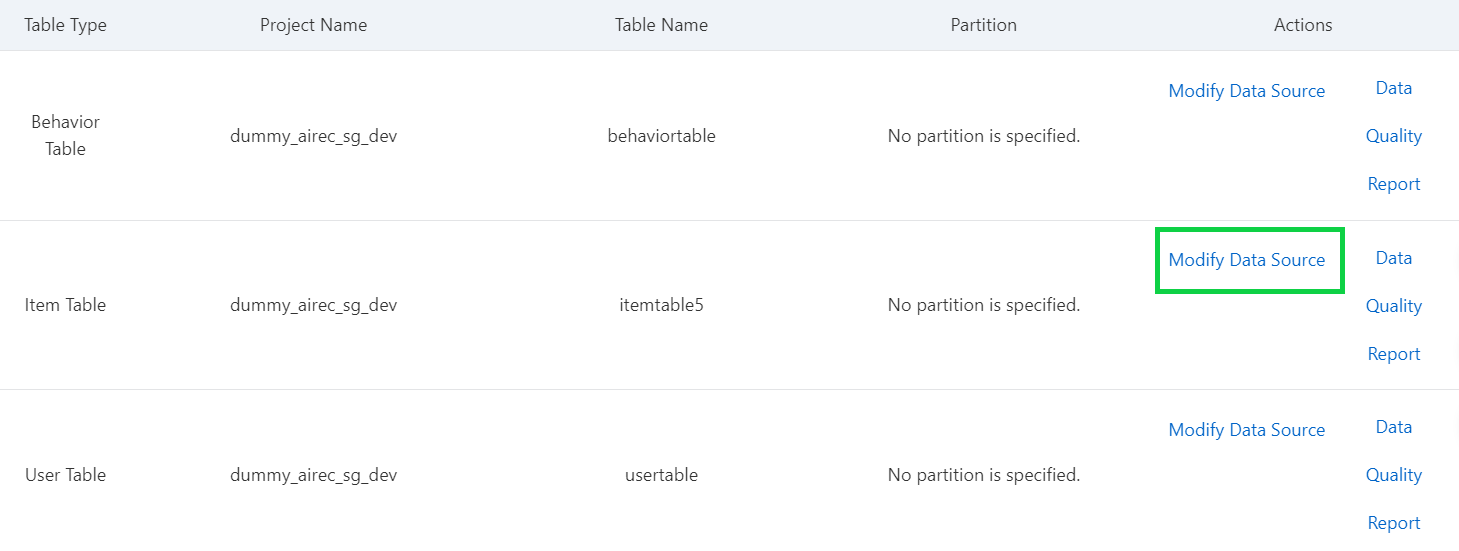
If you want to modify the table that has been uploaded to the AIRec instance, you can modify them by following this operations:
Prerequisite
-Make sure your other table has been granted permissions on MaxCompute Client.
1) On the Data Source section, click Modify Data Source to the table that you want to modify.
2) Upload the table name.
Do not forget to grant permisions in the MaxCompute Client.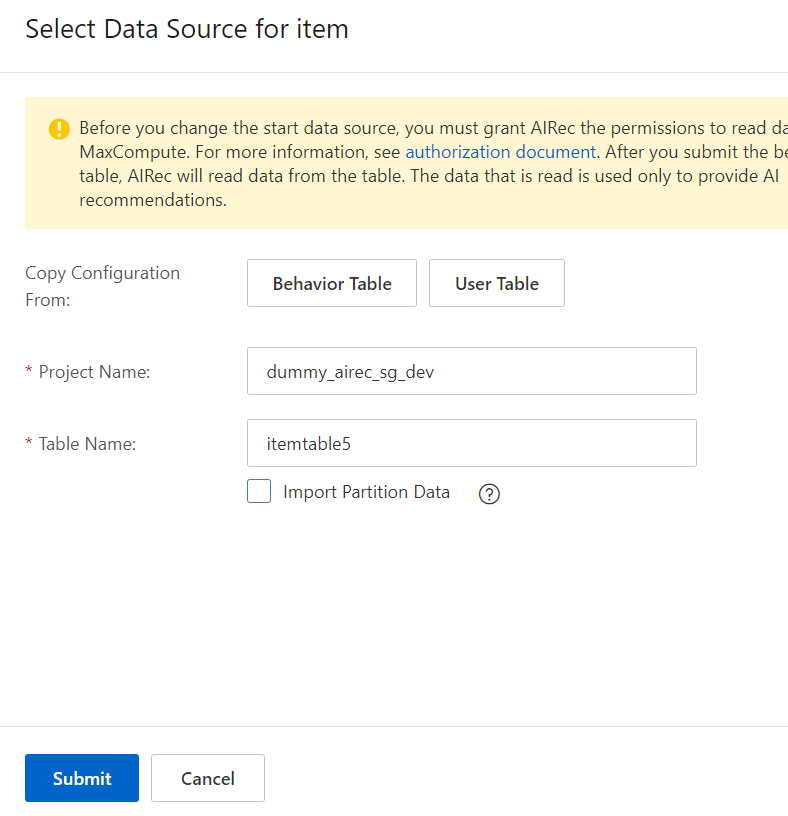
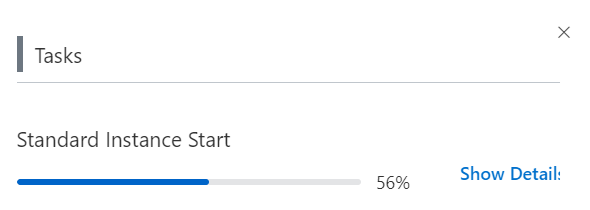
3) Wait for the instance to restart.
A guide to real-time data processing - Realtime compute for Apache Flink
115 posts | 21 followers
FollowAlibaba Cloud Community - March 17, 2023
PM - C2C_Yuan - April 18, 2024
Alibaba Cloud Indonesia - October 24, 2022
Alibaba Clouder - May 11, 2020
Iain Ferguson - January 6, 2022
Alibaba Cloud MaxCompute - October 18, 2021
115 posts | 21 followers
Follow DataWorks
A secure environment for offline data development, with powerful Open APIs, to create an ecosystem for redevelopment.
Learn More AIRec
AIRec
A high-quality personalized recommendation service for your applications.
Learn More MaxCompute
Conduct large-scale data warehousing with MaxCompute
Learn More Offline Visual Intelligence Software Packages
Offline SDKs for visual production, such as image segmentation, video segmentation, and character recognition, based on deep learning technologies developed by Alibaba Cloud.
Learn MoreMore Posts by Alibaba Cloud Indonesia