By Dassi Orleando, Alibaba Cloud Community Blog author.
Apache Cayenne is an open-source Java tool distributed under the Apache license. It provides such features as a powerful modeling utility, an object-relational mapping (ORM) for persistence operations and remote services.
In this article, you'll be interacting with a MySQL database using Apache Cayenne's object-relational mapping (ORM) feature from a small Java project build with Maven.
Maven is one of the most used tools for building Java applications. In this section, we're going to set up our project dependencies (this being on the assumption that your system is empty).
As the first step, let's add the following dependencies to add Apache Cayenne and MYSQL connector (specifically, the JDBC driver):
<dependency>
   <groupId>org.apache.cayenne</groupId>
   <artifactId>cayenne-server</artifactId>
   <version>4.0.1</version>
</dependency>
<dependency>
   <groupId>mysql</groupId>
   <artifactId>mysql-connector-java</artifactId>
   <version>5.1.14</version>
   <scope>runtime</scope>
</dependency>
The modeler plugin should be defined into the pom.xml as well. It is a maven command used to start the Apache Cayenne Modeler plugin from the command line when you open the mapping file of the current project:
<plugin>
   <groupId>org.apache.cayenne.plugins</groupId>
   <artifactId>cayenne-modeler-maven-plugin</artifactId>
   <version>4.0.1</version>

   <configuration>
      <modelFile>${project.basedir}/src/main/resources/cayenne-blog.xml</modelFile>
   </configuration>
</plugin>
Generally speaking, the modeler is the preferred and recommended way for designing and setting up mappings between your database and the actual Java model classes.
It's available for download from this page. You'll probably need to download the version made for your specific OS or, alternatively, you can just use the cross-platform version (JAR) included as a Maven plugin-which should works just fine for your OS, too. The latest stable version at the time of writing this article is version 4.1. Note that this version requires Java 1.8 or later.
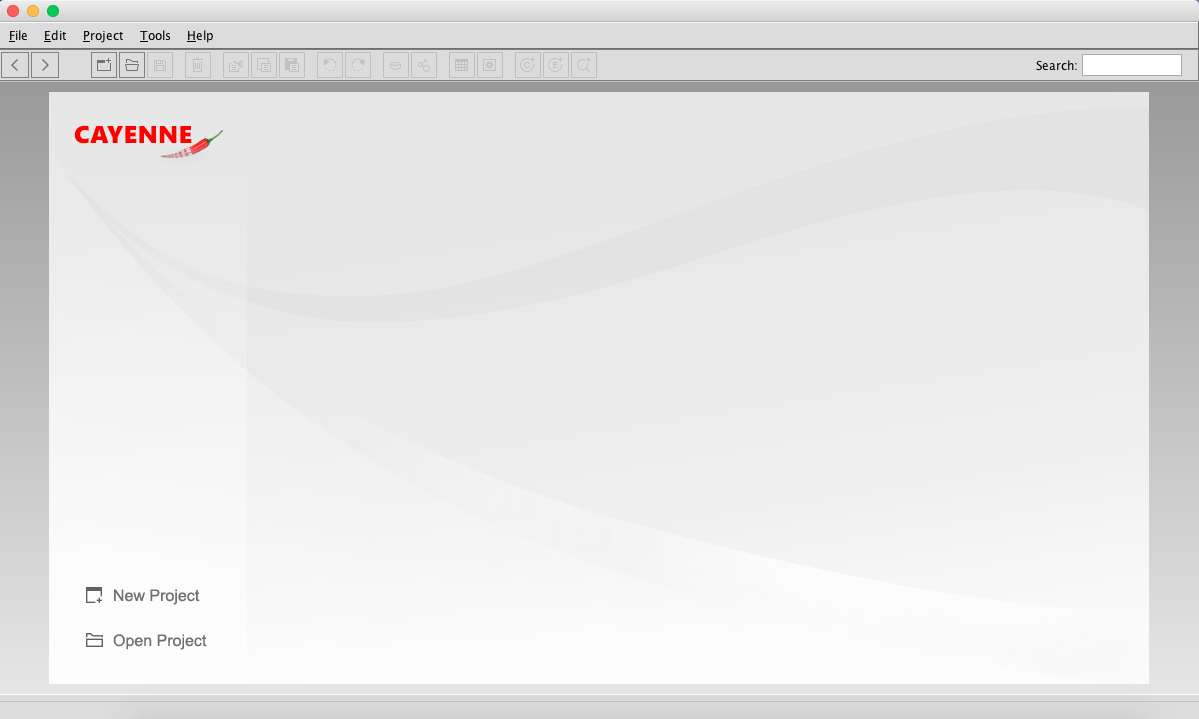
Next, as the next leg of this setup, let's build your project with the mvn clean install command and launch the modeler GUI with the command mvn cayenne-modeler:run to get as output this screen:
The configurations are database dependent, because, even the JDBC driver will need to be changed if you're using something other than MySQL. Here's the full list along with corresponding drivers.
Let's suppose you've got an existing database called cayenne_blog that showcases an one-to-many relationship between two tables, in which the following parameters are defined as so:
Now, consider the SQL commands referring to this example DB:
CREATE TABLE `author` (
  `id` int(11) NOT NULL,
  `name` varchar(250) NOT NULL
) ENGINE=InnoDB DEFAULT CHARSET=utf8;

--
-- Indexes for table `article`
--
ALTER TABLE `article`
  ADD PRIMARY KEY (`id`),
  ADD KEY `author_id` (`author_id`);

--
-- Indexes for table `author`
--
ALTER TABLE `author`
  ADD PRIMARY KEY (`id`);

--
-- AUTO_INCREMENT for table `article`
--
ALTER TABLE `article`
  MODIFY `id` int(11) NOT NULL AUTO_INCREMENT;

--
-- AUTO_INCREMENT for table `author`
--
ALTER TABLE `author`
  MODIFY `id` int(11) NOT NULL AUTO_INCREMENT;

--
-- Constraints for table `article`
--
ALTER TABLE `article`
  ADD CONSTRAINT `article_ibfk_1` FOREIGN KEY (`author_id`) REFERENCES `author` (`id`);
Just import the [db.sql](https://github.com/dassiorleando/apache-cayenne/blob/master/db.sql) file into your phpMyAdmin or, alternatively, this command from the MYSQL server in the terminal: mysql < db.sql.
Now let's add another plugin, cayenne-maven-plugin, our modeler plugin configuration into pom.xml:
<plugin>
   <groupId>org.apache.cayenne.plugins</groupId>
   <artifactId>cayenne-maven-plugin</artifactId>
   <version>4.0.1</version>

   <configuration>
      <map>${project.basedir}/src/main/resources/blog.map.xml</map>
      <dataSource>
         <driver>com.mysql.jdbc.Driver</driver>
         <url>jdbc:mysql://localhost:3306/cayenne_blog</url>
         <username>root</username>
         <password>root</password>
      </dataSource>
      <dbImport>
         <defaultPackage>com.dassiorleando.apachecayenne.models</defaultPackage>
      </dbImport>
   </configuration>

   <dependencies>
      <dependency>
         <groupId>mysql</groupId>
         <artifactId>mysql-connector-java</artifactId>
         <version>5.1.44</version>
         <scope>runtime</scope>
      </dependency>
   </dependencies>
</plugin>
Here we specify where the ORM should save the data from (<data source>) and where it must save the mapping file (<map>). From this configuration, we can see that the database name is cayenne_blog, the user database credentials in use are root:root (make sure to update these to match the one of your MYSQL server) and the default package should be the one from your project structure (the package where the models classes are going to be created).
Finally, from the command line into our project we use cbimport command: mvn cayenne:cdbimport. Note that cdbimport synchronizes our XML map file with the existing database, we should get some logs looking like these:
INFO] +++ Connecting: SUCCESS.
[INFO] Detected and installed adapter: org.apache.cayenne.dba.mysql.MySQLAdapter
[INFO]   Table: cayenne_blog.AUTO_PK_SUPPORT
[INFO]   Table: cayenne_blog.article
[INFO]   Table: cayenne_blog.author
[INFO]     Db Relationship : toOne  (article.author_id, author.id)
[INFO]     Db Relationship : toMany (author.id, article.author_id)
[INFO]
[INFO] Map file does not exist. Loaded db model will be saved into '/Users/dassiorleando/projects/opensource/apache-cayenne/src/main/resources/blog.map.xml'
[INFO]
[INFO] Detected changes:
[INFO]     Create Table         article
[INFO]     Create Table         author
[INFO]     Create Table         AUTO_PK_SUPPORT
[INFO]
[WARNING] Can't find ObjEntity for author
[WARNING] Db Relationship (Db Relationship : toOne  (article.author_id, author.id)) will have GUESSED Obj Relationship reflection.
[INFO] Migration Complete Successfully.
[INFO] ------------------------------------------------------------------------
[INFO] BUILD SUCCESS
[INFO] ------------------------------------------------------------------------
[INFO] Total time: 4.165 s
[INFO] Finished at: 2019-07-22T17:40:36+01:00
[INFO] Final Memory: 10M/164M
[INFO] ------------------------------------------------------------------------
Let's generate the Java classes: mvn cayenne:cgen
[INFO] Scanning for projects...
[INFO]
[INFO] ------------------------------------------------------------------------
[INFO] Building apache-cayenne 0.0.1-SNAPSHOT
[INFO] ------------------------------------------------------------------------
[INFO]
[INFO] --- cayenne-maven-plugin:4.0.1:cgen (default-cli) @ apache-cayenne ---
[INFO] Generating superclass file: /Users/dassiorleando/projects/opensource/apache-cayenne/src/main/java/com/dassiorleando/apachecayenne/model/auto/_Article.java
[INFO] Generating class file: /Users/dassiorleando/projects/opensource/apache-cayenne/src/main/java/com/dassiorleando/apachecayenne/model/Article.java
[INFO] Generating superclass file: /Users/dassiorleando/projects/opensource/apache-cayenne/src/main/java/com/dassiorleando/apachecayenne/model/auto/_Author.java
[INFO] Generating class file: /Users/dassiorleando/projects/opensource/apache-cayenne/src/main/java/com/dassiorleando/apachecayenne/model/Author.java
[INFO] Generating superclass file: /Users/dassiorleando/projects/opensource/apache-cayenne/src/main/java/com/dassiorleando/apachecayenne/model/auto/_AutoPkSupport.java
[INFO] Generating class file: /Users/dassiorleando/projects/opensource/apache-cayenne/src/main/java/com/dassiorleando/apachecayenne/model/AutoPkSupport.java
[INFO] ------------------------------------------------------------------------
[INFO] BUILD SUCCESS
[INFO] ------------------------------------------------------------------------
Now, you should immediately see the changes into your project structure, your persistent objects should have been successfully generated into the package specified. Here, we're talking about _Article.java and _Author.java (both files extend CayenneDataObject). The same configurations (XML format) can be seen as being put into the resources/blog.map.xml file.
Next, you'll want to launch the modeler by typing the command mvn cayenne-modeler:run. From there, click New Project, then go to the next page where you'll want to specify the Data Domain Nam (blog) for your mapping file, which will be called cayenne-blog.xml. Now, you'll want to save it into the same folder of the map file that we generated up here.
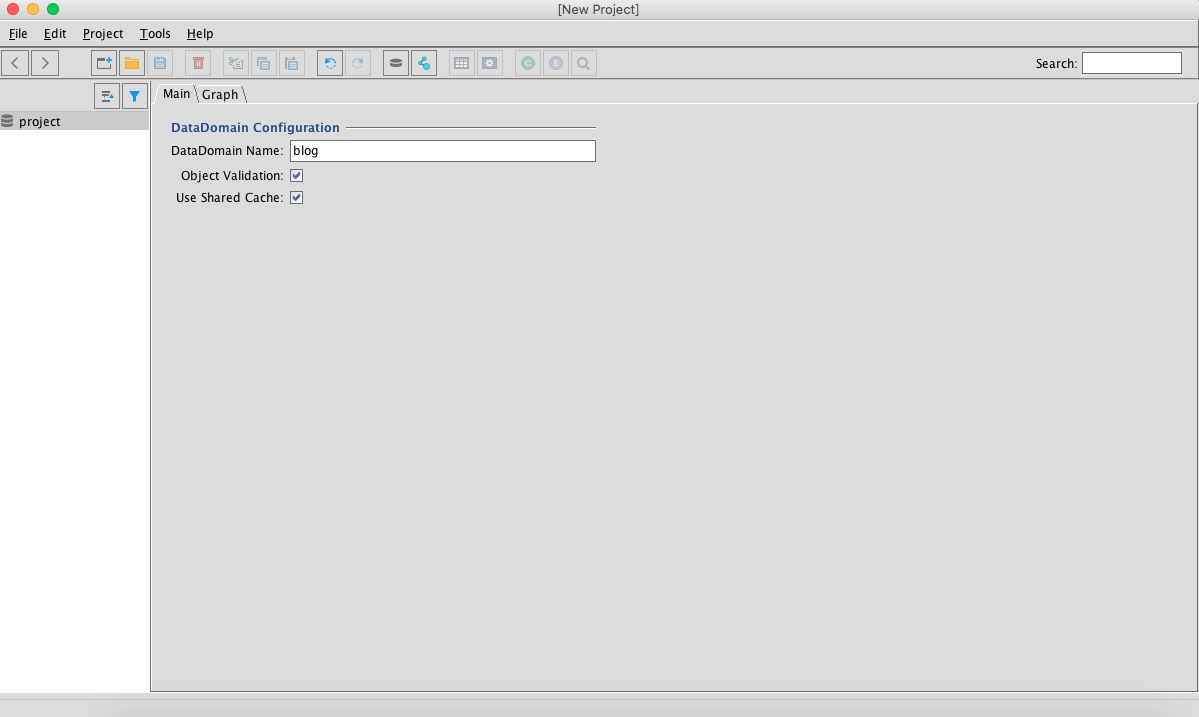
Then click File > Import Datamap to access the UI allowing use to link it to the datamap.
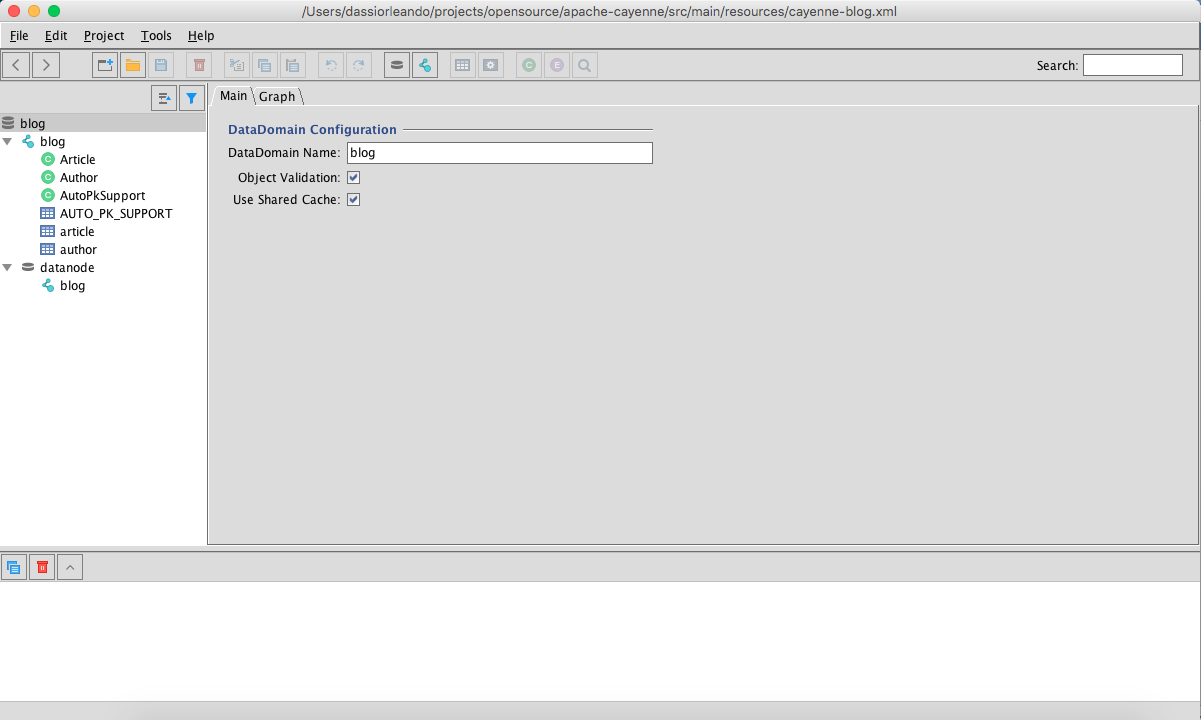
Once the cayenne-blog.xml and blog.map.xml are both linked, you can also update your model from the modeler for the changes to get applied into our classes. Here's how it will look like:
Apache Cayenne supports three kind of primary key strategies, which are:
In the following screenshot, the author table has an id which is an auto-incremented Integer managed by the database:
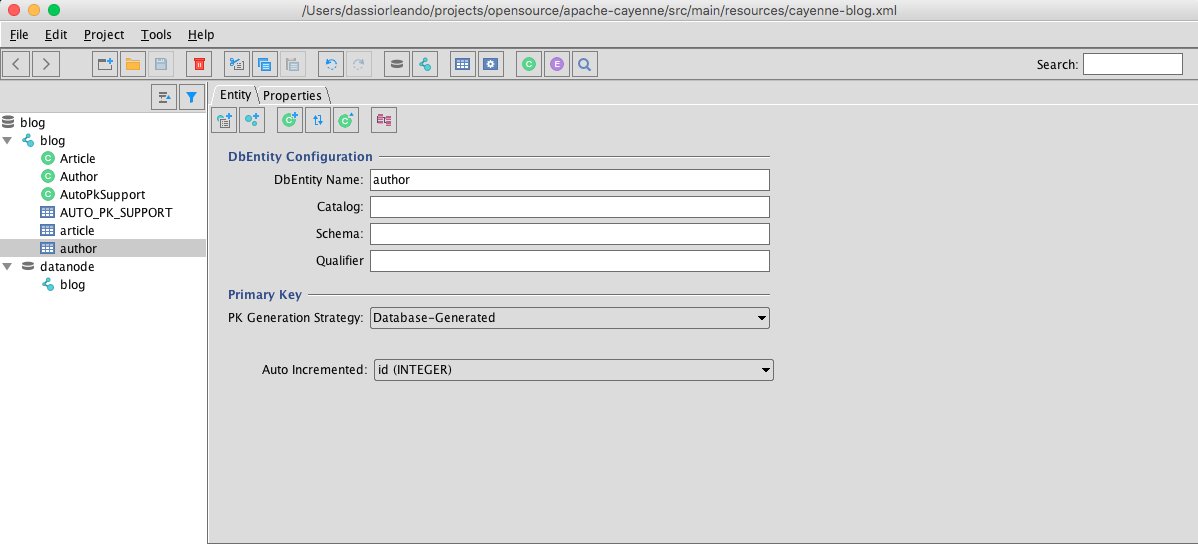
Note: Make sure that you create a DataNode with our exact database configurations as illustrated in the following image:
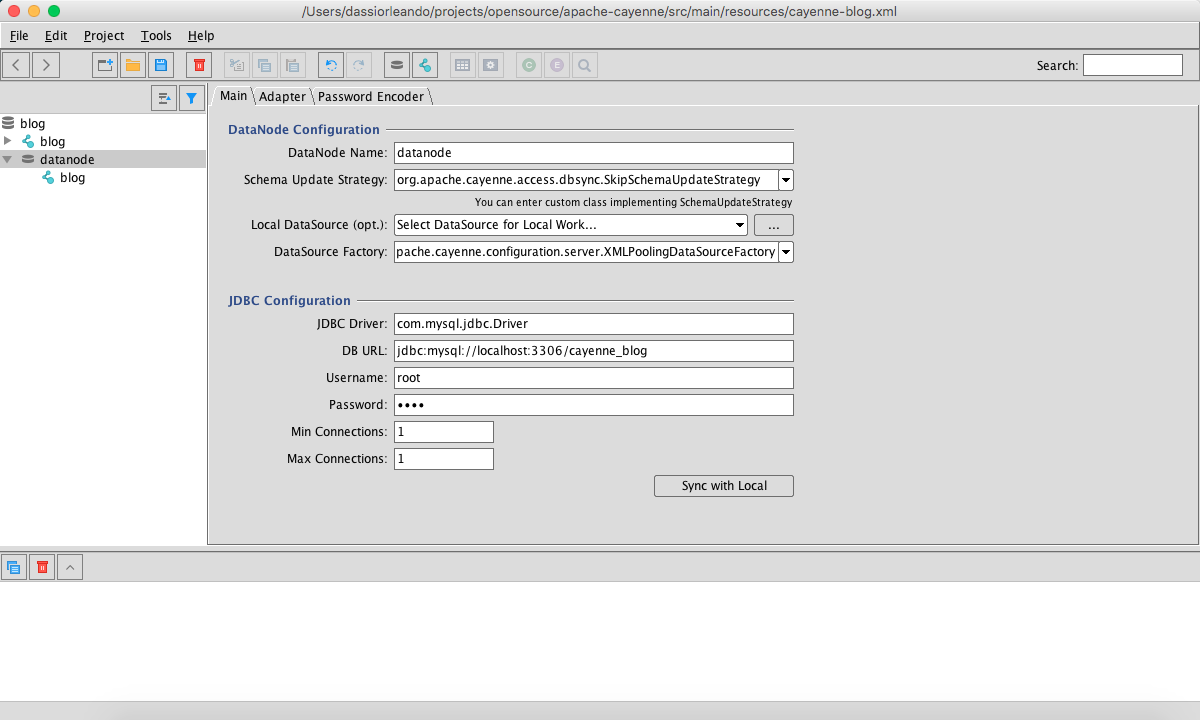
Into the resources directory of our Maven project, you'll now have a special XML file called cayenne-blog with the following content:
<?xml version="1.0" encoding="utf-8"?>
<domain project-version="9">
   <map name="blog"/>

   <node name="datanode"
       factory="org.apache.cayenne.configuration.server.XMLPoolingDataSourceFactory"
       schema-update-strategy="org.apache.cayenne.access.dbsync.SkipSchemaUpdateStrategy">
      <map-ref name="blog"/>
      <data-source>
         <driver value="com.mysql.jdbc.Driver"/>
         <url value="jdbc:mysql://localhost:3306/cayenne_blog"/>
         <connectionPool min="1" max="1"/>
         <login userName="root" password="root"/>
      </data-source>
   </node>
</domain>
XMLPoolingDataSourceFactory is responsible for loading JDBC connection information from an XML resource associated to the DataNodeDescriptor.
Apache Cayenne has its own syntax to describe the models, here are the available tags:
DataNode(<node>): the database's model. It contains all information necessary to get connected to a database, such as the name of the database, the driver and the database user credentials.DataMap(<data-map>): It's a container of persistent entities with their relations.DbAttribute(<db-attribute>): represents a column in a database table.DbEntity(<db-entity>): the model of a single database table or view. It can have DbAttributes and relationships.ObjEntity(<obj-entity>): the model of a single persistent java class, which is made of ObjAttributes that correspond to entity class properties and ObjRelationships that are properties that have a type of another entity.Embeddable(<embeddable>): the model of a Java class that acts as a property of an ObjEntity, but it corresponds to multiple columns in the database.Procedure(<procedure>): to register stored procedure in the database.Query(<query>): the model of a query, which is used to mapped query in configuration file without forget that we can also do it in the code.You can read this following guide for more information.
In this section you'll be applying some basic operations on our models (Article and Author). ObjectSelect class has some statics methods useful to query our database but for the insertions and updates we should use the server's context(ObjectContext) which is used to commit the changes.
Here's how to get the server context relative to our project:
ServerRuntime cayenneRuntime = ServerRuntime.builder()
        .addConfig("cayenne-blog.xml")
        .build();

ObjectContext context = cayenneRuntime.newContext();Note: cayenne-blog.xml file is located into the project resources folder.
You can create an object with the following query:
/**
 * Save an author
 * @param name
 */
public void save(String name) {
    // Save a single author
    Author author = this.context.newObject(Author.class);
    author.setName(name);

    context.commitChanges();
}You can read an object with the following query:
/**
 * Find an author by its ID
 * @param id    the author's ID
 * @return      the matched author or null if not existing
 */
public Author findById(int id) {
    Author author = Cayenne.objectForPK(context, Author.class, id);
    return author;
}

/**
 * Looking for an author by name
 * @param name  the name to look up with
 * @return      the first matched author or null if not existing
 */
public Author findByName(String name) {
    Author foundAuthor = ObjectSelect.query(Author.class)
            .where(Author.NAME.eq(name))
            .selectOne(this.context);

    return foundAuthor;
}

/**
 * Find authors by name starting with(like%)
 * @param partName expected name part
 * @return         list of authors
 */
public List<Author> findByNameLike(String partName) {
    // Let's apply a case-insensitive LIKE on the Author's name column
    // We get all the authors with their name starting with "partName"
    List<Author> authorsLike = ObjectSelect.query(Author.class)
            .where(Author.NAME.likeIgnoreCase(partName + "%"))
            .select(context);

    return authorsLike;
}

/**
 * Find authors by name ending with
 * @param partName expected name part
 * @return         list of authors
 */
public List<Author> findByNameEndWith(String partName) {
    // All authors with names ending with "partName"
    List<Author> authorsEnd = ObjectSelect.query(Author.class)
            .where(Author.NAME.endsWith(partName))
            .select(context);

    return authorsEnd;
}It's possible to query all the authors saved so far by using the following query:
public List<Author> findAll() {
    // Looking for all authors
    List<Author> authors = ObjectSelect
            .query(Author.class)
            .select(this.context);
    return authors;
}You can update an object with the following query:
/**
 * Update an author
 * @param id        the author's ID
 * @param newName   the new name to set
 * @return          true for a successful operation and false unknown author
 */
public boolean update(int id, String newName) {
    if (StringUtils.isEmpty(newName)) return false;

    // Get the author to update
    Author author = this.findById(id);

    if (author == null) return false;

    // Set its name
    author.setName(newName);
    context.commitChanges();
    return true;
}Here's how we can link an author with an article he wrote:
/**
 * Attach a fake article to the author
 * @param id    the author's ID
 * @return      true for a successful operation and false unknown author
 */
public boolean attachArticle(int id) {
    // Get the author to link with
    Author author = this.findById(id);

    if (author == null) return false;

    // Create a fake article and link it to the current author
    Article article = context.newObject(Article.class);
    article.setTitle("My post title");
    article.setContent("The content");
    article.setAuthor(author);

    context.commitChanges();

    // Get author's linked data (articles)
    List<Article> articles = author.getArticles();

    return true;
}You can delete an object with the following query:
/**
 * Delete an author
 * @param id author's ID
 * @return   true for a successful operation and false unknown author
 */
public boolean delete(int id) {
    // Get the author to delete
    Author author = this.findById(id);

    if (author != null) {
        context.deleteObjects(author);
        context.commitChanges();
        return true;
    } else {
        return false;
    }
}Apache Cayenne's API allows us to drop all the records of a table using SQLTemplate, here we just provide the basic SQL delete query along with the target class:
// SQL delete queries for Author and Article classes
SQLTemplate deleteArticles = new SQLTemplate(Article.class, "delete from article");
SQLTemplate deleteAuthors = new SQLTemplate(Author.class, "delete from author");

// Applying the deletion queries
context.performGenericQuery(deleteArticles);
context.performGenericQuery(deleteAuthors);There are many possibilities for building advanced queries with Apache Cayenne. But, most of the time we're using Expression and ExpressionFactory classes, here are some examples of these:
likeExp: used for building the LIKE expression.likeIgnoreCaseExp: used to build the LIKE_IGNORE_CASE expression.containsExp: an expression used for a LIKE query with the pattern matching anywhere in the string.containsIgnoreCaseExp: similar to the containsExp but uses a case-insensitive approach.startsWithExp: the pattern should match the beginning of the string.startsWithIgnoreCaseExp: similar to the startsWithExp but it uses a case-insensitive approach.endsWithExp: an expression that matches the end of a string.endsWithIgnoreCaseExp: an expression that matches the end of a string that uses a case-insensitive approach.expTrue: used for boolean true expressions.expFalse: used for boolean false expressions.andExp: used to chain two expressions with the and operator.orExp: to chain two expressions using the or operator.In this tutorial, you've learned how to setup Apache Cayenne's object-relational mapping (ORM) feature for a MySQL database along with some basic CRUD operations as query examples with an one-to-many relationship. The full source code for this article can be found on Github.

2,593 posts | 793 followers
FollowAlibaba Developer - June 25, 2021
Alibaba Clouder - March 23, 2018
Alibaba Clouder - December 3, 2019
Alibaba Clouder - April 11, 2018
Alibaba Clouder - November 21, 2019
Apache Flink Community China - April 23, 2020

2,593 posts | 793 followers
Follow Message Queue for Apache Kafka
A fully-managed Apache Kafka service to help you quickly build data pipelines for your big data analytics.
Learn More YiDA Low-code Development Platform
A low-code development platform to make work easier
Learn More mPaaS
mPaaS
Help enterprises build high-quality, stable mobile apps
Learn More ApsaraDB RDS for SQL Server
An on-demand database hosting service for SQL Server with automated monitoring, backup and disaster recovery capabilities
Learn MoreMore Posts by Alibaba Clouder