PolarDB for MySQL Redis protokolüyle uyumlu olan ve popüler Redis istemcilerini kullanarak veritabanına bağlanmanızı sağlayan Orca özelliğini sunar. Bu konu, bağlantı için gerekli hazırlıkları açıklar ve çeşitli popüler programlama dilleri için istemci bağlantısı kod örnekleri içerir.
Hazırlıklar
Orca özelliğine bağlanmadan önce aşağıdaki hazırlıkları tamamladığınızdan emin olun:
PolarDB kümenizde Orca özelliği etkinleştirilmiş olmalıdır.
İstemcinin IP adresini veya CIDR bloğunu PolarDB kümesinin izin listesine eklemiş olmalısınız.
Orca özelliğine erişmek için ayrı bir Orca hesabı oluşturmuş olmalısınız.
Orca özelliğinin uç noktasını edinmiş olmalısınız.
Kullanım notları
Kimlik doğrulama mekanizması farklılıkları: Orca ile yerel Redis farklı kimlik doğrulama mekanizmaları kullanır. Orca'nın varsayılan bir kullanıcısı yoktur. Tüm bağlantılar konsolda oluşturduğunuz bir Orca hesabı kullanılarak kimlik doğrulamasından geçmelidir.
-
AUTH komutu uyumluluğu: Yalnızca parola tabanlı kimlik doğrulamayı destekleyen istemcilerle uyumluluk sağlamak amacıyla Orca
AUTHkomutu iki formatı destekler. Bir istemci yapılandırırken istemcinin desteklediği kimlik doğrulama yöntemini seçin.AUTH <username> <password>: Standart format. Kullanıcı adı ve parolayı ayrı ayrı belirtin.AUTH <username>:<password>: Uyumluluk formatı. Kullanıcı adı ve parolayı iki nokta üst üste:işaretiyle birleştirin ve birleşik diziyi parola parametresinin değeri olarak iletin.
-
HELLO komutu uyumluluğu:
AUTHkomutuna benzer şekildeHELLOkomutunun kimlik doğrulama bölümü de yukarıda açıklanan iki formatı destekler.HELLO <protover> AUTH <username> <password>HELLO <protover> AUTH <username>:<password>
redis-cli kullanarak bağlanma
redis-cli yükleyin: redis-cli'yı istemci cihazınıza yüklemek için redis-cli kurulum öğreticisine bakın.
-
Orca özelliğine bağlanın: Aşağıdaki komutu çalıştırın. Komuttaki uç noktayı ve bağlantı noktasını kendi bilgilerinizle değiştirin.
redis-cli -h pz-****************.rwlb.rds.aliyuncs.com -p 6379 -
Bağlantınızı doğrulayın: Bağlantı kurulduktan sonra kimlik doğrulaması yapmak için
AUTHkomutunu kullanın. Aşağıdaki her iki format da desteklenir. Yer tutucuları Orca hesabınız ve parolanızla değiştirin.# Format 1: Provide the username and password separately AUTH orca_user orca_password # Format 2: Provide the concatenated username and password as the password AUTH orca_user:orca_passwordOKyanıtı dönerse bağlantı ve kimlik doğrulama başarılı olmuştur.
İstemci kitaplıklarını kullanarak bağlanma
Kullandığınız programlama diline göre aşağıdaki örneklere başvurarak uygulamanızdan bağlanabilirsiniz.
Java (Jedis)
-
Bağımlılıkları ekleyin (Maven):
<dependency> <groupId>redis.clients</groupId> <artifactId>jedis</artifactId> <version>4.3.0</version> </dependency> -
Kod örneği: Yalnızca tek bir parola parametresi kabul eden Jedis ayarıyla uyumlu olmak için
username:passwordformatını kullanmanız gerekir.import redis.clients.jedis.Jedis; import redis.clients.jedis.JedisPool; import redis.clients.jedis.JedisPoolConfig; public class JedisExample { public static void main(String[] args) { JedisPoolConfig poolConfig = new JedisPoolConfig(); // Orca connection information String host = "pz-****************.rwlb.rds.aliyuncs.com"; // Replace with your Orca endpoint int port = 6379; String username = "orca_user"; // Replace with your Orca username String password = "orca_password"; // Replace with your Orca password // Jedis authentication requires concatenating the username and password String authPassword = username + ":" + password; JedisPool pool = new JedisPool(poolConfig, host, port, 3000, authPassword); try (Jedis jedis = pool.getResource()) { jedis.set("name", "jedis"); System.out.println(jedis.get("name")); } catch (Exception e) { e.printStackTrace(); } finally { pool.destroy(); } } }
Java (Lettuce)
-
Bağımlılıkları ekleyin (Maven):
<dependency> <groupId>io.lettuce</groupId> <artifactId>lettuce-core</artifactId> <version>6.3.0.RELEASE</version> </dependency> <dependency> <groupId>io.netty</groupId> <artifactId>netty-transport-native-epoll</artifactId> <version>4.1.100.Final</version> <classifier>linux-x86_64</classifier> </dependency> -
Kod örneği: Lettuce kullanıcı adı ve parolayı ayrı ayrı ayarlamayı destekler. Bu yöntem önerilir.
import io.lettuce.core.RedisClient;
import io.lettuce.core.RedisURI;
import io.lettuce.core.api.StatefulRedisConnection;
import io.lettuce.core.api.sync.RedisCommands;
public class LettuceExample {
    public static void main(String[] args) {
        // Orca connection information
        String host = "pz-****************.rwlb.rds.aliyuncs.com"; // Replace with your Orca endpoint
        int port = 6379;
        String username = "orca_user"; // Replace with your Orca username
        String password = "orca_password"; // Replace with your Orca password
        // Lettuce supports setting the username and password separately
        RedisURI uri = RedisURI.Builder
                .redis(host, port)
                .withAuthentication(username, password)
                .build();
        RedisClient redisClient = RedisClient.create(uri);
        StatefulRedisConnection<String, String> connection = redisClient.connect();
        RedisCommands<String, String> syncCommands = connection.sync();
        syncCommands.set("name", "Lettuce");
        String value = syncCommands.get("name");
        // Output: Lettuce
        System.out.println("Get value: " + value);
        connection.close();
        redisClient.shutdown();
    }
}
Java (Spring Data Redis)
-
Bağımlılıkları ekleyin (Maven):
<!-- Spring Boot parent project for unified version management --> <parent> <groupId>org.springframework.boot</groupId> <artifactId>spring-boot-starter-parent</artifactId> <version>2.7.18</version> <!-- Use a recent stable version --> <relativePath/> </parent> <!-- Other configurations... --> <dependencies> <dependency> <groupId>org.springframework.boot</groupId> <artifactId>spring-boot-starter-data-redis</artifactId> </dependency> <dependency> <groupId>redis.clients</groupId> <artifactId>jedis</artifactId> </dependency> <dependency> <groupId>org.slf4j</groupId> <artifactId>slf4j-simple</artifactId> <version>1.7.36</version> </dependency> </dependencies> <build> <plugins> <!-- Spring Boot Maven plugin for packaging and running --> <plugin> <groupId>org.springframework.boot</groupId> <artifactId>spring-boot-maven-plugin</artifactId> </plugin> </plugins> </build> -
Kod örneği: Orca'ya bağlantıyı yapılandırmak için aşağıdaki yöntemlerden birini kullanabilirsiniz.
application.ymlkullanarak yapılandırmaSpring Boot 2.x ve sonraki sürümler
application.ymldosyasında kullanıcı adı ve parolayı ayrı ayrı belirtmeyi destekler. Bu yöntem önerilir.-
Proje dosya yapısı aşağıdaki gibidir:
test_redis/ ├── pom.xml └── src/ └── main/ ├── java/ │ └── com/ │ └── example/ │ ├── MainApplication.java │ └── RedisTestRunner.java └── resources/ └── application.yml -
application.ymldosyasını yapılandırın:src/main/resources/dizininde birapplication.ymldosyası oluşturun. Bu dosya tüm yapılandırma bilgilerini saklar.spring: redis: host: pz-****************.rwlb.rds.aliyuncs.com # Replace with your Orca endpoint port: 6379 username: orca_user # Replace with your Orca username password: orca_password # Replace with your Orca password database: 0 jedis: pool: max-active: 30 max-idle: 20 min-idle: 5 max-wait: -1ms -
Ana uygulama sınıfı
MainApplication.javadosyasını oluşturun: Bu Spring Boot uygulamasının giriş noktasıdır.package com.example; import org.springframework.boot.SpringApplication; import org.springframework.boot.autoconfigure.SpringBootApplication; @SpringBootApplication public class MainApplication { public static void main(String[] args) { SpringApplication.run(MainApplication.class, args); } } -
Test sınıfı
RedisTestRunner.javadosyasını oluşturun: Bu sınıf Spring Boot uygulaması başladıktan sonra otomatik olarak çalışır Redis okuma ve yazma işlemleri gerçekleştirir ve sonuçları yazdırır.package com.example; import org.springframework.beans.factory.annotation.Autowired; import org.springframework.boot.CommandLineRunner; import org.springframework.data.redis.core.StringRedisTemplate; import org.springframework.stereotype.Component; @Component public class RedisTestRunner implements CommandLineRunner { @Autowired private StringRedisTemplate stringRedisTemplate; @Override public void run(String... args) throws Exception { System.out.println("=== Starting Redis test with Spring Data Redis ==="); try { // Define a key-value pair String key = "name"; String value = "spring-data-redis"; // 1. Run the SET command stringRedisTemplate.opsForValue().set(key, value); System.out.println("SET " + key + " = " + value); // 2. Run the GET command String retrievedValue = stringRedisTemplate.opsForValue().get(key); System.out.println("GET " + key + " = " + retrievedValue); // 3. Verify the result if (value.equals(retrievedValue)) { System.out.println("Test successful!"); } else { System.out.println("Test failed! Retrieved value does not match."); } } catch (Exception e) { System.err.println("Redis operation failed: " + e.getMessage()); e.printStackTrace(); } System.out.println("=== Redis test completed ==="); } }
Java Config kullanarak yapılandırma
Spring'in daha eski bir sürümünü kullanıyorsanız veya özel gereksinimleriniz varsa Java yapılandırma sınıfı kullanabilirsiniz. Temel istemci olarak Jedis kullanıldığından kimlik doğrulama için kullanıcı adı ve parolayı yine de birleştirmeniz gerekir.
-
Proje dosya yapısı aşağıdaki gibidir:
test_redis/ ├── pom.xml └── src/ └── main/ ├── java/ │ └── com/ │ └── example/ │ ├── config/ │ │ └── RedisConfig.java <-- Core configuration class │ ├── MainApplication.java │ └── RedisTestRunner.java └── resources/ └── application.yml <-- This file can be deleted or left empty -
Çekirdek yapılandırma sınıfı
RedisConfig.javadosyasını oluşturun: Bu sınıfta manuel olarak birRedisConnectionFactoryörneği (bean) oluşturun ve tüm bağlantı ayrıntılarını sağlayın. Spring Boot bu bean'i otomatik olarak algılar veStringRedisTemplategibi Redis ile ilgili tüm işlemleri yapılandırmak için kullanır.package com.example.config; import org.springframework.context.annotation.Bean; import org.springframework.context.annotation.Configuration; import org.springframework.data.redis.connection.RedisConnectionFactory; import org.springframework.data.redis.connection.RedisStandaloneConfiguration; import org.springframework.data.redis.connection.lettuce.LettuceConnectionFactory; @Configuration public class RedisConfig { @Bean public RedisConnectionFactory redisConnectionFactory() { // 1. Create a standalone Redis configuration RedisStandaloneConfiguration redisConfig = new RedisStandaloneConfiguration(); // 2. Set the Orca connection information // Replace with your Orca endpoint redisConfig.setHostName("pz-****************.rwlb.rds.aliyuncs.com"); // Orca port. The default value is 6379 redisConfig.setPort(6379); // Replace with your Orca username redisConfig.setUsername("orca_user"); // Replace with your Orca password redisConfig.setPassword("orca_password"); // 3. Use Lettuce as the client and apply the preceding configuration LettuceConnectionFactory lettuceFactory = new LettuceConnectionFactory(redisConfig); // Optional: If you do not call afterPropertiesSet, the Spring container calls it automatically when the bean is initialized. // lettuceFactory.afterPropertiesSet(); // 4. Return the configured connection factory instance return lettuceFactory; } } -
Ana uygulama sınıfı
MainApplication.javadosyasını oluşturun: Bu Spring Boot uygulamasının giriş noktasıdır.package com.example; import org.springframework.boot.SpringApplication; import org.springframework.boot.autoconfigure.SpringBootApplication; @SpringBootApplication public class MainApplication { public static void main(String[] args) { SpringApplication.run(MainApplication.class, args); } } Test sınıfı
RedisTestRunner.javadosyasını oluşturun: Bu sınıf Spring Boot uygulaması başladıktan sonra otomatik olarak çalışır Redis okuma ve yazma işlemleri gerçekleştirir ve sonuçları yazdırır.-
package com.example;
import org.springframework.beans.factory.annotation.Autowired;
import org.springframework.boot.CommandLineRunner;
import org.springframework.data.redis.core.StringRedisTemplate;
import org.springframework.stereotype.Component;
@Component
public class RedisTestRunner implements CommandLineRunner {
    @Autowired
    private StringRedisTemplate stringRedisTemplate;
    @Override
    public void run(String... args) throws Exception {
        System.out.println("=== Starting Redis test with Spring Data Redis ===");
        try {
            // Define a key-value pair
            String key = "name";
            String value = "spring-data-redis";
            // 1. Run the SET command
            stringRedisTemplate.opsForValue().set(key, value);
            System.out.println("SET " + key + " = " + value);
            // 2. Run the GET command
            String retrievedValue = stringRedisTemplate.opsForValue().get(key);
            System.out.println("GET " + key + " = " + retrievedValue);
            // 3. Verify the result
            if (value.equals(retrievedValue)) {
                System.out.println("Test successful!");
            } else {
                System.out.println("Test failed! Retrieved value does not match.");
            }
        } catch (Exception e) {
            System.err.println("Redis operation failed: " + e.getMessage());
            e.printStackTrace();
        }
        System.out.println("=== Redis test completed ===");
    }
}
-
Python (redis-py)
-
Bağımlılığı yükleyin:
pip install redis -
Kod örneği:
redis-py4.2 ve sonraki sürümler ayrı birusernameparametresini destekler. Daha eski bir sürüm kullanıyorsanızpasswordparametresinin değeri olarakusername:passwordformatını kullanın.import redis # Orca connection information host = 'pz-****************.rwlb.rds.aliyuncs.com' # Replace with your Orca endpoint port = 6379 username = 'orca_user' # Replace with your Orca username password = 'orca_password' # Replace with your Orca password # Recommended method (redis-py >= 4.2) r = redis.Redis(host=host, port=port, username=username, password=password) # Compatibility method for earlier versions # auth_password = f'{username}:{password}' # r = redis.Redis(host=host, port=port, password=auth_password) r.set('name', 'redis-py') print(r.get('name').decode('utf-8')) r.close()
Go (go-redis)
-
Bağımlılığı yükleyin:
go get github.com/go-redis/redis/v8 -
Kod örneği:
go-redisayrı birUsernamealanını destekler; bu yöntem önerilir. İstemci sürümü daha eskiysePasswordalanının değeri olarakusername:passwordkullanın.package main import ( "context" "fmt" "github.com/go-redis/redis/v8" ) var ctx = context.Background() func main() { client := redis.NewClient(&redis.Options{ Addr: "pz-****************.rwlb.rds.aliyuncs.com:6379", // Replace with your Orca endpoint and port Username: "orca_user", // Replace with your Orca username Password: "orca_password", // Replace with your Orca password DB: 0, }) err := client.Set(ctx, "name", "go-redis", 0).Err() if err != nil { panic(err) } val, err := client.Get(ctx, "name").Result() if err != nil { panic(err) } fmt.Println("Get value:", val) }
Node.js (node-redis)
-
Bağımlılığı yükleyin:
npm install redis -
Kod örneği:
node-rediskimlik doğrulama bilgilerinin bağlantı URL'sine dahil edilmesini destekler.import { createClient } from 'redis'; // Orca connection information const host = 'pz-****************.rwlb.rds.aliyuncs.com'; // Replace with your Orca endpoint const port = 6379; const username = 'orca_user'; // Replace with your Orca username const password = 'orca_password'; // Replace with your Orca password const client = createClient({ url: `redis://${username}:${encodeURIComponent(password)}@${host}:${port}/0` }); client.on('error', (err) => console.error('Redis Client Error:', err)); async function runExample() { try { await client.connect(); await client.set('name', 'node-redis'); const value = await client.get('name'); console.log('get name:', value); } finally { await client.disconnect(); } } runExample();
PHP (PhpRedis)
-
Bağımlılığı yükleyin: Eklenti genellikle bir paket yöneticisi kullanılarak yüklenir. Örneğin CentOS üzerinde:
sudo yum install php-redis -
Kod örneği:
PhpRedisbir eklentidir veauthyöntemi kullanıcı adı ile parolayı içeren bir diziyi destekler.<?php $redis = new Redis(); // Orca connection information $host = 'pz-****************.rwlb.rds.aliyuncs.com'; // Replace with your Orca endpoint $port = 6379; $user = 'orca_user'; // Replace with your Orca username $password = 'orca_password'; // Replace with your Orca password if ($redis->connect($host, $port) === false) { die($redis->getLastError()); } // Authenticate by using an array that contains the username and password if ($redis->auth([$user, $password]) === false) { die($redis->getLastError()); } $redis->set("name", "php-redis"); echo $redis->get("name"); $redis->close(); ?>
C (Hiredis)
-
Bağımlılığı yükleyin: Kaynak koddan derleyip yükleyin.
git clone https://github.com/redis/hiredis.git cd hiredis make && sudo make install -
Kod örneği:
redisCommandkullanarakAUTHkomutunu çalıştırın.username:passwordbirleştirilmiş formatını kullanabilirsiniz.#include <stdio.h> #include <stdlib.h> #include <string.h> #include <hiredis.h> int main() { // Orca connection parameters const char *hostname = "********.rwlb.rds.aliyuncs.com"; // Replace with your Orca endpoint int port = 6379; // Define the username and password separately for ease of use const char *username = "orca_user"; // Replace with your Orca username const char *password = "orca_password"; // Replace with your Orca password redisContext *c; redisReply *reply; // 1. Connect to Redis (a connection with a timeout is recommended) struct timeval timeout = { 2, 0 }; // 2-second timeout c = redisConnectWithTimeout(hostname, port, timeout); if (c == NULL || c->err) { if (c) { printf("Connection error: %s\n", c->errstr); redisFree(c); } else { printf("Can't allocate redis context\n"); } exit(1); } // 2. Authenticate (corrected part) // Use the "AUTH <username> <password>" format reply = redisCommand(c, "AUTH %s %s", username, password); if (reply == NULL) { // If reply is NULL, an I/O error occurred. Check c->errstr printf("AUTH command failed: %s\n", c->errstr); redisFree(c); exit(1); } // Check whether reply itself is an error type if (reply->type == REDIS_REPLY_ERROR) { printf("Authentication failed: %s\n", reply->str); freeReplyObject(reply); redisFree(c); exit(1); } printf("Authenticated successfully\n"); freeReplyObject(reply); // After authentication succeeds, remember to release reply // 3. Run the SET command reply = redisCommand(c, "SET mykey %s", "Hello, hiredis!"); if (reply == NULL) { printf("SET command failed: %s\n", c->errstr); redisFree(c); exit(1); } // hiredis returns, for a successful SET command, a status (STATUS) type reply if (reply->type == REDIS_REPLY_STATUS && strcmp(reply->str, "OK") == 0) { printf("SET mykey succeeded\n"); } else { printf("SET failed with reply: %s\n", reply->str); } freeReplyObject(reply); // 4. Run the GET command reply = redisCommand(c, "GET mykey"); if (reply == NULL) { printf("GET command failed: %s\n", c->errstr); redisFree(c); exit(1); } if (reply->type == REDIS_REPLY_STRING) { printf("GET mykey = %s\n", reply->str); } else if (reply->type == REDIS_REPLY_NIL) { printf("Key 'mykey' does not exist\n"); } else { printf("GET returned unexpected type: %d, error: %s\n", reply->type, reply->str); } freeReplyObject(reply); // 5. Close the connection redisFree(c); printf("Disconnected from Redis\n"); return 0; } -
Derleyin ve çalıştırın.
# Compile. Adjust the paths after -I and -L based on your actual installation location
gcc -o orca orca.c -I/usr/local/include/hiredis -L/usr/local/lib -lhiredis
# Run
./orca
DMS kullanarak bağlanma
Orca'ya bağlanma
Data Management (DMS) konsoluna gidin.
Üst gezinme çubuğunda Data Assets > Instances seçeneğini belirleyin.
-
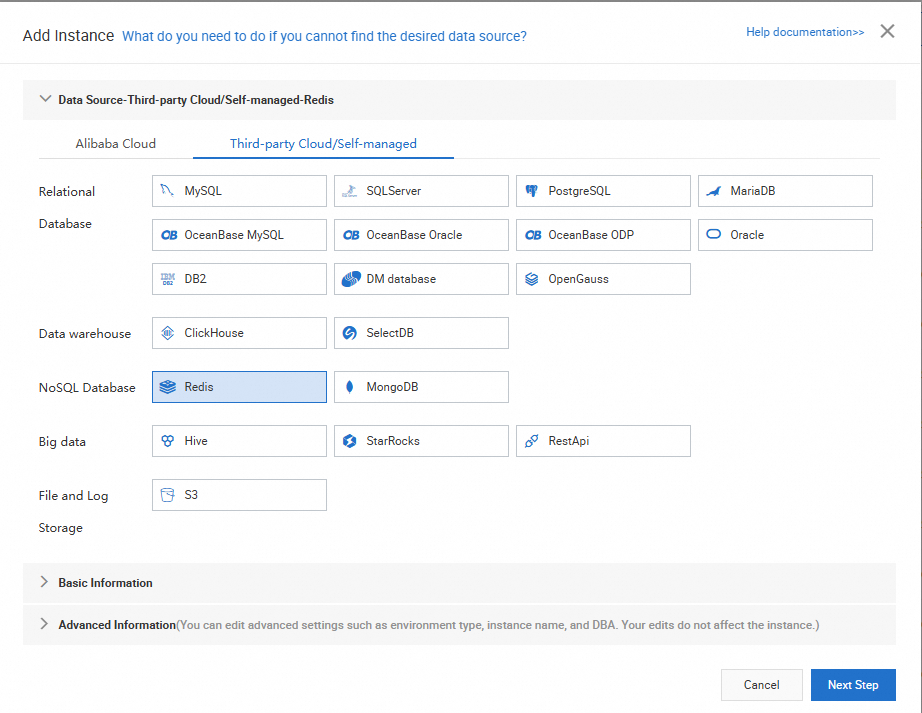
Add seçeneğine tıklayın Third-party Cloud/Self-managed seçeneğini belirleyin ve NoSQL veritabanı için Redis seçeneğini belirleyin.
-
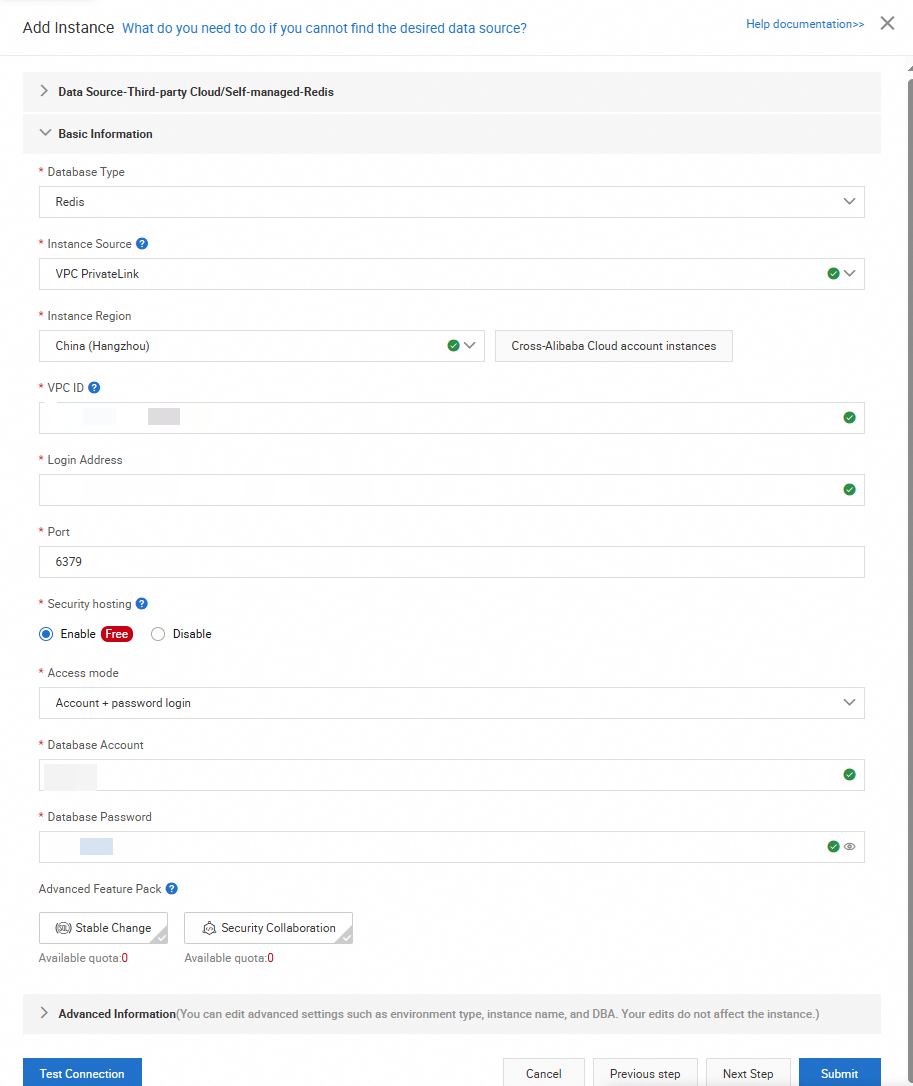
Temel bilgi yapılandırma sayfasına gitmek için Next seçeneğine tıklayın ve ardından aşağıdaki şekilde gösterildiği gibi parametreleri yapılandırın.
Instance Source: VPC PrivateLine seçeneğini belirleyin. Region için PolarDB kümenizin bulunduğu bölgeyi veya yakın bir bölgeyi seçin. VPC ID için PolarDB kümenizin ayrıntılar sayfasındaki VPC'yi seçin. Logon Address alanına Orca uç noktasını girin.
Access Method: Security Hosting + Manual seçeneğini belirleyin. Oluşturduğunuz Orca hesabının veritabanı hesabını ve parolasını girin.
Bilgileri girdikten sonra Test Connectivity seçeneğine tıklayın. Bir hata oluşmazsa bağlantının başarılı olduğuna ilişkin bir ileti görüntülenir.
-
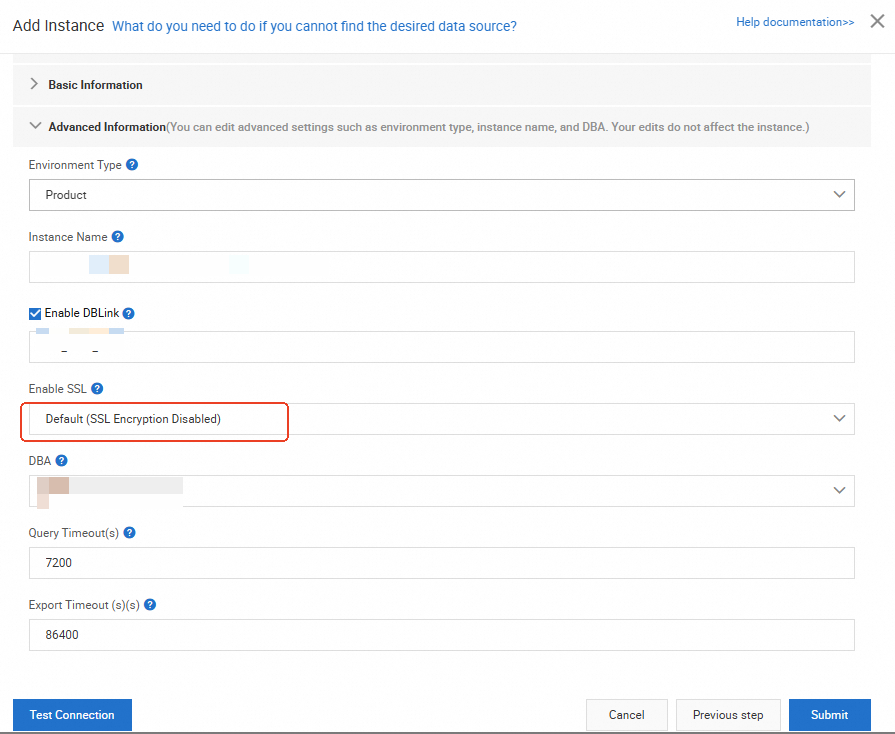
Advanced Information sayfasına gitmek için Next seçeneğine tıklayın ve ihtiyaçlarınıza göre ayarları yapılandırın.
NotOrca şu anda SSL etkinleştirmeyi desteklememektedir.
-
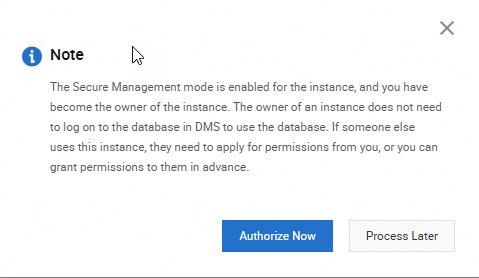
Submit seçeneğine tıklayın. Bir hata oluşmazsa Orca güvenlik barındırma durumuna geçer.
Verileri yönetme
Üst gezinme çubuğunda SQL Console seçeneğini belirleyin ve ardından barındırması tamamlanan Orca kümesini seçin.
-
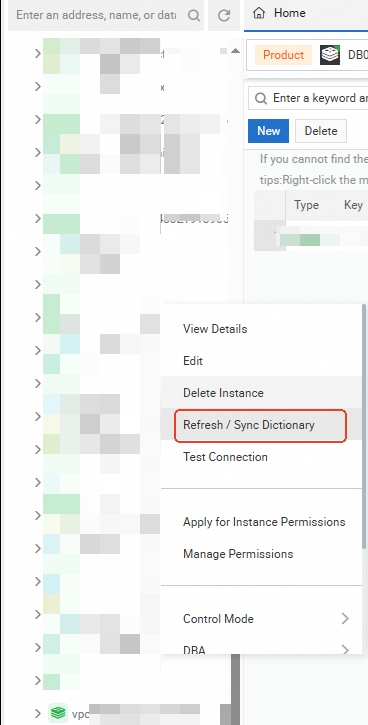
Orca şu anda yalnızca bir Redis mantıksal veritabanını (DB0) destekler. Geçerli veritabanı DB0'yı görmüyorsanız Refresh / Sync Dictionary seçeneğine tıklayın.
-
Bir hata oluşmazsa DMS'yi kullanarak Orca'yı yönetebilirsiniz.
Örneğin SQL Console içinde
ping key01komutunu çalıştırın.PONGyanıtı dönerse bağlantı başarılıdır.