本文介紹iOS端整合微短劇專案的操作步驟。
源碼說明
源碼下載
本方案僅支援播放器SDK專業版,請參考擷取播放器SDK License擷取專業版授權後提交工單或聯絡阿里雲商務申請下載。
環境要求
類別 | 要求 | ||||||
開發環境 | Xcode 14.0 及以上版本,推薦使用最新正式版本。 | ||||||
系統版本 | iOS 10及以上版本的真機。 說明
| ||||||
CocoaPods | CocoaPods 1.9.3 及以上版本。 | ||||||
前提條件
您已經擷取播放器SDK License專業版的授權及License Key,應用的綁定步驟請參見綁定License。
跑通Demo
擷取Demo源碼後,進入
Example目錄。進入Example目錄,執行
pod install --repo-update,自動安裝所需的SDK依賴。開啟工程檔案
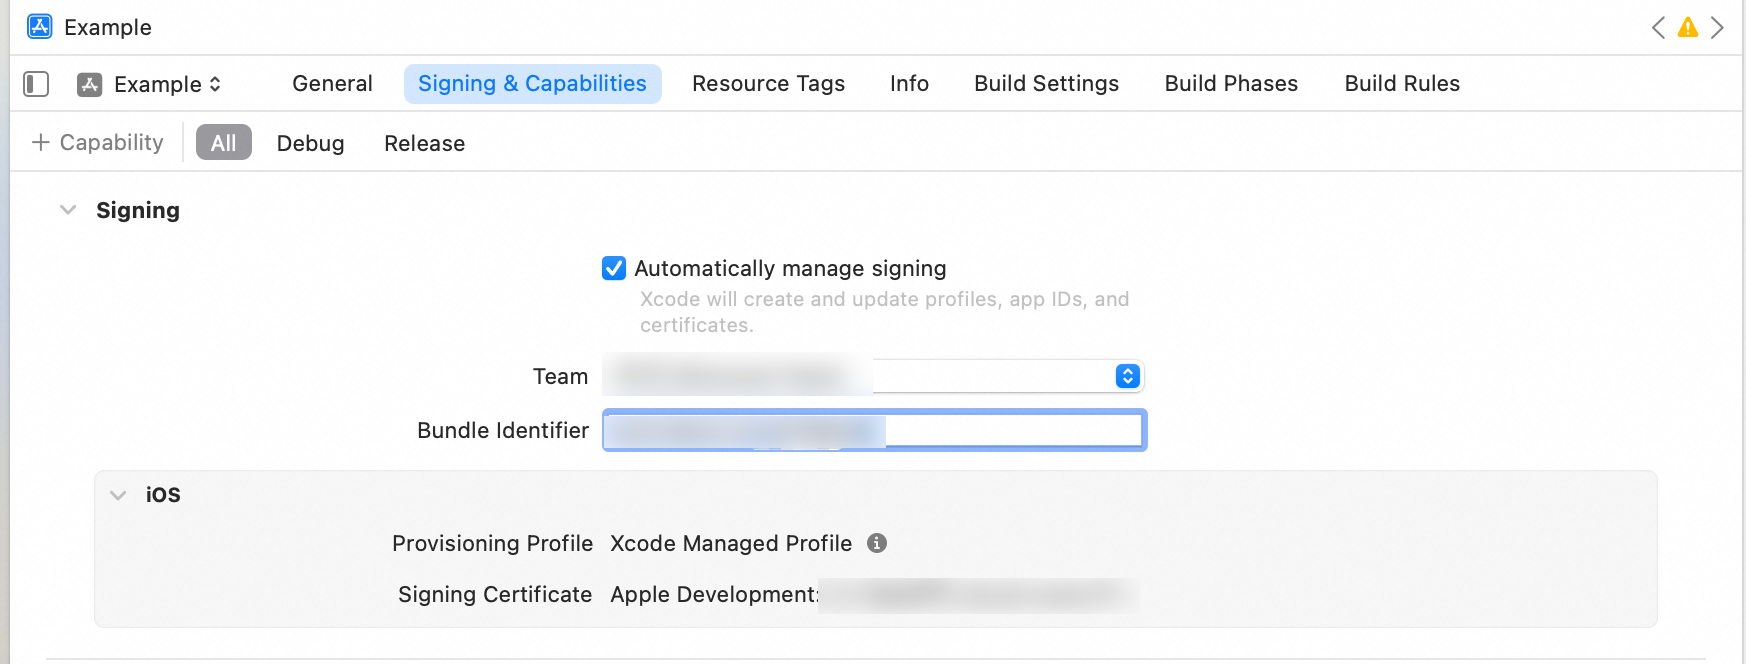
AlivcPlayerDemo.xcworkspace,在Signing & Capabilities中修改Team和Bundle Identifier。Team是使用者添加的開發人員Apple ID。
Bundle Identifier也就是包id。
將上述步驟中擷取的License授權認證放到
Example/AlivcPlayerDemo/目錄下,並修改檔案名稱為license.crt。並開啟Example/Info.plist檔案,在欄位AlivcLicenseKey的值中填寫在上述步驟中擷取的LicenseKey。在真機上編譯並運行Demo。
AUIShortVideoList組件需搭配VodAppServer(阿里雲VOD短劇管理後端)使用,提供內容管理、播放分發和鑒權控制功能。
用戶端與服務端協同實現全鏈路能力,無需自建後台即可快速搭建短劇業務體系,顯著降低成本並確保前後端體驗一致。
整合組件
以下是 AUIShortVideoList 組件的使用方法及其對外介面的詳細介紹,旨在實現短視頻列表播放功能。
整合準備
接入已授權播放器的音視頻終端SDK License。
具體操作,請參見接入License。
將AUIFoundation(AUI基礎組件)、AUIShortVideoList(短視頻列表基礎播放組件)、AUIPlayer.podspec(架構設定檔)三個模組拷貝到您專案工程中。
配置Podfile。
請根據您專案中實際存放依賴庫的相對路徑進行相應修改。更改Podfile檔案後請在Podfile相同目錄下執行
pod install --repo-update更新第三方庫依賴。重要播放器SDK及版本,建議使用最新版本,詳情見iOS SDK發布歷史。
# Pod Example install! 'cocoapods', :deterministic_uuids => false source 'https://github.com/CocoaPods/Specs.git' platform :ios, '9.0' target 'Your ProjectName' do # 選取的SDK類型 # TODO:在此行替換 'x.x.x' 為具體的版本號碼,詳細資料和版本號碼請參考上述文檔連結 pod 'AliPlayerSDK_iOS', '~> x.x.x' # 模組內依賴(可自訂版本,修改 AUIPlayer.podspec 檔案) pod "AUIPlayer/AliPlayerSDK_iOS", :path => "../" # 您可以根據自己的業務去調整使用的SDK,增加自己要使用的SDK;或者修改 AUIPlayer.podspec 中 AliPlayerSDK_iOS 版本 # pod "AUIPlayer/AliVCSDK_Standard", :path => "../" # AUI基礎組件(必需) pod "AUIFoundation/All", :path => "../AUIBaseKits/AUIFoundation" # 短劇列表播放組件 pod "AUIPlayer/AUIPlayerKits", :path => "../" # 可自訂第三方庫版本 pod 'SDWebImage', '5.18.1' end post_install do |installer| installer.pods_project.build_configurations.each do |config| config.build_settings['CLANG_WARN_DOCUMENTATION_COMMENTS'] = 'NO' config.build_settings['CLANG_WARN_QUOTED_INCLUDE_IN_FRAMEWORK_HEADER'] = 'NO' end end說明如果您專案中所使用的第三方庫版本與當前源碼依賴的版本存在衝突,請以專案中所使用的版本為準。
專案配置。
如果您的專案是Swift工程,並且需要使用Objective-C的第三方庫,您必須在專案的Build Settings中配置Bridging Header,以確保Swift能夠正確訪問並使用AUIShortVideoList模組中的Objective-C的介面。
設定Bridging Header。
在專案的 Build Settings 中找到 SWIFT_OBJC_BRIDGING_HEADER 設定,並將其指向您的橋接標頭檔。樣本路徑如下:
<YourProjectName>/<YourProjectName>-Bridge-Header.h引入Objective-C介面。
在橋接標頭檔中,確保引入需要暴露給 Swift 的 Objective-C 介面,樣本如下:
#import "AUIShortVideoList.h"您可以參考AUIShortVideoList模組中的AUIPlayer-Bridge-Header.h,擷取更多樣本和指導。
編譯與運行。
完成配置後,請編譯並運行專案,以確保AUIShortVideoList組件已被正確整合。
說明整合完成後,建議執行一次
git commit,提交記錄當前組件的最新 commit ID。這為將來的組件更新提供重要的追溯依據,也記錄了組件更新前後的代碼差異,有效把控整合准入品質。同時還可以在尋求支援人員時快速定位組件版本,從而提高支援人員的效率。整合問題詳見整合FAQ。
在完成AUIShortVideoList組件的整合準備後,您可以直接將以下代碼複製到專案中以進行使用。
使用方法
AUIShortVideoListViewController使用
以下提供兩種方式,來初始化和推送AUIShortVideoListViewController,以便快速實現功能運行:
使用UINavigationController進行跳轉。
Objective-C樣本
// 建立視頻資訊數組
NSArray<AUIShortVideoInfo *> *videoInfoList = [[NSArray alloc] init];
// 初始化 AUIShortVideoListViewController,傳入的視訊資料
AUIShortVideoListViewController *vc = [[AUIShortVideoListViewController alloc] initWithData:videoInfoList];
// 使用 UINavigationController 推送新視圖控制器
[self.navigationController pushViewController:vc animated:YES];
Swift樣本
// 建立視頻資訊數組 let info = Array<AUIShortVideoInfo>() // 添加資料來源 // 初始化 AUIShortVideoListViewController,傳入的視訊資料 let vc = AUIShortVideoListViewController(data: info) // 使用 UINavigationController 推送新視圖控制器 self.navigationController?.pushViewController(vc, animated: true)使用模態(Modal)跳轉。
Objective-C樣本
// 建立視頻資訊數組
NSArray<AUIShortVideoInfo *> *videoInfoList = [[NSArray alloc] init];
// 初始化 AUIShortVideoListViewController,傳入的視訊資料
AUIShortVideoListViewController *vc = [[AUIShortVideoListViewController alloc] initWithData:videoInfoList];
// 設定模態展示樣式(可選)
vc.modalPresentationStyle = UIModalPresentationFullScreen;
// 以模態方式展示新視圖控制器
[self presentViewController:vc animated:YES completion:nil];
Swift樣本
// 建立視頻資訊數組 let info = Array<AUIShortVideoInfo>() // 添加資料來源 // 初始化 AUIShortVideoListViewController,傳入的視訊資料 let vc = AUIShortVideoListViewController(data: info) // 設定模態展示樣式 vc.modalPresentationStyle = .fullScreen // 可選,根據需求設定樣式 // 以模態方式展示新視圖控制器 self.present(vc, animated: true, completion: nil)說明如果您選擇採用模態(Modal)方式進行頁面跳轉而不使用 UINavigationController,那麼可能需要調整內部的頁面跳轉邏輯,並自訂返迴路徑。這樣做是為了確保能夠順利地以模態形式開啟目標頁面。
您還可以通過實現AUIShortVideoDataProviderDelegate委託來註冊資料回調,從而自訂載入視頻資料。
UINavigationController 整合
在Xcode更新到11之後,新增了SceneDelegate;在iOS13之前,AppDelegate會處理App的生命週期和UI生命週期,但iOS13之後,AppDelegate不再處理UI生命週期了,只負責處理App的生命週期和新的 Scene Session生命週期,而UI的生命週期將由Scene Delegate處理。程式碼範例如下:
AppDelegate.m(適用於 iOS 13 之前)
#import "MyViewController.h"
#import "AlivcPlayerDemoConfig.h"
#import "AVTheme.h"

- (BOOL)application:(UIApplication *)application didFinishLaunchingWithOptions:(NSDictionary *)launchOptions {
    [UIApplication sharedApplication].statusBarStyle = UIStatusBarStyleLightContent;
    self.window = [[UIWindow alloc] initWithFrame:[UIScreen mainScreen].bounds];
    // Override point for customization after application launch.

    // 僅支援暗黑模式
    AVTheme.supportsAutoMode = NO;
    AVTheme.currentMode = AVThemeModeDark;

    // 建立根視圖控制器,可自訂
    MyViewController *mainViewController = [MyViewController new];
    // 使用封裝後的AVNavigationController
    AVNavigationController *nav =[[AVNavigationController alloc]initWithRootViewController:mainViewController];
    // 使用系統的UINavigationController
//  UINavigationController *nav = [[UINavigationController alloc]initWithRootViewController:mainViewController];
    [self.window setRootViewController:nav];
    [self.window makeKeyAndVisible];
    return YES;
}
SceneDelegate.m(適用於 iOS 13 之後)
#import "MyViewController.h" #import "AlivcPlayerDemoConfig.h" #import "AVTheme.h" - (void)scene:(UIScene *)scene willConnectToSession:(UISceneSession *)session options:(UISceneConnectionOptions *)connectionOptions { // Use this method to optionally configure and attach the UIWindow `window` to the provided UIWindowScene `scene`. // If using a storyboard, the `window` property will automatically be initialized and attached to the scene. // This delegate does not imply the connecting scene or session are new (see `application:configurationForConnectingSceneSession` instead). // Override point for customization after application launch. [UIApplication sharedApplication].statusBarStyle = UIStatusBarStyleLightContent; UIWindowScene *windowScene = (UIWindowScene *)scene; self.window = [[UIWindow alloc]initWithWindowScene:scene]; self.window.frame = windowScene.coordinateSpace.bounds; // 僅支援暗黑模式 AVTheme.supportsAutoMode = NO; AVTheme.currentMode = AVThemeModeDark; // 建立根視圖控制器 MyViewController *mainViewController = [MyViewController new]; AVNavigationController *nav =[[AVNavigationController alloc]initWithRootViewController:mainViewController]; // UINavigationController *nav = [[UINavigationController alloc]initWithRootViewController:mainViewController]; [self.window setRootViewController:nav]; [self.window makeKeyAndVisible]; }SceneDelegate.swift(適用於 iOS 13 之後)
func scene(_ scene: UIScene, willConnectTo session: UISceneSession, options connectionOptions: UIScene.ConnectionOptions) {
    UIApplication.shared.statusBarStyle = UIStatusBarStyle.darkContent;
    let windowScene = scene as! UIWindowScene;

    self.window = UIWindow(windowScene: windowScene);
    self.window?.frame = windowScene.coordinateSpace.bounds;

    let myViewController = MyViewController();

    let nav = AVNavigationController(rootViewController: myViewController );
    // 使用系統的 UINavigationController
    // let nav = UINavigationController(rootViewController: myViewController );

    self.window?.rootViewController = nav;
    self.window?.makeKeyAndVisible();
    guard let _ = (scene as? UIWindowScene) else { return }
}
擷取資料
資料結構
AUIShortVideoList 組件使用的資料結構為NSArray<AUIShortVideoInfo *>,其中AUIShortVideoInfo為儲存視頻資訊的資料類,其資料結構如下:
欄位 | 類型 | 釋義 | 備忘 |
videoId | int | 視頻唯一id | 用於唯一標識每一個視頻。 |
url | String | 視頻源地址 | 您可以自訂視頻源格式,如MP4/M3U8等。 |
coverUrl | String | 視頻封面圖 | |
author | String | 視頻作者 | |
title | String | 視頻標題 | |
type | String | 視頻類型 | 參考VideoType枚舉,視頻源或者廣告。 |
組件初始化
為了確保AUIShortVideoList組件正常運行,請在初始化AUIShortVideoListViewController 時,傳入 NSArray<AUIShortVideoInfo *>資料來源。以下是範例程式碼:
Objective-C樣本
// 在當前視圖控制器中建立視頻資訊數組並初始化控制器
NSArray<AUIShortVideoInfo *> *videoInfoList = [[NSArray alloc] init];
AUIShortVideoListViewController *vc = [[AUIShortVideoListViewController alloc] initWithData:videoInfoList];
// 使用 UINavigationController 推送新視圖控制器
[self.navigationController pushViewController:vc animated:YES];
Swift樣本
// 在當前視圖控制器中建立視頻資訊數組並初始化控制器
let info = [AUIShortVideoInfo]() // 添加資料來源
let vc = AUIShortVideoListViewController(data: info)
// 使用 UINavigationController 推送新視圖控制器
self.navigationController?.pushViewController(vc, animated: true)
自訂資料載入
除了直接傳遞資料數組,您也可以通過實現AUIShortVideoDataProviderDelegate協議來自訂資料載入:
通過代理初始化組件(建議在初始化時實現資料代理)
Objective-C樣本
// 在當前視圖控制器中初始化控制器,傳入資料提供者
AUIShortVideoListViewController *videoListVC = [[AUIShortVideoListViewController alloc] initWithDataProvider:self];
// 使用 UINavigationController 推送新視圖控制器
[self.navigationController pushViewController:videoListVC animated:YES];
Swift樣本
// 在當前視圖控制器中初始化控制器,傳入資料提供者
let videoListVC = AUIShortVideoListViewController(dataProvider: self)
// 使用 UINavigationController 推送新視圖控制器
self.navigationController?.pushViewController(videoListVC, animated: true)
實現AUIShortVideoDataProviderDelegate協議,以自訂資料載入和重新整理:
@protocol AUIShortVideoDataProviderDelegate <NSObject>
@required
- (void)loadData:(id _Nullable)controller; //載入資料
@optional
- (void)refreshData:(id _Nullable)controller;//重新整理資料(可選)
@end
更新資料列表
當擷取到視頻資料後,使用以下介面更新ViewController中的資料列表:
追加資料
/**
* @brief 將新的視頻資料追加到當前視頻列表中。
*
* @param videoInfoList 新的視頻資料列表,可以為空白。
*                      當提供的資料列表不為空白時,這些資料將被追加到現有的視頻列表的末尾。
*                      如果提供為空白的資料列表,則不對當前列表進行任何修改。
*/
- (void)appendVideoInfoList:(NSArray<AUIShortVideoInfo *> * _Nullable)videoInfoList;
重設資料
/**
* @brief 重設當前的視頻列表為指定的新視頻資料列表。
*
* @param videoInfoList 新的視頻資料列表,可以為空白。
*                      將當前的視頻列表替換為提供的資料列表。
*                      如果提供為空白的資料列表,將清空當前視頻列表。
*/
- (void)resetVideoInfoList:(NSArray<AUIShortVideoInfo *> * _Nullable)videoInfoList;
擷取資料樣本
您可以通過網路請求和資料轉換兩種方式來擷取NSArray<AUIShortVideoInfo *>資料來源,樣本如下:
網路請求
Objective-C樣本
//請求額外資料 AUIShortVideoListConstants.defaultVideoInfoListURL 為請求URL ,您可以嘗試將其替換為自己的請求地址URL
- (void)loadData:(id)controller {
    __weak typeof(self) weakSelf = self;  // 弱引用 self
    [AUIShortVideoListDataManager requestVideoInfoList:AUIShortVideoListConstants.defaultVideoInfoListURL completed:^(NSArray<AUIShortVideoInfo *> * _Nullable data, NSError * _Nullable error) {
        if (error) {
            __strong typeof(weakSelf) strongSelf = weakSelf; // 強引用 self
            [AVToastView show:[NSString stringWithFormat:@"Unable to retrieve short video list, error: %@", error.localizedDescription]
                        view:strongSelf.view
                    position:AVToastViewPositionMid];
            return;
        }

        // 調用相應子視圖控制器的 appendVideoInfoList: 方法
        if (controller && [controller respondsToSelector:@selector(appendVideoInfoList:)]) {
            [controller appendVideoInfoList:data];
        }
    }];
}
Swift樣本
// 請求額外資料 AUIShortVideoListConstants.defaultVideoInfoListURL 為請求URL ,您可以嘗試將其替換為自己的請求地址URL
func loadData(_ controller: Any?) {
    weak var weakSelf = self  // Weak reference to self
    AUIShortVideoListDataManager.requestVideoInfoList(AUIShortVideoListConstants.defaultVideoInfoListURL) { (data: [AUIShortVideoInfo]?, error: Error?) in
        if let error = error {
            guard let strongSelf = weakSelf else { return } // Strong reference to self
            AVToastView.show("Unable to retrieve short video list, error: \(error.localizedDescription)", view: strongSelf.view, position: .mid)
            return
        }

        if let myController = controller as? AUIShortVideoListViewController {
            // 成功轉型,使用 myController
            if  myController.responds(to: #selector(myController.appendVideoInfoList(_:))) {
                myController.appendVideoInfoList(data)
            }
        }
    }
}
資料轉換
Objective-C樣本
// 將字典數群組轉換為視頻資訊模型數組
NSArray<NSDictionary *> *responseArray = (NSArray<NSDictionary *> *)responseObject;
NSMutableArray<AUIShortVideoInfo *> *videoInfoArray = [NSMutableArray arrayWithCapacity:responseArray.count];
for (NSDictionary *dict in responseArray) {
    // 初始化 AUIShortVideoInfo 模型對象並添加到數組中
    AUIShortVideoInfo *videoInfo = [[AUIShortVideoInfo alloc] initWithDict:dict];
    [videoInfoArray addObject:videoInfo];
}
Swift樣本
let responseArray = responseObject as? [[AnyHashable : Any]]
var videoInfoArray = [AnyHashable](repeating: 0, count: responseArray?.count ?? 0) as? [AUIShortVideoInfo]
for dict in responseArray ?? [:] {
    guard let dict = dict as? [AnyHashable : Any] else {
            continue
    }
    // 初始化 AUIShortVideoInfo 模型對象並添加到數組中
    let videoInfo = AUIShortVideoInfo(dict: dict)
    videoInfoArray?.append(videoInfo)
}
整合FAQ
播放黑屏等異常情況
請檢查您的SDK License配置,詳情請參見接入License。
錯誤“Sandbox: rsync.samba(56557) deny(1) file-read-data”
配置Build Setting中的User Script Sandboxing為NO。
編譯運行出現報錯
如果您的專案中已包含相同的第三方庫,請調整AUIPlayer.podspec檔案中該第三方庫的版本,以確保相容性並避免發生衝突。
找不到第三方依賴
如果您在修改完Podfile之後找不到第三方依賴,請在 PodFile 所在目錄下,執行 pod install --repo-update。
依賴整合很慢
如果您的依賴整合很慢,可以在Podfile配置阿里雲Pod倉庫,解決第三方庫整合慢的問題。樣本如下:
source 'https://github.com/CocoaPods/Specs.git'
source 'https://github.com/aliyun/aliyun-specs.git'
播放器切換版本
如果您不想使用 AUIPlayer.podspec 裡面的播放器依賴,可以參考iOS播放器SDK-快速整合。
搭建情境
AUIShortVideoList組件支援低代碼整合,適用於多種情境。您可以基於此組件構建短視頻列表的情境化功能。請參考AUIPlayerScenes中的樣本,例如AUIShortPlaylistTheater(短劇劇場情境化模組)和 AUIShortPlaylistFeeds(短劇Feeds流情境化模組)。
短劇劇場情境
概述
AUIShortPlaylistTheater是短劇劇場情境化模組,基於AUIShortVideoList組件實現。模組提供了劇場詳情頁和推薦頁,並且支援一二級頁面嵌套和播放器執行個體共用。
情境整合
在進行短劇劇場情境搭建之前,請確保已完成AUIShortVideoList組件的整合準備。
將AUIShortPlaylistTheater模組拷貝到專案工程中。
配置Podfile。
在專案的Podfile中添加對AUIShortPlaylistTheater模組的引用和依賴。樣本配置如下:
# Pod Example
install! 'cocoapods', :deterministic_uuids => false
source 'https://github.com/CocoaPods/Specs.git'

platform :ios, '9.0'

target 'Your ProjectName' do

  # 短劇情境(包含劇場/Feed流)兩個模組,可單獨整合。
  pod "AUIPlayer/AUIPlayerScenes", :path => "../"
  # 短劇劇場情境
#  pod "AUIPlayer/AUIPlayerScenes/AUIShortPlaylistTheater", :path => "../"

end

post_install do |installer|
  installer.pods_project.build_configurations.each do |config|
      config.build_settings['CLANG_WARN_DOCUMENTATION_COMMENTS'] = 'NO'
      config.build_settings['CLANG_WARN_QUOTED_INCLUDE_IN_FRAMEWORK_HEADER'] = 'NO'
  end
end
請根據您專案中實際存放依賴庫的路徑進行相應修改。
說明如果您專案中所使用的第三方庫版本與AUIShortPlaylistTheater源碼依賴的版本存在衝突,請以專案中所使用的版本為準。
專案配置。
如果您的專案是Swift工程,並且需要使用Objective-C的第三方庫,您必須在專案的Build Settings中配置Bridging Header,以確保Swift能夠正確訪問並使用AUIShortPlaylistTheater模組中的Objective-C的介面。
設定Bridging Header。
在專案的 Build Settings 中找到 SWIFT_OBJC_BRIDGING_HEADER 設定,並將其指向您的橋接標頭檔。樣本路徑如下:
<YourProjectName>/<YourProjectName>-Bridge-Header.h引入Objective-C介面。
在橋接標頭檔中,確保引入需要暴露給 Swift 的 Objective-C 介面,樣本如下:
#import "AUIShortPlaylistTheater.h"您可以參考AUIShortVideoList模組中的AUIPlayer-Bridge-Header.h檔案,擷取更多樣本和指導。
編譯與運行。
完成配置後,請編譯並運行專案,以確保AUIShortPlaylistTheater組件已被正確整合。
使用方法
您可以將短劇劇場ViewController頁面直接提供給外部進行跳轉,具體調用邏輯可參考以下樣本。
Objective-C樣本
- (void)openShortDramaList {
    AUIShortTheaterViewController *vc = [[AUIShortTheaterViewController alloc] init];
    [self.navigationController pushViewController:vc animated:YES];
}
Swift樣本
func openShortDramaList() {
    let vc = AUIShortTheaterViewController()
    navigationController?.pushViewController(vc, animated: true)
}
擷取資料
AUIShortPlaylistTheater 模組使用的資料結構為NSMutableArray<AUIShortPlaylistInfo *>,其中 AUIShortPlaylistInfo 為儲存短劇集的資料類,其資料結構如下:
欄位 | 類型 | 釋義 | 備忘 |
playlistId | NSInteger | 集唯一標識 ID | |
playlistName | NSString * | 集標題 | |
playlistCoverUrl | NSString * | 集封面 | |
count | NSNumber * | 集總數 | |
playlistVideos | NSMutableArray<AUIShortVideoInfo *> * | 集列表 | 可作為 AUIShortVideoList 模組的資料來源 |
您可以通過網路請求或資料轉換這兩種方式,擷取最終的NSMutableArray<AUIShortPlaylistInfo *>資料來源:
AUIShortTheaterViewController代碼中提供了擷取資料的程式碼範例。該類實現了 AUIShortVideoDataProviderDelegate資料請求代理介面,提供了以下兩種主要方法:
@protocol AUIShortVideoDataProviderDelegate <NSObject>
@required
- (void)loadData:(id _Nullable)controller; //載入資料
@optional
- (void)refreshData:(id _Nullable)controller; // 重新整理資料(可選)
@end
通過AUIShortTheaterDataManager中提供的requestPlayListInfoList方法進行網路請求,以擷取最終的
NSMutableArray<AUIShortPlaylistInfo *>資料來源。擷取的資料會儲存在內部的playListInfoList對象中,用於後續的視圖展示和處理。
短劇Feeds流情境
概述
AUIShortPlaylistFeeds是短劇 Feeds 流情境化模組,基於AUIShortVideoList組件實現。模組提供了Feeds流TAB頁,支援TAB頁嵌套以及上下左右滑動播放,實現了播放器執行個體共用。
情境整合
在進行短劇 Feeds 流情境搭建之前,請確保已完成AUIFoundation基礎組件和AUIShortVideoList組件的整合準備。
將AUIShortPlaylistFeeds模組拷貝到您專案工程中。
配置Podfile。
在專案的Podfile中添加對AUIShortPlaylistFeeds模組的引用和依賴。樣本配置如下:
# Pod Example
install! 'cocoapods', :deterministic_uuids => false
source 'https://github.com/CocoaPods/Specs.git'

platform :ios, '9.0'

target 'Your ProjectName' do

  # 短劇情境(包含劇場/Feed流)兩個模組,可單獨整合。
  pod "AUIPlayer/AUIPlayerScenes", :path => "../"
  # 短劇Feeds流情境
#  pod "AUIPlayer/AUIPlayerScenes/AUIShortPlaylistFeeds", :path => "../"

end

post_install do |installer|
  installer.pods_project.build_configurations.each do |config|
      config.build_settings['CLANG_WARN_DOCUMENTATION_COMMENTS'] = 'NO'
      config.build_settings['CLANG_WARN_QUOTED_INCLUDE_IN_FRAMEWORK_HEADER'] = 'NO'
  end
end
請根據您專案中實際存放依賴庫的路徑進行相應修改。
說明如果您專案中所使用的第三方庫版本與AUIShortPlaylistFeeds源碼依賴的版本存在衝突,請以專案中所使用的版本為準。
專案配置。
如果您的專案是Swift工程,並且需要使用Objective-C的第三方庫,您必須在專案的Build Settings中配置Bridging Header,以確保Swift能夠正確訪問並使用AUIShortPlaylistFeeds模組中的Objective-C的介面。
設定Bridging Header。
在專案的 Build Settings 中找到 SWIFT_OBJC_BRIDGING_HEADER 設定,並將其指向您的橋接標頭檔。樣本路徑如下:
<YourProjectName>/<YourProjectName>-Bridge-Header.h引入Objective-C介面。
在橋接標頭檔中,確保引入需要暴露給 Swift 的 Objective-C 介面,樣本如下:
#import "AUIShortPlaylistFeeds.h"您可以參考AUIShortVideoList模組中的AUIPlayer-Bridge-Header.h檔案,擷取更多樣本和指導。
編譯與運行。
完成配置後,請編譯並運行專案,以確保AUIShortPlaylistFeeds組件已被正確整合。
使用方法
您可以將短劇Feeds流ViewController頁面直接提供給外部進行跳轉,具體調用邏輯可參考以下樣本。
Objective-C樣本
- (void)openShortDramaFeeds {
    AUIShortPlaylistFeedsViewController *vc = [[AUIShortPlaylistFeedsViewController alloc] init];
    [self.navigationController pushViewController:vc animated:YES];
}
Swift樣本
func openShortDramaFeeds() {
    let vc = AUIShortPlaylistFeedsViewController()
    navigationController?.pushViewController(vc, animated: true)
}
擷取資料
AUIShortPlaylistFeeds 模組使用的資料結構為NSArray<AUIShortVideoInfo *>,其中 AUIShortVideoInfo 為儲存視頻資訊的資料類該數組包含多個 AUIShortVideoInfo 執行個體,每個執行個體代表一個視頻的資訊。如需瞭解更詳細的內容,建議查閱 AUIShortVideoList 組件的完整文檔。
核心功能介紹
本組件功能使用阿里雲播放器SDK,通過多個播放器執行個體(AliPlayer)+ 預先載入(MediaLoader)+ 預渲染的方式進行實現,使用了預先載入、預渲染、HTTPDNS、加密播放等核心能力,在播放延遲、播放穩定性及安全性方面大幅提升觀看體驗。具體介紹參考進階功能。
預先載入
通過滑動視窗策略,動態啟停視頻的預先載入任務。SDK底層基於網路狀態智能調節任務優先順序,以確保正播放視頻和即將播放視頻可以獲得更多的網路資源,顯著提升視頻秒開率,減少播放卡頓。即使在快速滑動視頻時,仍然可以獲得流暢的播放體驗。更多資訊,請參見預先載入。
預渲染
使用預渲染的方式,在後台提前渲染後續視頻的首幀,減少黑屏的出現,讓播放更加絲滑。音視頻終端 SDK和播放器SDK從6.16.0版本開始增添了對強制預渲染功能的支援。更多資訊,請參見預渲染。
多執行個體播放器池
實現了全域共用的播放器執行個體池,可以靈活配置執行個體數。通過最佳化 API 呼叫和線程資源管控,確保線上程管理、CPU利用、記憶體佔用等方面達到效能最優、資源最省,使效能和體驗達到最佳平衡。通過效能最佳化,減少了滑動過程中的耗時操作,降低滑動卡頓,讓播放體驗更加絲滑。
小窗播放自動切集
通過全域PiPVC+DisplayLayer技術,確保小窗切集時渲染連續,執行個體切換無中斷,實現無縫、無感、不中斷的體驗。該實現是小窗播放(畫中畫能力)最佳實務的工程化落地。
HTTPDNS
HTTPDNS可以提供更快速和穩定的DNS解析服務,通過替換傳統DNS解析,可以減少DNS解析時間,提高視頻播放的載入速度和穩定性,從而提升使用者的觀看體驗。音視頻終端SDK和播放器SDK從6.12.0版本開始無需手動開啟HTTPDNS。更多資訊,請參見HTTPDNS。
視頻加密
微短劇情境的視頻通常為1~3分鐘的MP4格式視頻,音視頻終端SDK和播放器SDK從6.8.0版本開始支援MP4私人加密播放能力,為微短劇情境的視頻提供安全保障支撐。更多資訊,請參見阿里雲視頻加密(私人加密)。
經私人加密的MP4格式視頻,需滿足以下條件,才可正常播放:
經私人加密的MP4視頻傳給播放器播放時,業務側(App側)需要為視頻URL追加
etavirp_nuyila=1,例如:原視頻URL為https://example.aliyundoc.com/test.mp4,則需要傳給播放器播放的視頻URL為https://example.aliyundoc.com/test.mp4?etavirp_nuyila=1。App的License對應的uid與產生私人加密MP4的uid是一致的。
如何校正私人加密視頻是否正確,以私人加密的視頻URL為例說明如下:
meta資訊裡面應帶有
AliyunPrivateKeyUri的tag。ffplay不能直接播放。
H265自適應播放
當播放H265流硬解失敗且已設定H264備流時,實現自動降級播放H264備流;若未設定H264備流,則自動降級為H265軟解播放。更多資訊,請參見H265自適應播放。
自適應ABR
播放器SDK支援多碼率自適應HLS、DASH視頻流,通過調用播放器的selectTrack方法切換播放的碼流,可以實現網路自適應切換視訊清晰度的功能。更多資訊,請參見自網路自適應切換。