PolarDB MySQL版的Orca功能相容Redis協議,允許您使用主流的Redis用戶端串連資料庫。本文將引導您完成串連前的準備工作,並提供多種常見程式設計語言的用戶端串連程式碼範例。
準備工作
在嘗試串連Orca功能前,請確保您已完成以下準備工作:
注意事項
-
認證機制差異:Orca功能與原生Redis在認證機制上存在差異。Orca沒有預設使用者,所有串連都需使用您在控制台上建立的Orca帳號進行認證。
-
AUTH命令相容性:為相容部分只支援密碼認證的用戶端,Orca的
AUTH命令支援兩種格式。在配置用戶端時,請根據用戶端的能力選擇合適的認證方式。-
AUTH <username> <password>:標準格式,分別提供使用者名稱和密碼。 -
AUTH <username>:<password>:相容格式,將使用者名稱和密碼用冒號:拼接後,作為一個整體作為密碼(password)參數傳入。
-
-
HELLO命令相容性:與
AUTH命令類似,HELLO命令中的認證部分也支援上述兩種格式。-
HELLO <protover> AUTH <username> <password> -
HELLO <protover> AUTH <username>:<password>
-
通過redis-cli串連
-
安裝redis-cli:您可以參考安裝redis-cli教程,在您的用戶端裝置上進行安裝。
-
串連Orca功能:執行以下命令,將命令中的串連地址和連接埠替換為您的實際資訊。
redis-cli -h pz-****************.rwlb.rds.aliyuncs.com -p 6379 -
進行身份認證:串連成功後,使用
AUTH命令進行認證。以下兩種格式均可,請替換為您的Orca帳號和密碼。# 格式一:分別提供使用者名稱和密碼 AUTH orca_user orca_password # 格式二:將使用者名稱和密碼拼接後作為密碼提供 AUTH orca_user:orca_password如果返回
OK,表示串連和認證均成功。
通過各語言用戶端串連
您可以根據應用程式的開發語言,參考以下樣本進行串連。
Java(Jedis)
-
添加依賴配置(Maven):
<dependency> <groupId>redis.clients</groupId> <artifactId>jedis</artifactId> <version>4.3.0</version> </dependency> -
程式碼範例:為相容Jedis只接受一個密碼參數的設定,需使用
username:password的格式。import redis.clients.jedis.Jedis; import redis.clients.jedis.JedisPool; import redis.clients.jedis.JedisPoolConfig; public class JedisExample { public static void main(String[] args) { JedisPoolConfig poolConfig = new JedisPoolConfig(); // Orca串連資訊 String host = "pz-****************.rwlb.rds.aliyuncs.com"; // 替換為您的Orca串連地址 int port = 6379; String username = "orca_user"; // 替換為您的Orca使用者名稱 String password = "orca_password"; // 替換為您的Orca密碼 // Jedis認證需要將使用者名稱和密碼拼接 String authPassword = username + ":" + password; JedisPool pool = new JedisPool(poolConfig, host, port, 3000, authPassword); try (Jedis jedis = pool.getResource()) { jedis.set("name", "jedis"); System.out.println(jedis.get("name")); } catch (Exception e) { e.printStackTrace(); } finally { pool.destroy(); } } }
Java(Lettuce)
-
添加依賴配置(Maven):
<dependency> <groupId>io.lettuce</groupId> <artifactId>lettuce-core</artifactId> <version>6.3.0.RELEASE</version> </dependency> <dependency> <groupId>io.netty</groupId> <artifactId>netty-transport-native-epoll</artifactId> <version>4.1.100.Final</version> <classifier>linux-x86_64</classifier> </dependency> -
程式碼範例:Lettuce支援分別設定使用者名稱和密碼,推薦使用此方式。
import io.lettuce.core.RedisClient;
import io.lettuce.core.RedisURI;
import io.lettuce.core.api.StatefulRedisConnection;
import io.lettuce.core.api.sync.RedisCommands;
public class LettuceExample {
    public static void main(String[] args) {
        // Orca串連資訊
        String host = "pz-****************.rwlb.rds.aliyuncs.com"; // 替換為您的Orca串連地址
        int port = 6379;
        String username = "orca_user"; // 替換為您的Orca使用者名稱
        String password = "orca_password"; // 替換為您的Orca密碼
        // Lettuce支援分別設定使用者名稱和密碼
        RedisURI uri = RedisURI.Builder
                .redis(host, port)
                .withAuthentication(username, password)
                .build();
        RedisClient redisClient = RedisClient.create(uri);
        StatefulRedisConnection<String, String> connection = redisClient.connect();
        RedisCommands<String, String> syncCommands = connection.sync();
        syncCommands.set("name", "Lettuce");
        String value = syncCommands.get("name");
        // 輸出: Lettuce
        System.out.println("Get value: " + value);
        connection.close();
        redisClient.shutdown();
    }
}
Java(Spring Data Redis)
-
添加依賴配置(Maven):
<!-- Spring Boot父專案,統一管理版本 --> <parent> <groupId>org.springframework.boot</groupId> <artifactId>spring-boot-starter-parent</artifactId> <version>2.7.18</version> <!-- 建議使用一個較新的穩定版本 --> <relativePath/> </parent> <!-- 其他配置項... --> <dependencies> <dependency> <groupId>org.springframework.boot</groupId> <artifactId>spring-boot-starter-data-redis</artifactId> </dependency> <dependency> <groupId>redis.clients</groupId> <artifactId>jedis</artifactId> </dependency> <dependency> <groupId>org.slf4j</groupId> <artifactId>slf4j-simple</artifactId> <version>1.7.36</version> </dependency> </dependencies> <build> <plugins> <!-- Spring Boot Maven外掛程式,用於打包和運行 --> <plugin> <groupId>org.springframework.boot</groupId> <artifactId>spring-boot-maven-plugin</artifactId> </plugin> </plugins> </build> -
程式碼範例:您可以選擇以下任一方式進行配置資訊與串連Orca。
通過
application.yml配置Spring Boot 2.x及以上版本支援在
application.yml中分別指定使用者名稱和密碼,這是推薦的方式。-
專案檔結構如下:
test_redis/ ├── pom.xml └── src/ └── main/ ├── java/ │ └── com/ │ └── example/ │ ├── MainApplication.java │ └── RedisTestRunner.java └── resources/ └── application.yml -
配置
application.yml:在src/main/resources/目錄下建立application.yml檔案。這裡是存放所有配置資訊的地方。spring: redis: host: pz-****************.rwlb.rds.aliyuncs.com # 替換為您的Orca串連地址 port: 6379 username: orca_user # 替換為您的Orca使用者名稱 password: orca_password # 替換為您的Orca密碼 database: 0 jedis: pool: max-active: 30 max-idle: 20 min-idle: 5 max-wait: -1ms -
建立主啟動類
MainApplication.java:這是Spring Boot程式的入口。package com.example; import org.springframework.boot.SpringApplication; import org.springframework.boot.autoconfigure.SpringBootApplication; @SpringBootApplication public class MainApplication { public static void main(String[] args) { SpringApplication.run(MainApplication.class, args); } } -
建立測試類別
RedisTestRunner.java:這個類會在Spring Boot應用啟動後自動運行,執行Redis的讀寫操作並列印結果。package com.example; import org.springframework.beans.factory.annotation.Autowired; import org.springframework.boot.CommandLineRunner; import org.springframework.data.redis.core.StringRedisTemplate; import org.springframework.stereotype.Component; @Component public class RedisTestRunner implements CommandLineRunner { @Autowired private StringRedisTemplate stringRedisTemplate; @Override public void run(String... args) throws Exception { System.out.println("=== Starting Redis test with Spring Data Redis ==="); try { // 定義一個索引值對 String key = "name"; String value = "spring-data-redis"; // 1. 執行 SET 命令 stringRedisTemplate.opsForValue().set(key, value); System.out.println("SET " + key + " = " + value); // 2. 執行 GET 命令 String retrievedValue = stringRedisTemplate.opsForValue().get(key); System.out.println("GET " + key + " = " + retrievedValue); // 3. 驗證結果 if (value.equals(retrievedValue)) { System.out.println("Test successful!"); } else { System.out.println("Test failed! Retrieved value does not match."); } } catch (Exception e) { System.err.println("Redis operation failed: " + e.getMessage()); e.printStackTrace(); } System.out.println("=== Redis test completed ==="); } }
通過Java Config配置
如果您的Spring版本較低或有自訂需求,可以使用Java配置類。由於底層使用Jedis,認證時仍需拼接使用者名稱和密碼。
-
專案檔結構如下:
test_redis/ ├── pom.xml └── src/ └── main/ ├── java/ │ └── com/ │ └── example/ │ ├── config/ │ │ └── RedisConfig.java <-- 核心配置類 │ ├── MainApplication.java │ └── RedisTestRunner.java └── resources/ └── application.yml <-- 這個檔案可以刪除或留空 -
建立核心配置類
RedisConfig.java:在這個類中,手動建立一個RedisConnectionFactory的執行個體(Bean),並提供所有串連細節。Spring Boot會自動檢測到這個Bean,並用它來配置所有Redis相關的操作(比如StringRedisTemplate)。package com.example.config; import org.springframework.context.annotation.Bean; import org.springframework.context.annotation.Configuration; import org.springframework.data.redis.connection.RedisConnectionFactory; import org.springframework.data.redis.connection.RedisStandaloneConfiguration; import org.springframework.data.redis.connection.lettuce.LettuceConnectionFactory; @Configuration public class RedisConfig { @Bean public RedisConnectionFactory redisConnectionFactory() { // 1. 建立獨立的Redis配置 RedisStandaloneConfiguration redisConfig = new RedisStandaloneConfiguration(); // 2. 設定Orca的串連資訊 // 替換為您的Orca串連地址 redisConfig.setHostName("pz-****************.rwlb.rds.aliyuncs.com"); // Orca連接埠,預設為6379 redisConfig.setPort(6379); // 替換為您的Orca使用者名稱 redisConfig.setUsername("orca_user"); // 替換為您的Orca密碼 redisConfig.setPassword("orca_password"); // 3. 使用Lettuce作為用戶端,並應用上面的配置 LettuceConnectionFactory lettuceFactory = new LettuceConnectionFactory(redisConfig); // 可選:如果不調用afterPropertiesSet,Spring容器在初始化bean時會自動調用。 // lettuceFactory.afterPropertiesSet(); // 4. 返回配置好的串連工廠執行個體 return lettuceFactory; } } -
建立主啟動類
MainApplication.java:這是Spring Boot程式的入口。package com.example; import org.springframework.boot.SpringApplication; import org.springframework.boot.autoconfigure.SpringBootApplication; @SpringBootApplication public class MainApplication { public static void main(String[] args) { SpringApplication.run(MainApplication.class, args); } } -
建立測試類別
RedisTestRunner.java:這個類會在Spring Boot應用啟動後自動運行,執行Redis的讀寫操作並列印結果。 package com.example; import org.springframework.beans.factory.annotation.Autowired; import org.springframework.boot.CommandLineRunner; import org.springframework.data.redis.core.StringRedisTemplate; import org.springframework.stereotype.Component; @Component public class RedisTestRunner implements CommandLineRunner { @Autowired private StringRedisTemplate stringRedisTemplate; @Override public void run(String... args) throws Exception { System.out.println("=== Starting Redis test with Spring Data Redis ==="); try { // 定義一個索引值對 String key = "name"; String value = "spring-data-redis"; // 1. 執行 SET 命令 stringRedisTemplate.opsForValue().set(key, value); System.out.println("SET " + key + " = " + value); // 2. 執行 GET 命令 String retrievedValue = stringRedisTemplate.opsForValue().get(key); System.out.println("GET " + key + " = " + retrievedValue); // 3. 驗證結果 if (value.equals(retrievedValue)) { System.out.println("Test successful!"); } else { System.out.println("Test failed! Retrieved value does not match."); } } catch (Exception e) { System.err.println("Redis operation failed: " + e.getMessage()); e.printStackTrace(); } System.out.println("=== Redis test completed ==="); } }
-
Python(redis-py)
-
安裝依賴:
pip install redis -
程式碼範例:
redis-py從4.2版本開始支援獨立的username參數。如果使用舊版本,請使用username:password的格式作為password參數。import redis # Orca串連資訊 host = 'pz-****************.rwlb.rds.aliyuncs.com' # 替換為您的Orca串連地址 port = 6379 username = 'orca_user' # 替換為您的Orca使用者名稱 password = 'orca_password' # 替換為您的Orca密碼 # 推薦方式 (redis-py >= 4.2) r = redis.Redis(host=host, port=port, username=username, password=password) # 相容舊版本方式 # auth_password = f'{username}:{password}' # r = redis.Redis(host=host, port=port, password=auth_password) r.set('name', 'redis-py') print(r.get('name').decode('utf-8')) r.close()
Go(go-redis)
-
安裝依賴:
go get github.com/go-redis/redis/v8 -
程式碼範例:
go-redis支援獨立的Username欄位,推薦使用。如果用戶端版本較舊,請使用username:password作為Password欄位的值。package main import ( "context" "fmt" "github.com/go-redis/redis/v8" ) var ctx = context.Background() func main() { client := redis.NewClient(&redis.Options{ Addr: "pz-****************.rwlb.rds.aliyuncs.com:6379", // 替換為您的Orca地址和連接埠 Username: "orca_user", // 替換為您的Orca使用者名稱 Password: "orca_password", // 替換為您的Orca密碼 DB: 0, }) err := client.Set(ctx, "name", "go-redis", 0).Err() if err != nil { panic(err) } val, err := client.Get(ctx, "name").Result() if err != nil { panic(err) } fmt.Println("Get value:", val) }
Node.js(node-redis)
-
安裝依賴:
npm install redis -
程式碼範例:
node-redis支援在串連URL中包含認證資訊。import { createClient } from 'redis'; // Orca串連資訊 const host = 'pz-****************.rwlb.rds.aliyuncs.com'; // 替換為您的Orca串連地址 const port = 6379; const username = 'orca_user'; // 替換為您的Orca使用者名稱 const password = 'orca_password'; // 替換為您的Orca密碼 const client = createClient({ url: `redis://${username}:${encodeURIComponent(password)}@${host}:${port}/0` }); client.on('error', (err) => console.error('Redis Client Error:', err)); async function runExample() { try { await client.connect(); await client.set('name', 'node-redis'); const value = await client.get('name'); console.log('get name:', value); } finally { await client.disconnect(); } } runExample();
PHP(PhpRedis)
-
安裝依賴:通常通過包管理器安裝,例如在CentOS上:
sudo yum install php-redis -
程式碼範例:
PhpRedis擴充的auth方法支援傳入包含使用者名稱和密碼的數組。<?php $redis = new Redis(); // Orca串連資訊 $host = 'pz-****************.rwlb.rds.aliyuncs.com'; // 替換為您的Orca串連地址 $port = 6379; $user = 'orca_user'; // 替換為您的Orca使用者名稱 $password = 'orca_password'; // 替換為您的Orca密碼 if ($redis->connect($host, $port) === false) { die($redis->getLastError()); } // 使用包含使用者名稱和密碼的數組進行認證 if ($redis->auth([$user, $password]) === false) { die($redis->getLastError()); } $redis->set("name", "php-redis"); echo $redis->get("name"); $redis->close(); ?>
C (Hiredis)
-
安裝依賴:從源碼編譯安裝。
git clone https://github.com/redis/hiredis.git cd hiredis make && sudo make install -
程式碼範例:使用
redisCommand執行AUTH命令,可以採用username:password的拼接格式。#include <stdio.h> #include <stdlib.h> #include <string.h> #include <hiredis.h> int main() { // Orca 串連參數 const char *hostname = "********.rwlb.rds.aliyuncs.com"; // 替換為您的Orca串連地址 int port = 6379; // 將使用者名稱和密碼分開定義,便於使用 const char *username = "orca_user"; // 替換為您的Orca使用者名稱 const char *password = "orca_password"; // 替換為您的Orca密碼 redisContext *c; redisReply *reply; // 1. 串連 Redis (建議使用帶逾時的串連) struct timeval timeout = { 2, 0 }; // 2秒逾時 c = redisConnectWithTimeout(hostname, port, timeout); if (c == NULL || c->err) { if (c) { printf("Connection error: %s\n", c->errstr); redisFree(c); } else { printf("Can't allocate redis context\n"); } exit(1); } // 2. 認證 (修正部分) // 使用 "AUTH <username> <password>" 格式 reply = redisCommand(c, "AUTH %s %s", username, password); if (reply == NULL) { // 如果 reply 為 NULL,說明IO錯誤,檢查 c->errstr printf("AUTH command failed: %s\n", c->errstr); redisFree(c); exit(1); } // 檢查 reply 本身是否是錯誤類型 if (reply->type == REDIS_REPLY_ERROR) { printf("Authentication failed: %s\n", reply->str); freeReplyObject(reply); redisFree(c); exit(1); } printf("Authenticated successfully\n"); freeReplyObject(reply); // 認證成功後,別忘了釋放reply // 3. 執行 SET 命令 reply = redisCommand(c, "SET mykey %s", "Hello, hiredis!"); if (reply == NULL) { printf("SET command failed: %s\n", c->errstr); redisFree(c); exit(1); } // hiredis對於SET命令成功返回的是一個狀態(STATUS)類型的reply if (reply->type == REDIS_REPLY_STATUS && strcmp(reply->str, "OK") == 0) { printf("SET mykey succeeded\n"); } else { printf("SET failed with reply: %s\n", reply->str); } freeReplyObject(reply); // 4. 執行 GET 命令 reply = redisCommand(c, "GET mykey"); if (reply == NULL) { printf("GET command failed: %s\n", c->errstr); redisFree(c); exit(1); } if (reply->type == REDIS_REPLY_STRING) { printf("GET mykey = %s\n", reply->str); } else if (reply->type == REDIS_REPLY_NIL) { printf("Key 'mykey' does not exist\n"); } else { printf("GET returned unexpected type: %d, error: %s\n", reply->type, reply->str); } freeReplyObject(reply); // 5. 關閉串連 redisFree(c); printf("Disconnected from Redis\n"); return 0; } -
編譯與運行。
# 編譯,-I和-L後的路徑請根據您的實際安裝位置調整
gcc -o orca orca.c -I/usr/local/include/hiredis -L/usr/local/lib -lhiredis
# 運行
./orca
通過DMS串連
串連Orca
-
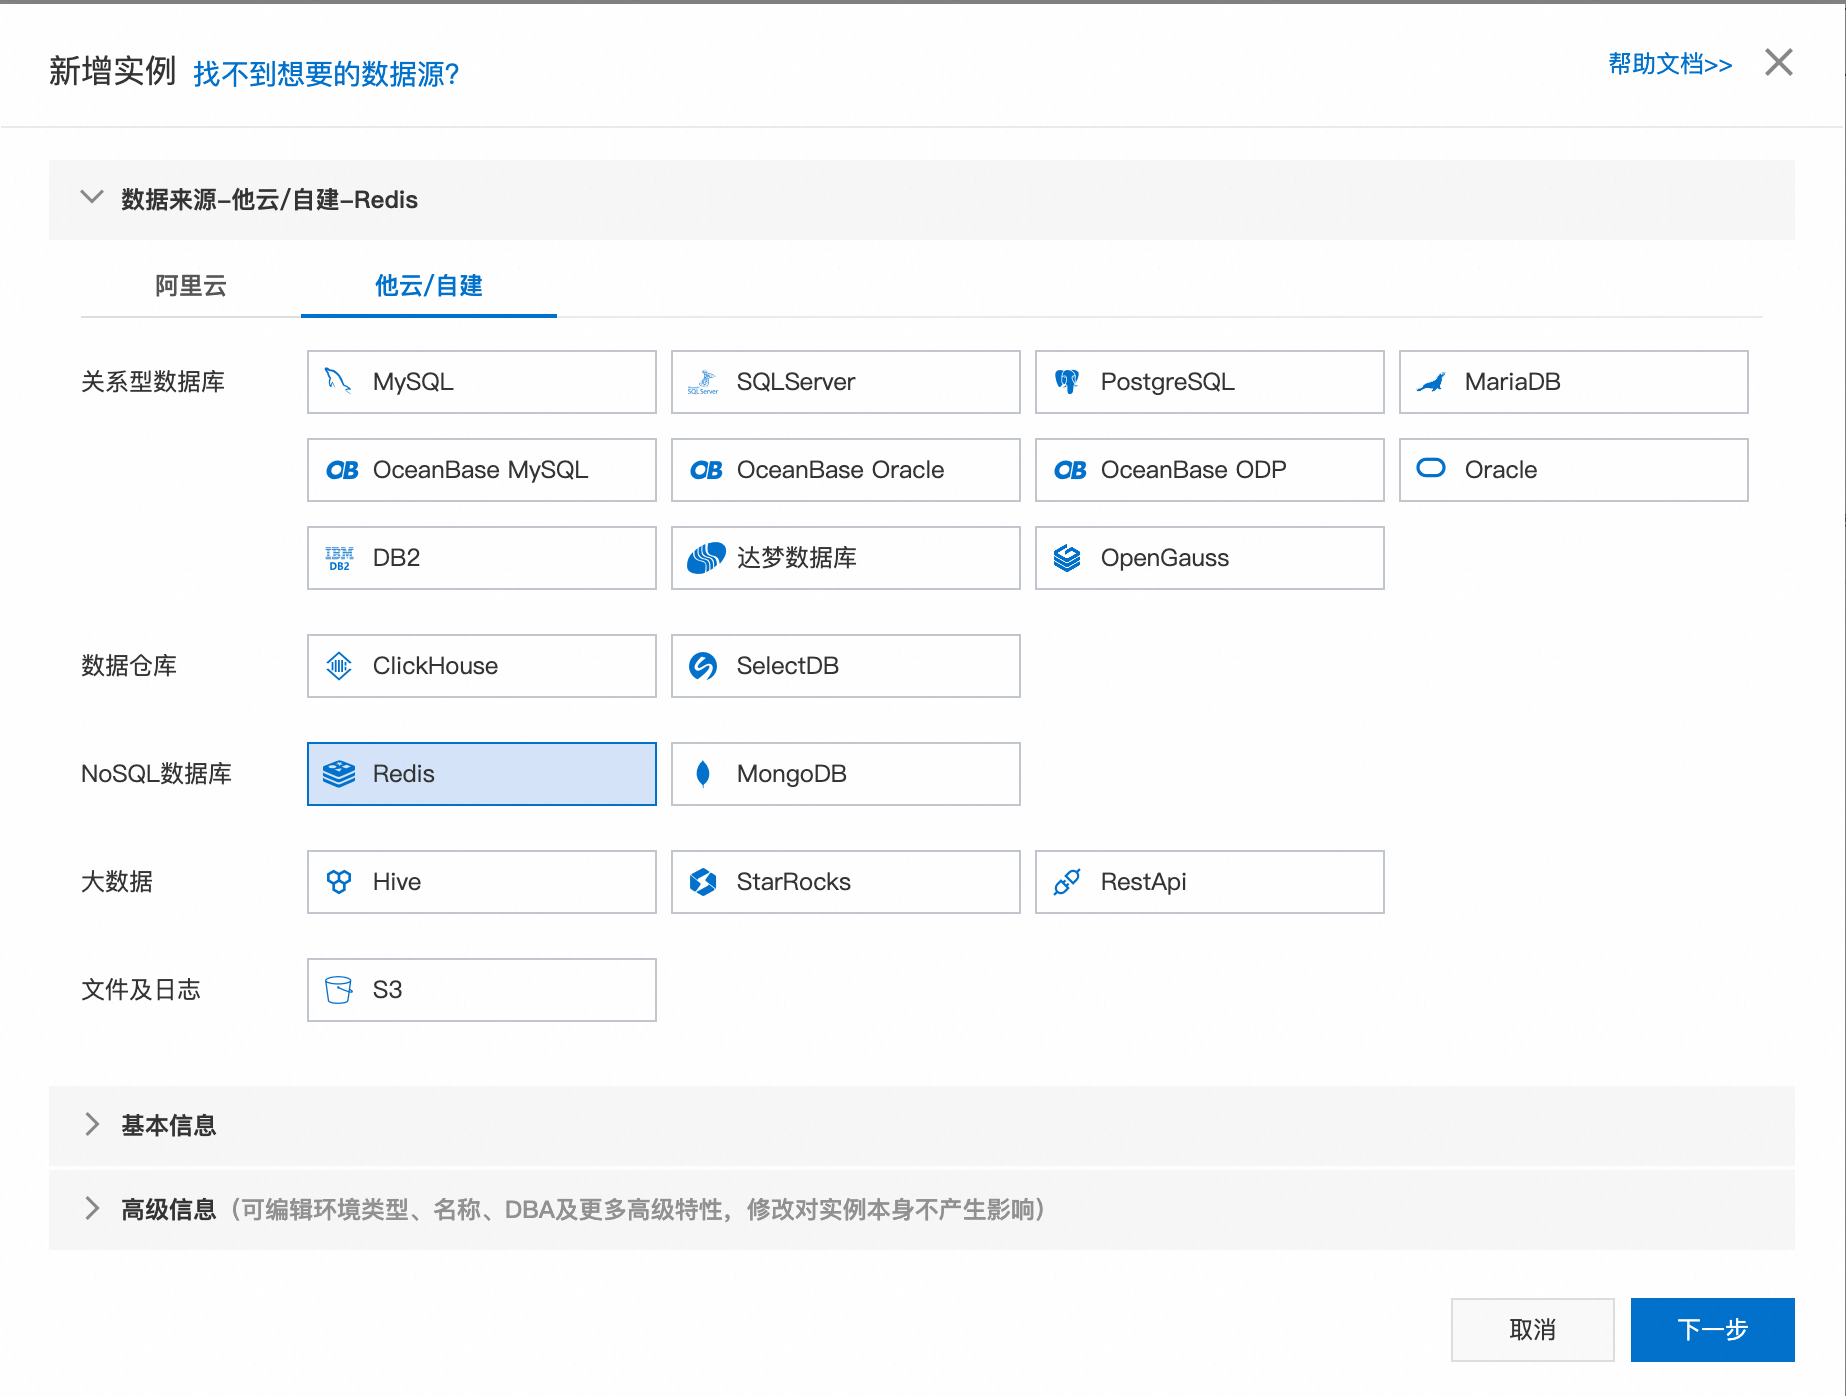
點擊新增,選擇他雲/自建,在NoSQL資料庫中選擇Redis。
-
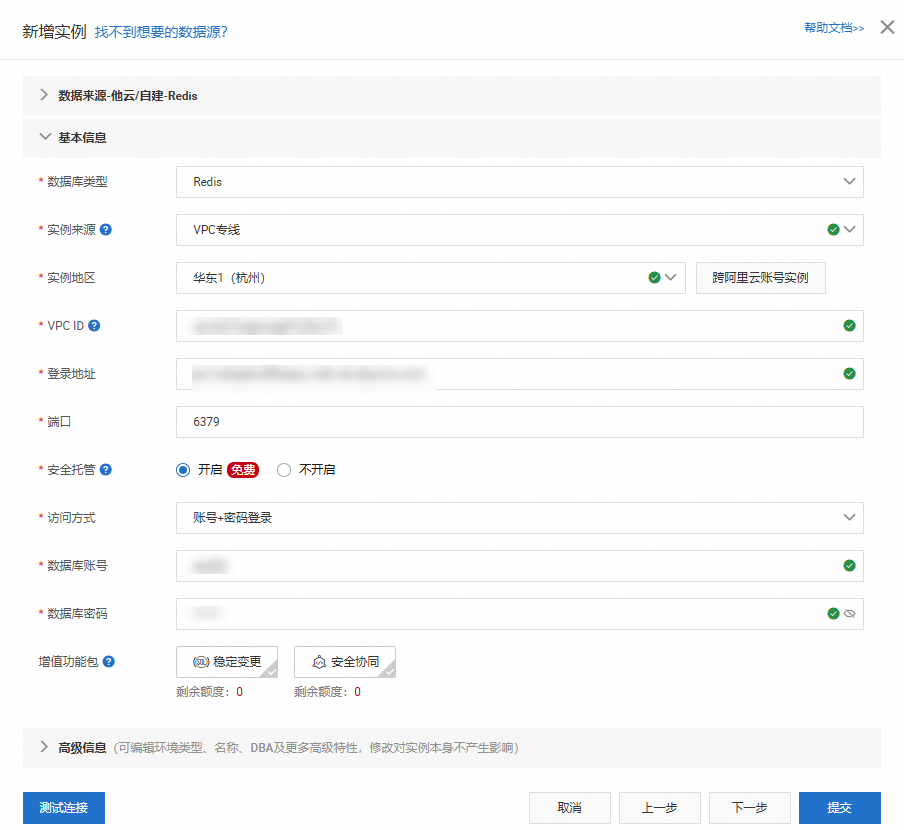
點擊下一步進入基本資料配置頁面,按照下圖方式選擇。
-
執行個體來源選擇VPC專線、執行個體地區選擇PolarDB叢集所在地區或就近地區、VPC ID選擇PolarDB詳情頁中VPC、登入地址填寫Orca串連地址。
-
訪問方式選擇安全託管+手動,資料庫帳號及密碼按照已建立的Orca帳號填寫即可。
-
資訊填寫完成後點擊測試連接,如無異常會顯示串連成功。
-
-
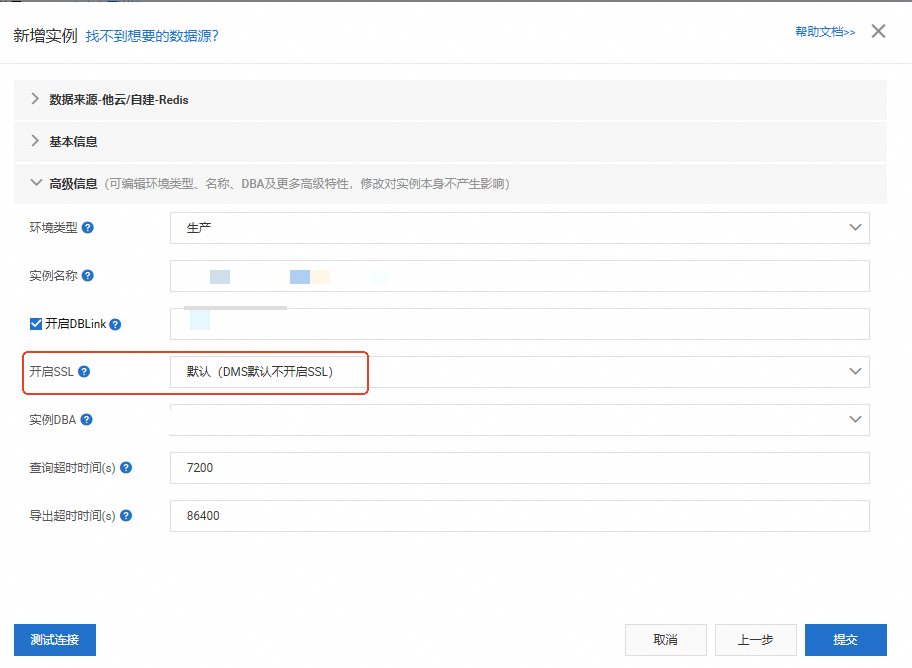
點擊下一步,進入進階資訊介面,按照實際需要設定。
說明需要注意Orca目前不支援開啟SSL。
-
點擊提交,如無異常Orca將進入安全託管狀態。

資料管理
-
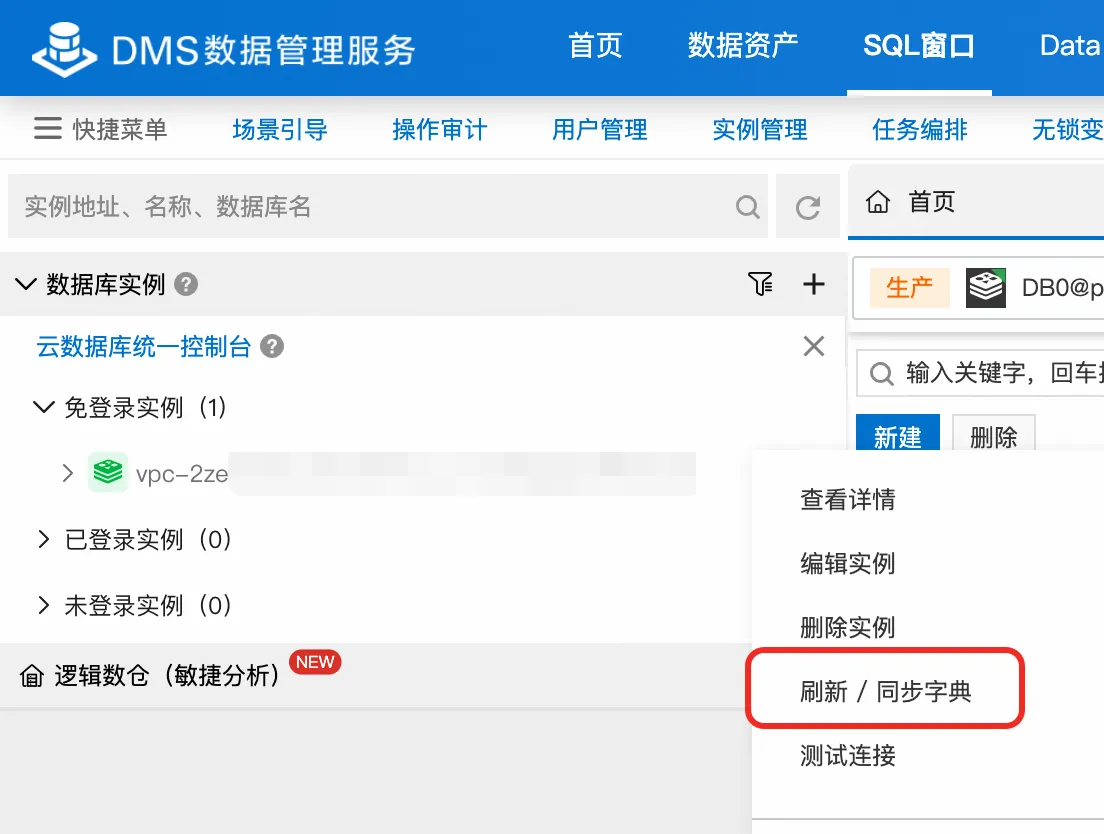
在頂部功能表列中,選擇數據編織,並選擇已託管完成的Orca叢集。
-
Orca目前僅支援一個Redis邏輯資料庫DB0,若您未看到當前資料庫DB0,請單擊重新整理 / 同步字典。
-
若無異常,即可正常使用DMS管理Orca。
例如在 SQLConsole 中執行
ping key01命令,返回結果為PONG即表示串連成功。