PolarSearch是PolarDB提供的一種分布式搜尋服務,支援全文檢索索引與向量檢索,其架構基於OpenSearch(相容Elasticsearch生態)並與PolarDB資料庫緊密整合。PolarSearch讓您通過簡單操作就能滿足一站式的資料檢索需求。
本文PolarSearch使用指南需要您對Elasticsearch或OpenSearch有一定瞭解。更多資訊,請參見OpenSearch Documentation。
適用範圍
叢集配置要求
產品版本:企業版。
系列:叢集版。
資料庫引擎:MySQL 8.0.1、MySQL 8.0.2。
說明以上資料庫引擎版本要求均無小版本要求。更多資訊,請參見查詢版本號碼。
支援地區與可用性區域
PolarSearch支援的可用性區域如下:
地區 | 可用性區域 |
華東1(杭州) | 可用性區域I、可用性區域J、可用性區域K |
華東2(上海) | 可用性區域E、可用性區域F、可用性區域L、可用性區域N |
華南1(深圳) | 可用性區域C、可用性區域D、可用性區域F |
華北2(北京) | 可用性區域F、可用性區域L、可用性區域I、可用性區域K |
華北3(張家口) | 可用性區域B |
華北6(烏蘭察布) | 可用性區域B、可用性區域C |
中國(香港) | 可用性區域B、可用性區域D |
新加坡 | 可用性區域A、可用性區域B |
日本(東京) | 可用性區域B、可用性區域C |
韓國(首爾) | 可用性區域A、可用性區域B |
德國(法蘭克福) | 可用性區域A |
美國(矽谷) | 可用性區域B |
菲律賓 | 可用性區域A |
若您有其他可用性區域需求,請提交工單與我們聯絡。
費用說明
PolarSearch通過獨立的搜尋節點支援搜尋功能,並收取費用。搜尋節點按照普通計算節點計費。同時,搜尋節點中的索引與資料將佔用一定的儲存空間,因此也會產生相應的儲存空間費用。
添加PolarSearch搜尋節點
符合適用範圍的已有叢集,添加搜尋節點。
登入PolarDB控制台,在左側導覽列單擊集群列表,選擇叢集所在地區,找到目的地組群。
單擊目的地組群ID,進入叢集基本信息頁。
在数据库节点地區,單擊增删节点。

在增删节点向导對話方塊,選擇新增搜尋節點。
建立搜尋節點帳號
設定管理員帳號
添加的帳號是資料庫的普通許可權帳號。
添加的普通許可權帳號為PolarSearch功能的管理員權限帳號。
登入PolarDB控制台,在左側導覽列單擊集群列表,選擇叢集所在地區,找到目的地組群。
單擊目的地組群ID,進入叢集基本信息頁。
数据库节点地區,將滑鼠懸浮在搜索节点,單擊设置连接数据库账号。
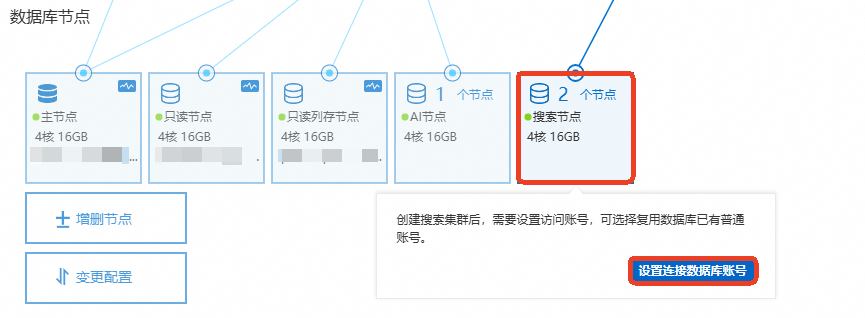
在對話方塊中可以選擇已有的資料庫普通帳號或建立新普通帳號,並輸入帳號密碼。
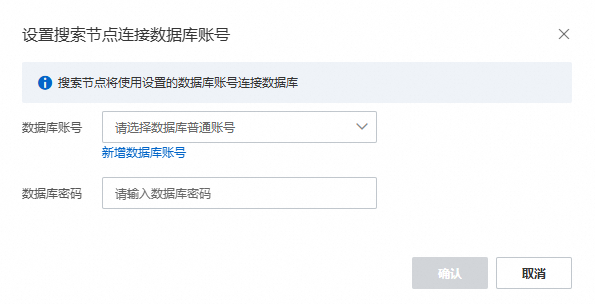 重要
重要資料庫帳號名字不能是資料庫密碼的字元子串(不區分大小寫)。例如
search_test的資料庫帳號,密碼不能是SEARCH_test@123,但可以是SEARCHtest@123或SEARCH@_test。
設定普通帳號
普通賬戶可以按照索引維度控制帳號能訪問的索引範圍。常用有兩種賬戶使用權限設定方式,分別是Dashboard白屏化設定和REST API設定。
Dashboard白屏化設定
需要帳號擁有security_rest_api_access角色,否則不顯示Security頁面。
建立使用者:
單擊左側導覽列,進入Management > Security頁面,並選擇Internal users,單擊Create internal user。

在建立使用者頁面,輸入使用者名稱和密碼建立使用者。例如,建立一個帳號密碼為
USER@test123的使用者testuser,然後單擊Create完成建立。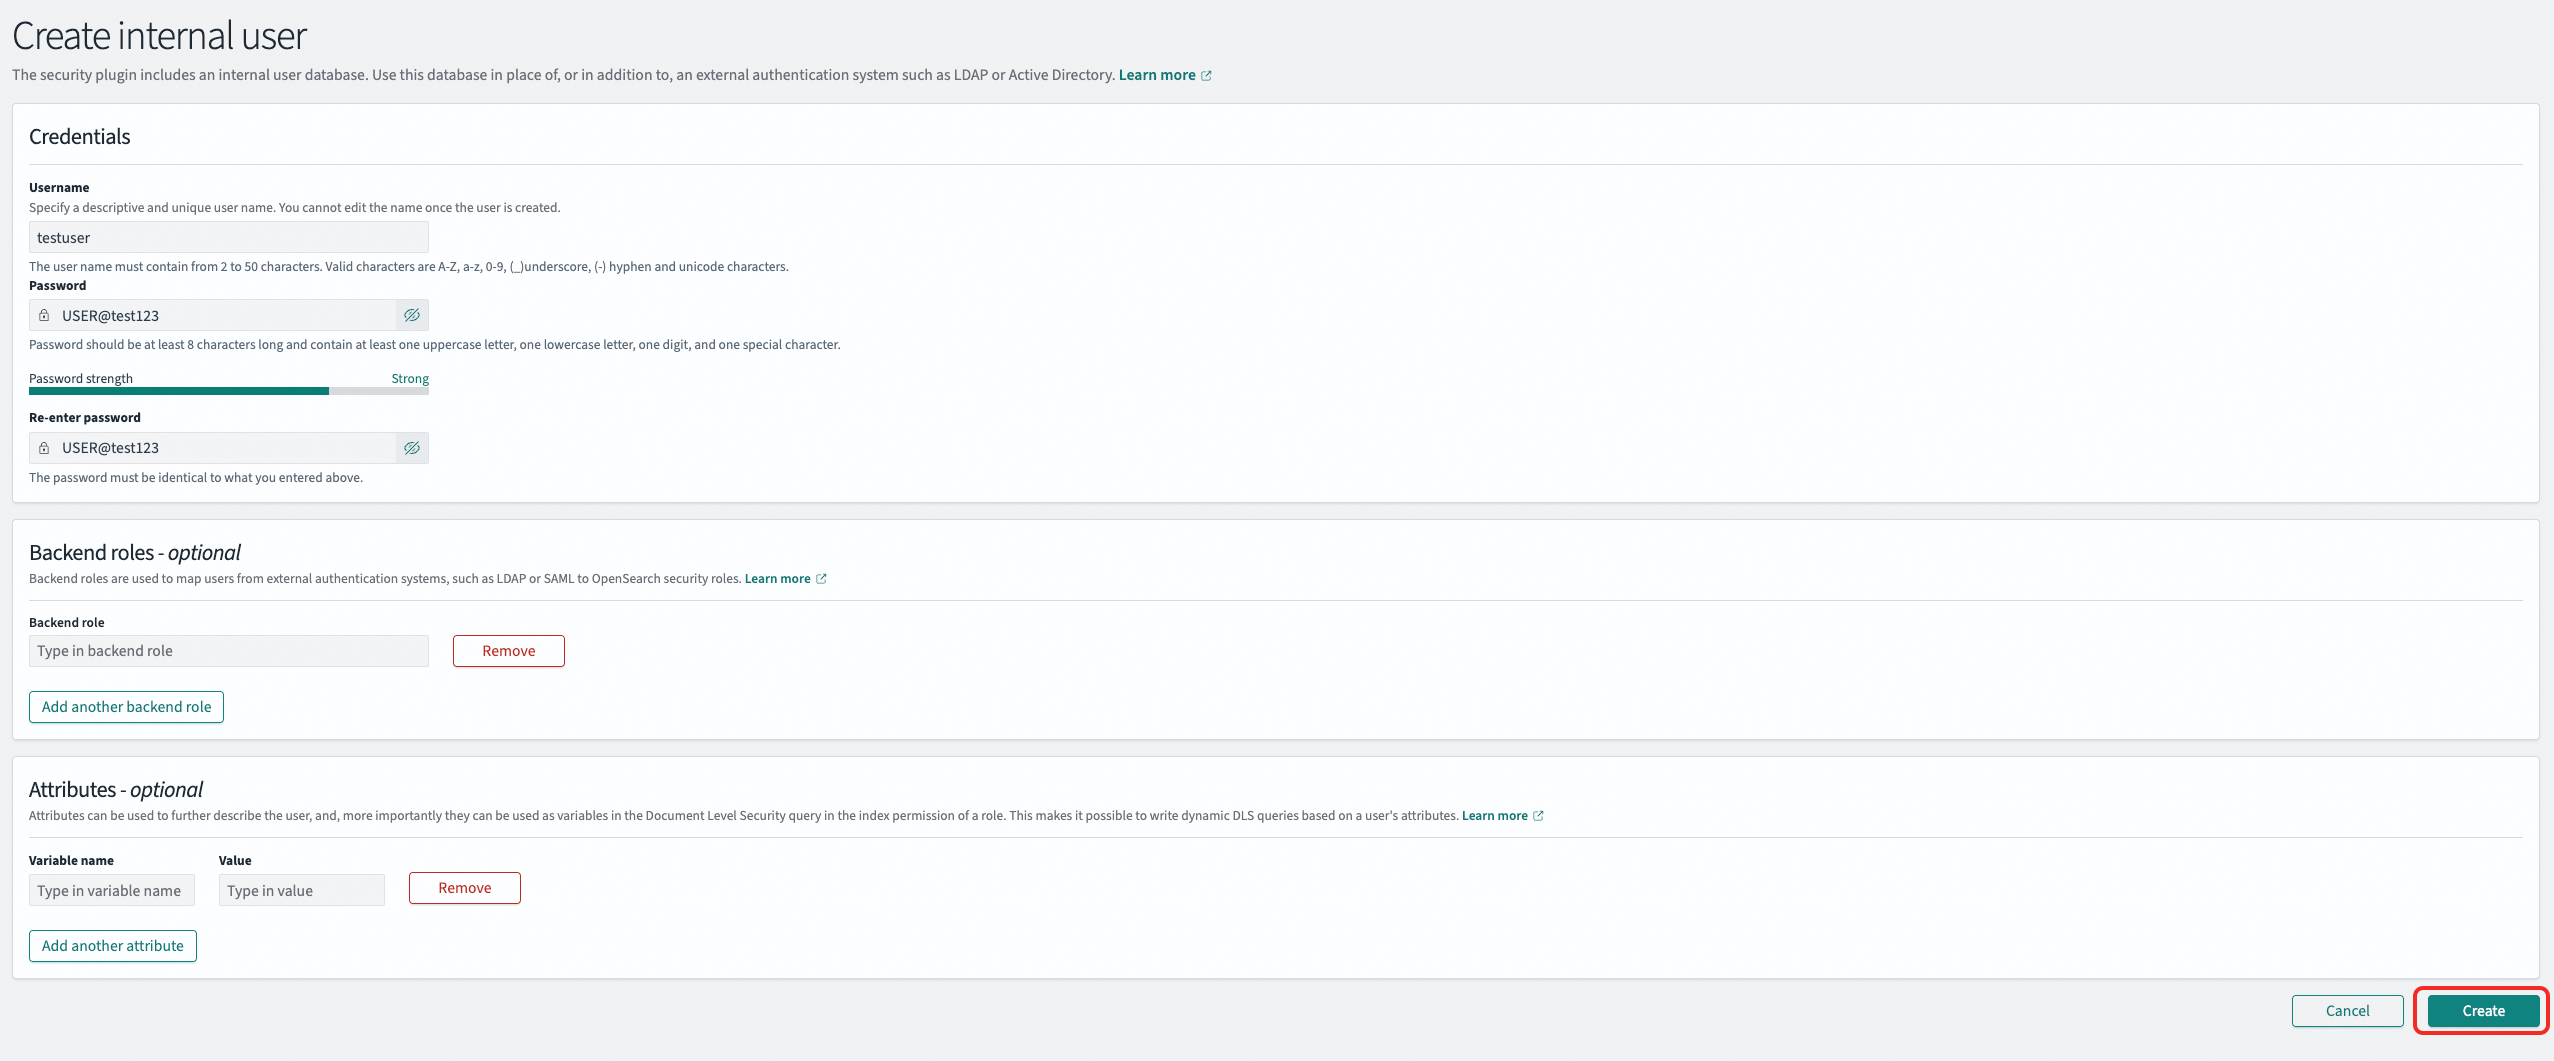
建立角色
單擊左側導覽列,進入頁面,並選擇Roles,單擊Create role。

角色許可權主要包括叢集許可權和索引許可權,許可權的設定可以通過操作組進行添加。索引許可權配置在Index處可以設定具體的索引名字或者通過
*萬用字元適配某一類名字的索引,在Index permissions選擇索引的具體許可權,如唯讀、讀寫等。樣本:建立一個擁有全部叢集許可權(unlimited相當於全部許可權)以及以
indextest作為首碼的所有索引的索引唯讀許可權的角色onlyreadrole。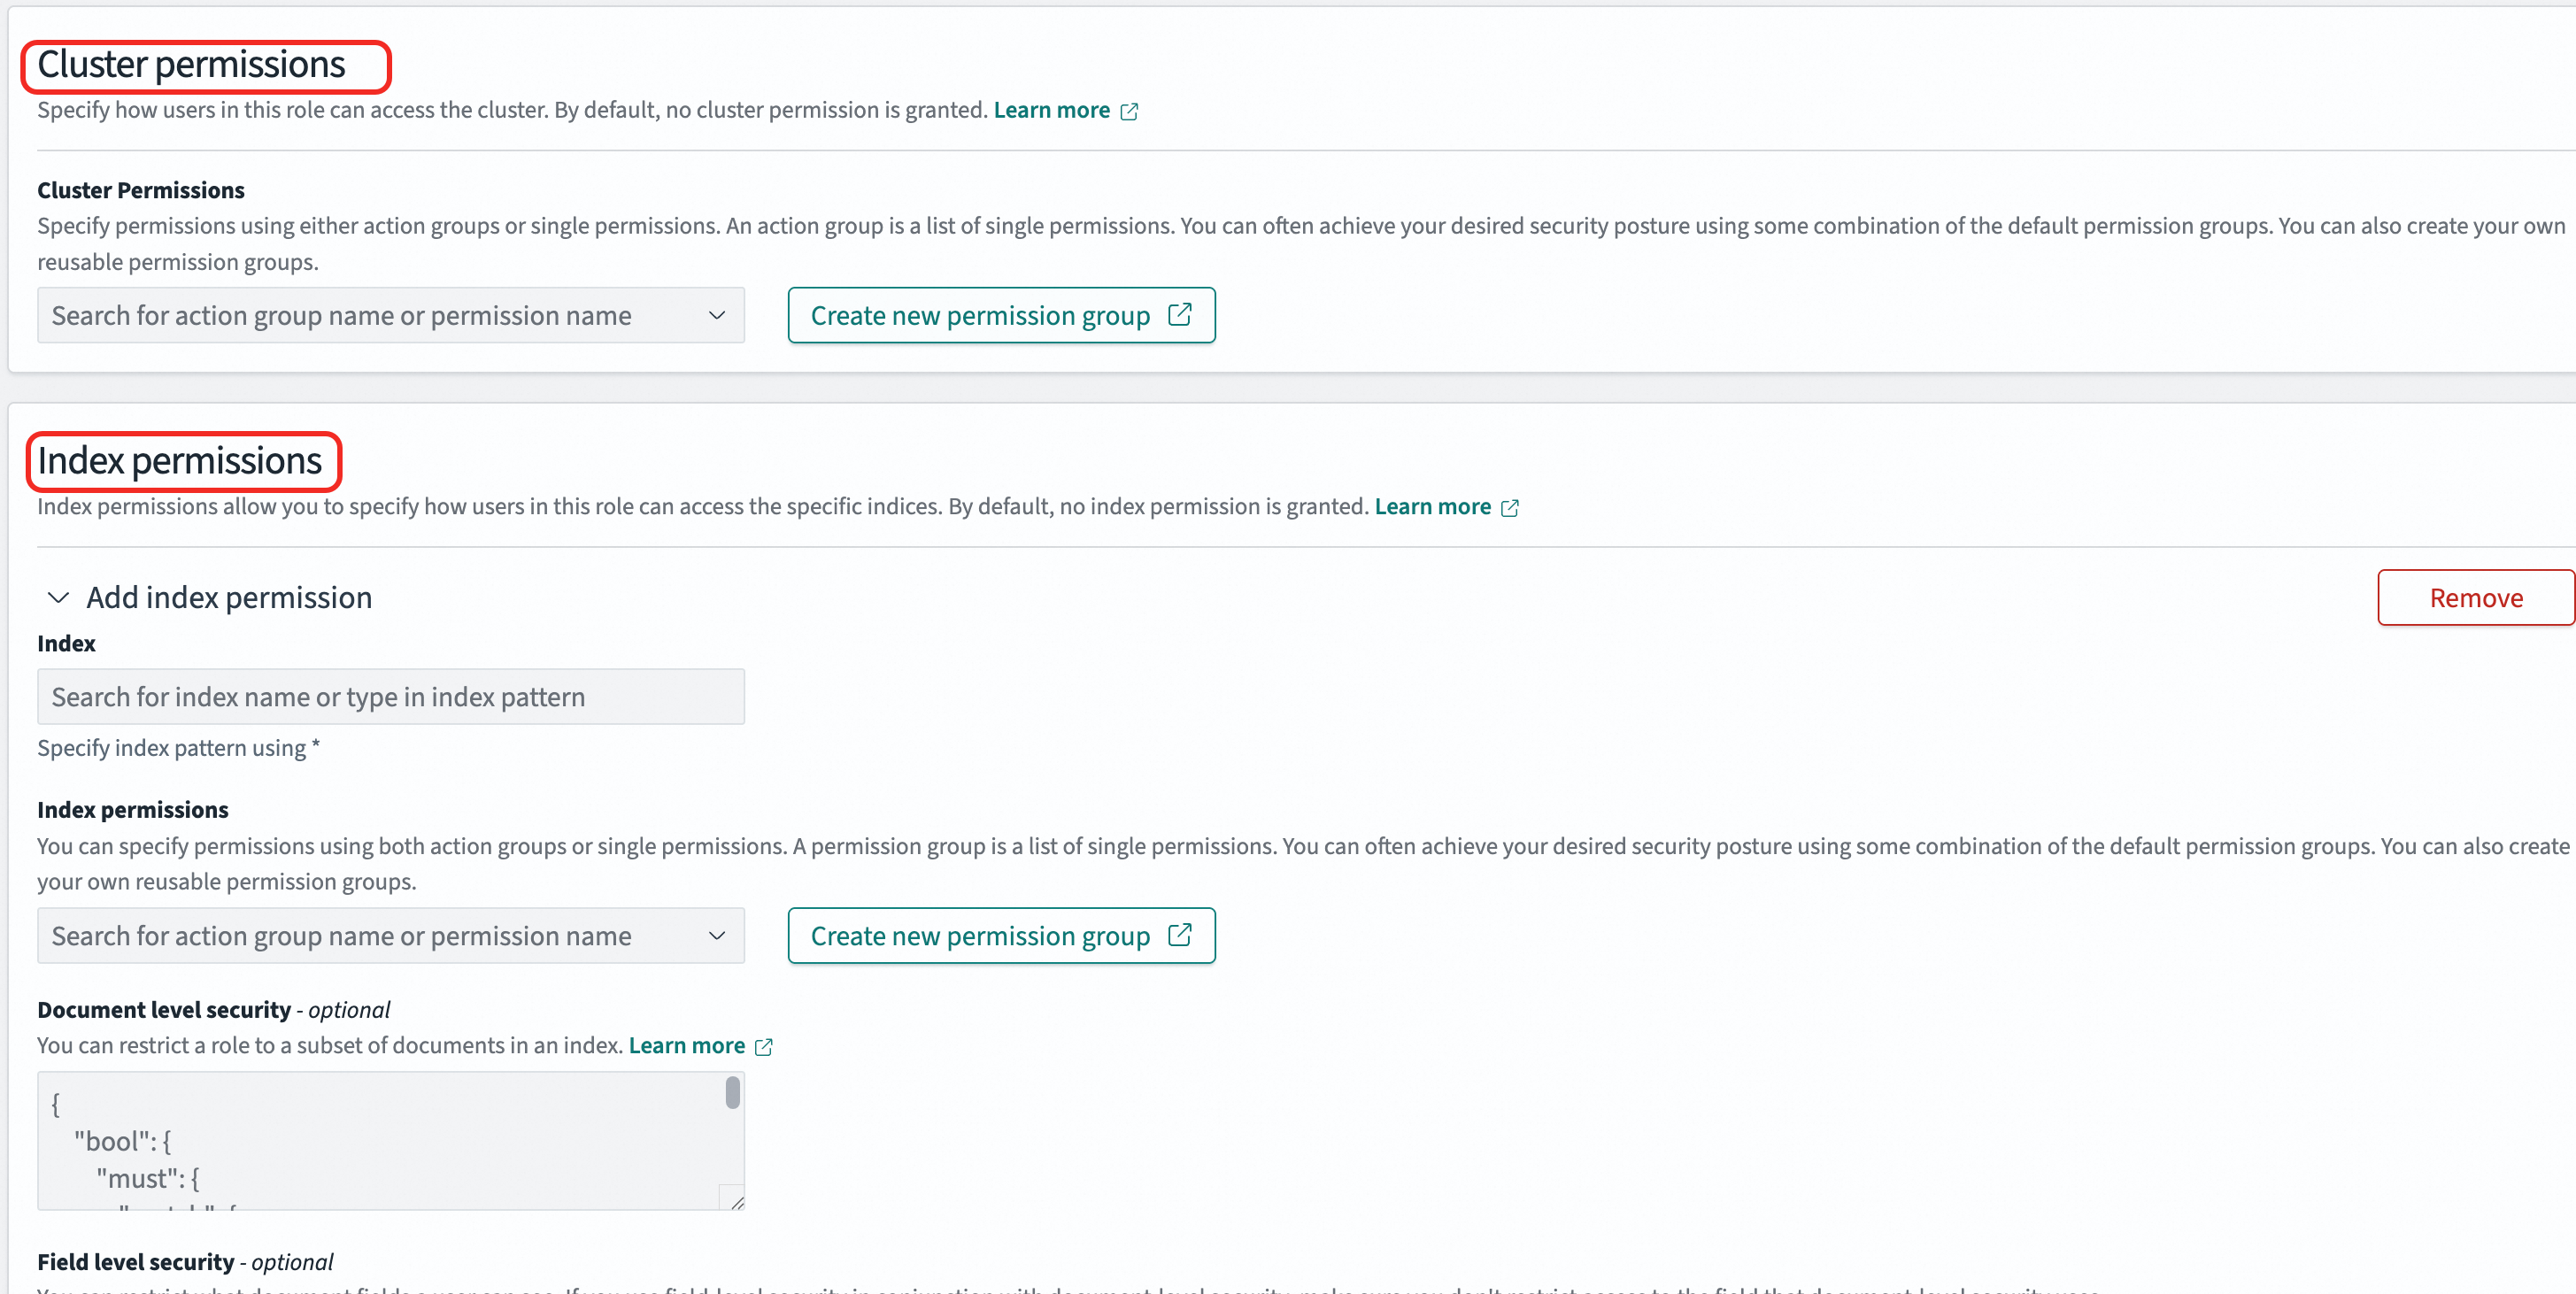
角色映射使用者
單擊左側導覽列,進入頁面,並選擇Roles,單擊目標角色。
在Mapped users頁簽中添加使用者映射。一個使用者可以被多個角色映射,並同時擁有這些角色的許可權。
樣本:將
onlyreadrole的角色與testuser使用者進行映射,testuser使用者獲得onlyreadrole角色所擁有的許可權。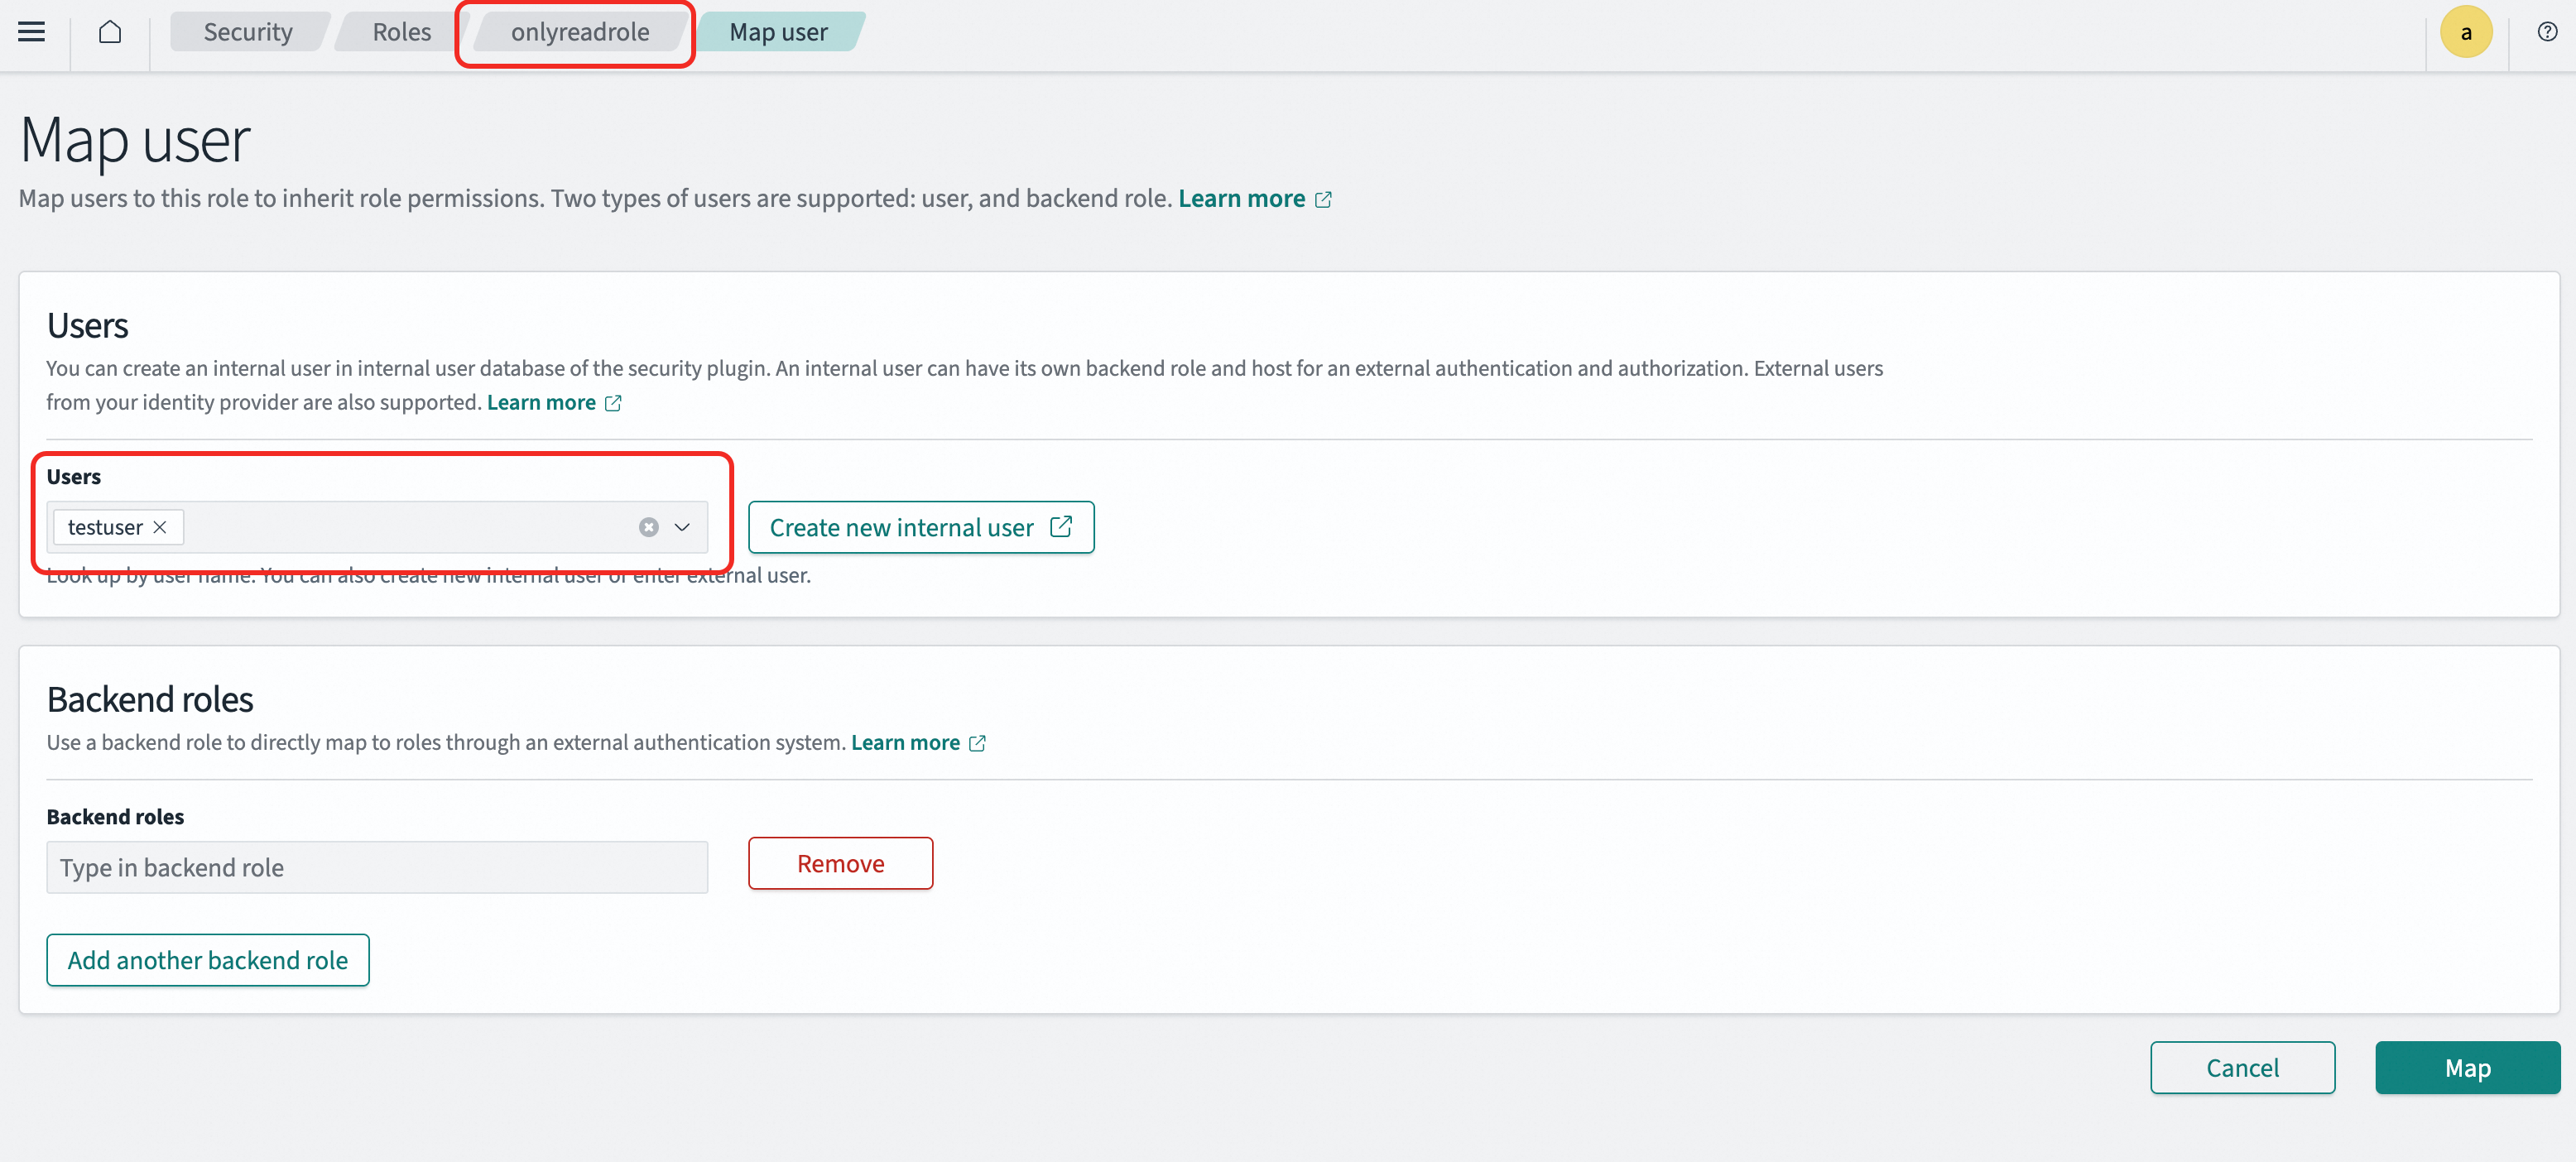
REST API設定
搜尋節點可通過API實現完整的存取控制,請參見社區文檔OpenSearch API。
建立使用者
curl -X PUT "http://<endpoint>:<port>/_plugins/_security/api/internalusers/<new_user>" \
  --user "<user_name>:<passwd>" \
  -H "Content-Type: application/json" \
  -d '{
    "password": "<new_password>",
    "backend_roles": [],
    "attributes": {}
  }'
樣本:建立一個帳號密碼為
USER@test123的使用者testuser。curl -X PUT "http://<endpoint>:<port>/_plugins/_security/api/internalusers/testuser" \ --user "<user_name>:<passwd>" \ -H "Content-Type: application/json" \ -d '{ "password": "USER@test123", "backend_roles": [], "attributes": {} }'建立角色
curl -X PUT "http://<endpoint>:<port>/_plugins/_security/api/roles/<role_name>" \ --user "<user_name>:<passwd>" \ -H "Content-Type: application/json" \ -d '{ "cluster_permissions": ["*"], "index_permissions": [ { "index_patterns": ["*"], "allowed_actions": ["*"] } ] }'index_patterns:對應需要設定的索引名字,可以通過*萬用字元大量設定索引。allowed_actions:對應具體的許可權,如read、write等。
樣本:建立一個具有全部叢集許可權以及以
indextest作為首碼的所有索引的唯讀許可權角色onlyreadrole。curl -X PUT "http://<endpoint>:<port>/_plugins/_security/api/roles/onlyreadrole" \ --user "<user_name>:<passwd>" \ -H "Content-Type: application/json" \ -d '{ "cluster_permissions": ["*"], "index_permissions": [ { "index_patterns": ["indextest*"], "allowed_actions": ["read"] } ] }'映射角色
curl -X PUT "http://<endpoint>:<port>/_plugins/_security/api/rolesmapping/<role_name>" \
  --user "<user_name>:<passwd>" \
  -H "Content-Type: application/json" \
  -d '{
    "backend_roles": [],
    "hosts": [],
    "users": ["<new_user>"]
  }'
樣本:將
onlyreadrole的角色與testuser使用者進行映射,testuser使用者獲得onlyreadrole角色所擁有的許可權。curl -X PUT "http://<endpoint>:<port>/_plugins/_security/api/rolesmapping/onlyreadrole" \ --user "<user_name>:<passwd>" \ -H "Content-Type: application/json" \ -d '{ "backend_roles": [], "hosts": [], "users": ["testuser"] }'
擷取串連地址
搜尋地址
在数据库节点地區,將滑鼠懸浮在搜索节点,根據您的實際使用的環境,擷取對應的私網或公網地址。
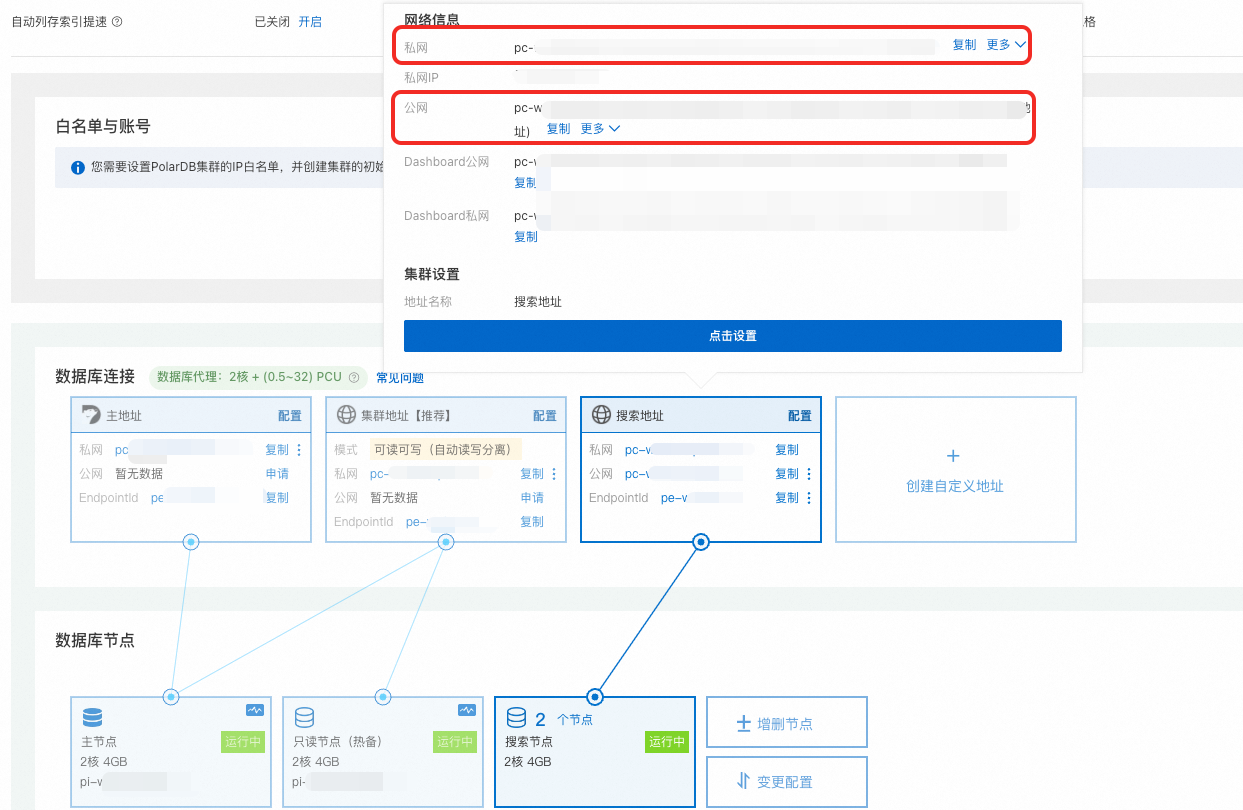
Dashboard地址
在数据库节点地區,將滑鼠懸浮在搜索节点,根據您的實際使用的環境,擷取對應的Dashboard私網或公網地址。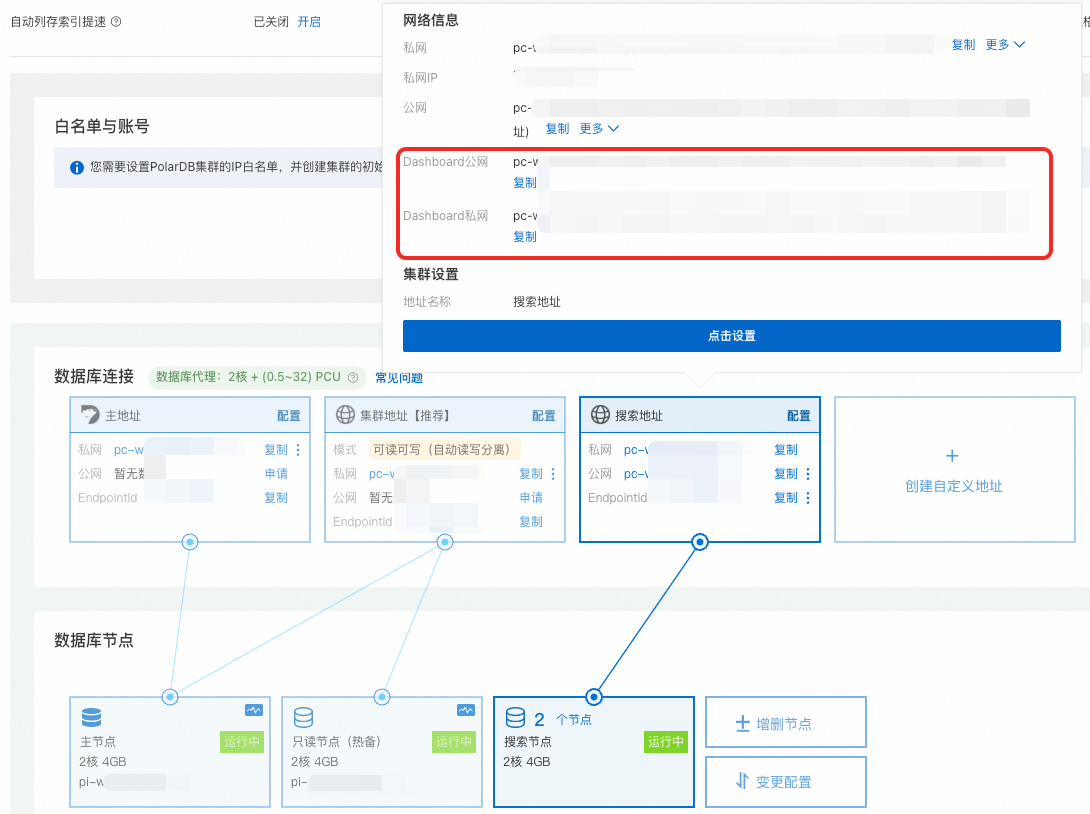
登入PolarSearch
通過搜尋地址訪問
若您偏向於使用API進行管理索引與資料,則可以通過API來訪問PolarSearch。此處以ECS執行個體為例:
設定叢集白名單:請根據您ECS執行個體所屬網路添加對應的IP地址至PolarDB MySQL版叢集白名單中。
說明ECS執行個體與PolarDB MySQL版叢集在同一Virtual Private Cloud下,請填寫ECS執行個體的私網IP。
ECS執行個體與PolarDB MySQL版叢集不在同一Virtual Private Cloud下,請填寫ECS執行個體的公網IP。
串連PolarSearch:執行如下命令,如果返回叢集資訊,說明叢集可服務。其中,
<endpoint>:<port>需替換PolarSearch的搜尋地址,<user_name>:<passwd>為PolarSearch的管理員帳號。curl http://<endpoint>:<port>/ -u <user_name>:<passwd>
通過Dashboard訪問
若您想通過白屏方式操作PolarSearch,則可以通過Dashboard(控制台)來訪問PolarSearch。此處以本地環境中瀏覽器為例:
設定叢集白名單:請根據您本地環境的IP地址至PolarDB MySQL版叢集白名單中。
在瀏覽器中登入PolarSearch控制台:
在瀏覽器地址欄輸入
http://<endpoint>:<port>後斷行符號。其中,<endpoint>:<port>需替換PolarSearch的Dashboard公網地址。在控制台登入頁面,輸入PolarSearch的管理員帳號,即可登入Kibana相容的PolarSearch控制台。
操作樣本
本例全部在ECS執行個體中通過命令列完成。
PolarSearch完全相容OpenSearch 2.19.0版本的SDK或REST API,其他版本可能存在相容性問題。更多資訊,請參見OpenSearch。
建立索引
搜尋節點中的索引,相當於關係型資料庫中的表,可使用Elasticsearch相容的REST API建立或直接在Dashboard中執行命令,樣本如下:
命令列
curl -XPUT "http://<endpoint>:<port>/articles" \
--user "<user_name>:<passwd>" \
-H 'Content-Type: application/json' \
-d '{
  "settings": {
    "number_of_shards": 1,
    "number_of_replicas": 1
  },
  "mappings": {
    "properties": {
      "title": {
        "type": "text"
      },
      "content": {
        "type": "text"
      },
      "author": {
        "type": "keyword"
      }
    }
  }
}'
Dashboard
PUT articles
{
  "settings": {
    "number_of_shards": 1,
    "number_of_replicas": 1
  },
  "mappings": {
    "properties": {
      "title": {
        "type": "text"
      },
      "content": {
        "type": "text"
      },
      "author": {
        "type": "keyword"
      }
    }
  }
}
匯入資料
命令列
curl -XPOST "http://<endpoint>:<port>/articles/_bulk" \
--user "<user_name>:<passwd>" \
-H 'Content-Type: application/json' \
-d '
{"index": {}}
{"title": "Introduction to PolarSearch", "content": "PolarSearch is a powerful search engine.", "author": "Allen"}
{"index": {}}
{"title": "Advanced Search Techniques", "content": "Learn how to use full-text search and filters in PolarDB.", "author": "Lang"}
{"index": {}}
{"title": "Elasticsearch vs PolarSearch", "content": "A comparison of Elasticsearch and PolarSearch features.", "author": "Zhao"}
'
Dashboard
POST articles/_bulk
{"index": {}}
{"title": "Introduction to PolarSearch", "content": "PolarSearch is a powerful search engine.", "author": "Allen"}
{"index": {}}
{"title": "Advanced Search Techniques", "content": "Learn how to use full-text search and filters in PolarDB.", "author": "Lang"}
{"index": {}}
{"title": "Elasticsearch vs PolarSearch", "content": "A comparison of Elasticsearch and PolarSearch features.", "author": "Zhao"}
執行搜尋查詢
資料匯入完成後,可通過SDK、REST API或在Dashboard上進行全文檢索搜尋,如下所示:
命令列
curl -XGET "http://<endpoint>:<port>/articles/_search" \
--user "<user_name>:<passwd>" \
-H 'Content-Type: application/json' \
-d '
{
  "query": {
    "match": {
      "content": "PolarSearch"
    }
  }
}'
Dashboard
GET articles/_search
{
  "query": {
    "match": {
      "content": "PolarSearch"
    }
  }
}更多搜尋查詢文法,請參見OpenSearch。
建立向量索引
命令列
curl -XPUT "http://<endpoint>:<port>/my-vector-index" \
--user "<user_name>:<passwd>" \
-H "Content-Type:application/json" \
-d '
{
  "settings": {
    "index": {
      "knn": true
    }
  },
  "mappings": {
    "properties": {
      "vector_field": {
        "type": "knn_vector",
        "dimension": 4
      },
      "metadata": {
        "type": "text"
      }
    }
  }
}
'
Dashboard
PUT my-vector-index
{
  "settings": {
    "index": {
      "knn": true
    }
  },
  "mappings": {
    "properties": {
      "vector_field": {
        "type": "knn_vector",
        "dimension": 4
      },
      "metadata": {
        "type": "text"
      }
    }
  }
}
插入向量資料
命令列
curl -XPOST "http://<endpoint>:<port>/my-vector-index/_bulk" \
--user "<user_name>:<passwd>" \
-H "Content-Type:application/json" \
-d '
{"index": {}}
{"vector_field": [0.1, 0.5, -0.3, 0.8], "metadata": "Document 1"}
{"index": {}}
{"vector_field": [-0.2, 0.7, 0.4, -0.1], "metadata": "Document 2"}
'
Dashboard
POST my-vector-index/_bulk
{"index": {}}
{"vector_field": [0.1, 0.5, -0.3, 0.8], "metadata": "Document 1"}
{"index": {}}
{"vector_field": [-0.2, 0.7, 0.4, -0.1], "metadata": "Document 2"}
向量檢索
命令列
curl -XGET "http://<endpoint>:<port>/my-vector-index/_search" \
--user "<user_name>:<passwd>" \
-H "Content-Type:application/json" \
-d '
{
  "size": 2,
  "query": {
    "knn": {
      "vector_field": {
        "vector": [0.1, 0.5, -0.3, 0.8],
        "k": 2
      }
    }
  }
}
'
Dashboard
GET my-vector-index/_search
{
  "size": 2,
  "query": {
    "knn": {
      "vector_field": {
        "vector": [0.1, 0.5, -0.3, 0.8],
        "k": 2
      }
    }
  }
}