通過在商務服務器前端部署支援Proxy Protocol V1/V2 的 NGINX 伺服器,您可以確保日誌記錄與審計、存取控制與認證、安全防護和效能最佳化等關鍵情境中的用戶端真實 IP 位址能夠被準確擷取和傳遞,從而提升系統的安全性、可靠性和使用者體驗。
使用情境
您營運一個電子商務網站,後端服務使用 TCP 協議。為了進行存取控制、日誌記錄和地理定位等業務判斷,您需要在來源站點伺服器內擷取用戶端的真實 IP 位址。NGINX 已經支援Proxy Protocol,但您的應用程式需要直接解析Proxy Protocol頭以擷取用戶端真實 IP。
前提條件
安裝NGINX
# 安裝nginx編譯環境依賴
yum -y install gcc gcc-c++ autoconf automake
yum -y install zlib zlib-devel openssl openssl-devel pcre-devel
#下載安裝包
wget http://nginx.org/download/nginx-1.20.0.tar.gz
# 解壓源碼包
tar -zxvf nginx-1.20.0.tar.gz
# 進入目錄
cd nginx-1.20.0
# 設定nginx編譯安裝配置,帶上--with-stream
./configure --prefix=/usr/local/nginx --sbin-path=/usr/local/nginx/sbin/nginx --conf-path=/usr/local/nginx/conf/nginx.conf --with-http_stub_status_module --with-http_gzip_static_module --with-stream
# 編譯
make
# 安裝
make install配置NGINX支援proxy protocol v1/v2
步驟1:修改設定檔
配置NGINX支援proxy protocol,只需要將參數proxy_protocol添加在server塊中的listen指令後,詳情請參考Accepting the PROXY Protocol。例如:
http {
log_format combined '$proxy_protocol_addr - $remote_user [$time_local] '
'"$request" $status $body_bytes_sent '
'"$http_referer" "$http_user_agent"';
#...
server {
server_name localhost;
listen 80 proxy_protocol;
listen 443 ssl proxy_protocol;
ssl_certificate /etc/nginx/ssl/public.example.com.pem;
ssl_certificate_key /etc/nginx/ssl/public.example.com.key;
location /app/ {
proxy_pass http://backend1;
proxy_set_header Host $host;
proxy_set_header X-Real-IP $proxy_protocol_addr;
proxy_set_header X-Forwarded-For $proxy_protocol_addr;
}
}
}
stream {
log_format basic '$proxy_protocol_addr - $remote_user [$time_local] '
'$protocol $status $bytes_sent $bytes_received '
'$session_time';
#...
server {
listen 8080 ssl proxy_protocol;
ssl_certificate /etc/nginx/ssl/cert.pem;
ssl_certificate_key /etc/nginx/ssl/cert.key;
proxy_pass esa.example.com:8080;
proxy_protocol on;
}
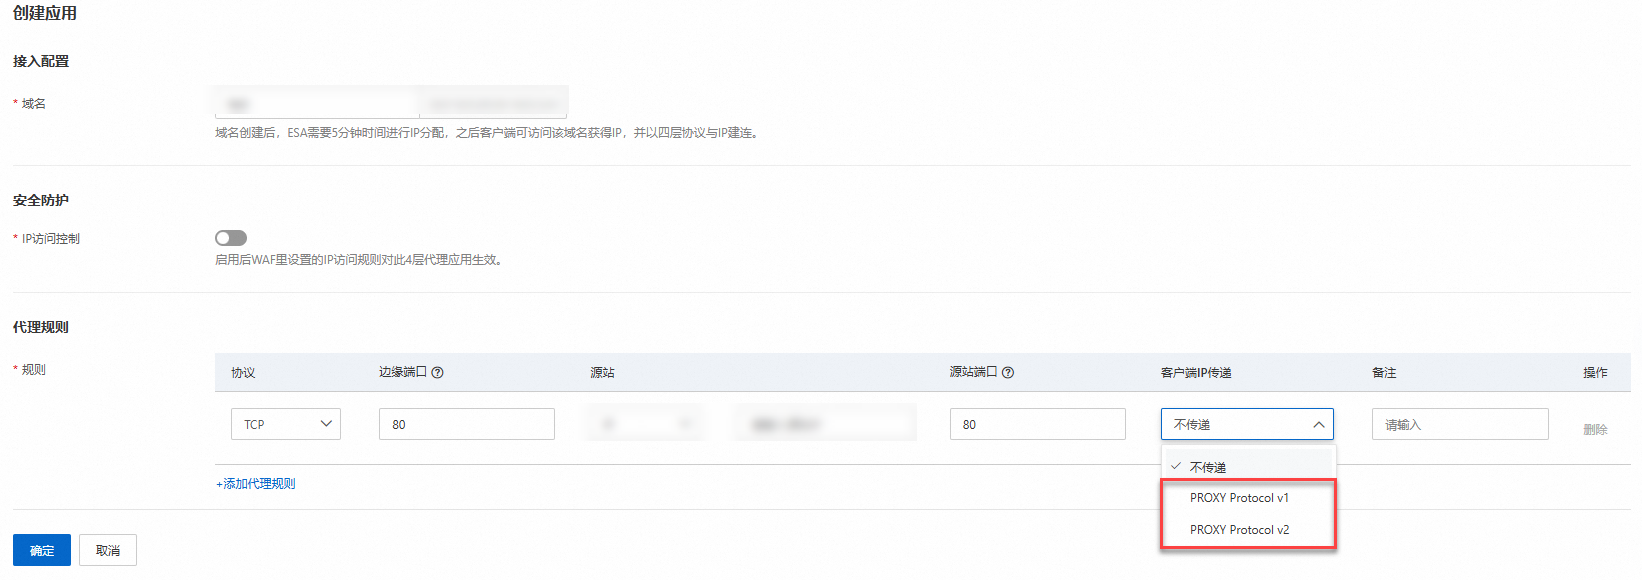
}步驟2:建立四層代理應用
在ESA控制台,選擇四層代理,建立四層代理應用,填入對應的參數。選擇業務需要的proxy protocol v1、proxy protocol v2代理。
測試和驗證
快速搭建一個HTTP服務,提供一個檔案瀏覽的Web服務。
python -m SimpleHTTPServer 8080使用Curl 請求來類比 TCP 請求。
curl -i "https://esa.example.com:8080"查看NGINX伺服器日誌,即可擷取到用戶端的真實IP地址。

說明
HAProxy對PP的應用支援請參考HAProxy Proxy Protocol