本文為您介紹如何使用Terraform完成建立ECS叢集、部署應用、綁定SLB、建立應用分組及擴容等操作。
本教程所含範例程式碼支援一鍵運行,您可以直接運行代碼。一鍵運行
前提條件
完成此教程,您需要開通以下服務:
為了降低資訊安全風險,建議使用最小許可權的RAM使用者完成此教程的操作。請參見建立RAM使用者與為RAM使用者授權,完成此教程所需最小許可權的權限原則如下:
{
  "Version": "1",
  "Statement": [
    {
      "Effect": "Allow",
      "Action": [
        "edas:CreateCluster",
        "edas:ReadCluster",
        "edas:DeleteCluster",
        "edas:ListResourceGroup",
        "edas:ListServiceGroups",
        "edas:ListSwimmingLaneGroup",
        "edas:ReadApplication",
        "edas:ListSlb",
        "edas:DeleteApplication"
      ],
      "Resource": "*"
    },
    {
      "Effect": "Allow",
      "Action": [
        "ecs:CreateSecurityGroup",
        "ecs:ModifySecurityGroupPolicy",
        "ecs:DescribeSecurityGroups",
        "ecs:ListTagResources",
        "ecs:DeleteSecurityGroup",
        "ecs:DescribeSecurityGroupAttribute",
        "ecs:RunInstances",
        "ecs:DescribeInstances",
        "ecs:DescribeUserData",
        "ecs:DescribeInstanceRamRole",
        "ecs:DescribeInstanceAttribute",
        "ecs:DescribeNetworkInterfaces",
        "ecs:DescribeInstanceMaintenanceAttributes",
        "ecs:DescribeDisks",
        "ecs:DeleteInstance"
      ],
      "Resource": "*"
    },
    {
      "Effect": "Allow",
      "Action": [
        "edas:ManageCluster",
        "edas:SynchronizeResource",
        "edas:CreateApplication",
        "edas:ManageApplication",
        "edas:QueryMigrateEcuList",
        "edas:ReadApplication"
      ],
      "Resource": "*"
    },
    {
      "Effect": "Allow",
      "Action": [
        "slb:CreateLoadBalancer",
        "slb:DescribeLoadBalancerAttribute",
        "slb:ListTagResources",
        "slb:DeleteLoadBalancer"
      ],
      "Resource": "*"
    },
    {
      "Effect": "Allow",
      "Action": [
        "vpc:CreateVpc",
        "vpc:DeleteVpc",
        "vpc:CreateVSwitch",
        "vpc:DeleteVSwitch"
      ],
      "Resource": "*"
    },
    {
      "Effect": "Allow",
      "Action": [
        "vpc:DescribeVpcAttribute",
        "vpc:DescribeRouteTableList",
        "vpc:DescribeVSwitchAttributes"
      ],
      "Resource": "*"
    },
    {
      "Effect": "Allow",
      "Action": "kms:CreateKey",
      "Resource": "*"
    }
  ]
}
準備Terraform運行環境,您可以選擇以下任一方式來使用Terraform。
Explorer:阿里雲提供了Terraform的線上運行環境,您無需安裝Terraform,登入後即可線上使用和體驗Terraform。適用於零成本、快速、便捷地體驗和調試Terraform的情境。
Cloud Shell:阿里雲Cloud Shell中預裝了Terraform的組件,並已配置好身份憑證,您可直接在Cloud Shell中運行Terraform的命令。適用於低成本、快速、便捷地訪問和使用Terraform的情境。
在本地安裝和配置Terraform:適用於網路連接較差或需要自訂開發環境的情境。
本教程樣本包含的部分資源會產生一定費用,請在不需要時及時進行釋放或退訂。
使用的資源
alicloud_vpc:Virtual Private Cloud。
alicloud_security_group:安全性群組。
alicloud_vswitch:交換器。
alicloud_instance:ECS執行個體。
alicloud_edas_cluster:阿里雲ECS叢集。
alicloud_edas_instance_cluster_attachment:ECS叢集添加執行個體。
alicloud_edas_application:EDAS ECS應用。
alicloud_slb_load_balancer:Server Load Balancer執行個體。
alicloud_edas_slb_attachment:應用綁定負載平衡。
步驟一:建立ECS
建立一個工作目錄,並在該工作目錄中建立名為main.tf的設定檔。以下代碼將建立一個ECS執行個體,以及建立ECS執行個體所需的VPC、安全性群組與交換器資源。將以下代碼複製到main.tf中。
variable "region" {
  default = "cn-shanghai"
}

variable "instance_type" {
  type    = string
  default = "ecs.e-c1m1.large"
}

variable "vpc_cidr_block" {
  default = "172.16.0.0/16"
}

variable "vsw_cidr_block" {
  default = "172.16.0.0/24"
}

# 官網demo地址
variable "war_url" {
  type    = string
  default = "http://edas-sz.oss-cn-shenzhen.aliyuncs.com/prod/demo/SPRING_CLOUD_CONSUMER.jar"
}

provider "alicloud" {
  region = var.region
}

data "alicloud_zones" "default" {
  available_instance_type     = var.instance_type
  available_resource_creation = "VSwitch"
  available_disk_category     = "cloud_essd"
}

# 隨機數
resource "random_integer" "default" {
  min = 10000
  max = 99999
}

# 建立Virtual Private Cloud
resource "alicloud_vpc" "vpc" {
  vpc_name   = "vpc-test_${random_integer.default.result}"
  cidr_block = var.vpc_cidr_block
}

# 建立安全性群組
resource "alicloud_security_group" "group" {
  name   = "test_${random_integer.default.result}"
  vpc_id = alicloud_vpc.vpc.id
}

# 建立交換器
resource "alicloud_vswitch" "vswitch" {
  vpc_id       = alicloud_vpc.vpc.id
  cidr_block   = var.vsw_cidr_block
  zone_id      = data.alicloud_zones.default.zones[0].id
  vswitch_name = "vswitch-test-${random_integer.default.result}"
}

# 建立ECS
resource "alicloud_instance" "instance" {
  availability_zone          = data.alicloud_zones.default.zones[0].id
  security_groups            = alicloud_security_group.group.*.id
  instance_type              = var.instance_type
  system_disk_category       = "cloud_essd"
  system_disk_name           = "test_foo_system_disk_${random_integer.default.result}"
  system_disk_description    = "test_foo_system_disk_description"
  image_id                   = "aliyun_2_1903_x64_20G_alibase_20240628.vhd"
  instance_name              = "test_ecs_${random_integer.default.result}"
  vswitch_id                 = alicloud_vswitch.vswitch.id
  internet_max_bandwidth_out = 10
  password                   = "Terraform@Example"
}

# 建立ecs執行個體成功之後等待執行個體初始化完成,一般不超過60s
resource "time_sleep" "example" {
  depends_on      = [alicloud_instance.instance]
  create_duration = "60s"
}
執行如下命令,初始化Terraform運行環境。
terraform init返回資訊如下,則Terraform初始化成功。
Terraform has been successfully initialized!

You may now begin working with Terraform. Try running "terraform plan" to see
any changes that are required for your infrastructure. All Terraform commands
should now work.

If you ever set or change modules or backend configuration for Terraform,
rerun this command to reinitialize your working directory. If you forget, other
commands will detect it and remind you to do so if necessary.
執行如下命令,開始執行代碼。
terraform apply在執行過程中,根據提示輸入
yes並按下Enter鍵,等待命令執行完成,若出現以下資訊,則表示代碼執行成功。You can apply this plan to save these new output values to the Terraform state, without changing any real infrastructure. Do you want to perform these actions? Terraform will perform the actions described above. Only 'yes' will be accepted to approve. Enter a value: yes Apply complete! Resources: 6 added, 0 changed, 0 destroyed.驗證結果。
執行terraform show命令
您可以在工作目錄中,使用以下命令查詢Terraform已建立資源的詳細資料:
terraform show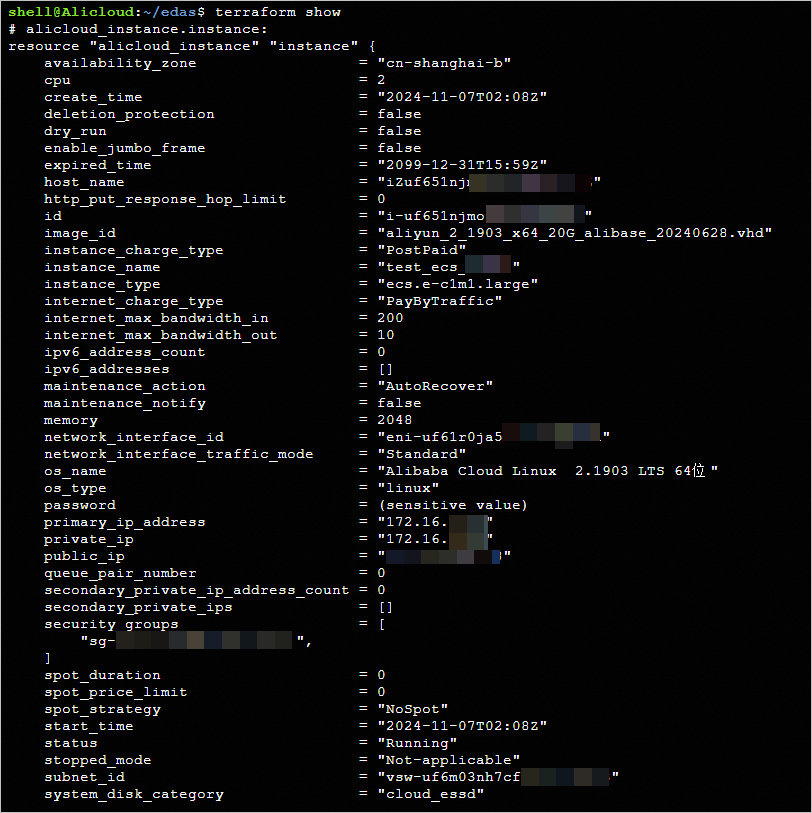
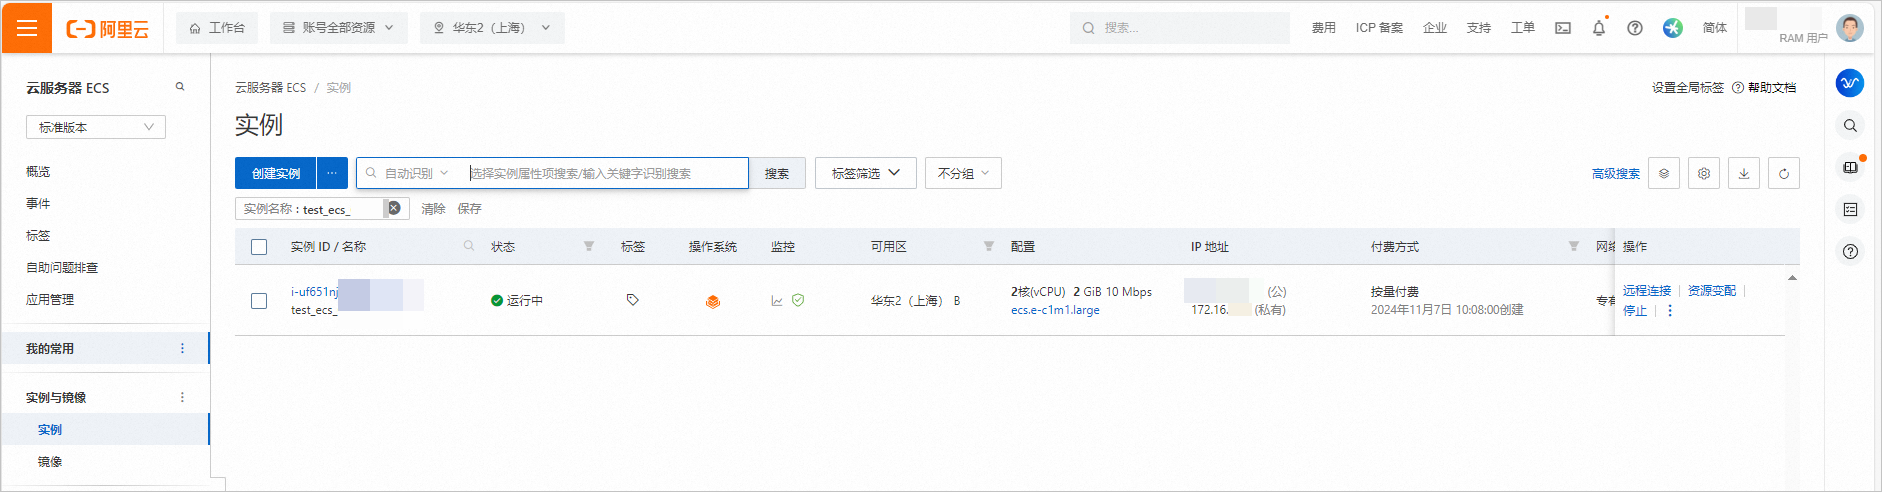
登入控制台查看
登入雲端服務器管理主控台 (aliyun.com),進入頁面,左上方選擇地區,此例中選擇華東2(上海),查看已建立的ECS執行個體。
步驟二:建立ECS叢集並添加ECS
在
main.tf檔案中增加如下代碼。# 建立ECS叢集 resource "alicloud_edas_cluster" "cluster" { cluster_name = "tf-edas-${random_integer.default.result}" cluster_type = "2" network_mode = "2" logical_region_id = var.region vpc_id = alicloud_vpc.vpc.id } # 添加ECS執行個體到ECS叢集 resource "alicloud_edas_instance_cluster_attachment" "default" { depends_on = [time_sleep.example] cluster_id = alicloud_edas_cluster.cluster.id instance_ids = [alicloud_instance.instance.id] }建立執行計畫,並預覽變更。
terraform plan執行如下命令,開始執行代碼。
terraform apply在執行過程中,根據提示輸入
yes並按下Enter鍵,等待命令執行完成,若出現以下資訊,則表示代碼執行成功。Apply complete! Resources: 2 added, 0 changed, 0 destroyed.驗證結果。
執行terraform show命令
您可以在工作目錄中,使用以下命令查詢Terraform已建立資源的詳細資料:
terraform show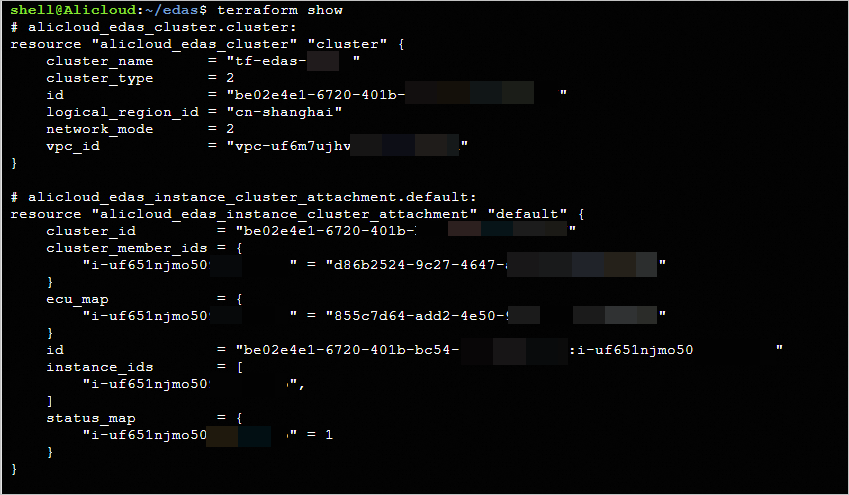
登入控制台查看
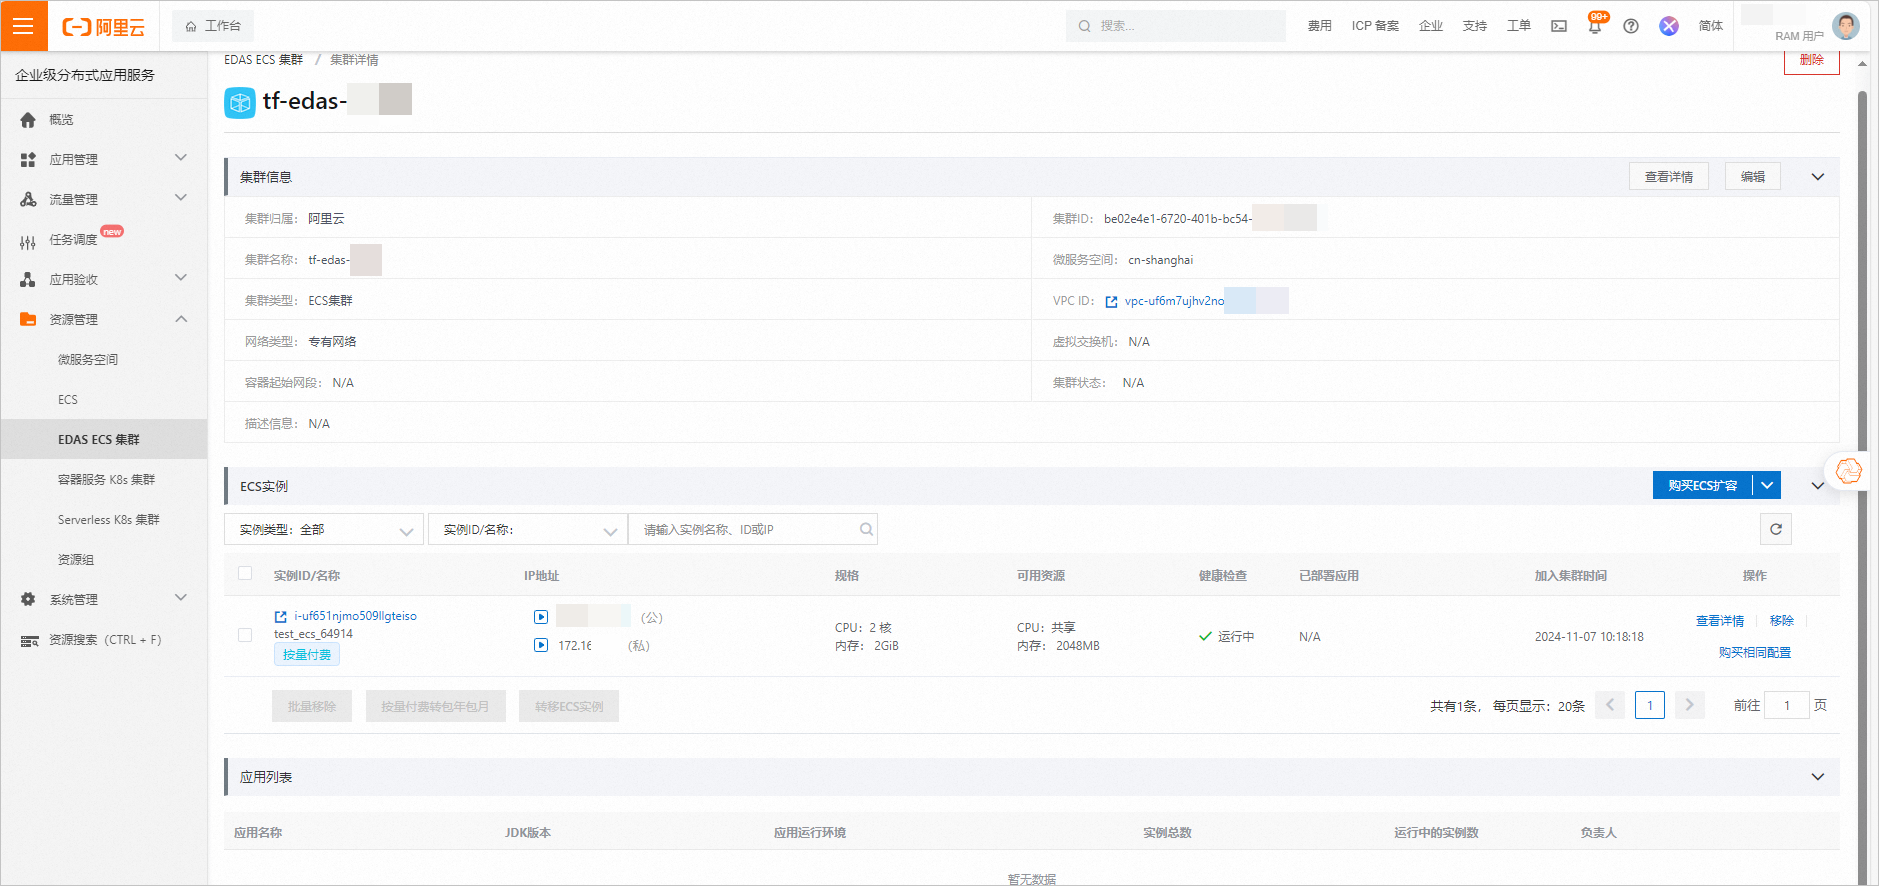
登入Enterprise Distributed Application Service(EDAS) (aliyun.com),進入頁面,左上方選擇地區,此例中選擇華東2 (上海),查看已建立的ECS叢集。
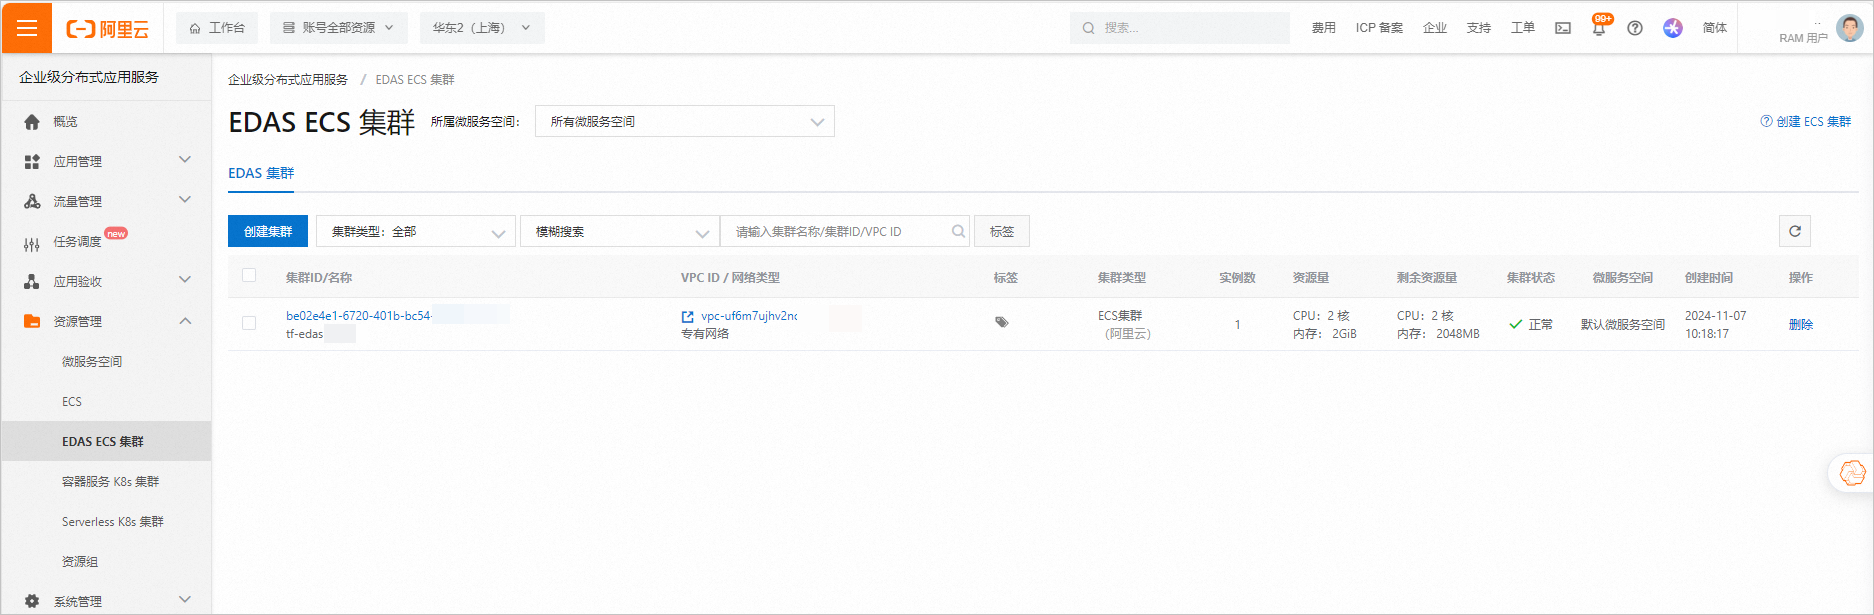
單擊此此教程建立的ECS叢集ID,查看叢集詳情。
步驟三:建立應用與應用分組
在
main.tf檔案中增加如下代碼。# 建立應用 resource "alicloud_edas_application" "app" { application_name = "tf-test-app-${random_integer.default.result}" cluster_id = alicloud_edas_cluster.cluster.id package_type = "JAR" } # 建立應用分組 resource "alicloud_edas_deploy_group" "this" { app_id = alicloud_edas_application.app.id group_name = "tf-test-group-${random_integer.default.result}" }建立執行計畫,並預覽變更。
terraform plan執行如下命令,開始執行代碼。
terraform apply在執行過程中,根據提示輸入
yes並按下Enter鍵,等待命令執行完成,若出現以下資訊,則表示代碼執行成功。Apply complete! Resources: 2 added, 0 changed, 0 destroyed.驗證結果。
執行terraform show命令
您可以在工作目錄中,使用以下命令查詢Terraform已建立資源的詳細資料:
terraform show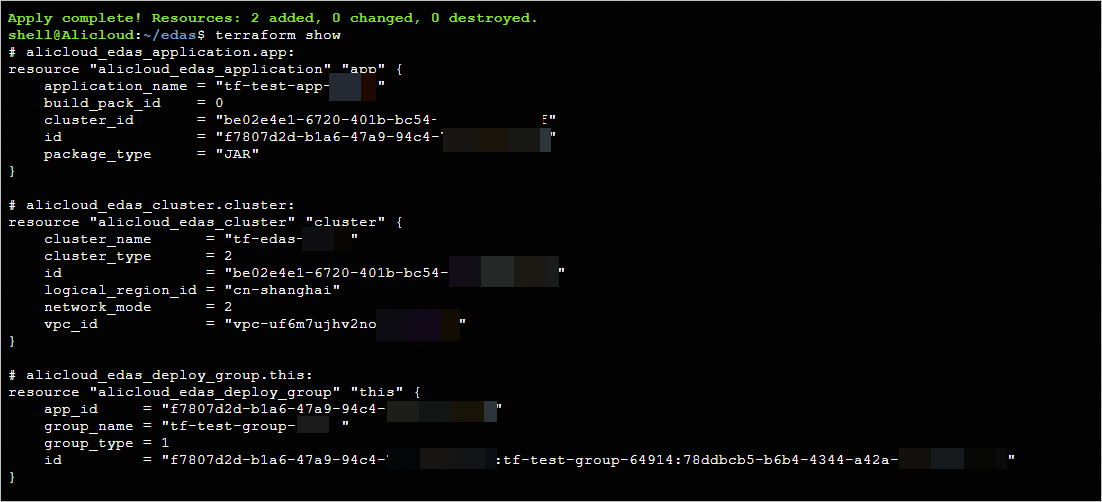
登入控制台查看
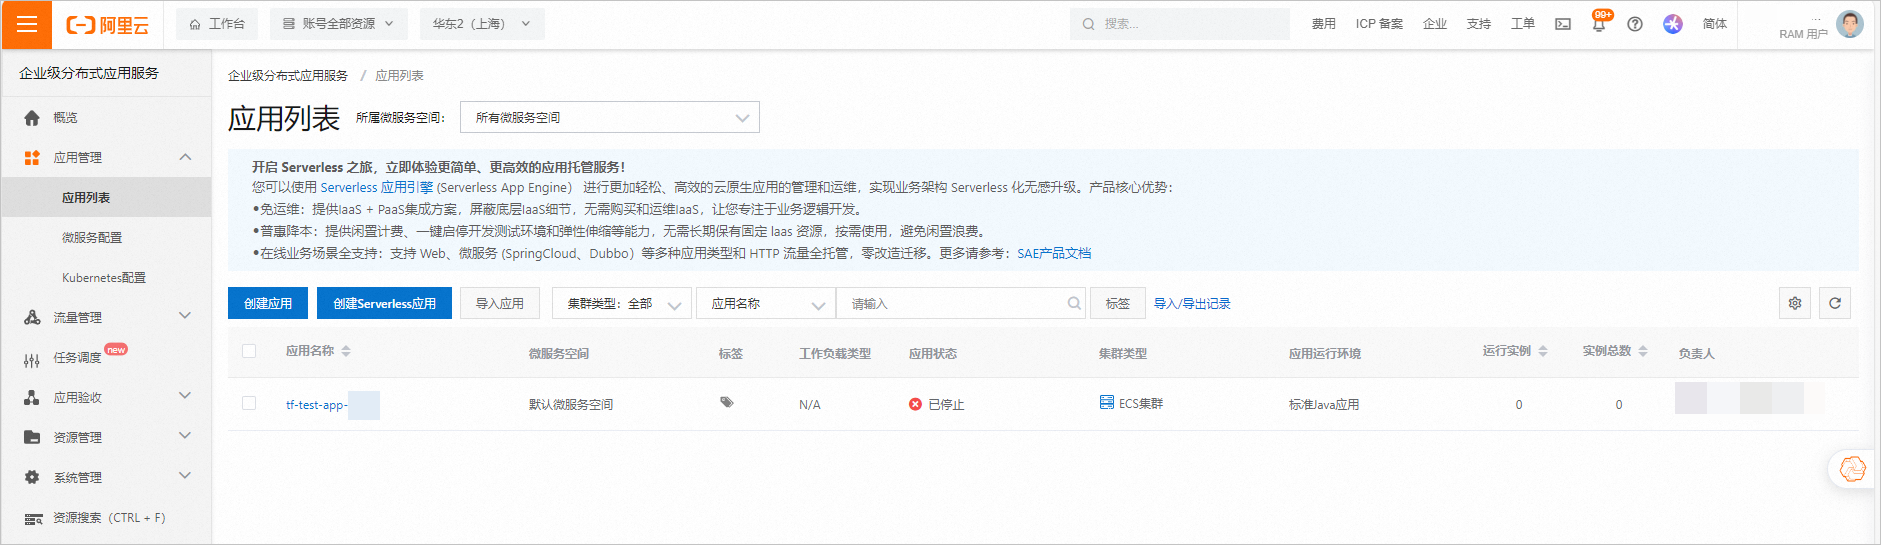
登入Enterprise Distributed Application Service(EDAS) (aliyun.com),進入頁面,左上方選擇地區,此例中選擇華東2 (上海),查看已建立的應用。
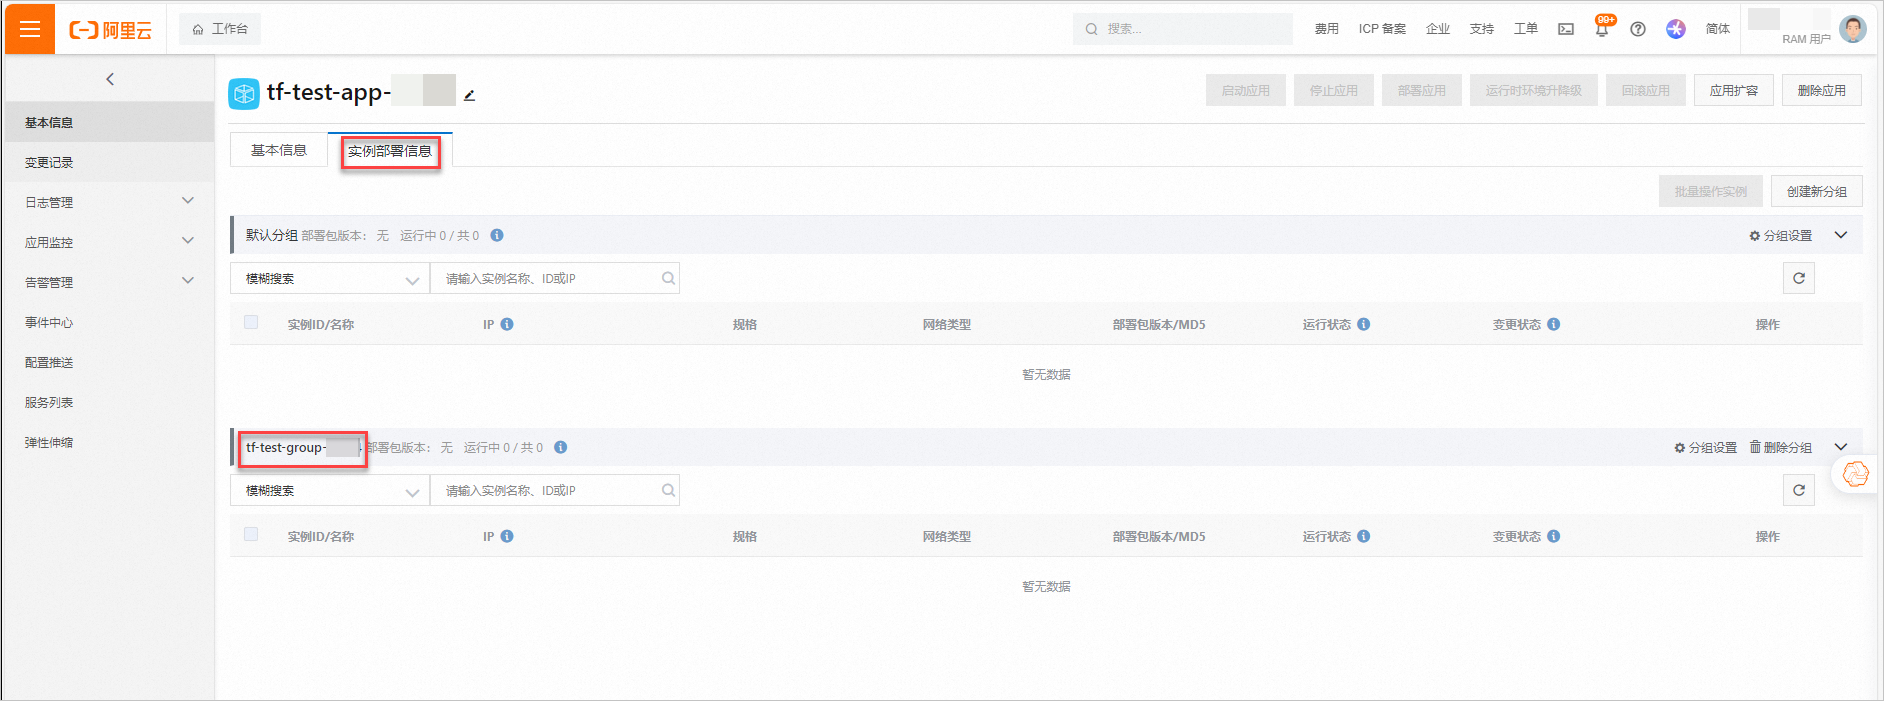
單擊此例建立應用的應用程式名稱,進入執行個體部署資訊頁簽,查看應用的分組資訊。
步驟四:應用擴容並部署
在
main.tf檔案中增加如下代碼。# 截取應用分組ID locals { parts = split(":", alicloud_edas_deploy_group.this.id) group_id = local.parts[2] } # 應用擴容 resource "alicloud_edas_application_scale" "default" { app_id = alicloud_edas_application.app.id deploy_group = local.group_id ecu_info = [alicloud_edas_instance_cluster_attachment.default.ecu_map[alicloud_instance.instance.id]] } # 部署應用 resource "alicloud_edas_application_deployment" "default" { depends_on = [alicloud_edas_application_scale.default, alicloud_edas_instance_cluster_attachment.default] app_id = alicloud_edas_application.app.id group_id = local.group_id war_url = var.war_url } # 部署應用成功後等待應用啟動,一般不超過60s resource "time_sleep" "example2" { depends_on = [alicloud_edas_application_deployment.default] create_duration = "60s" }建立執行計畫,並預覽變更。
terraform plan執行如下命令,開始執行代碼。
terraform apply在執行過程中,根據提示輸入
yes並按下Enter鍵,等待命令執行完成,若出現以下資訊,則表示代碼執行成功。Apply complete! Resources: 3 added, 0 changed, 0 destroyed.驗證結果。
執行terraform show命令
您可以在工作目錄中,使用以下命令查詢Terraform已建立資源的詳細資料:
terraform show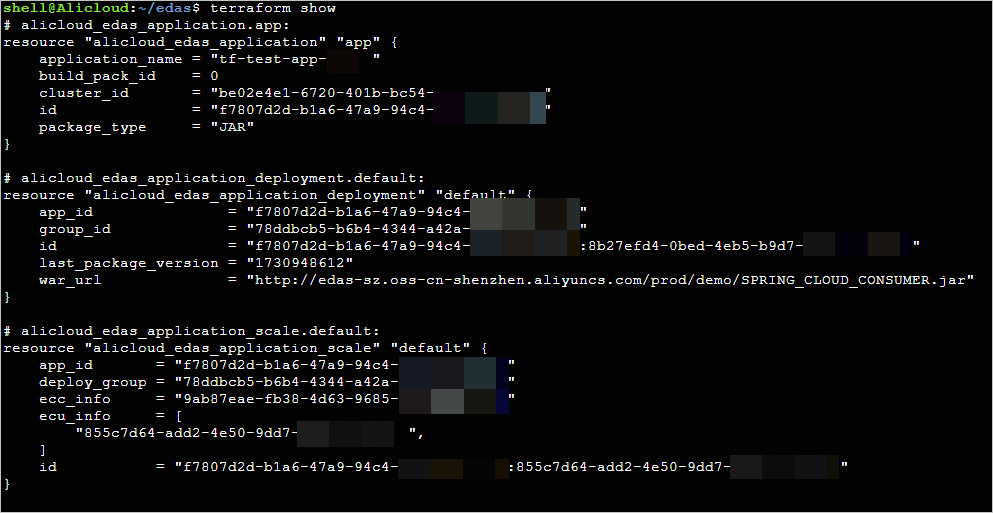
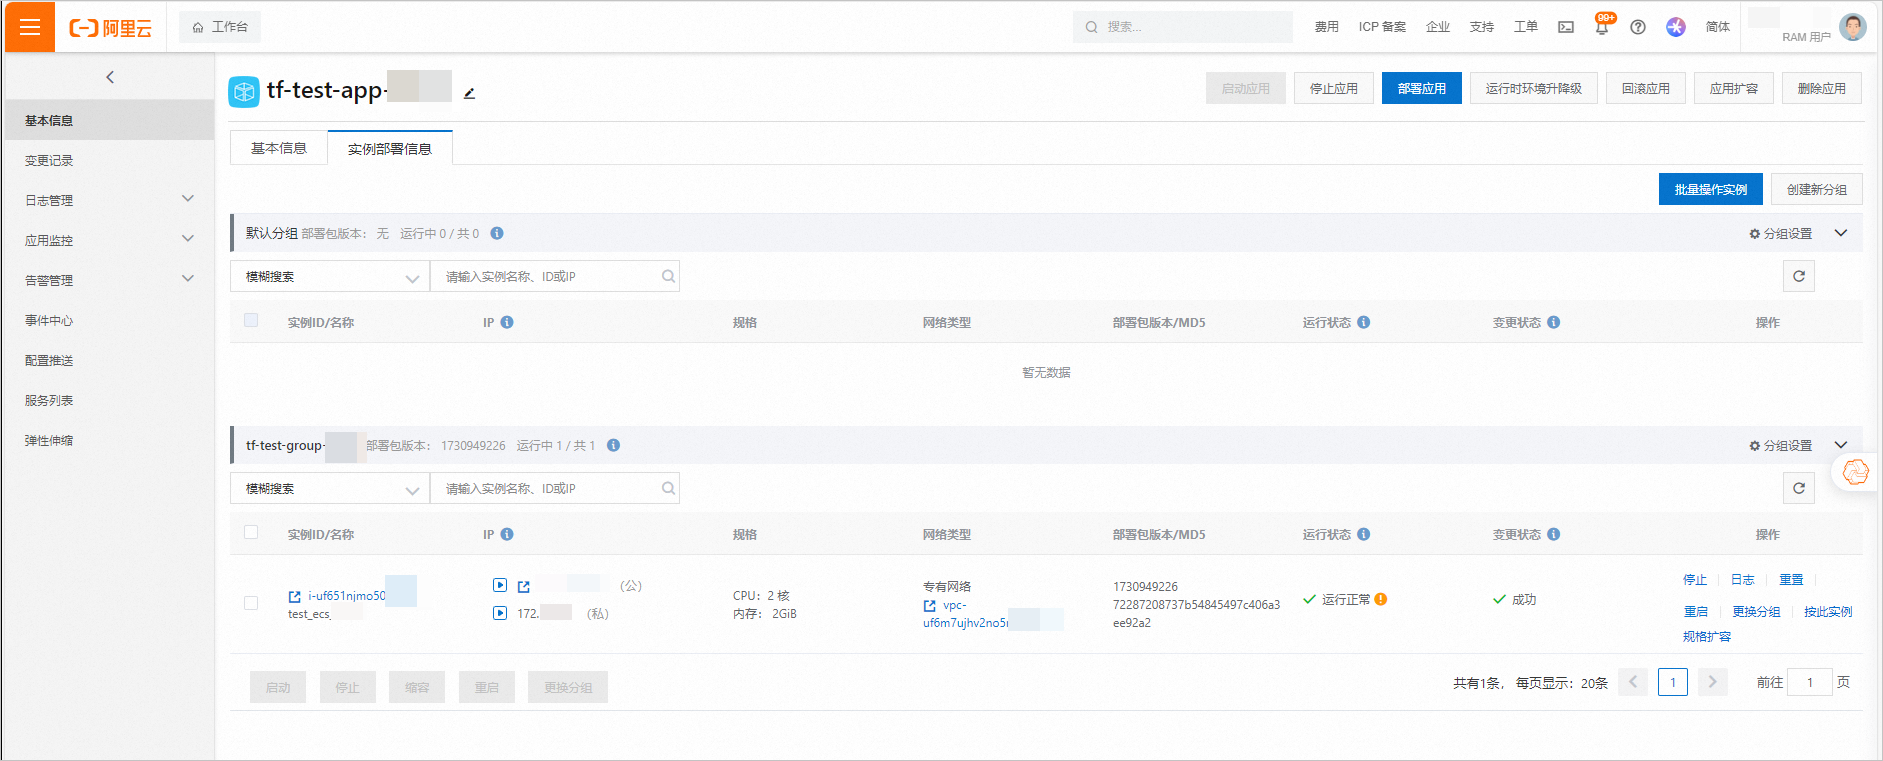
登入控制台查看
登入Enterprise Distributed Application Service(EDAS) (aliyun.com),進入頁面,左上方選擇地區,此例中選擇華東2 (上海),查看已建立的應用。單擊此例建立應用的應用程式名稱,進入執行個體部署資訊頁簽,查看應用的部署資訊。
步驟五:建立SLB並綁定應用
在
main.tf檔案中增加如下代碼。# 建立SLB resource "alicloud_slb_load_balancer" "default" { load_balancer_name = "tf-test-slb-${random_integer.default.result}" vswitch_id = alicloud_vswitch.vswitch.id load_balancer_spec = "slb.s2.small" address_type = "intranet" } # 綁定SLB resource "alicloud_edas_slb_attachment" "this" { depends_on = [time_sleep.example2] app_id = alicloud_edas_application.app.id slb_id = alicloud_slb_load_balancer.default.id slb_ip = alicloud_slb_load_balancer.default.address type = alicloud_slb_load_balancer.default.address_type }建立執行計畫,並預覽變更。
terraform plan執行如下命令,開始執行代碼。
terraform apply在執行過程中,根據提示輸入
yes並按下Enter鍵,等待命令執行完成,若出現以下資訊,則表示代碼執行成功。Apply complete! Resources: 2 added, 0 changed, 0 destroyed.驗證結果。
執行terraform show命令
您可以在工作目錄中,使用以下命令查詢Terraform已建立資源的詳細資料:
terraform show
登入控制台查看
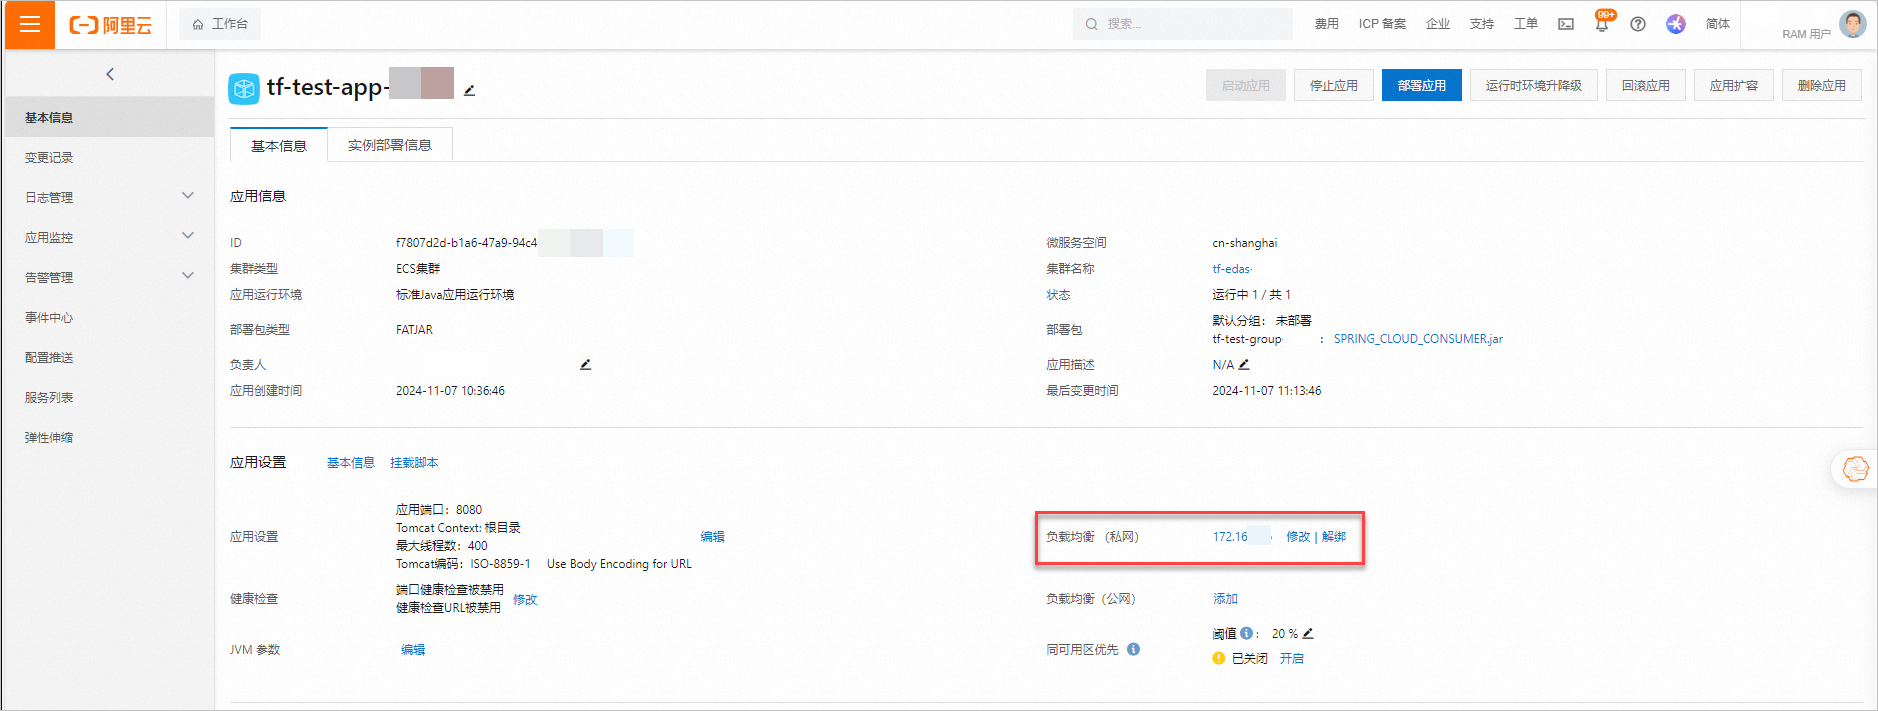
登入Enterprise Distributed Application Service(EDAS) (aliyun.com),進入頁面,左上方選擇地區,此例中選擇華東2 (上海),查看已建立的應用。單擊此例建立應用的應用程式名稱,進入基本資料頁簽,查看應用的基本資料。
清理資源
當您不再需要上述通過Terraform建立或管理的資源時,請運行以下命令以釋放資源。關於terraform destroy的更多資訊,請參見常用命令。
terraform destroy完整樣本
本教程所含範例程式碼支援一鍵運行,您可以直接運行代碼。一鍵運行
範例程式碼
如果您想體驗更多完整樣本,請前往更多完整樣本中對應產品的檔案夾查看。
相關文檔
Terrafrom介紹,請參見Terraform產品介紹。
如果您不瞭解教程中使用的SLB,請參見什麼是傳統型負載平衡CLB。