Ray原生Dashboard僅在叢集運行時可用,叢集終止後使用者無法擷取歷史日誌與監控資料。為解決此問題,本文介紹了RayCluster HistoryServer功能,其在叢集運行期間即時採集節點日誌並持久化儲存至OSS,支援叢集回收後仍可查詢記錄。
前提條件
開啟HistoryServer後,RayCluster建立的Pod的PostStartHook會被覆蓋。如果需要使用PostStartHook,請將以下指令碼添加到其中。該指令碼會將Ray的
nodeid寫入/tmp/ray/init.log檔案,供HistoryServer Collector的Sidecar讀取和使用。GetNodeId(){ while true; do nodeid=$(ps -ef | grep raylet | grep node_id | grep -v grep | grep -oP '(?<=--node_id=)[^ ]*' | tr -d '\n') if [ -n "$nodeid" ]; then echo "$(date) raylet started: \"$(ps -ef | grep raylet | grep node_id | grep -v grep | grep -oP '(?<=--node_id=)[^ ]*')\" => ${nodeid}" >> /tmp/ray/init.log echo $nodeid > /tmp/ray/alibabacloud_raylet_node_id break else echo "$(date) raylet not start" >> /tmp/ray/init.log sleep 1 fi done } GetNodeId開啟HistoryServer後,RayCluster建立的Pod的ServiceAccount會被替換。新的ServiceAccount名稱建置規則為:
ServiceAccountPrefix-RayClusterName。如果需要使用自訂的ServiceAccount,請確保其配置與建置規則一致。安裝的Kuberay組件版本需不低於
1.2.1.5。具體操作,請參見在ACK中安裝KubeRay組件。
1. 開啟叢集RRSA功能
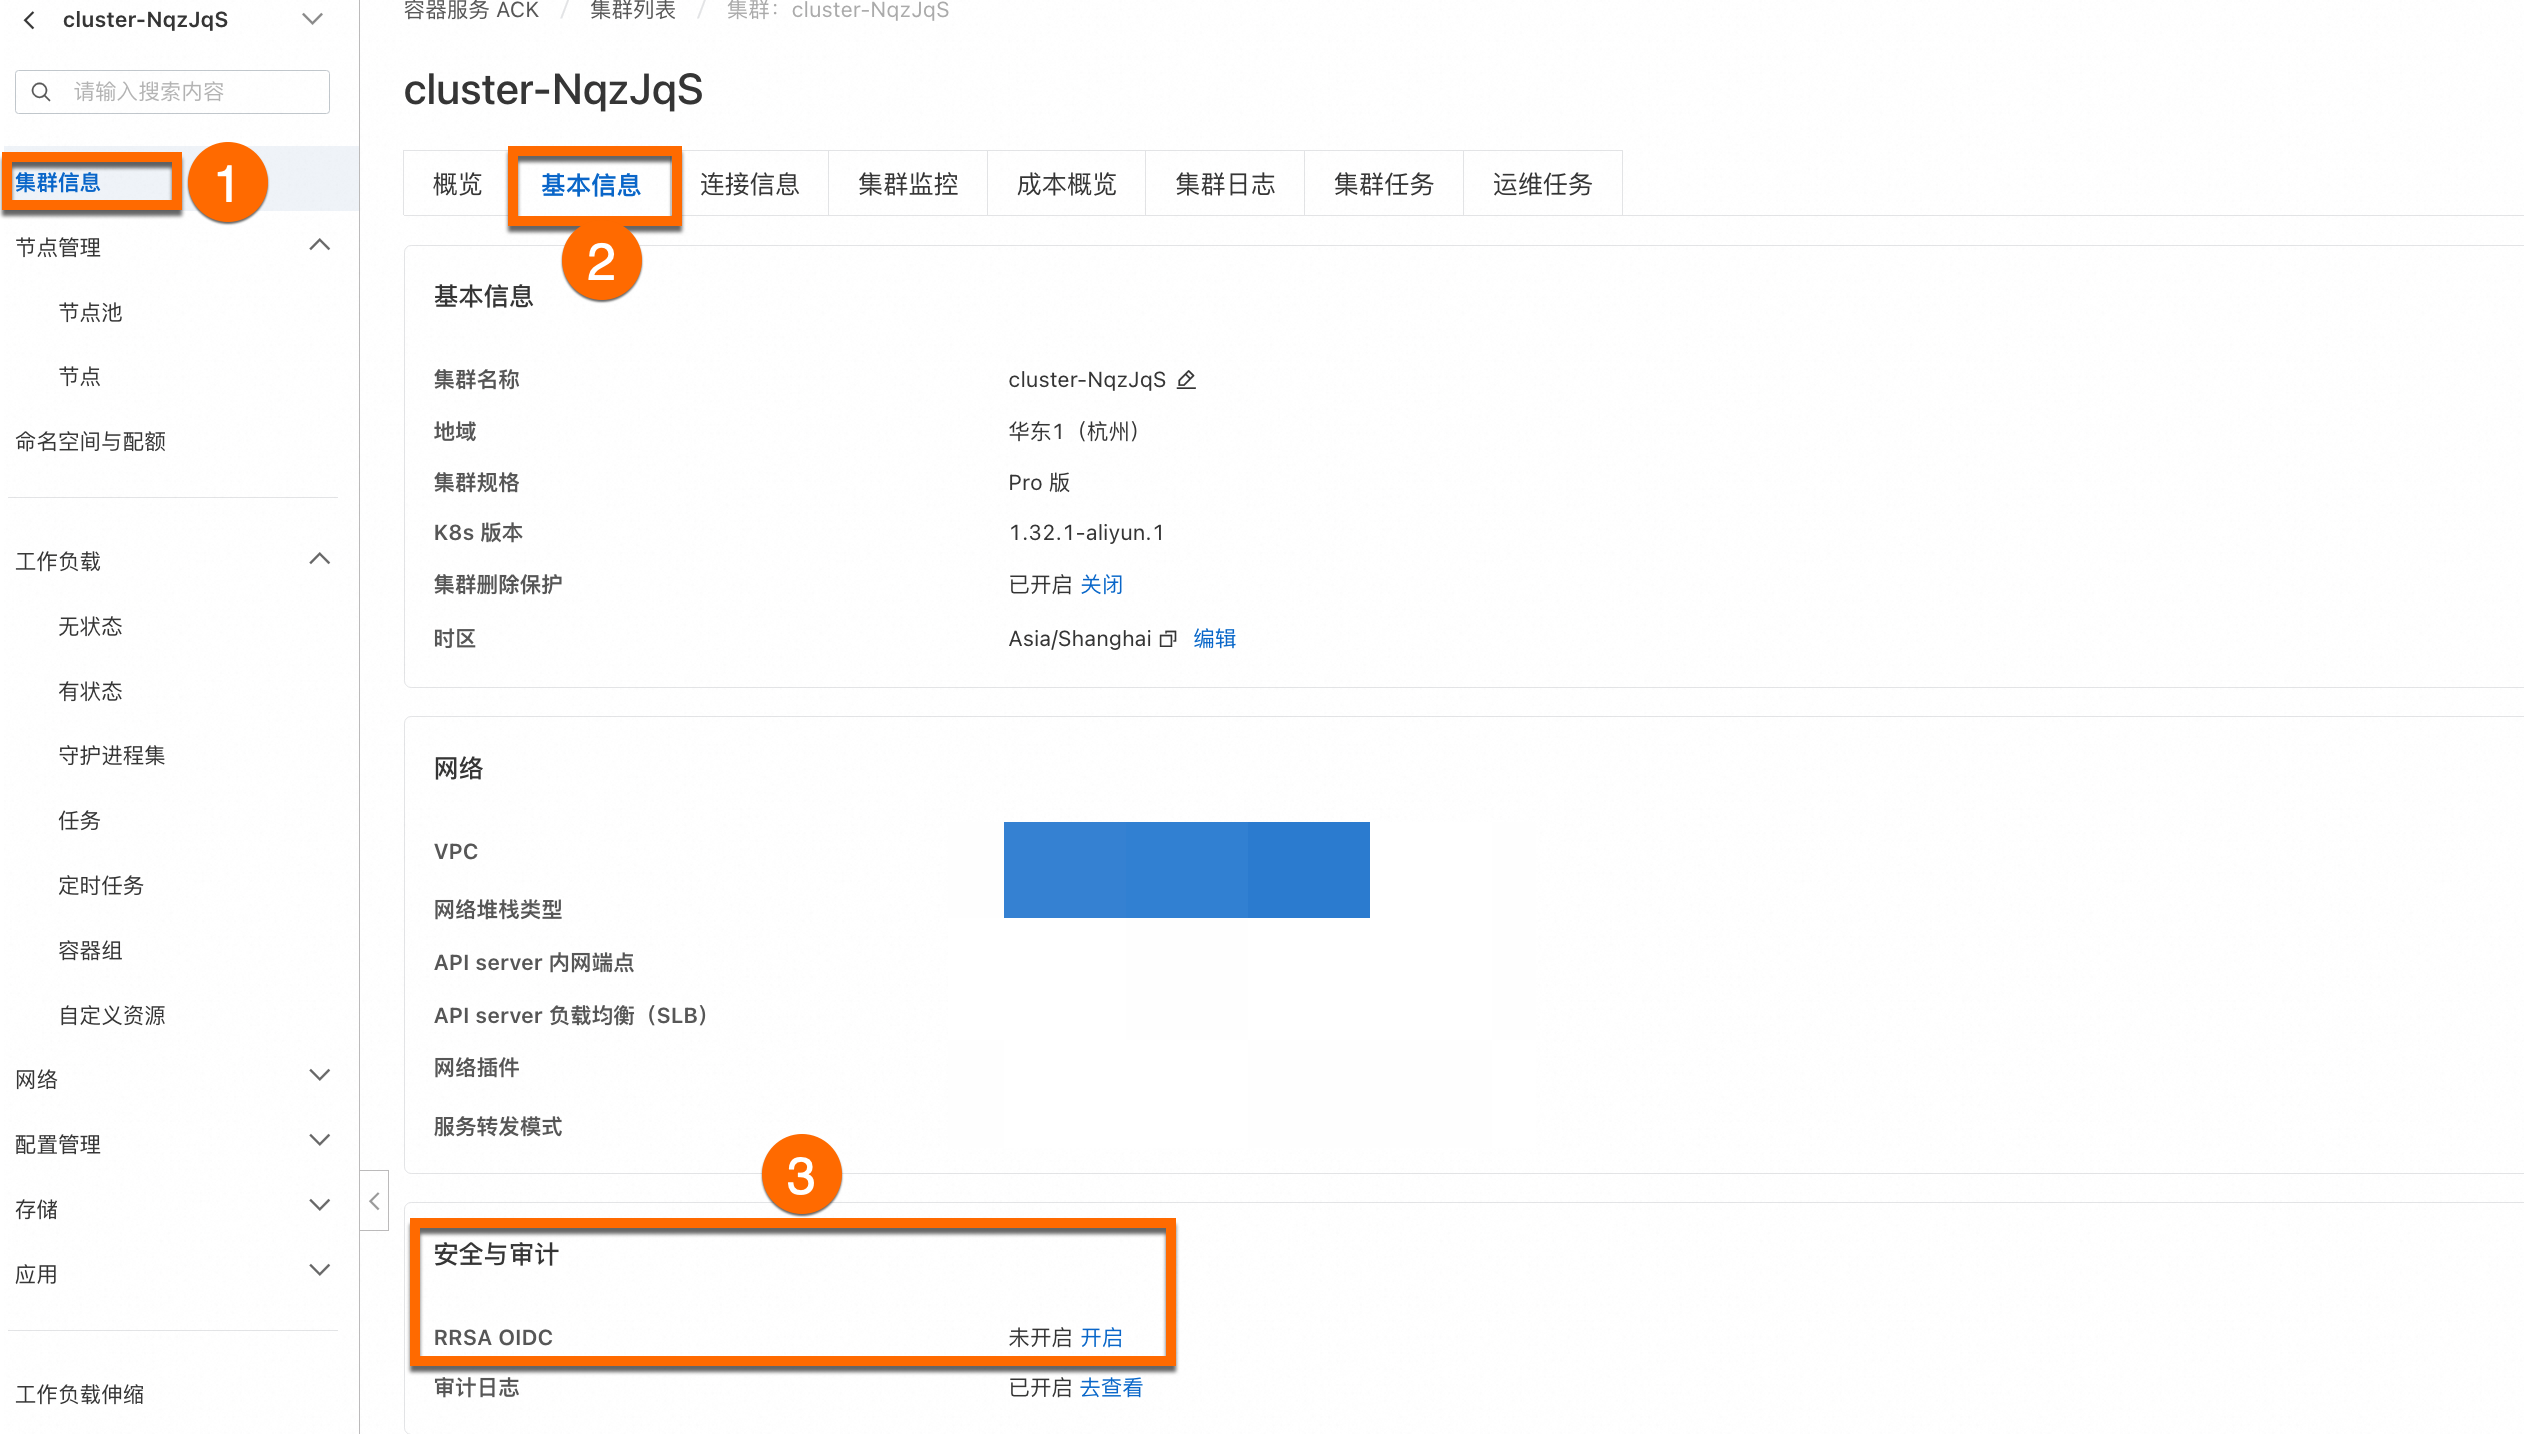
登入Container Service管理主控台,在左側導覽列選擇叢集列表。
在叢集列表頁面,單擊目的地組群名稱,然後在左側導覽列,選擇叢集資訊。
啟用叢集的RRSA OIDC功能。在叢集頁面,叢集資訊 > 基本資料 > 安全與審計,單擊開啟RRSA OIDC。如果您想瞭解更詳細的操作,請參見啟用RRSA OIDC功能。
2. 建立RRSA角色
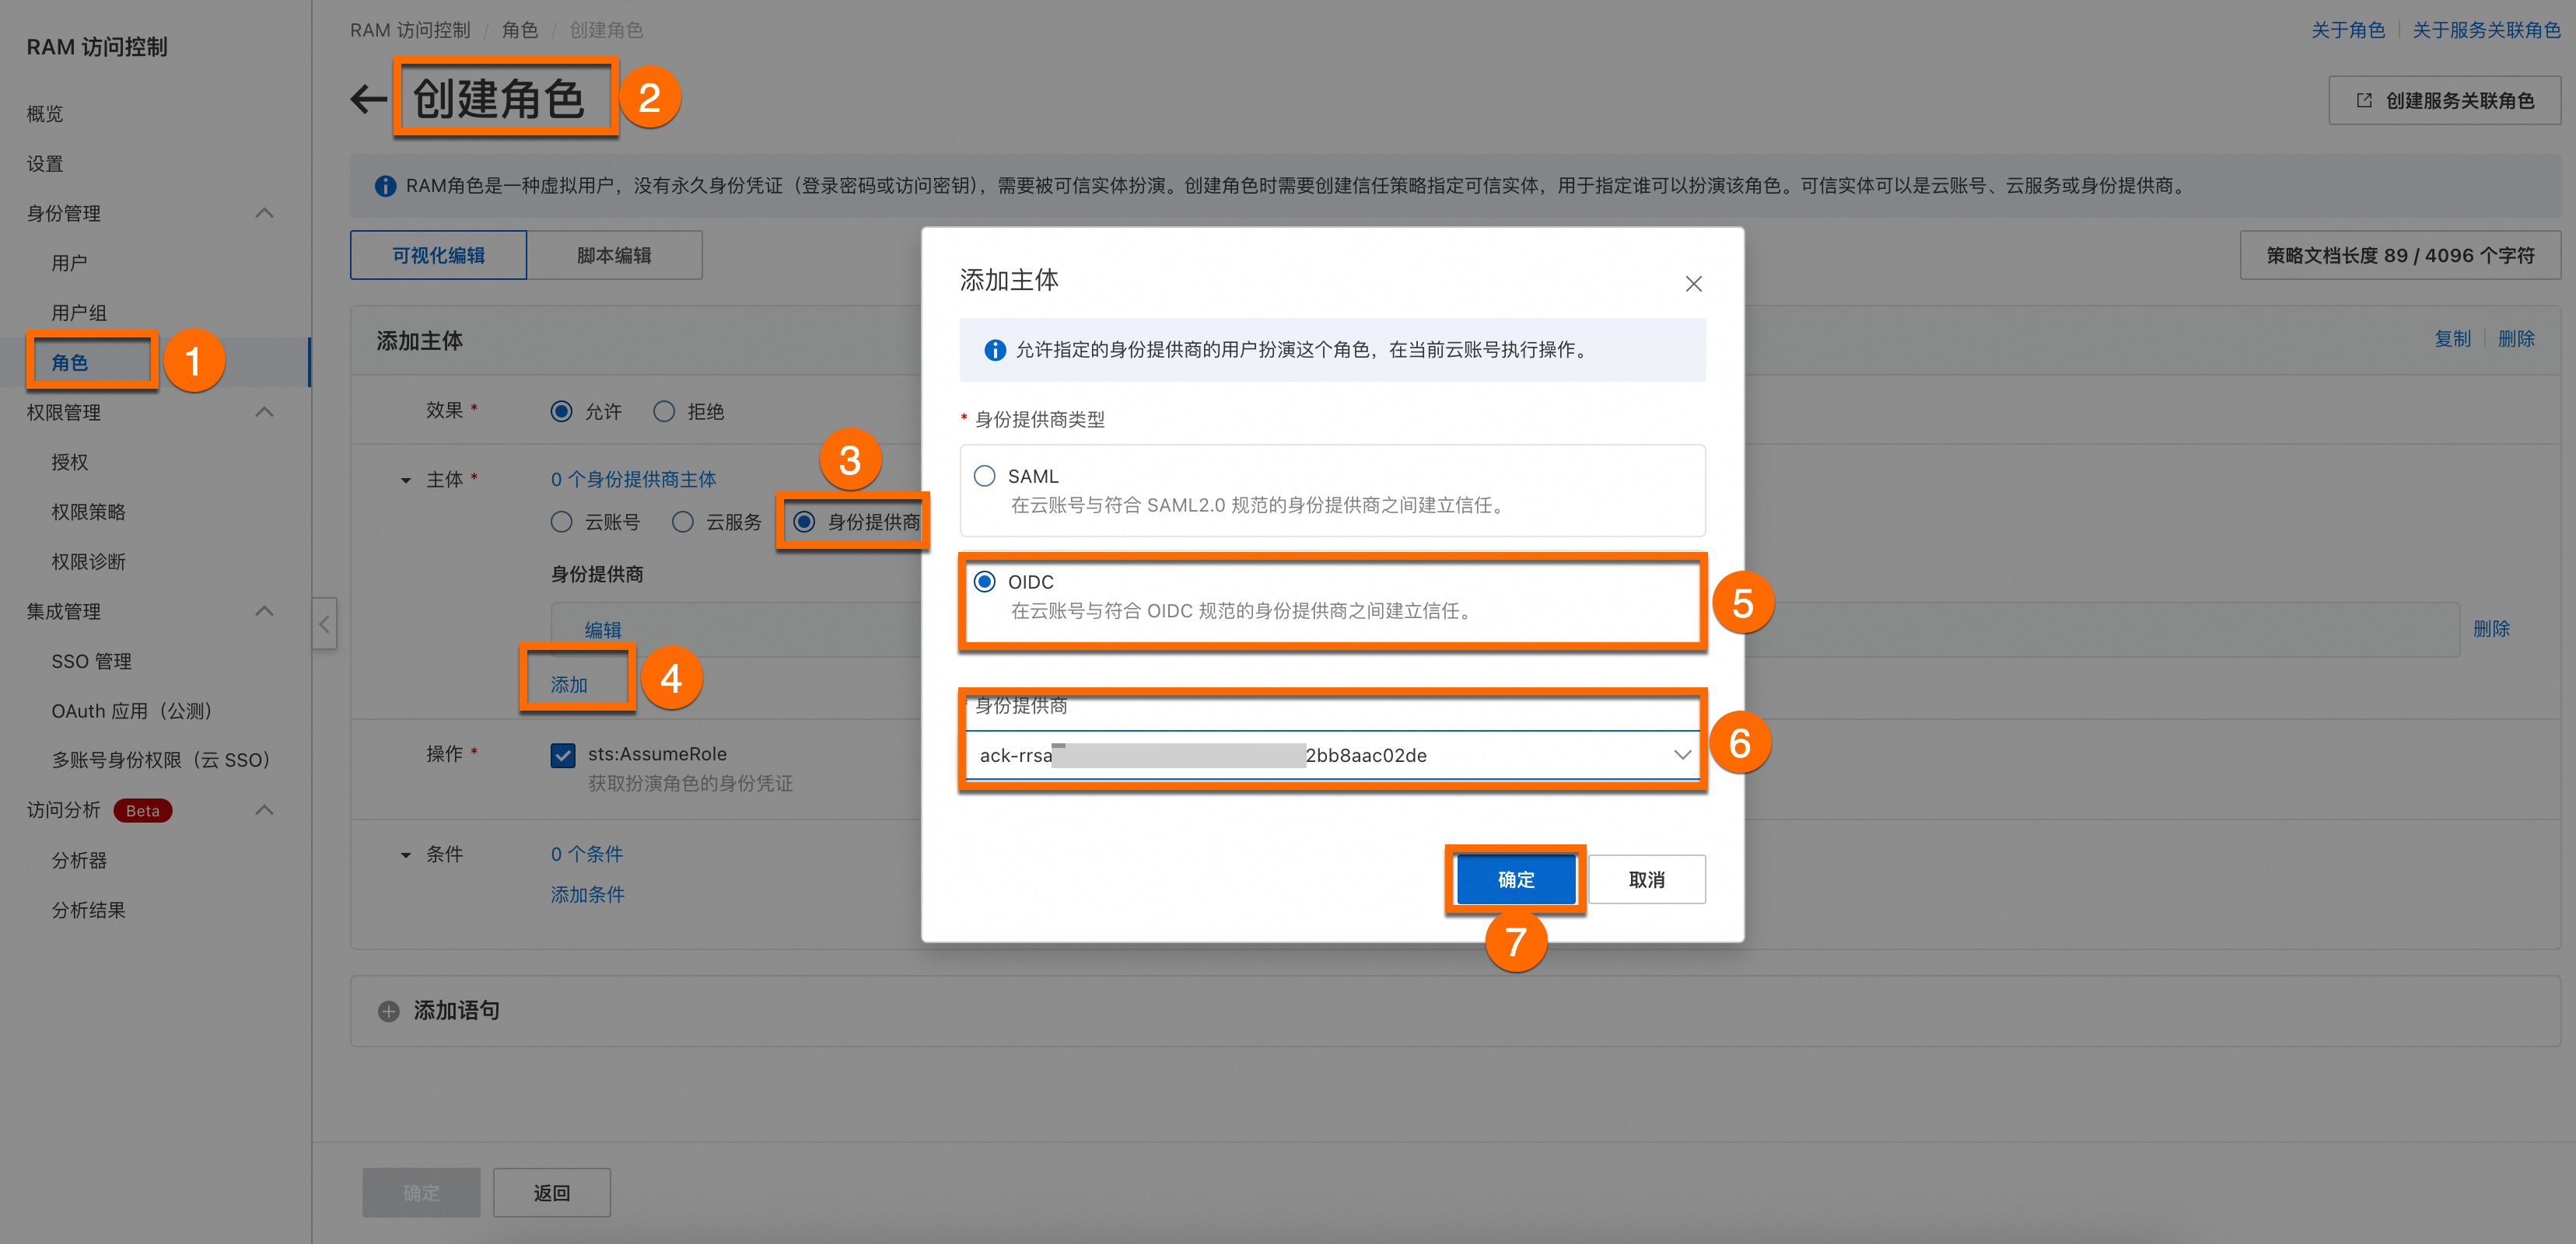
建立RRSA角色。
使用Resource Access Management員登入RAM控制台。在左側導覽列,選擇,在角色頁面,單擊創建角色,選擇可信的實體類型為身分提供商。
添加主體。
身份供應商:選擇已開啟RRSA OIDC的叢集。
添加條件。
關聯特定ServiceAccount,RRSA角色建立完成後,將RRSA角色關聯集群中的特定ServiceAccount。
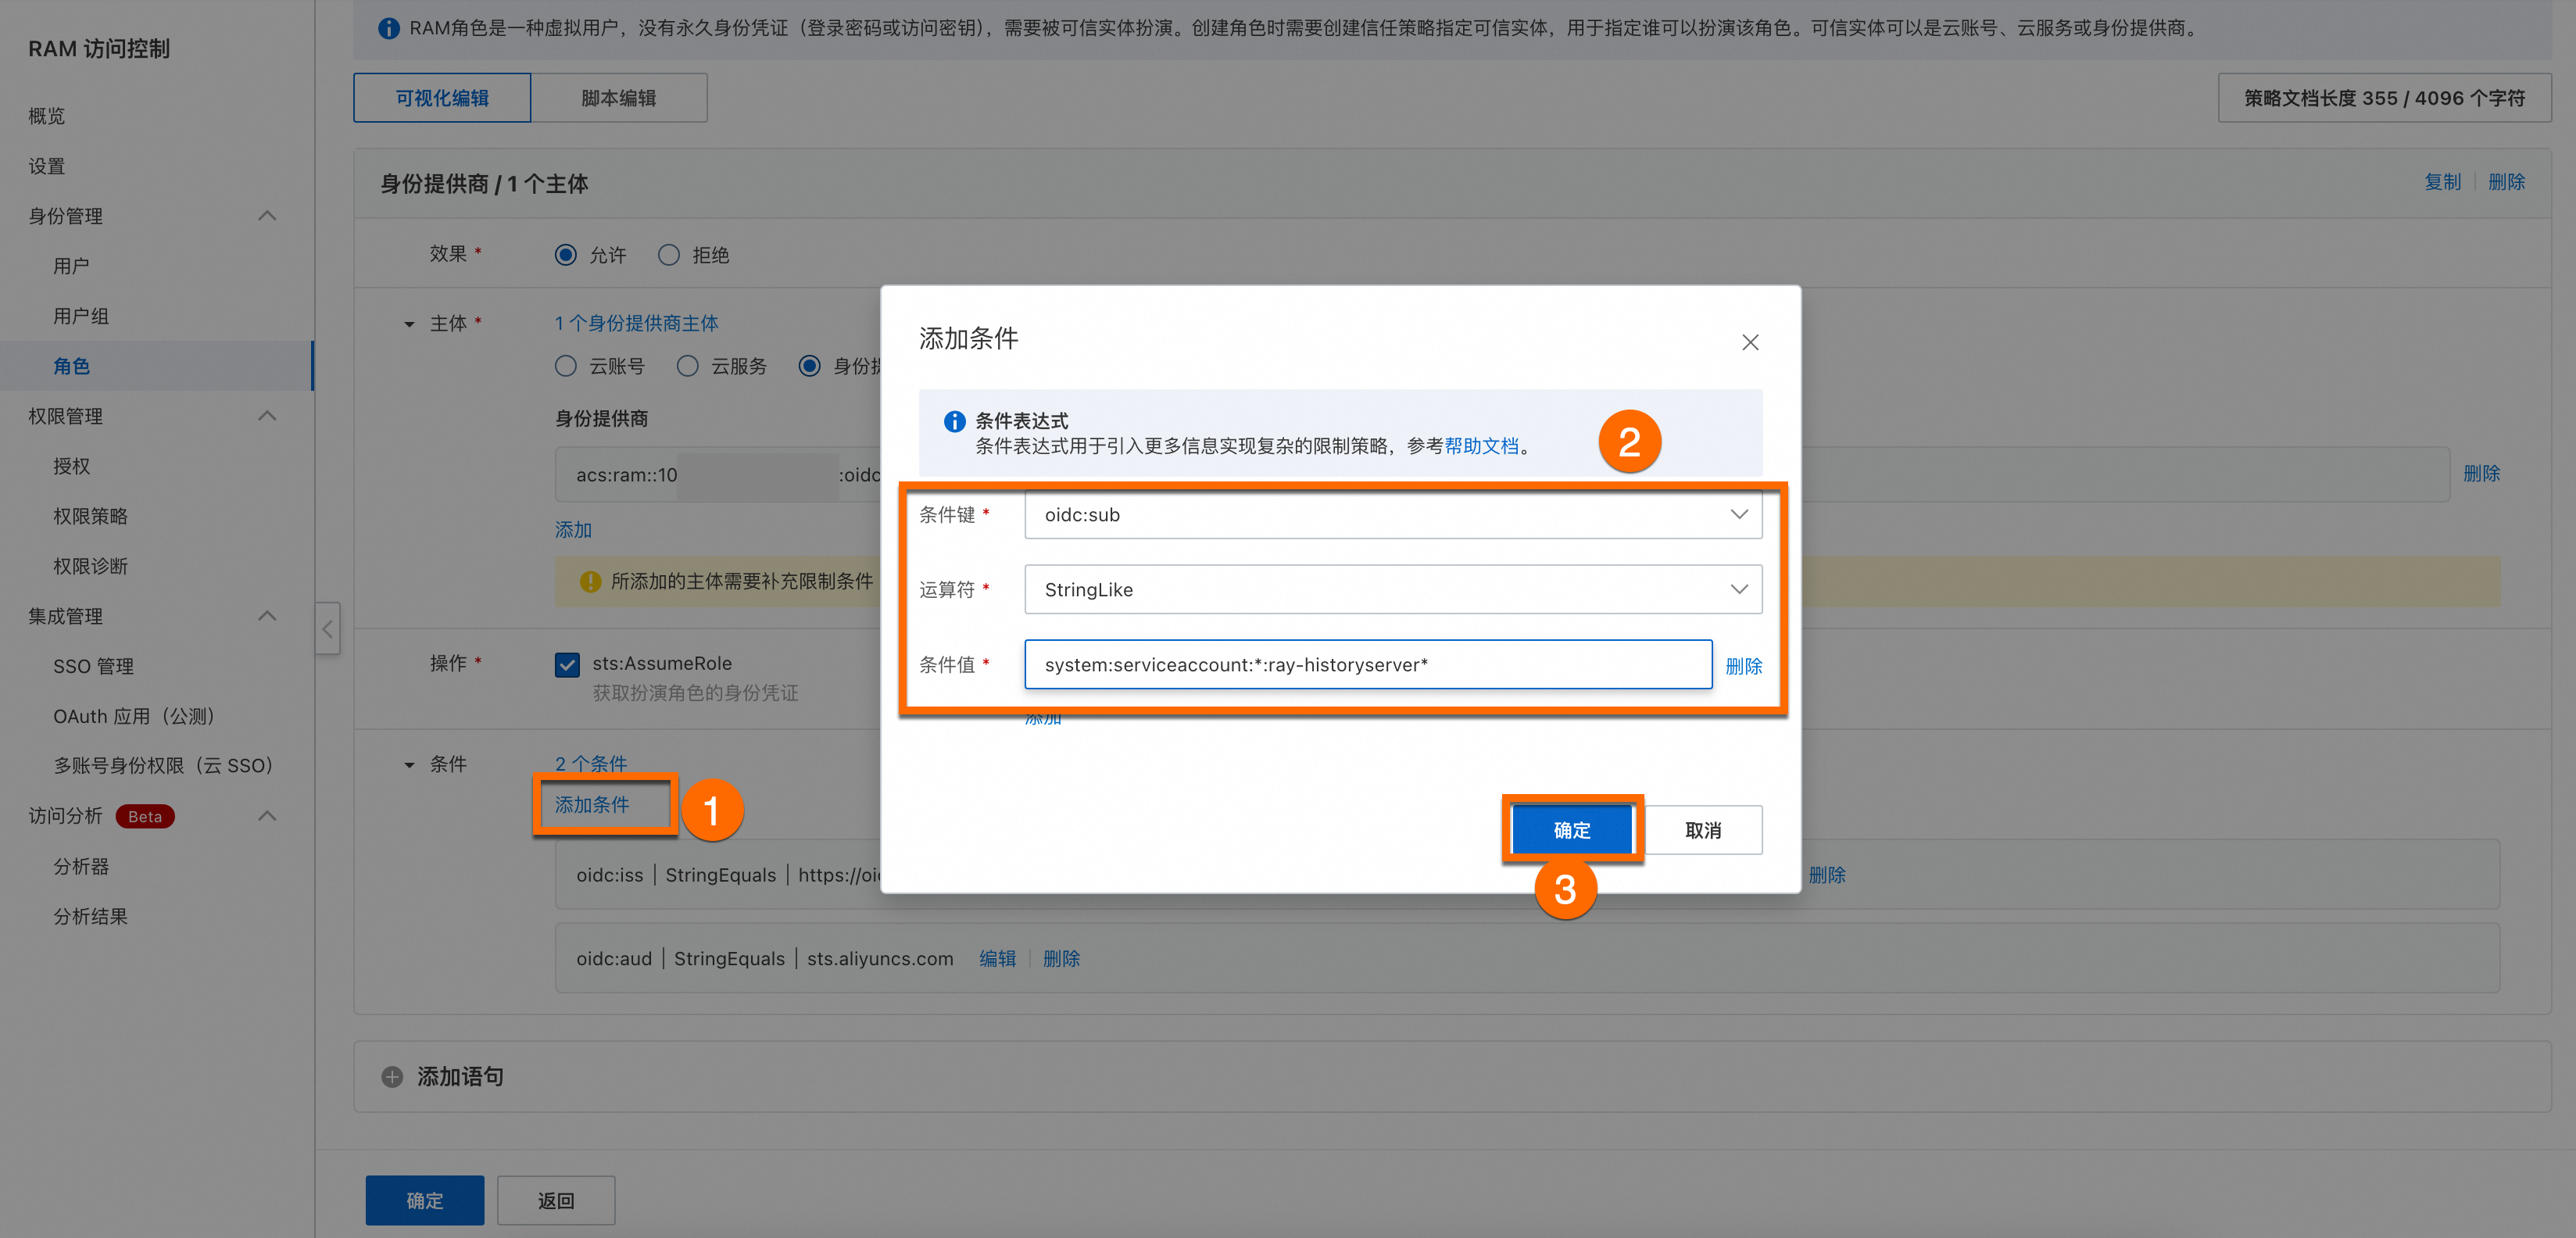
條件名稱
選擇值
條件鍵
oidc:sub運算子
StringLike條件值
system:serviceaccount:*:ray-historyserver*說明*代表萬用字元,<ray-historyserver>的部分對應後續操作中的serviceAccountPrefix。
ray-historyserver是可以自訂的部分,需要與安裝Historyserver時的ServiceAccountPrefix相同。
說明如果您使用的是自訂的SA,您需要單擊添加語句,在同一個RRSA角色中添加兩個主體,並分別為兩個主體添加以下條件。
主體1:身份供應商
條件名稱
選擇值
條件鍵
oidc:sub運算子
StringEquals條件值
system:serviceaccount:kuberay:ray-historyserver主體2:身份供應商
條件名稱
選擇值
條件鍵
oidc:sub運算子
StringLike條件值
system:serviceaccount:*:rhs*
兩個SA分別為
system:serviceaccount:kuberay:ray-historyserver以及system:serviceaccount:*:rhs*,其中rhs是可自訂部分。
為RRSA角色新增授權。
為角色新增
AliyunARMSReadOnlyAccess唯讀訪問業務即時監控服務(ARMS)的許可權。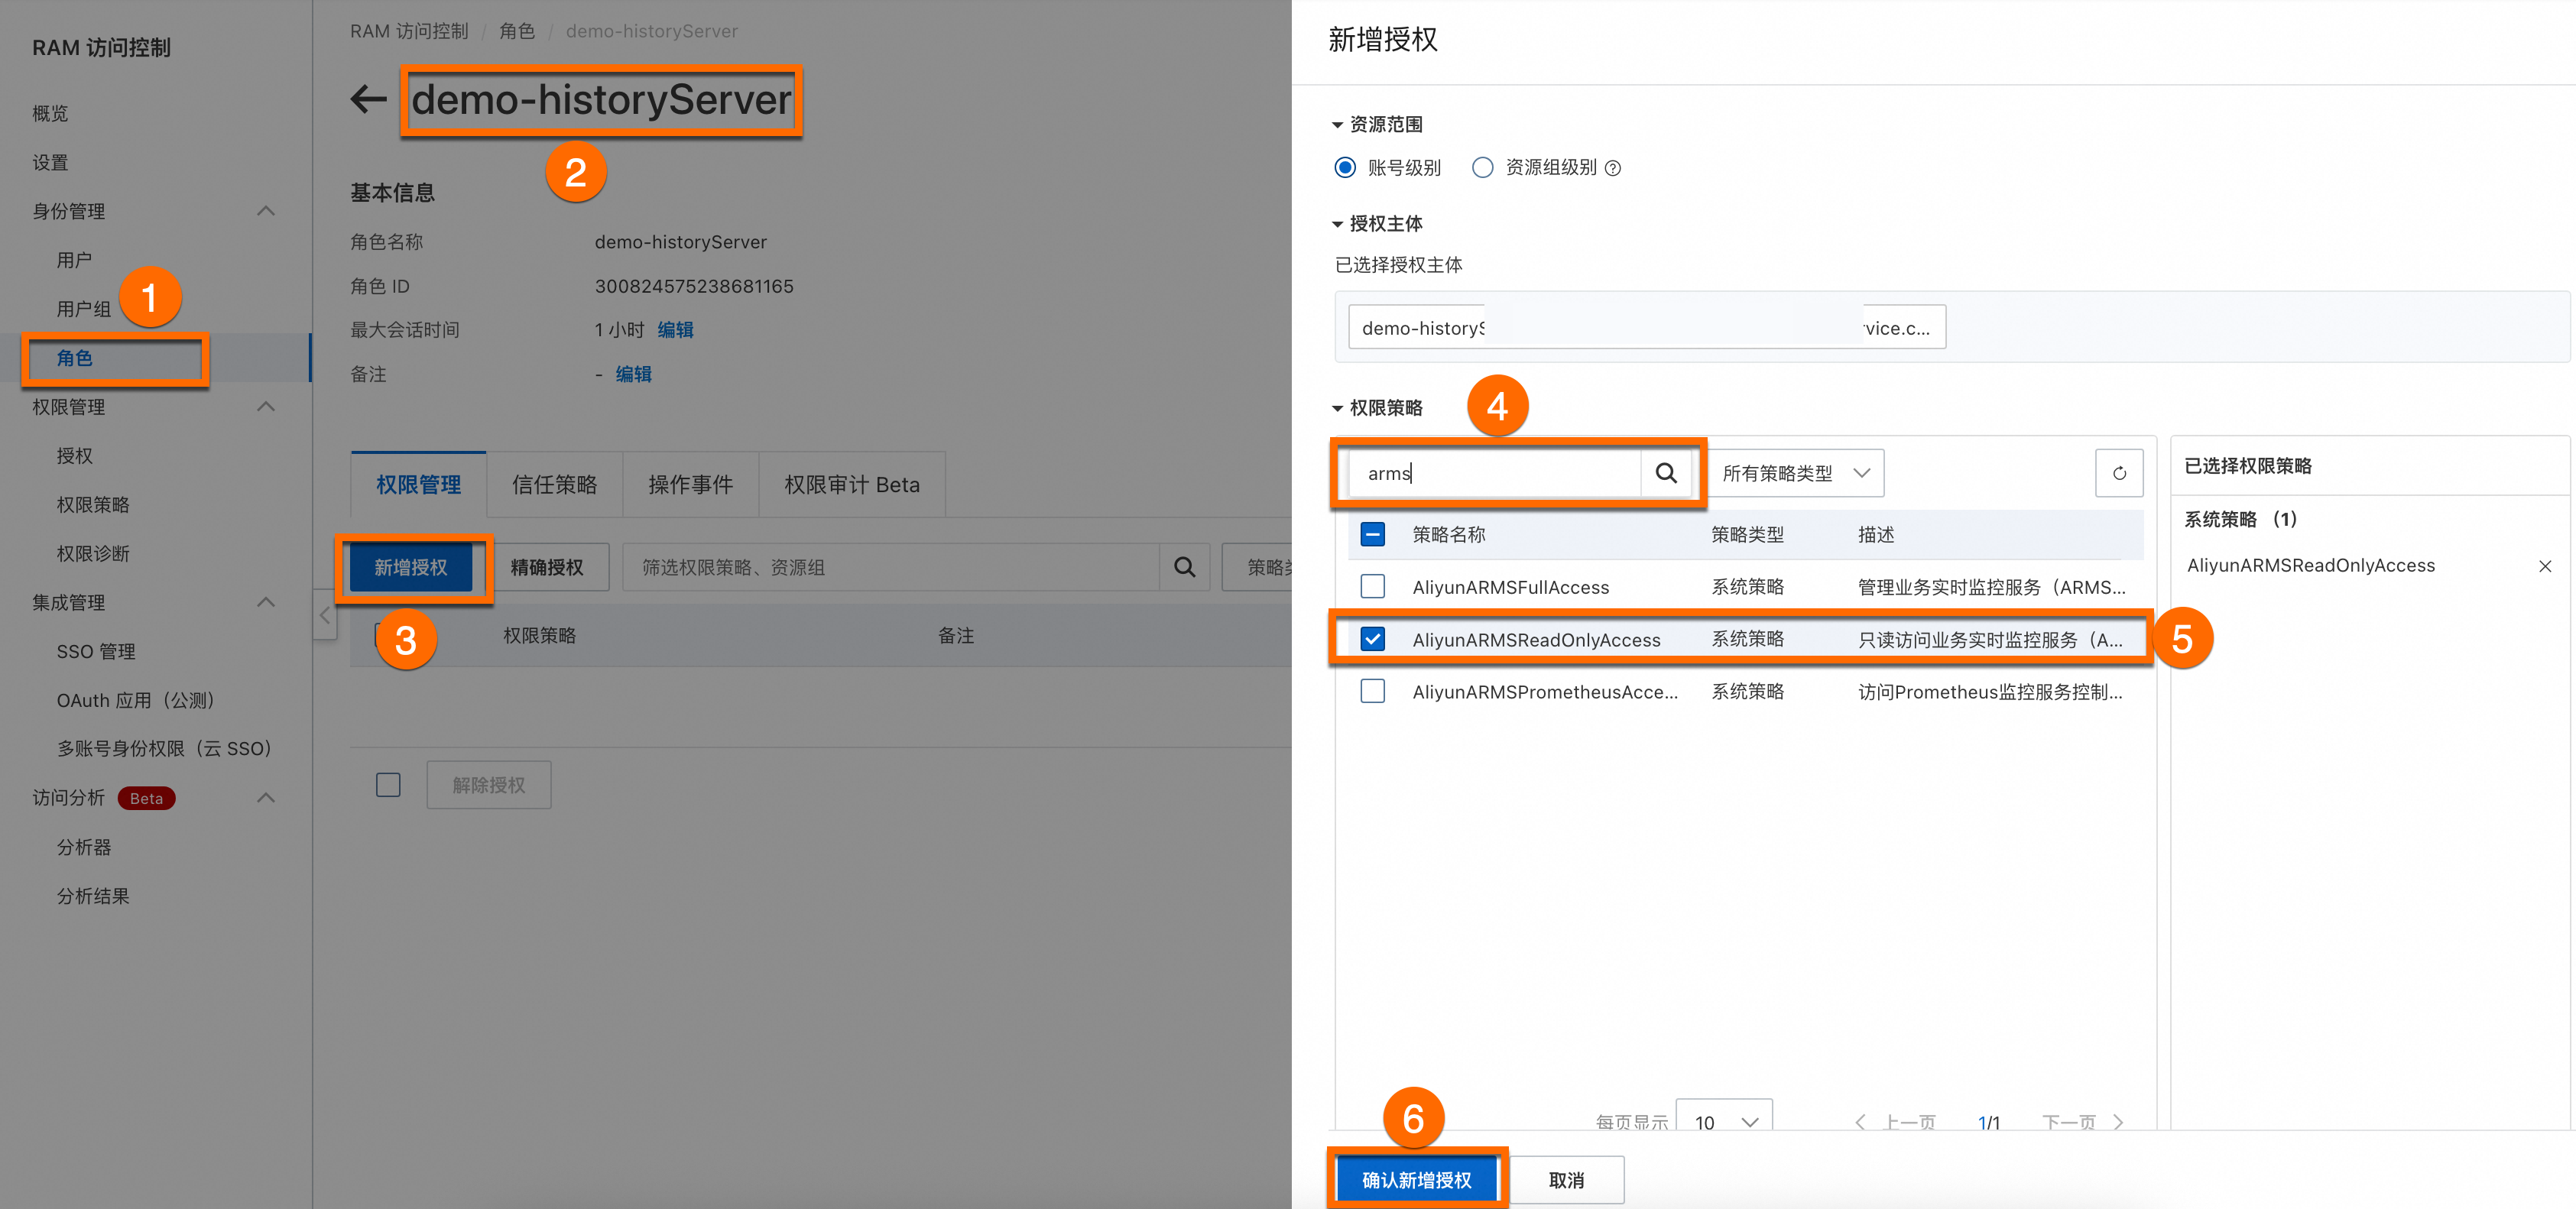
為角色新增
AliyunOSSFullAccess管理Object Storage Service服務(OSS)許可權。操作步驟同上。重要本文中賦予了角色OSS的全部許可權,但在實際使用中,建議採用精確授權以控制許可權範圍。
3. 建立OAuth應用
建立並配置OAuth公司專屬應用程式。
重要若您需要使用公網串連到HistoryServer。具體配置公網訪問操作,請參見配置公網訪問。
 說明
說明回調地址為:
http://localhost:8080/auth/callback。其中localhost:8080是HistoryServer的網域名稱,對應後續操作中的CallbackServiceName,需要在安裝HistoryServer時指定;/auth/callback是固定的路徑尾碼。配置OAuth應用。
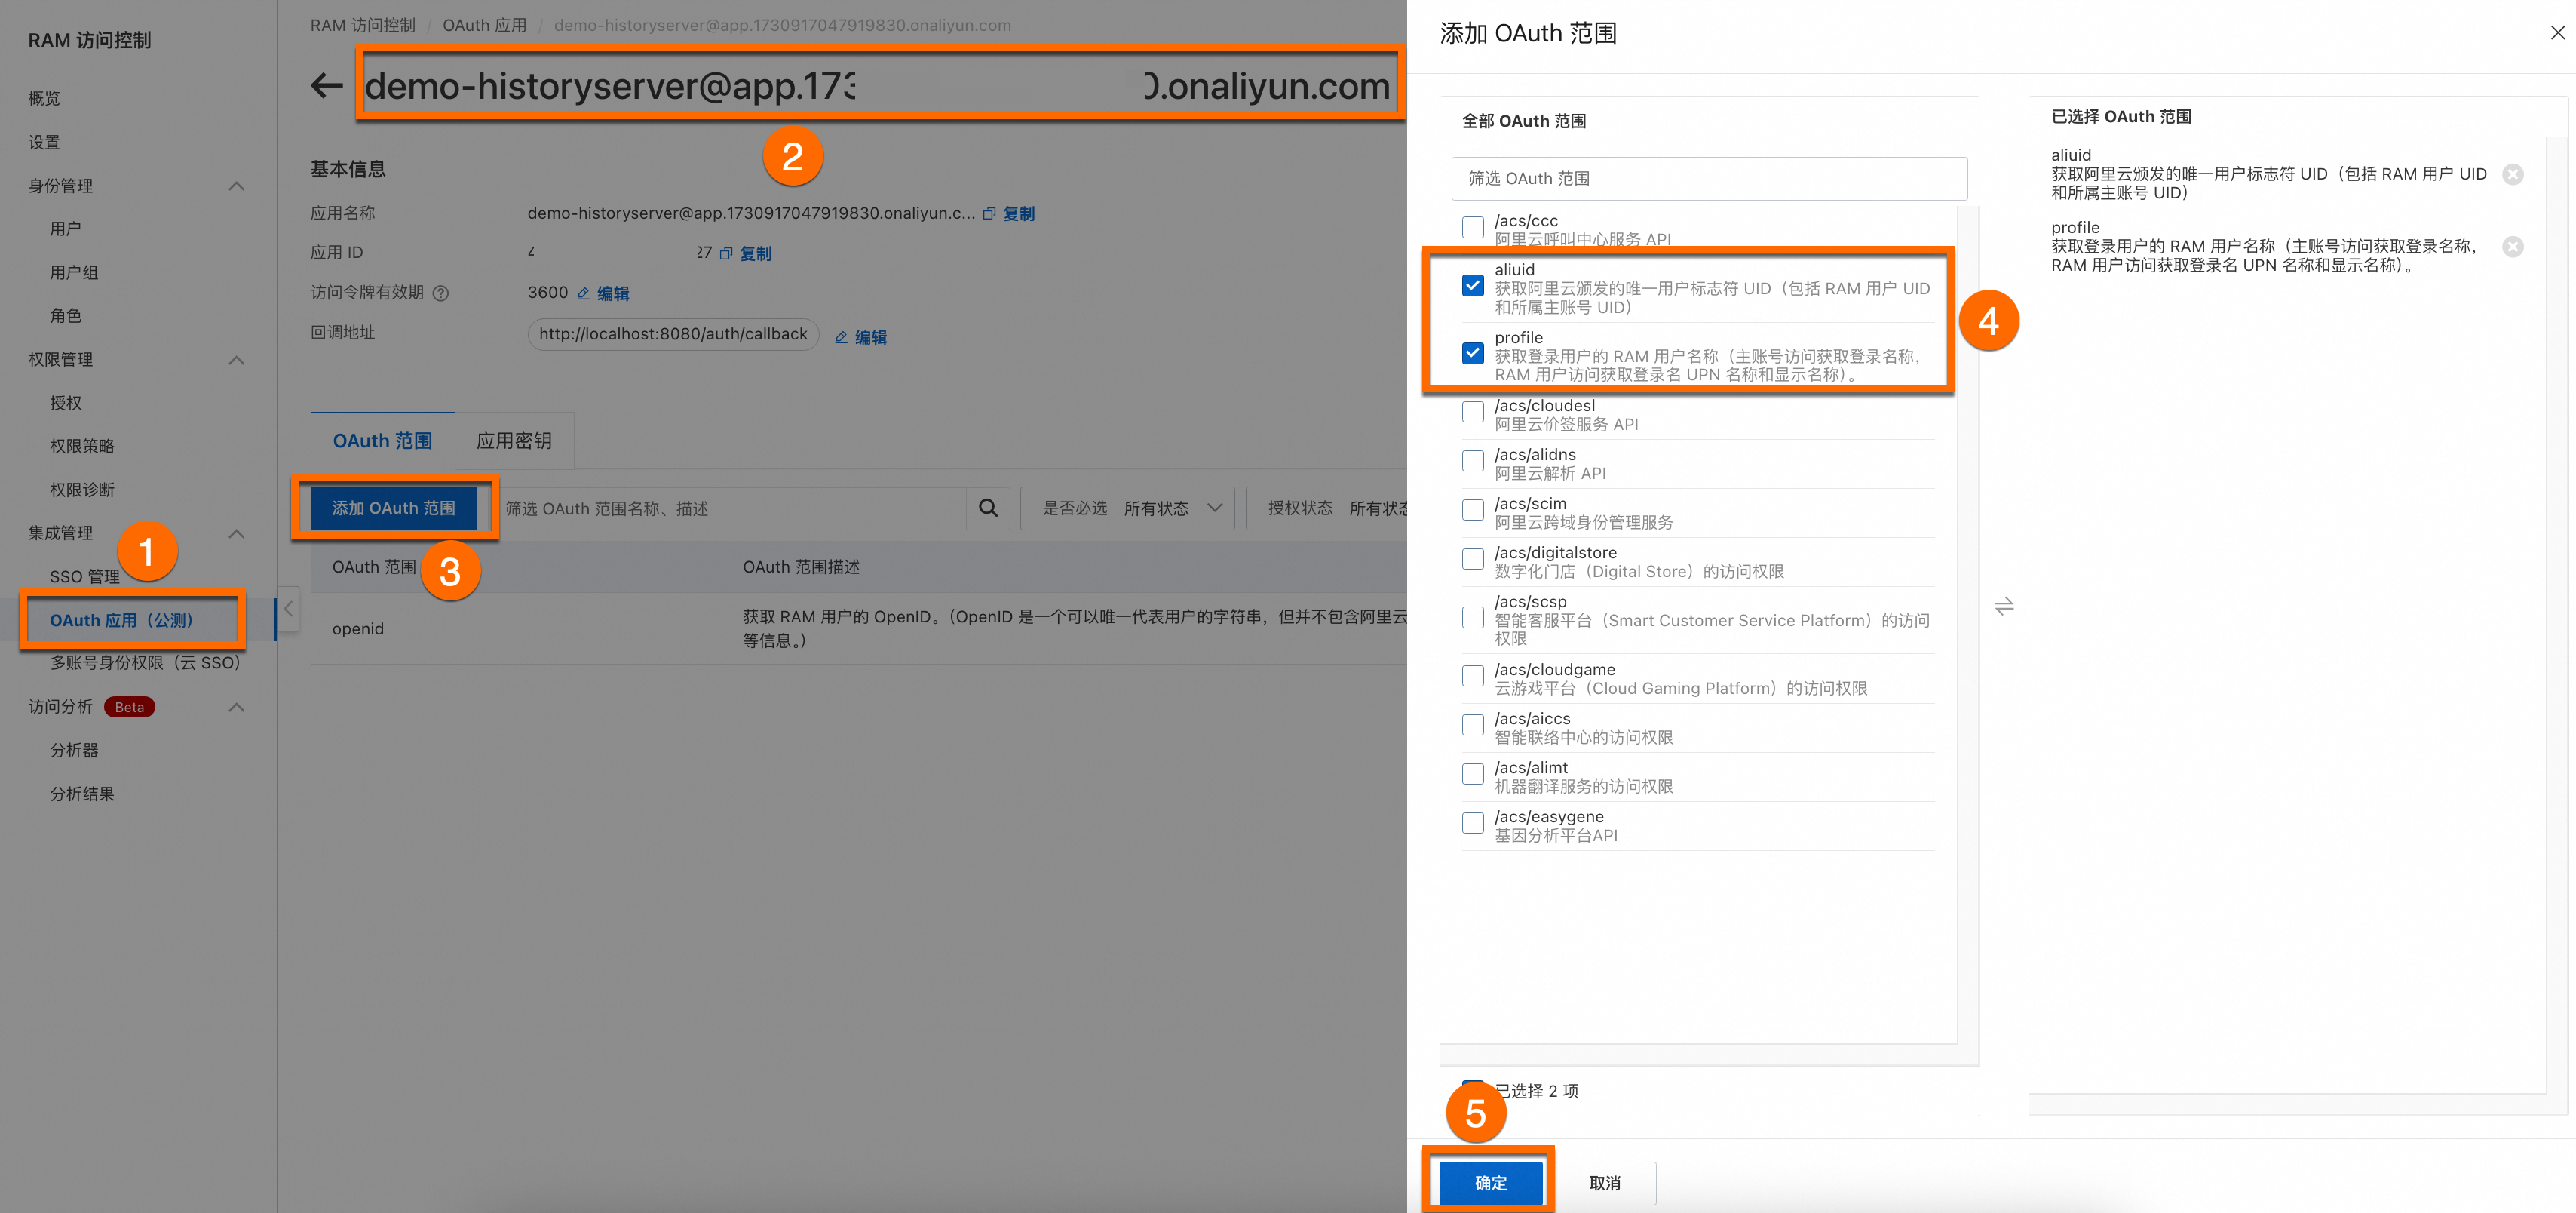
添加OAuth範圍。
aliuid
擷取阿里雲頒發的唯一使用者標誌符 UID(包括 RAM 使用者 UID 和所屬主帳號 UID)。
profile
擷取登入使用者的 RAM 使用者名稱稱(主帳號訪問擷取登入名稱稱,RAM 使用者訪問擷取登入名稱 UPN 名稱和顯示名稱)。
建立並儲存OAuth應用密鑰。
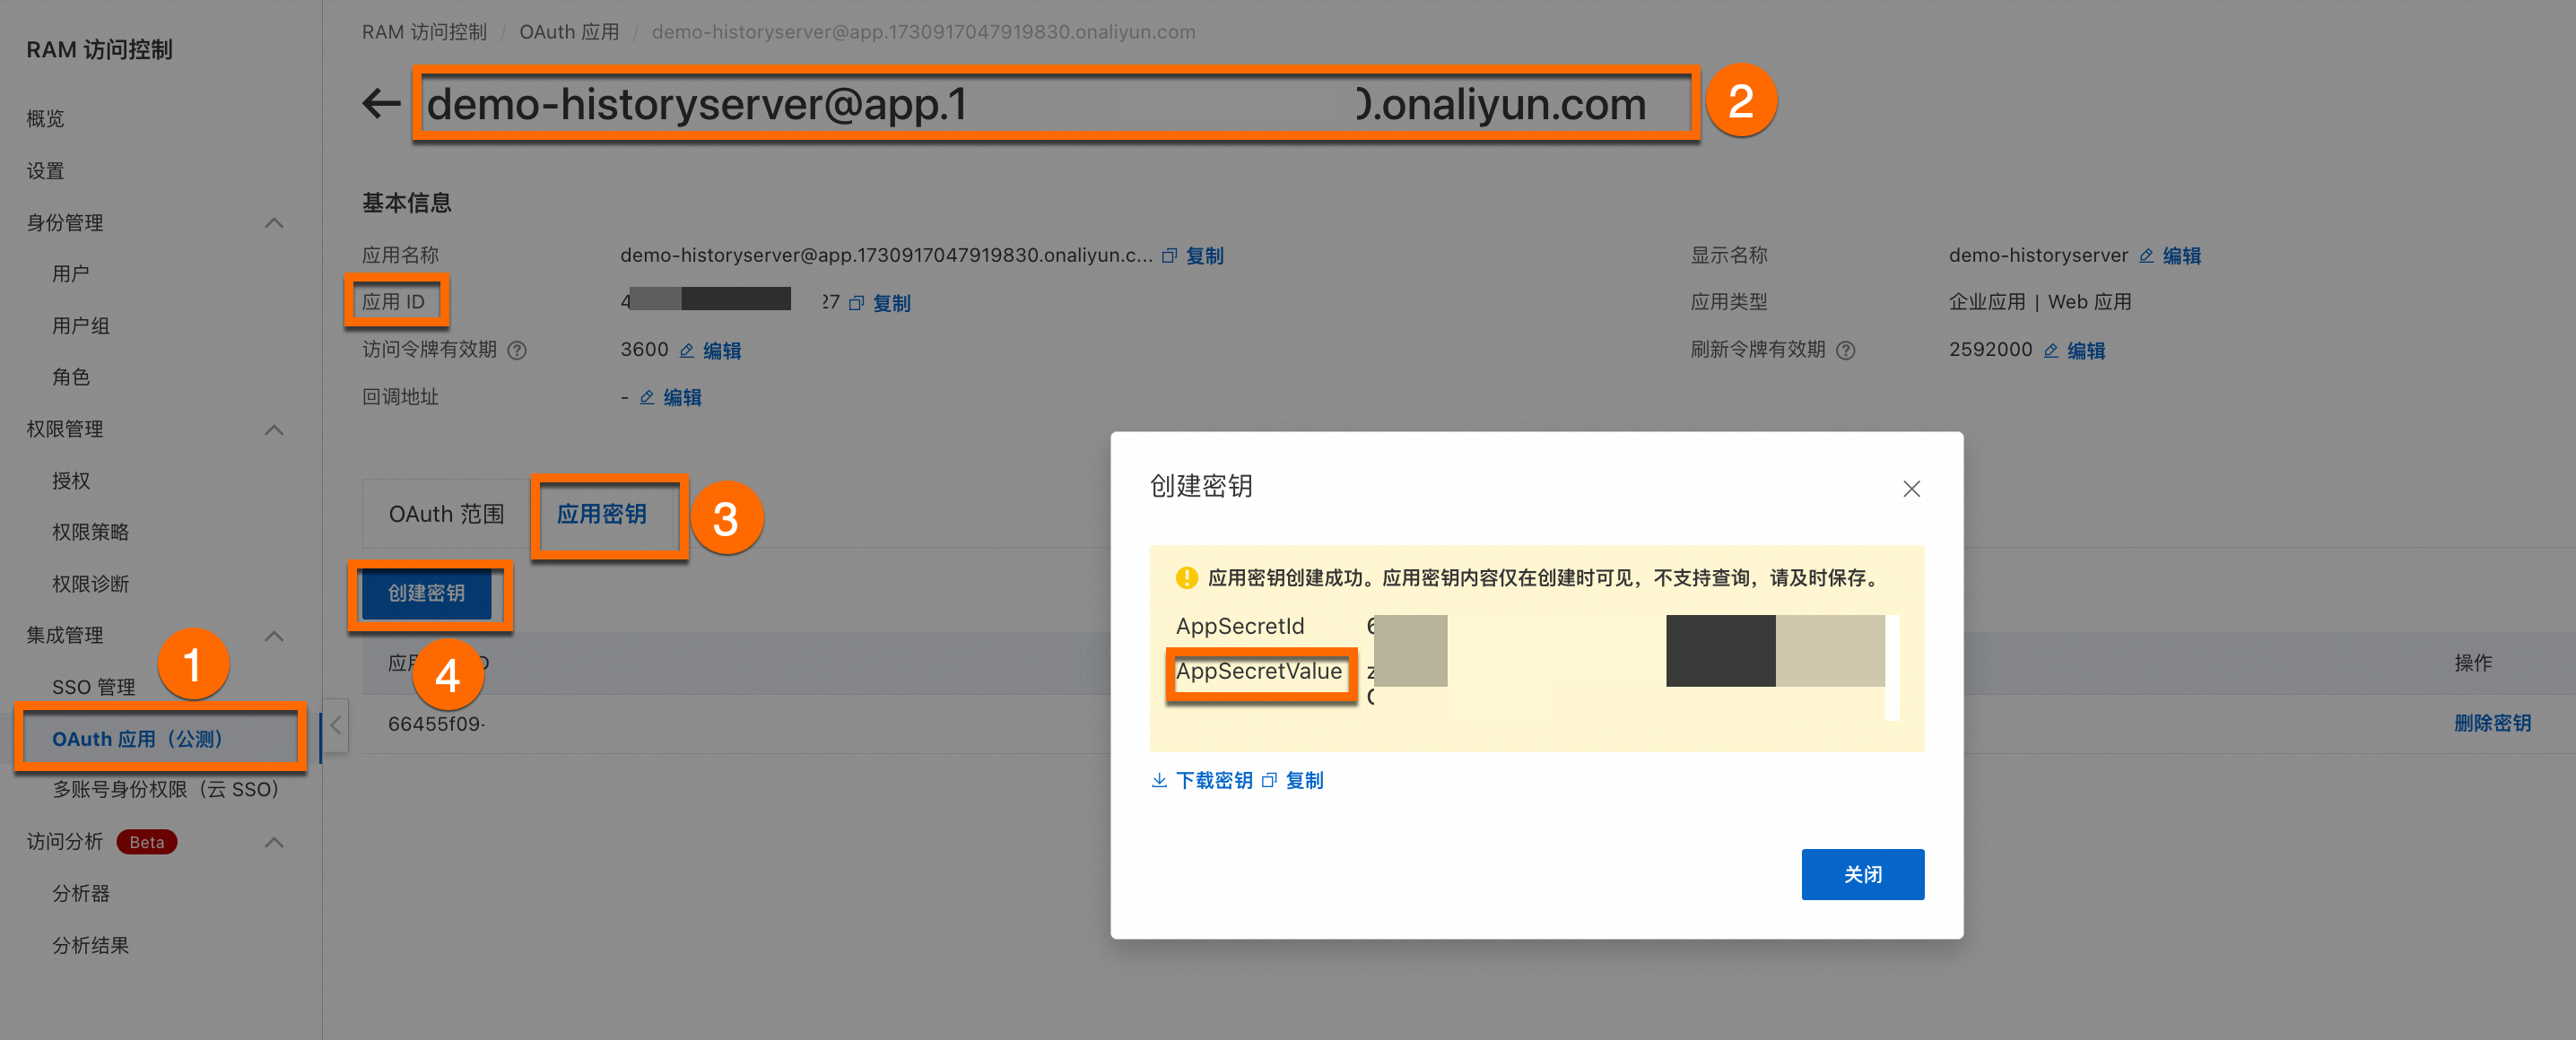 重要
重要記錄您的應用 ID、AppSecretValue,後續在Kuberay命名空間下建立Secret操作中使用。
串連叢集,在kuberay命名空間下建立Secret。
關於如何串連ACK叢集,更多詳細操作,請參見串連叢集。
kubectl create ns kuberay
kubectl create secret -n kuberay generic webapp-secret --from-literal=webapp-id="yours-AppID" --from-literal=webapp-secret=yours-AppSecretValue
參數
參數說明
webapp-secret
建立Secret的名稱,可自訂設定。
webapp-id
OAuth應用 ID。
webapp-secret
OAuth密鑰AppSecretValue值。
4. 配置KubeRay組件參數
安裝kuberay組件。
更多詳細操作,請參見安裝KubeRay組件。
對Kuberay-Operator參數配置。
參數名稱
參數說明
是否開啟 HistoryServer
勾選開啟。
CallbackServiceName
HistoryServer OAuth認證時的回調網域名稱,需要與OAuth應用中的回調地址的網域名稱一致,如OAtuh配置http://xx.com/oauth/callback,則此處配置xx.com
CloudRoleName
HistoryServer關聯的RRSA角色名稱。
OSSBucket
HistoryServer使用的OSS儲存桶的名稱
OSSEndPoint
HistoryServer使用的OSS儲存桶的端點
OSSHistoryServerRootDir
HistoryServer存放日誌和元資訊的目錄
OSSRegion
HistoryServer使用的OSS地區,例如cn-hangzhou,ap-southeast-1等
5. 建立RayCluster
如果您需要在RayCluster中啟用HistoryServer功能,您需要在提交RayCluster時,通過註解添加 ray.alibabacloud.com/enable-historyserver: "true"。以下是一個YAML配置樣本。
6. 串連到HistoryServer
通過Localhost訪問
預設情況下,HistoryServer需要通過port-forward的方式進行訪問。啟動終端視窗並執行以下指令。
kubectl -n kuberay port-forward svc/ray-history-server --address 0.0.0.0 8080:80之後,在瀏覽器中訪問localhost:8080即可訪問HistoryServer。此時訪問HistoryServer還無法查看監控資料。若要查看監控資料,需要額外執行一次port-forward命令。
kubectl -n kuberay port-forward svc/ray-history-server --address 0.0.0.0 3000:3000配置公網訪問
本樣本作為示範,為了您的應用資料安全,建議您在生產環境同時開啟存取控制功能。
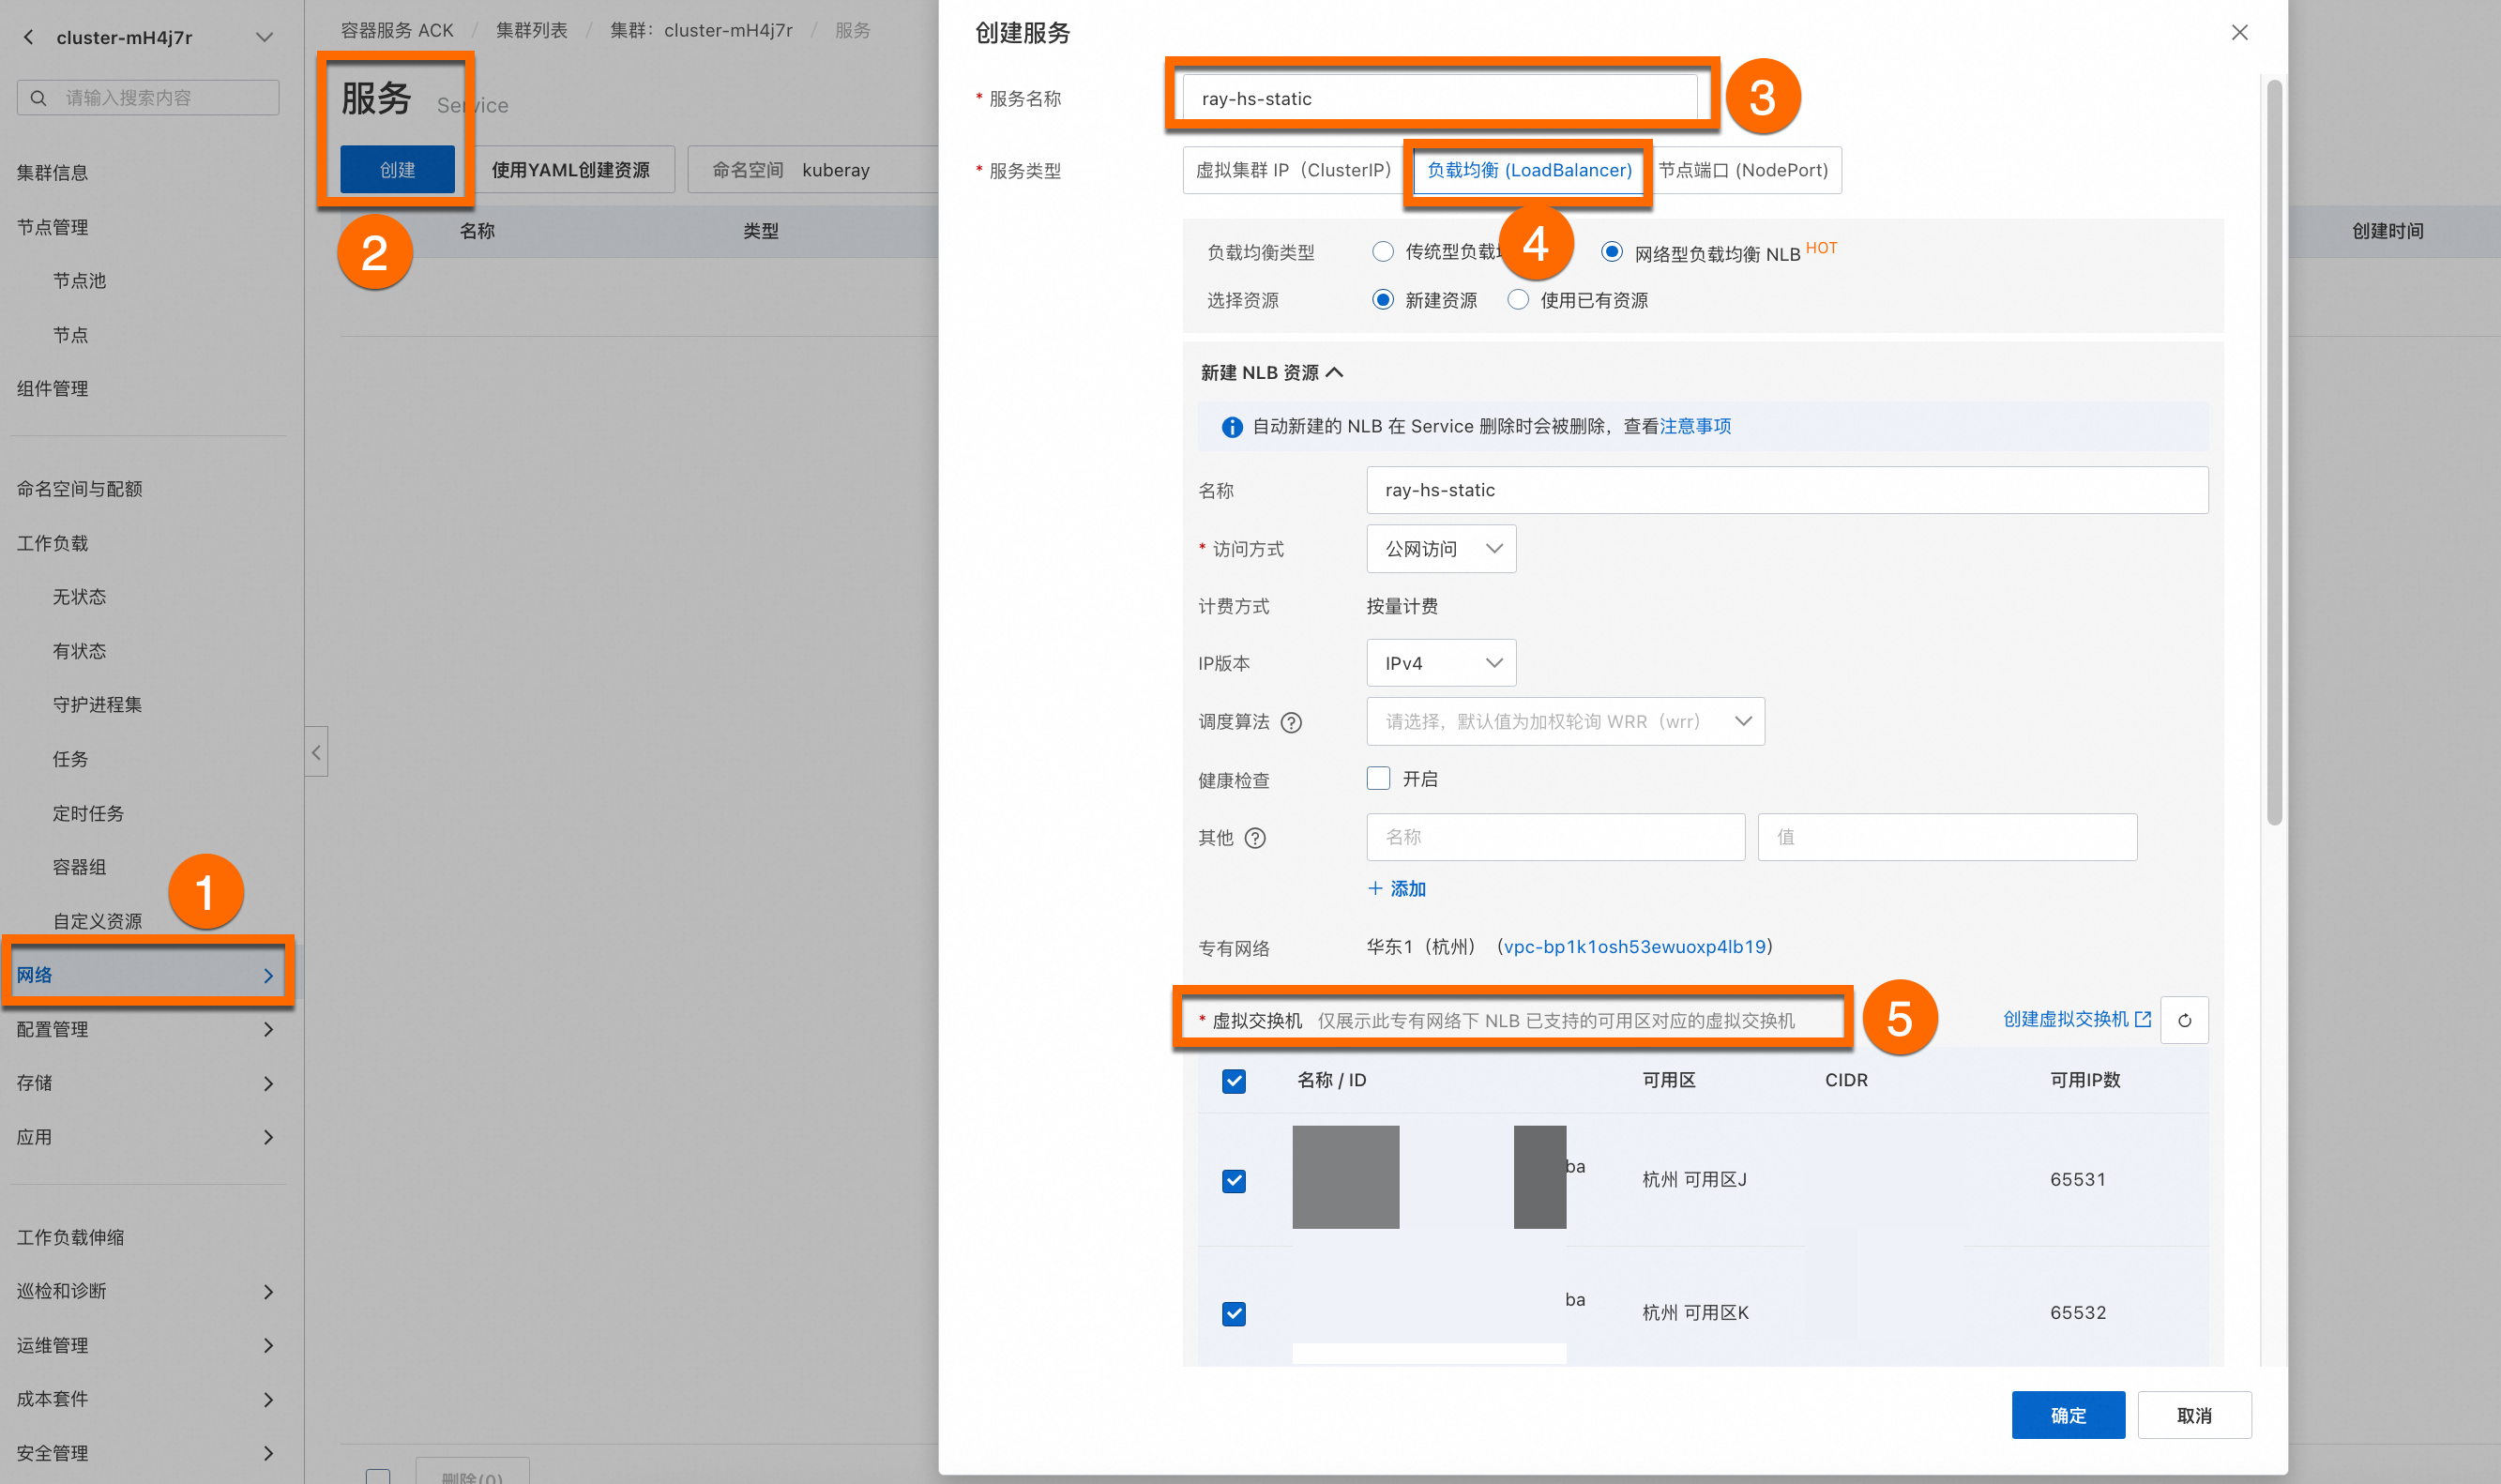
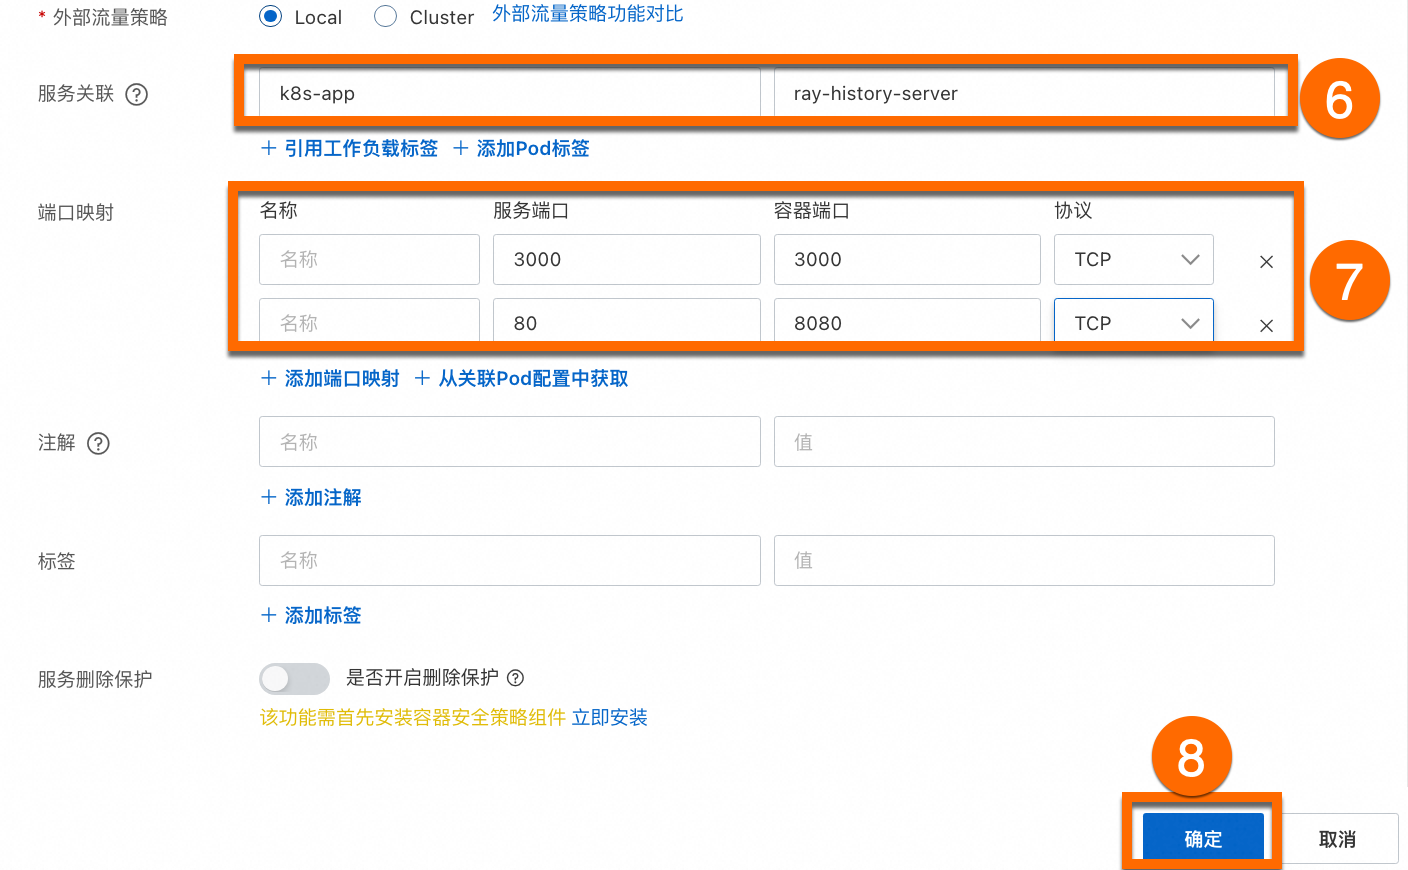
登入Container Service管理主控台,在左側導覽列選擇叢集列表。單擊目的地組群名稱,進入叢集詳情頁面,如下圖所示,按照序號依次單擊配置公網服務。設定OAuth應用的回調地址為已建立的公網服務,格式為http://${externalIP}/auth/callback。具體OAuth應用設定作業,請參見建立OAuth應用。