Relate dados de rastro de uma aplicação Go para o Managed Service for OpenTelemetry usando um agente SkyWalking Go. Após o envio dos dados, monitore a aplicação e visualize informações como topologia da aplicação, rastros, transações anômalas, transações lentas e análise de SQL.
O ARMS também oferece um agente desenvolvido internamente para aplicações Go. Esse agente possui suporte comercial e instrumenta aplicações sem intrusão de código. Para mais informações, consulte Monitor Go applications.
Escolha um agente SkyWalking Go
(Recomendado) Utilize o skywalking-go. Trata-se do agente SkyWalking Go mais recente, com suporte oficial estável, que instrumenta sua aplicação com intrusão de código quase nula.
O Go2Sky é o agente SkyWalking Go legado. Embora possua uma grande base de usuários, seu nível de intrusão é elevado, motivo pelo qual o SkyWalking lançou o skywalking-go. Este tópico descreve o procedimento de integração para ambos os agentes, permitindo relatar dados no console do Managed Service for OpenTelemetry.
|
Dimensão |
skywalking-go |
Go2Sky |
|
Instrumentação |
Intrusão de código quase nula. Especifique o agente com a flag |
Altamente intrusivo. Adicione um hook para cada plug-in no projeto. |
|
Status de manutenção |
Agente SkyWalking Go mais recente, com suporte oficial estável. |
Suporte encerrado após o lançamento oficial do skywalking-go. O site oficial lista o Go2Sky como aposentado, indicando que não recebe mais manutenção e que o SkyWalking não aceita mais pull requests para ele. |
|
Base de usuários |
Menor que a do Go2Sky. |
Grande base de usuários. |
O SkyWalking continua portando plug-ins do Go2Sky para o skywalking-go. Ambos os agentes instrumentam o mesmo conjunto de bibliotecas, mas o skywalking-go também instrumenta o framework gRPC, o que não ocorre no Go2Sky. Para a lista de bibliotecas e os comandos de instalação do Go2Sky, consulte Supported instrumentation libraries.
Obter um endpoint
New console
Faça login no console do Managed Service for OpenTelemetry. No painel de navegação à esquerda, clique em Integration Center.
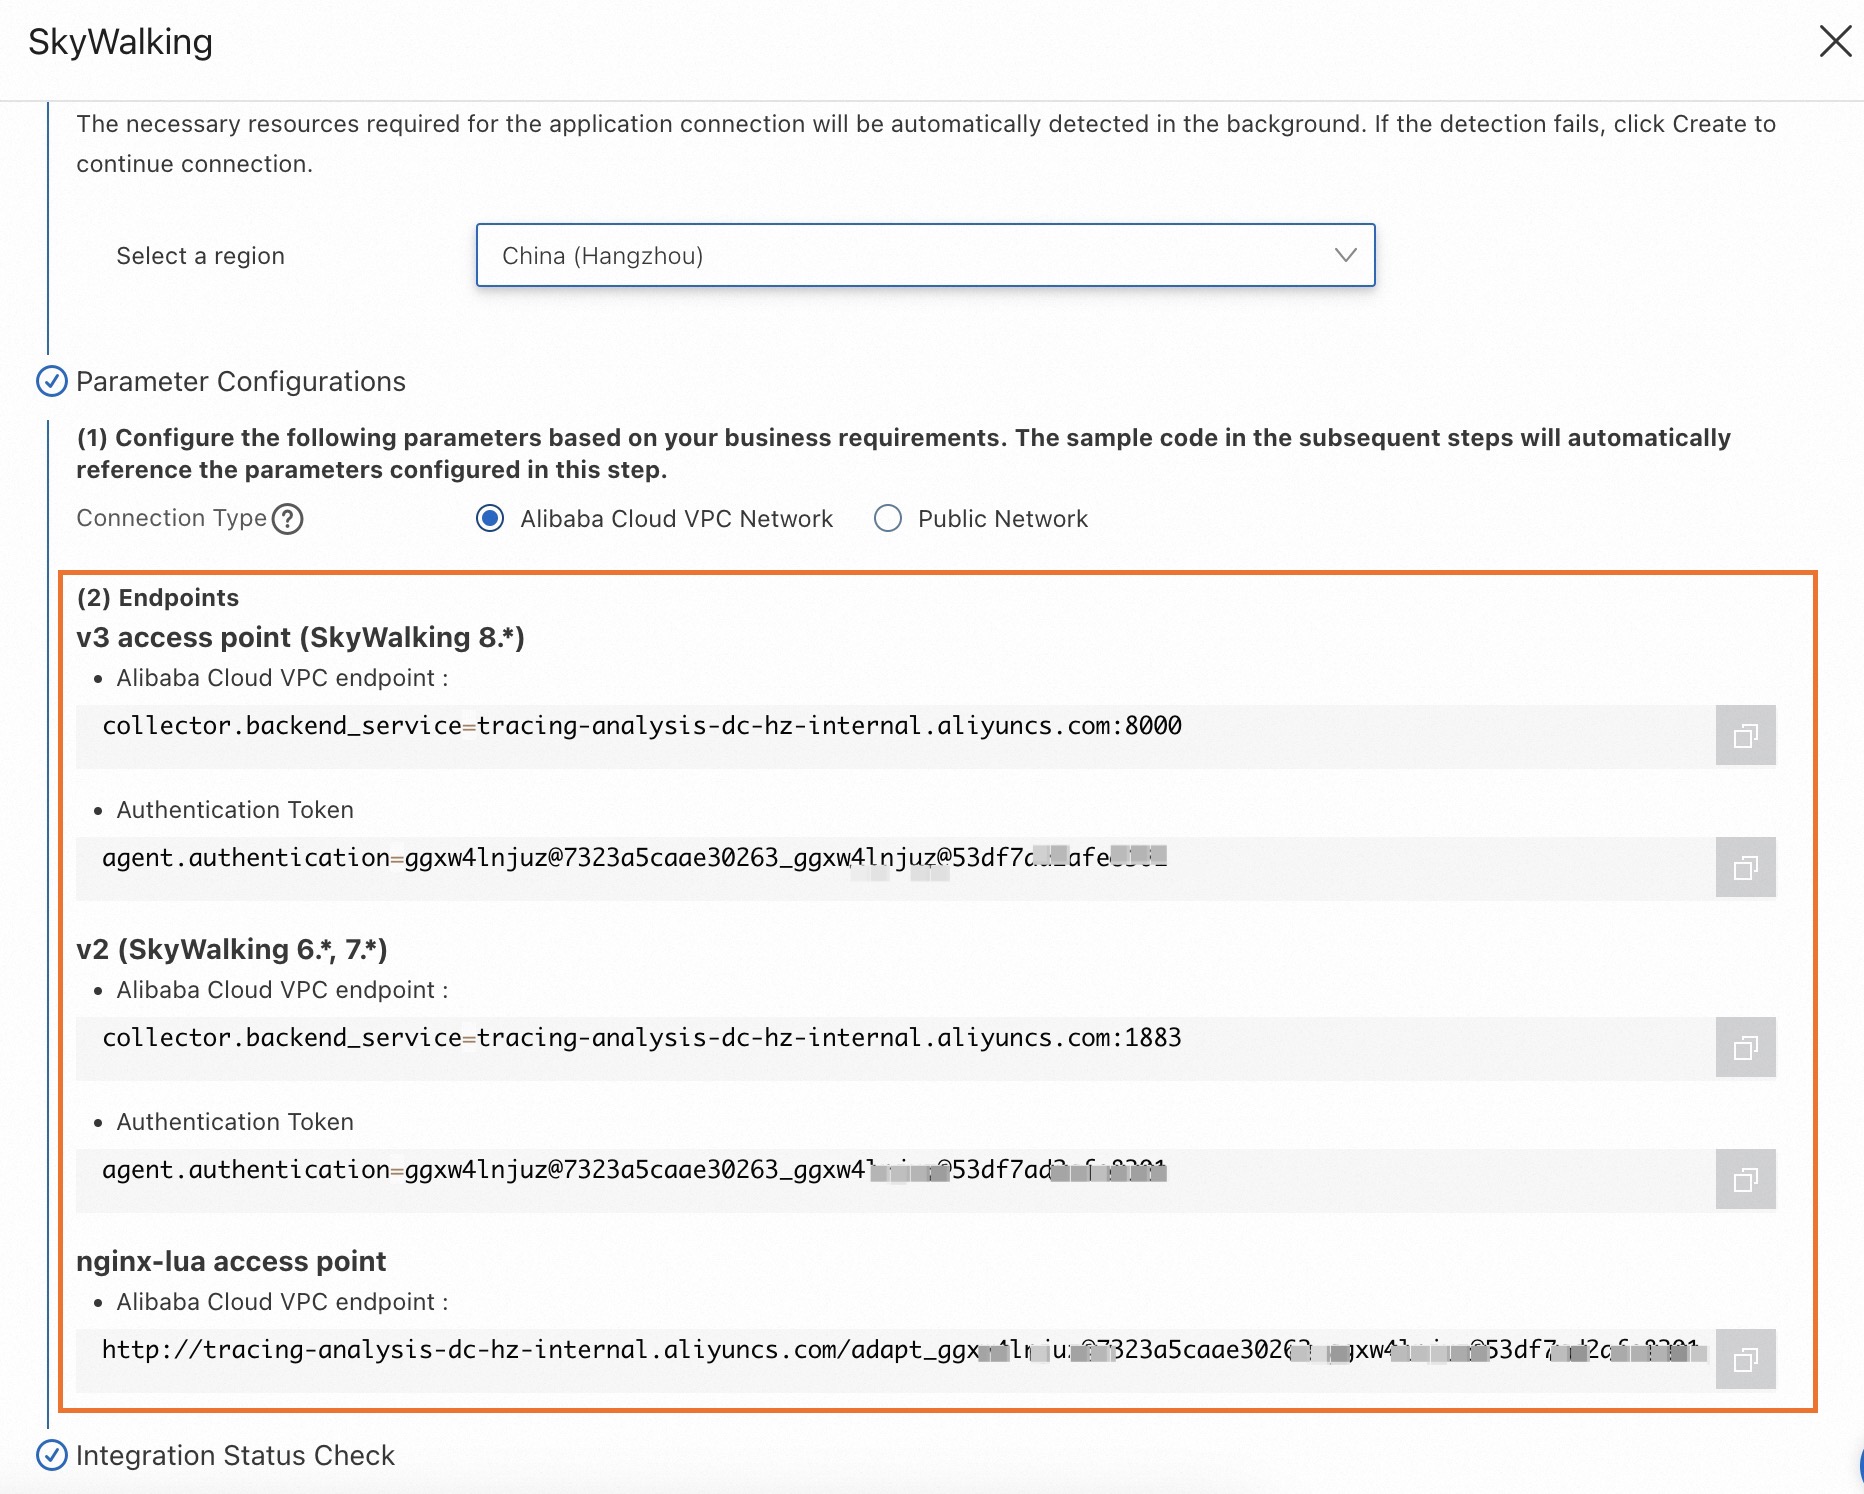
Na seção Open Source Frameworks, clique em SkyWalking.
-
No painel SkyWalking exibido, selecione a região para a qual deseja relatar dados.
Ao acessar uma região pela primeira vez, os recursos são inicializados automaticamente.
-
Selecione um Connection Type e copie o endpoint.
Se o service estiver implantado na Alibaba Cloud na região selecionada, escolha a rede VPC da Alibaba Cloud. Caso contrário, selecione a rede pública.
Old console
Faça login no console do Managed Service for OpenTelemetry.
No painel de navegação à esquerda, clique em Cluster Configurations. Na página exibida, clique em Access point information.
No topo da página, selecione a região para a qual deseja relatar dados. Na seção Cluster Information, ative Show Token.
-
Na seção Client, clique em SkyWalking. Na coluna Related Information, obtenha o endpoint.
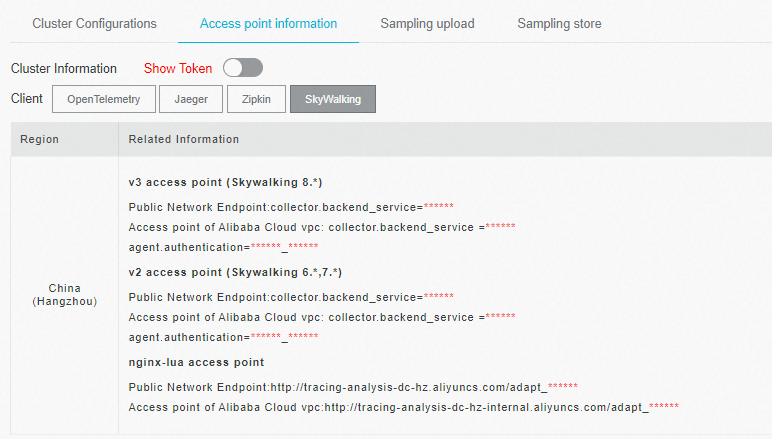
Se a aplicação estiver implantada na Alibaba Cloud na região selecionada, utilize o endpoint de VPC. Caso contrário, use o endpoint público.
Relatar dados com o agente skywalking-go (recomendado)
Etapa 1: Baixe e compile o agente
Baixe o agente skywalking-go e execute o comando abaixo para compilá-lo:
cd skywalking-go && make buildUm arquivo executável será gerado no diretório skywalking-go/bin. O nome do executável varia conforme o sistema operacional:
macOS:
skywalking-go-agent--darwin-amd64Linux:
skywalking-go-agent--linux-amd64Windows:
skywalking-go-agent--windows-amd64
Etapa 2: Ative a instrumentação no projeto Go
Abra o projeto Go e ative a instrumentação de uma das formas a seguir. Se o comando inject retornar um erro, importe o módulo skywalking no pacote main.
Importar o módulo no código (recomendado)
Importe o módulo skywalking no pacote main:
package main
import (
    _ "github.com/apache/skywalking-go"
)
Injetar o agente (sem alterações de código)
Execute o arquivo executável com a flag -inject:
skywalking-go/bin/skywalking-go-agent--darwin-amd64 -inject path/to/your-projectEtapa 3: Configure os parâmetros de conexão
Copie o arquivo skywalking-go/tools/go-agent/config/config.default.yaml do repositório skywalking-go baixado na Etapa 1, salve-o como seu próprio arquivo config.yaml e defina os seguintes parâmetros para conectar o agente ao Managed Service for OpenTelemetry:
agent:
  service_name: ${SW_AGENT_NAME:<your-service-name>}
reporter:
  grpc:
    backend_service: ${SW_AGENT_REPORTER_GRPC_BACKEND_SERVICE:<your-endpoint>}
authentication: ${SW_AGENT_REPORTER_GRPC_AUTHENTICATION:<your-auth-token>}service_name: nome do service. Substitua<your-service-name>pelo nome da sua aplicação.backend_service: endpoint. Substitua<your-endpoint>pelo endpoint copiado em Obtain an endpoint.authentication: token de autenticação do endpoint. Substitua<your-auth-token>pelo seu token.
Para os demais parâmetros do agente, formas de configuração e arquivo de configuração padrão, consulte Advanced configuration for the skywalking-go agent.
Etapa 4: Recompilar e iniciar o projeto
Recompile o projeto e passe o agente ao compilador Go usando a flag -toolexec:
# You must use -toolexec
sudo go build -toolexec "path/to/skywalking-go-agent -config path/to/config.yaml" -apath/to/skywalking-go-agent: caminho absoluto do arquivo executável compilado na Etapa 1.path/to/config.yaml: caminho absoluto do arquivo de configurações de parâmetros do agente skywalking-go.
Inicie o projeto. Os dados do SkyWalking serão então relatados no console do Managed Service for OpenTelemetry.
Relatar dados com o agente Go2Sky (legado)
Etapa 1: Configure os parâmetros de conexão
O Go2Sky suporta dois métodos de configuração: codificar os parâmetros diretamente no projeto ou configurá-los automaticamente via variáveis de ambiente.
Codificar os parâmetros diretamente
Passe o endpoint e o token de autenticação obtidos em Obtain an endpoint para o reporter:
// Import parameters by using reporter.WithParameter()
report, err := reporter.NewGRPCReporter(
    <your-backend-server-address>,
    reporter.WithAuthentication(<your-auth-token>))
Configuração automática com variáveis de ambiente
Para as variáveis de ambiente lidas pelo Go2Sky, consulte Go2Sky environment variables. Configure uma variável de uma das maneiras abaixo. O exemplo a seguir utiliza macOS:
# Method 1: write to the environment variable configuration file (persistent)
vim ~/.bash_profile
export SW_AGENT_COLLECTOR_BACKEND_SERVICES=<your-collector-address>
source ~/.bash_profile
# Method 2: open a terminal and configure on the command line (temporary; no longer in effect in a new terminal)
export SW_AGENT_COLLECTOR_BACKEND_SERVICES=<your-collector-address>
Etapa 2: Configure o nome do service
Configure ServiceName para identificar a aplicação:
ServiceName := <your-service-name>
tracer, err := go2sky.NewTracer(ServiceName, go2sky.WithReporter(report))
Etapa 3: Adicionar um hook de plug-in do Go2Sky
O Go2Sky fornece plug-ins para diversas bibliotecas, mas adicione a instrumentação no source do projeto. Para saber como adicionar a instrumentação, consulte o repositório Go2Sky-Plugins no GitHub. O arquivo README.md em cada pasta de plug-in contém um exemplo básico de uso.
Para adicionar o hook do framework gin, siga os passos abaixo:
Acesse a pasta /gin e abra o arquivo /gin/v3/README.md.
Adicione o hook de middleware:
v3.Middleware(r, tracer).
O exemplo a seguir demonstra como montar o hook. Antes de relatar dados ao Managed Service for OpenTelemetry, substitua o reporter de log pelo reporter gRPC e pelo nome do service configurados na Etapa 1 e na Etapa 2.
package main
import (
    "log"
    "github.com/SkyAPM/go2sky"
    v3 "github.com/SkyAPM/go2sky-plugins/gin/v3"
    "github.com/SkyAPM/go2sky/reporter"
    "github.com/gin-gonic/gin"
)
func main() {
    // Use gRPC reporter for production
    re, err := reporter.NewLogReporter()
    if err != nil {
        log.Fatalf("new reporter error %v \n", err)
    }
    defer re.Close()
    tracer, err := go2sky.NewTracer("gin-server", go2sky.WithReporter(re))
    if err != nil {
        log.Fatalf("create tracer error %v \n", err)
    }
    gin.SetMode(gin.ReleaseMode)
    r := gin.New()
    //Use go2sky middleware with tracing
    r.Use(v3.Middleware(r, tracer))
    // do something
}
Etapa 4: Reiniciar a aplicação
Reinicie a aplicação.
Configurações avançadas do agente skywalking-go
Formas de defina um parâmetro
Defina um parâmetro do agente skywalking-go de duas maneiras. O exemplo abaixo configura service_name:
Método 1 (recomendado): adicionar o parâmetro ao config.yaml
agent:
  service_name: ${SW_AGENT_NAME:<your_service_name>}
Método 2: configure uma variável de ambiente do sistema
export SW_AGENT_NAME=<your_service_name>Excluir plug-ins
Por padrão, o agente skywalking-go instrumenta todos os plug-ins automaticamente. Para excluir um plug-in específico, defina o parâmetro excluded:
# To exclude the sql plugin
plugin:
  excluded: ${SW_AGENT_PLUGIN_EXCLUDES:sql}
# To exclude multiple plugins at the same time, separate them with commas
plugin:
  excluded: ${SW_AGENT_PLUGIN_EXCLUDES:sql,gorm}
Arquivo de configuração padrão
O exemplo a seguir mostra o arquivo completo config.default.yaml do agente skywalking-go:
agent:
  # Service name is showed in UI.
  service_name: ${SW_AGENT_NAME:Your_ApplicationName}
  # To obtain the environment variable key for the instance name, if it cannot be obtained, an instance name will be automatically generated.
  instance_env_name: SW_AGENT_INSTANCE_NAME
  # Sampling rate of tracing data, which is a floating-point value that must be between 0 and 1.
  sampler: ${SW_AGENT_SAMPLE:1}
  meter:
    # The interval of collecting metrics, in seconds.
    collect_interval: ${SW_AGENT_METER_COLLECT_INTERVAL:20}
reporter:
  grpc:
    # The gRPC server address of the backend service.
    backend_service: ${SW_AGENT_REPORTER_GRPC_BACKEND_SERVICE:127.0.0.1:11800}
    # The maximum count of segment for reporting tracing data.
    max_send_queue: ${SW_AGENT_REPORTER_GRPC_MAX_SEND_QUEUE:5000}
    # The interval(s) of checking service and backend service
    check_interval: ${SW_AGENT_REPORTER_GRPC_CHECK_INTERVAL:20}
    # The authentication string for communicate with backend.
    authentication: ${SW_AGENT_REPORTER_GRPC_AUTHENTICATION:}
    # The interval(s) of fetching dynamic configuration from backend.
    cds_fetch_interval: ${SW_AGENT_REPORTER_GRPC_CDS_FETCH_INTERVAL:20}
    tls:
      # Whether to enable TLS with backend.
      enable: ${SW_AGENT_REPORTER_GRPC_TLS_ENABLE:false}
      # The file path of ca.crt. The config only works when opening the TLS switch.
      ca_path: ${SW_AGENT_REPORTER_GRPC_TLS_CA_PATH:}
      # The file path of client.pem. The config only works when mTLS.
      client_key_path: ${SW_AGENT_REPORTER_GRPC_TLS_CLIENT_KEY_PATH:}
      # The file path of client.crt. The config only works when mTLS.
      client_cert_chain_path: ${SW_AGENT_REPORTER_GRPC_TLS_CLIENT_CERT_CHAIN_PATH:}
      # Controls whether a client verifies the server's certificate chain and host name.
      insecure_skip_verify: ${SW_AGENT_REPORTER_GRPC_TLS_INSECURE_SKIP_VERIFY:false}
log:
  # The type determines which logging type is currently used by the system.
  # The Go agent wourld use this log type to generate custom logs. It supports: "auto", "logrus", or "zap".
  # auto: Automatically identifies the source of the log.
  #       If logrus is present in the project, it wourld automatically use logrus.
  #       If zap has been initialized in the project, it would use the zap framework.
  #       By default, it would use std errors to output log content.
  # logrus: Specifies that the Agent should use the logrus framework.
  # zap: Specifies that the Agent should use the zap framework.
  # The system must have already been initialized through methods such as "zap.New", "zap.NewProduction", etc.
  type: ${SW_AGENT_LOG_TYPE:auto}
  tracing:
    # Whether to automatically integrate Tracing information into the logs.
    enable: ${SW_AGENT_LOG_TRACING_ENABLE:true}
    # If tracing information is enabled, the tracing information would be stored in the current Key in each log.
    key: ${SW_AGENT_LOG_TRACING_KEY:SW_CTX}
  reporter:
    # Whether to upload logs to the backend.
    enable: ${SW_AGENT_LOG_REPORTER_ENABLE:true}
    # The fields name list that needs to added to the label of the log.(multiple split by ",")
    label_keys: ${SW_AGENT_LOG_REPORTER_LABEL_KEYS:}
plugin:
  # List the names of excluded plugins, multiple plugin names should be splitted by ","
  # NOTE: This parameter only takes effect during the compilation phase.
  excluded: ${SW_AGENT_PLUGIN_EXCLUDES:}
  config:
    http:
      # Collect the parameters of the HTTP request on the server side
      server_collect_parameters: ${SW_AGENT_PLUGIN_CONFIG_HTTP_SERVER_COLLECT_PARAMETERS:false}
    mongo:
      # Collect the statement of the MongoDB request
      collect_statement: ${SW_AGENT_PLUGIN_CONFIG_MONGO_COLLECT_STATEMENT:false}
    sql:
      # Collect the parameter of the SQL request
      collect_parameter: ${SW_AGENT_PLUGIN_CONFIG_SQL_COLLECT_PARAMETER:false}
Variáveis de ambiente
Variáveis de ambiente do skywalking-go
A tabela a seguir lista as variáveis de ambiente suportadas pelo agente skywalking-go. NULL indica que nenhum valor padrão foi definido.
|
Variável de ambiente |
Descrição |
Valor padrão |
|
|
Nome do service. |
NULL |
|
|
Nome da instância do service. |
Gerado automaticamente |
|
|
Taxa de amostragem. Valores válidos: 0 a 1. |
1 |
|
|
Endpoint do servidor para onde os dados de monitoramento são relatados via gRPC. |
127.0.0.1:11800 |
|
|
Token de autenticação do servidor para onde os dados de monitoramento são relatados via gRPC. |
NULL |
|
|
Plug-ins a serem excluídos. |
NULL |
Variáveis de ambiente do Go2Sky
A tabela a seguir lista as variáveis de ambiente suportadas pelo agente Go2Sky. NULL indica que nenhum valor padrão foi definido.
|
Variável de ambiente |
Descrição |
Valor padrão |
|
|
Nome do service Go. |
NULL |
|
|
Nome da camada à qual a instância pertence, conforme definido no backend. |
NULL |
|
|
Nome da instância do service Go. |
Gerado aleatoriamente |
|
|
Taxa de amostragem. O valor 1 indica coleta completa. |
1 |
|
|
Endereço do servidor para onde o agente relata dados. |
NULL |
|
|
Token de autenticação do servidor para onde o agente relata dados. |
NULL |
|
|
Intervalo de relato de heartbeat do agente, em segundos. |
20 |
|
|
Intervalo para obtenção dinâmica da configuração do agente, em segundos. |
20 |
|
|
Tamanho do buffer da fila de envio de spans. |
30000 |
|
|
Ativa o recurso de hook de status de processo. |
False |
|
|
Rótulos do processo. Separe múltiplos rótulos com vírgulas (,). |
NULL |
Bibliotecas de instrumentação suportadas
Tanto o agente skywalking-go quanto o Go2Sky instrumentam as bibliotecas listadas abaixo. O agente skywalking-go as instrumenta automaticamente durante a compilação do projeto, sem necessidade de instalação. Para o Go2Sky, execute o comando de instalação de cada biblioteca utilizada no projeto.
|
Biblioteca |
Comando de instalação do Go2Sky |
|
sql |
|
|
dubbo-go |
|
|
gear |
|
|
gin |
|
|
go-restful |
|
|
gorm |
|
|
http |
|
|
go-kratos v2 |
|
|
logrus |
|
|
go-micro (v3.5.0) |
|
|
mongo |
|
|
go-resty (v2.2.0) |
|
|
zap (v1.16.0) |
|
FAQ
O comando inject do skywalking-go retorna um erro de versão
O seguinte erro ocorre ao utilizar o skywalking-go:
U-VF4VY9W5-1944:skywalking-go-test whlongxi$ skywalking-go/bin/skywalking-go-agent--darwin-amd64 -inject ../skywalking-go-test -all
2023/08/09 16:55:59 version is empty, please use the release version of skywalking-go
Caso ocorra um erro ao usar o método inject, importe o módulo skywalking no pacote main.
Rastros entre processos não são exibidos corretamente ao relatar dados via Go2Sky
O rastreamento ponta a ponta conecta um rastro utilizando o ID de rastro, transportado nas requisições http. Um rastro incorreto significa que o ID de rastro não foi propagado adequadamente; portanto, configure os spans corretamente. Utilize as duas interfaces a seguir para conectar chamadas entre processos em um único rastro:
CreateEntrySpan: span de entrada. Use esta interface para extrair o contexto de rastreamento, incluindo o ID de rastro, de uma requisição http.CreateExitSpan: span de saída. Use esta interface para injetar o contexto de rastreamento, incluindo o ID de rastro, em uma requisição http.
// Within a process, use CreateLocalSpan to create a span.
span, ctx, err := tracer.CreateLocalSpan(context.Background())
subSpan, newCtx, err := tracer.CreateLocalSpan(ctx)
// Across processes, use the entry span CreateEntrySpan to extract the context from the HTTP request, and use the exit span CreateExitSpan to inject the context into the HTTP request.
span, ctx, err := tracer.CreateEntrySpan(r.Context(), "/api/login", func(key string) (string, error) {
    return r.Header.Get(key), nil
})
span, err := tracer.CreateExitSpan(req.Context(), "/service/validate", "tomcat-service:8080", func(key, value string) error {
        req.Header.Set(key, value)
        return nil
})
Em projetos com comunicação entre processos, propague o ID de rastro entre eles para manter a continuidade do rastro. Utilize as interfaces acima para injetar o contexto nas requisições http, garantindo que ele seja transmitido entre os processos junto com as requisições.
Referências
SkyWalking Demo: repositório de demonstração de exemplo para este tópico.