Ant Cube Card (Cube Card) originated from the demand for dynamic native pages. With the emergence of Mini Programs, Cube Cards were integrated into the Alipay Mini Program technology stack as a lightweight alternative to web-based Mini Programs.
Cube Card supports three integration methods: integrate based on mPaaS framework, integrate based on existing projects and using mPaaS plugins, and integrate based on existing projects and using CocoaPods. This guide walks you through integration and usage.
Prerequisites
-
You have connected your project to mPaaS. For more information, see the following topics:
-
You have installed the Cube Card AntCubeTool. For more information, see About AntCubeTool.
Connection steps
-
Select a baseline.
-
Add the 10.2.3 main baseline.
-
Add the card component.
-
-
Initialize the card.
-
Build a card project.
-
Initialize the project.
-
Build the project.
-
-
Publish a card.
-
Go to the card backend.
-
Create a card.
-
Add card resources.
-
Publish the card.
-
-
Render the card.
-
Select baseline.
Cube Card is supported in baseline 10.2.3. Select the appropriate component addition method based on your integration method.
-
Use mPaaS Xcode Extension
Applicable to: Integrate based on mPaaS framework or Integrate by using mPaaS plugin based on existing projects.
-
Click the Xcode menu item Editor > mPaaS > Edit Project > Upgrade Baseline to switch the project to the 10.2.3 baseline.
NoteIf the "Upgrade Baseline" option is not clickable, make sure the project configuration has been imported. Refer to the Prerequisites section to open the project editing page.
-
After upgrading the baseline, click Edit Module > Modify Module, select the Cube Card, save, and then click Start Editing to complete the addition.
-
-
Use cocoapods-mPaaS Plugin
Applicable to: Integrate by using CocoaPods based on the existing project.
-
Perform the following operations in the Podfile.
-
Change mPaaS_baseline to
10.2.3. -
Use mPaaS_pod "mPaaS_Cube" to add the Cube Card component dependency.
-
-
Run
pod installto complete the integration.
-
-
-
Initialize the card.
-
Compile the Xcode project. If the header file cannot be found, set
Allow Non-modular Includes In Framework ModulestoYes, as shown in the following figure.
-
Add system dependencies.
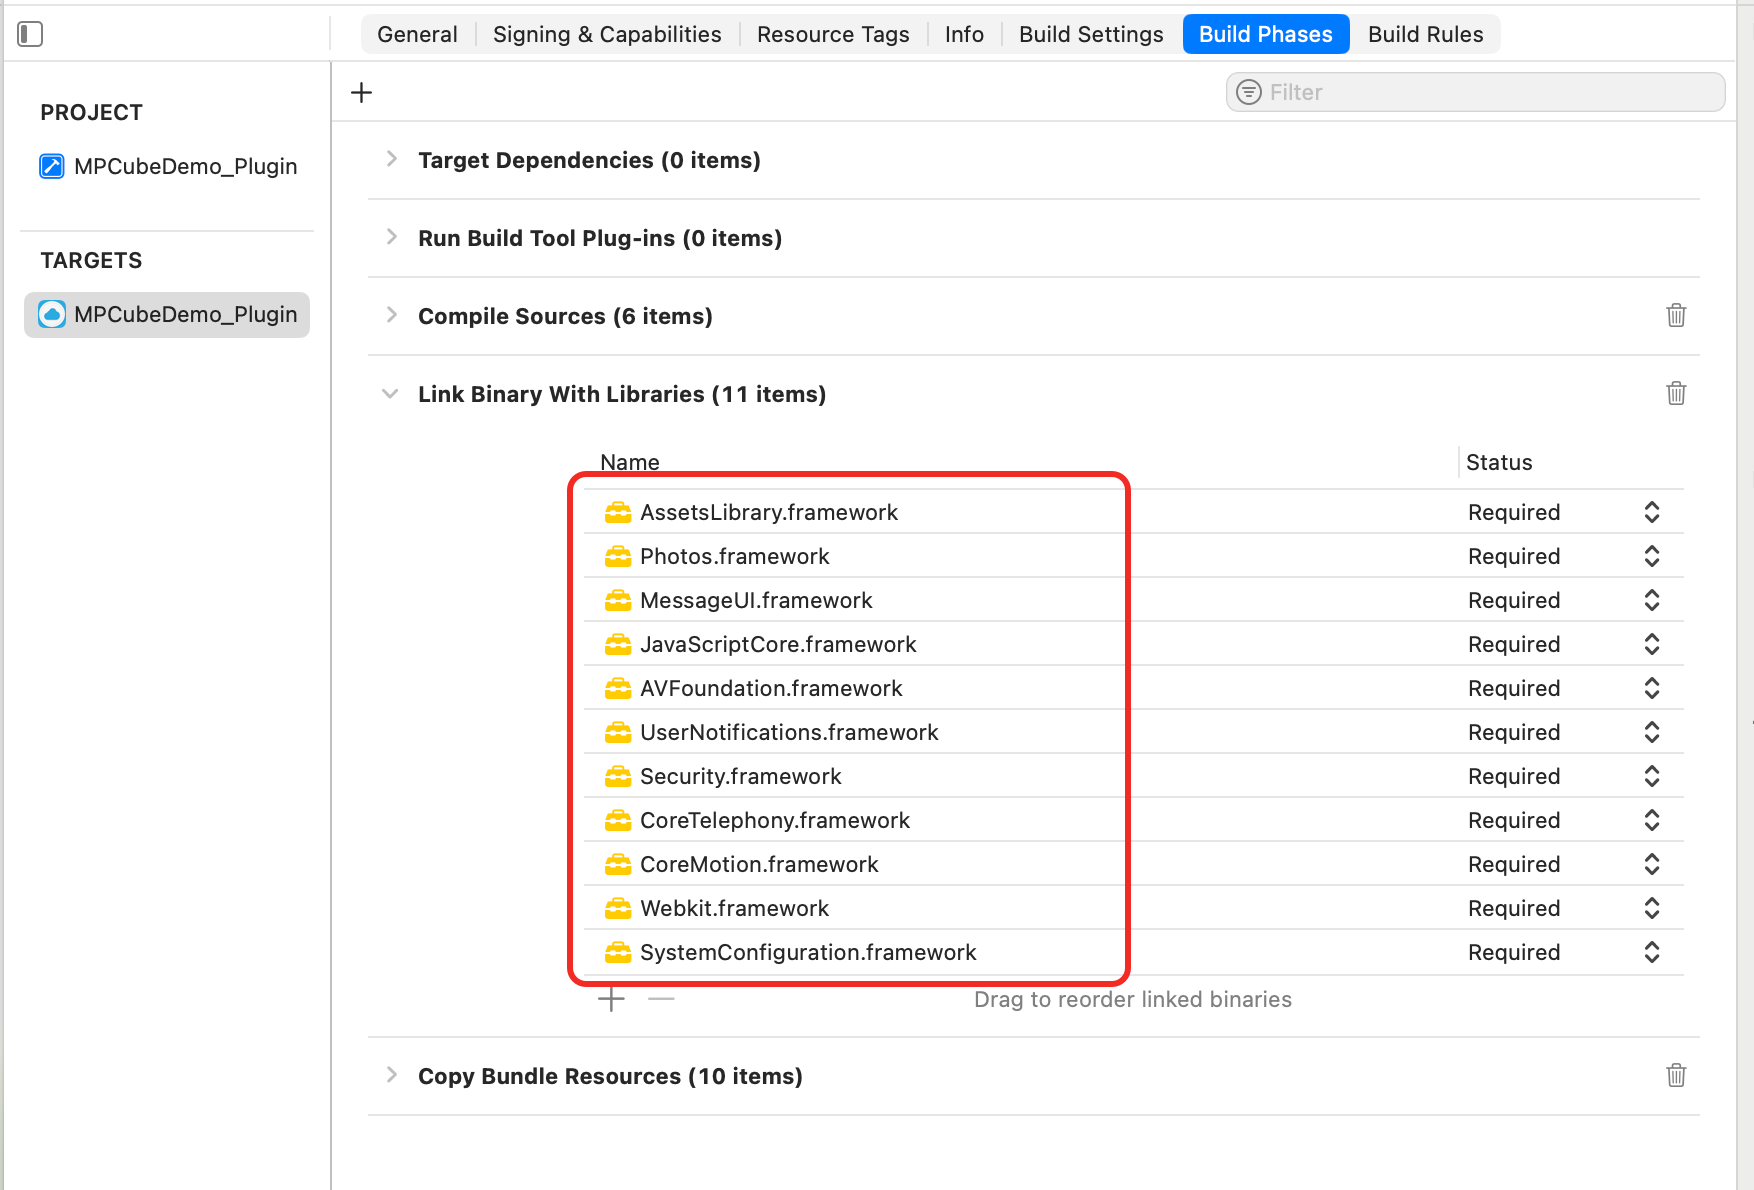
-
Import the libraries required for Cube Card.
#import <CubeCrystal/CubeEngine.h> #import <AntCube/CubeService.h> -
Use a singleton to initialize the card engine.
- (void)initEngie{
    static dispatch_once_t onceToken;
    NSString *mockBundlePath = [NSString stringWithFormat:@"%@/%@/crystal", [[NSBundle mainBundle] resourcePath], @"MPCubeDemo.bundle"];
    dispatch_once(&onceToken, ^{
        CubeEngineConfig* config = [[CubeEngineConfig alloc] init];
        [config setBundlePath:mockBundlePath];
        [[CubeService sharedInstance] initWithConfig:config];
    });
}
-
-
Build a card project.
-
Initialize a project. Run the
act initcommand in the terminal.-
Select Application Type as Cube and select Template Card (VUE format).
-
Enter an application name. Use a combination of English letters, numbers, and underscores.
-
Select "Create an additional project source code folder" to create a subfolder named after the application. If you select "Do not", the project is initialized in the current directory.
-
-
Build the project. Run
cdto navigate to the card project directory, then runact build. The build output is stored in the/dist/folder.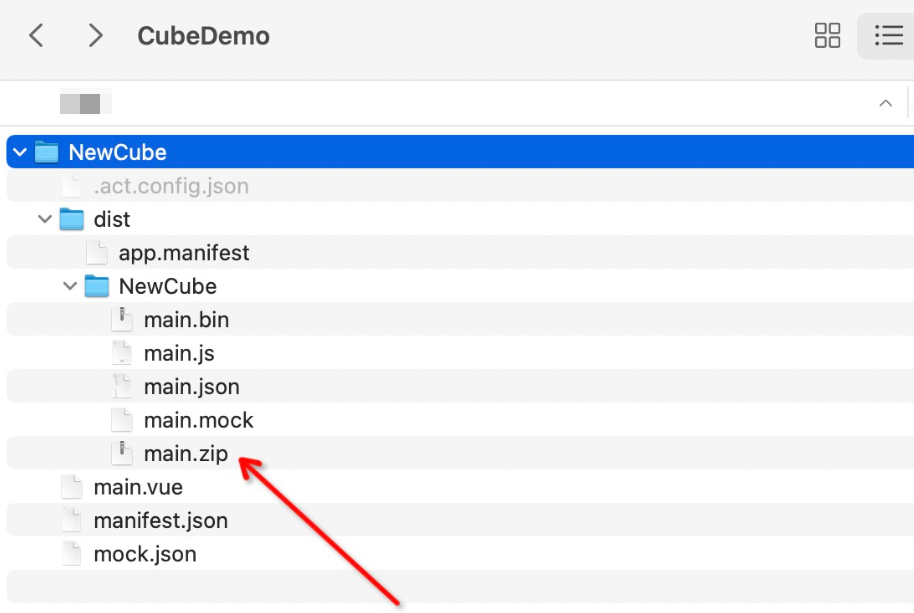
-
-
Release the card.
-
Go to the Ant Cube Card platform.
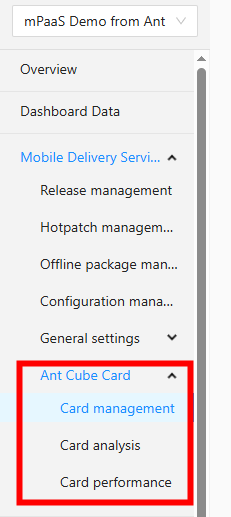
-
Click Create Card.
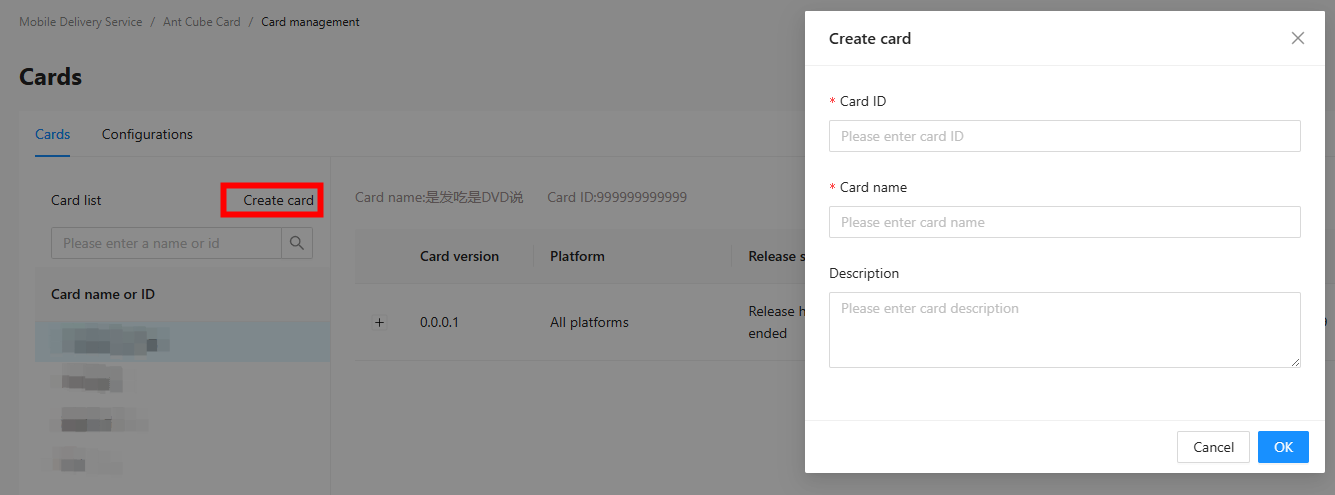
Use a combination of English letters, numbers, and underscores for the card ID. The client relies on the card ID to render the card. The card name can be any value.
-
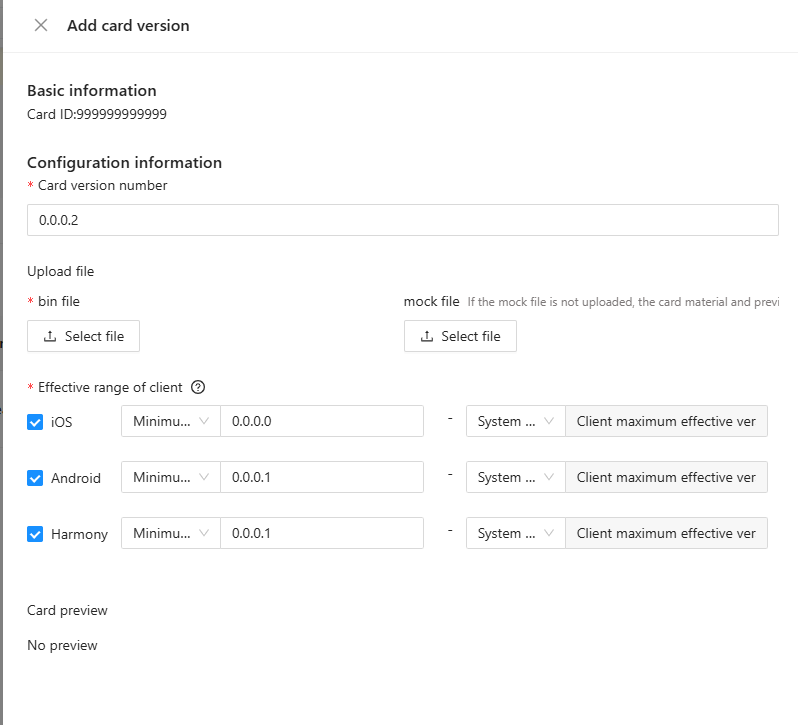
Add card resources.
-
Use a 4-digit version number.
-
Select the main.zip that you just compiled.
-
The client range specifies which client versions can pull the card. To cover all client versions, enter
0.0.0.0in the minimum version field.
-
-
Release the card.
-
Click Create Release.

-
Select Official Release.
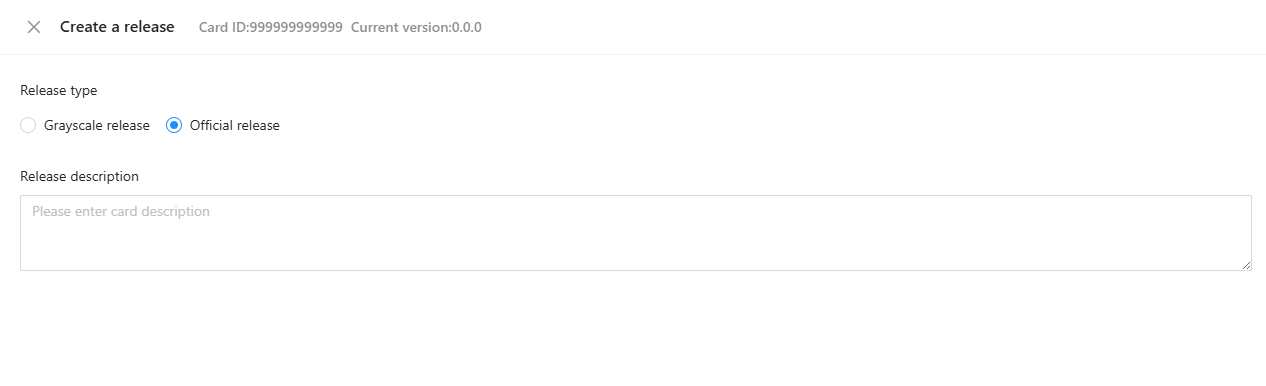
After the card is released, clients can pull and display it.
-
-
-
Render the card.
-
Copy the card ID and card version number from the webpage.
//Create card object. CubeCardConfig *cardConfig = [[CubeCardConfig alloc] init]; //Configure the card version (required), copied from the console. [cardConfig setVersion:@"1.0.0.0"]; //Configure card ID (required), copy from console. [cardConfig setTemplteId:@"20211118"]; //Preset card width. [cardConfig setWidth:[UIScreen mainScreen].bounds.size.width]; //Preset card height. [cardConfig setHeight:350]; //Set the card data (required) parameter to business JSON data. [cardConfig setData:@{}]; //Load the card. [[[CubeService sharedInstance] getEngine] createCard:cardConfig callback:self]; -
The card retrieves the value for the key "iosImage", as shown in the following code:
[self.cardConfig setData:@{@"iosImage":@"https://img.zcool.cn/community/013edb5c7b5b1ca801213f269fc887.jpg@1280w_1l_2o_100sh.jpg"}]; -
The delegate method for card creation must conform to the
CCardCallbackprotocol and implement theonLoaded:cardType:config:erroCodemethod.@interface ViewController () <CCardCallback> @end- (void)onLoaded:(CubeCard *)card cardType:(CCardType)cardType config:(CubeCardConfig *)config erroCode:(CubeCardResultCode)erroCode { //Card creation failed if (!card) { NSLog(@"load card fail %@ style %d error %d", [config templteId], cardType, erroCode); return; } //Creation successful NSLog(@"load card success %@ style %d error %d", [config templteId], cardType, erroCode); dispatch_async(dispatch_get_main_queue(), ^{ //Main thread UI operations: Rendering cards CubeView *view = [[[CubeService sharedInstance] getEngine] createView]; CGSize size = [card getSize]; [view setFrame:CGRectMake(0, 20, size.width, size.height) ]; [self.view addSubview:view]; [card renderView:view]; }); } -
Build & Run.
-
If compilation and execution are successful, the Xcode command line may report an RPC request exception. For details, please refer to RPC request exception.
-
-
-
Effect preview.
Demo Reference
For a demo of this integration method, download MPCubeDemo_Pod.zip.