This guide provides detailed steps and best practices for migrating data from Amazon DynamoDB to PolarDB for PostgreSQL. PolarDB offers a dedicated suite of migration tools that combines full and incremental synchronization to help you achieve a smooth, low-downtime data migration.
Migration overview
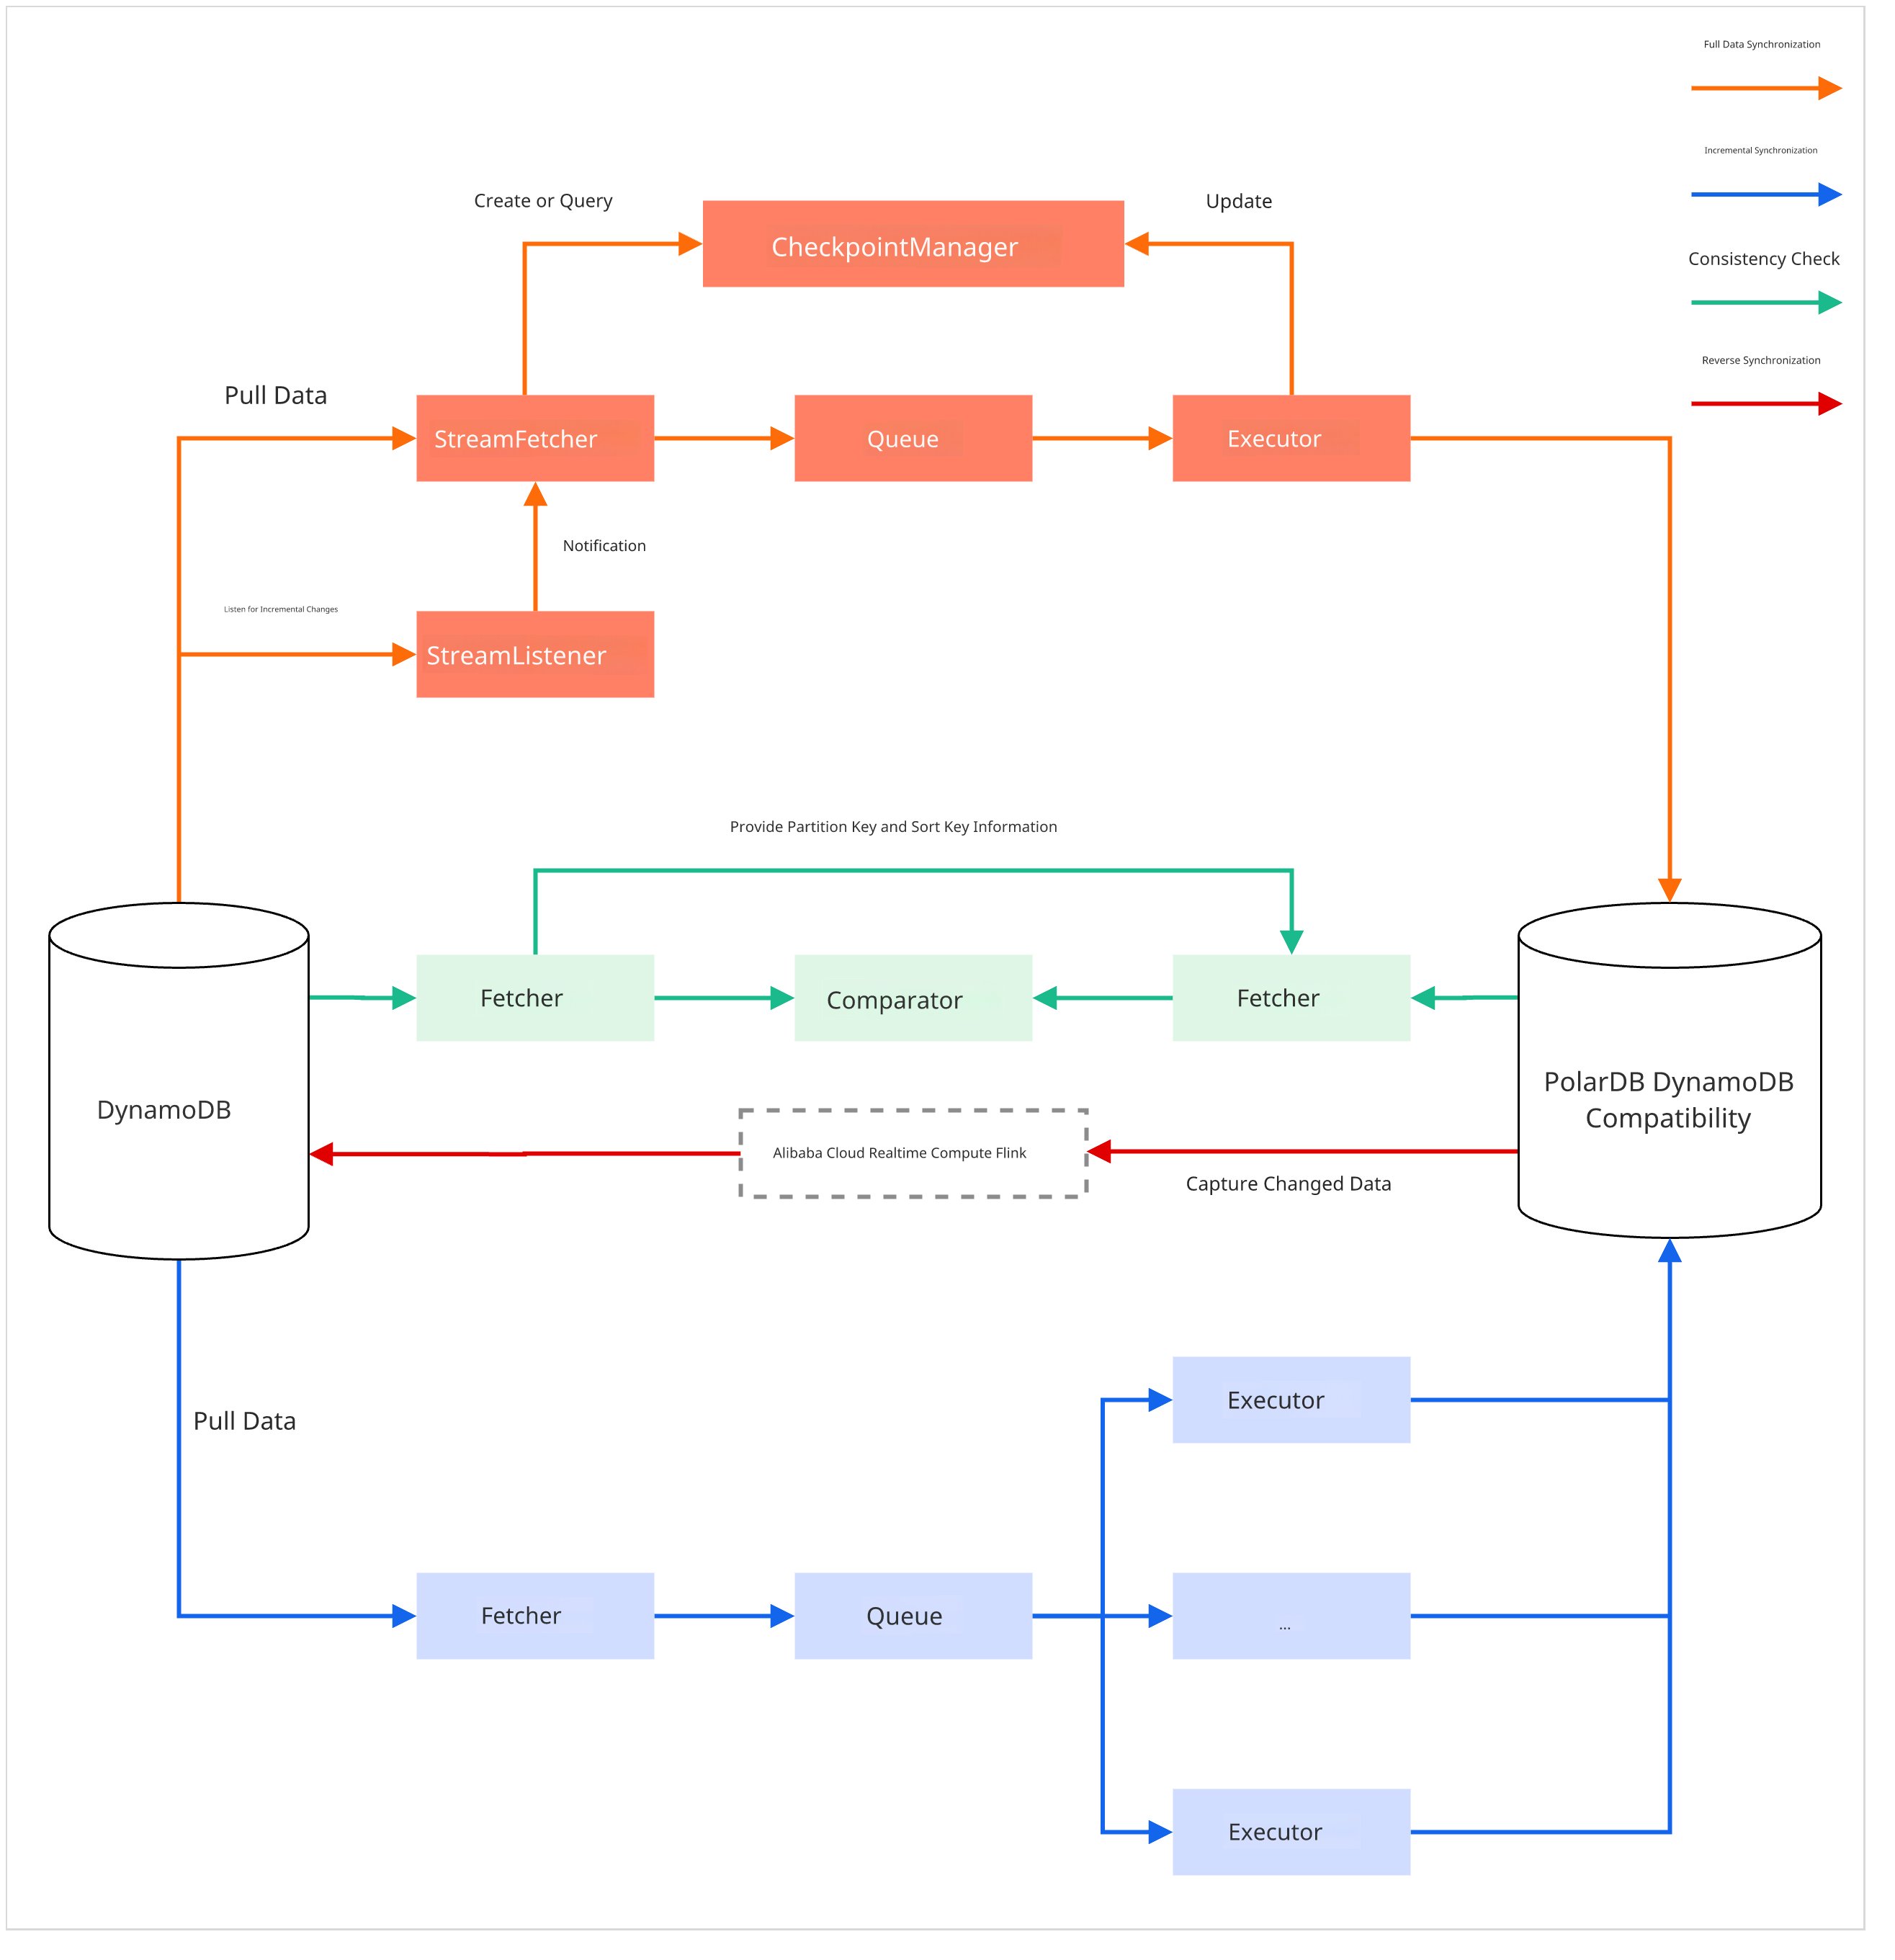
The migration consists of five stages, orchestrated by three core tools: nimo-shake (for data synchronization, including full and incremental synchronization), nimo-full-check (for data consistency checks), and PolarDBBackSync (for reverse synchronization).
Full synchronization
Tool:
nimo-shakeProcess: The tool automatically creates a matching table schema in the target PolarDB cluster. It then concurrently reads all data from the source database using
Scanoperations and writes it to the target cluster in batches usingBatchWriteItem.
Incremental synchronization
Tool:
nimo-shakeProcess: After full synchronization, the tool uses AWS DynamoDB Streams to capture data changes (inserts, deletes, and modifications) from the source since the migration began. It then synchronizes these changes to the target cluster to ensure eventual data consistency. This process supports resumable transfers.
Consistency check
Tool:
nimo-full-checkProcess: You can run this tool at any time during or after data synchronization. It concurrently reads data from the source and target, compares them by primary key, and generates a detailed difference report to verify data integrity.
(Optional) Reverse synchronization
Tool:
PolarDBBackSync.jar(based on Realtime Compute for Apache Flink)Process: After verifying data consistency, you can create a reverse synchronization link from PolarDB for PostgreSQL to the source DynamoDB as a safeguard for business rollbacks. This tool uses Flink to capture real-time data changes from PolarDB and calls DynamoDB's PutItem or DeleteItem API operations to synchronize the updates.
Business cutover
Process: When incremental data latency is minimal and the consistency check shows no discrepancies, you can briefly stop business writes. After all data is synchronized, switch your application connections to the PolarDB cluster to complete the migration.
Notes
Performance impact: The data migration, especially during full synchronization, places a heavy read and write load on both the source and target databases. We recommend performing the migration during off-peak hours and assessing your database capacity beforehand.
Security configuration: Before the business cutover, restrict write permissions on the target PolarDB cluster. Grant write access only to the data synchronization account to prevent accidental data corruption.
Prerequisites
Before you start the migration, make sure you have completed the following preparations:
Obtain the toolkits:
Migration toolkit: NimoShake_v20260616.zip. This package contains three tools:
nimo-shake,nimo-full-check, andnimo-repair.(Optional) Reverse migration toolkit: PolarDBBackSync.jar.
PolarDB cluster:
For an existing or new cluster, enable DynamoDB compatibility, obtain the DynamoDB endpoint, and create a dedicated DynamoDB account to get the access credential for API access.
(Optional) Parameter configuration: If you need to configure reverse synchronization, you must change the
wal_levelparameter of the PolarDB cluster tological. Changing this parameter requires a cluster restart, so we recommend completing this step before starting the migration.
AWS DynamoDB:
Obtain the access credential (AccessKey ID and Secret Access Key) for AWS DynamoDB.
Runtime environment: Prepare an ECS instance or another server with connectivity to both the PolarDB cluster and AWS DynamoDB to run the migration toolkits.
Procedure
Step 1: Configure and start data synchronization
Unzip
NimoShake_v20260616.zip, navigate to theNimoShakedirectory, and edit the shared configuration fileconf/nimo.conf. Thenimo-shake,nimo-full-check, andnimo-repairtools share this file, and each tool reads only the parameters it requires. The following are the core configuration parameters required to start the synchronization:Parameter
Description
Example value
sync_modeSynchronization mode:
allindicates full and incremental, andfullindicates full only.allsource.access_key_idThe AccessKey ID of the source AWS DynamoDB.
AKIAIOSFODNN7...source.secret_access_keyThe secret access key of the source AWS DynamoDB.
wJalrXUtnFEMI...source.regionThe region where the source AWS DynamoDB resides.
cn-north-1target.endpoint_urlThe DynamoDB access endpoint of the target PolarDB cluster (including the port number).
http://pe-xxx.rwlb.rds...target.access_key_idThe AccessKey ID of the DynamoDB account for the target PolarDB cluster.
your-polardb-access-keytarget.secret_access_keyThe secret access key of the DynamoDB account for the target PolarDB cluster.
your-polardb-secret-keyfilter.collection.whiteA whitelist for table filtering. Separate multiple table names with a semicolon (
;). This parameter cannot be used with the blacklist parameter.c1;c2filter.collection.blackA blacklist for table filtering. Separate multiple table names with a semicolon (
;). This parameter cannot be used with the whitelist parameter.c1;c2To use the recommended S3 snapshot-based check mode (see Step 2), you must also configure these native PostgreSQL connection parameters:
Parameter
Description
Example value
s3.export_state_fileThe path to the export state file. This file is written by
nimo-shakeand read bynimo-full-check.../nimo-shake-s3-exports.jsons3.export_bucketThe name of the target S3 bucket for DynamoDB data export.
my-export-buckets3.export_prefixThe S3 path prefix used to organize exported files.
exports/my-project/target.pg.endpoint_urlThe native port address of PolarDB for PostgreSQL (
host:portformat).pc-xxx.pg.polardb.rds...:5432target.pg.userThe username for PolarDB for PostgreSQL (also used as the schema name).
NoteA DynamoDB account is essentially a standard database account. Its secret access key (SK) is generated by encrypting the user-defined password with a compatible algorithm. Therefore,
target.pg.userandtarget.access_key_idcorrespond to the same account.target.pg.passwordis the user-defined password, and the SK is derived from this password.your-usernametarget.pg.passwordThe password for PolarDB for PostgreSQL.
your-password(Optional) Full synchronization PG direct-write mode
By default, full synchronization uses the native PostgreSQL direct write mode to directly write data to PolarDB by using the standard PostgreSQL protocol, bypassing the DynamoDB compatibility layer API for higher performance. To revert to the DynamoDB layer API (
BatchWriteItem, which writes a maximum of 25 items at a time), you can manually change this parameter todynamodb. You can configure the following parameters in the[SHAKE]section of theconf/nimo.conffile:Parameter
Description
Default
full.write_protocolFull write protocol.
postgresql(default) is the high-performance mode for direct writes to PostgreSQL.dynamodbis the DynamoDB layer API (BatchWriteItem, with a maximum of 25 items per batch).postgresqlfull.document.write.batchThe number of documents to write in each batch. When you use direct writes to PG, the batch size is not limited to 25 documents. You can increase this value to further improve write throughput. If you switch back to the
dynamodbprotocol, change this value back to 25.1000full.document.concurrencyThe number of concurrent write threads per table. In PG direct-write mode, the tool automatically sets the connection pool size based on this value to ensure a one-to-one correspondence between threads and connections.
4NotePG direct-write mode also requires you to configure the three
target.pg.*parameters. This set of configurations is shared with the s3/incr check mode, so you do not need to enter them again.This mode affects only the write path during the full synchronization phase. Incremental synchronization always writes data through the DynamoDB-compatible API layer.
Run the binary file for your operating system to start the synchronization.
NoteWe recommend running the task with
nohupin the background to prevent the synchronization task from being interrupted if the terminal session disconnects.# Execute in the NimoShake directory nohup ./bin/nimo-shake.linux.amd64 -conf=./conf/nimo.conf > /dev/null 2>&1 &The program first performs a full synchronization. After the full synchronization is complete, the program automatically switches to the incremental synchronization phase and continues to run.
Step 2: Check data consistency
nimo-full-checkandnimo-shakeshare the sameconf/nimo.conffile, so you do not need to switch directories or edit extra configuration files. Select a check mode using themodeparameter:scan: Performs a real-time scan to compare data between the source and the target. This mode is the simplest to configure and requires no additional infrastructure, but it continuously consumes DynamoDB read capacity during the check.s3(Recommended): When full synchronization is complete,nimo-shakeautomatically exports the source data to S3 and creates a point-in-time snapshot.nimo-full-checkuses this snapshot as the baseline for the check, which avoids rescanning the source DynamoDB. This requires the S3-related parameters from Step 1.incr(Use with s3 mode): During the incremental synchronization phase,nimo-shakewrites the primary key of each changed record into a check table (ct_{user}_{table}) in PolarDB.nimo-full-checkreads this check table and checks only the changed records.Comparison of the two check methods
Scan mode
S3 / incr mode
Required downtime
Longer. Business writes must be stopped during the check to prevent the source data from changing during the scan.
Shorter. The check is based on a snapshot. After stopping writes, you only need to confirm that incremental data has caught up before the cutover.
Impact on the source
Continuously consumes DynamoDB read capacity.
The full check is based on an S3 snapshot and does not consume DynamoDB capacity. The incremental check (incr mode) queries only changed records, which consumes less capacity.
Configuration complexity
Low.
Higher. It requires additional configuration for S3 and PolarDB for PostgreSQL connections.
Start the check task.
nohup ./bin/nimo-full-check.linux.amd64 -conf=./conf/nimo.conf > /dev/null 2>&1 &The check tool stores detailed logs and data difference reports in the default directories
logs/andnimo-full-check-diff/, respectively.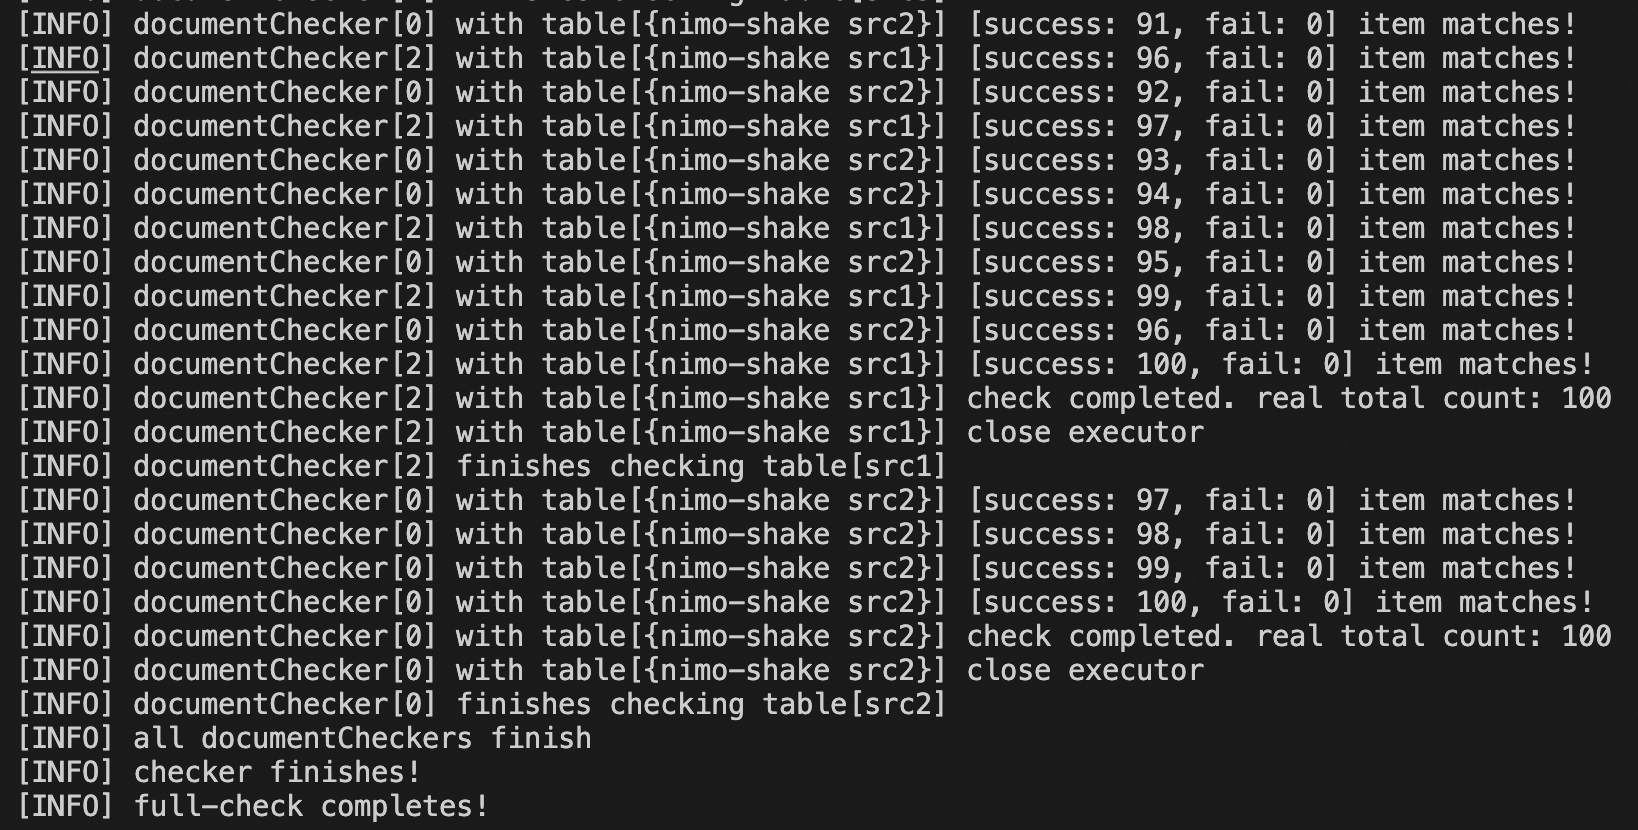
(Optional) Repair inconsistent data:
When data in the source DynamoDB is inconsistent with the data in the target PolarDB for PostgreSQL cluster, the inconsistent tables are listed in the specified diff directory. Example:
NoteThe default diff directory is
nimo-full-check-diff. You can configure it inconf/nimo.confby using thediff_output_fileparameter.nimo-full-check-diff/ └── testtable-0 └── testtable-1Run the repair task:
nohup ./bin/nimo-repair.linux.amd64 -conf=./conf/nimo.conf > /dev/null 2>&1 &
Step 3: (Optional) Configure reverse synchronization
Before the business cutover, you can configure a reverse synchronization link from PolarDB for PostgreSQL to the source DynamoDB. This link is activated during the official switch to PolarDB to enable data backflow and provide a safeguard for business rollbacks. The configuration procedure is as follows:
Environment preparation
Ensure that the PolarDB parameter
wal_levelis set tological.Create a privileged account and grant permissions:
(Optional) If you have not created a privileged account, go to the PolarDB console, and on the page of the cluster, create a privileged account.
Create a logical replication slot and grant permissions: Connect to the
polardb_internal_dynamodbdatabase by using a privileged account. Run the following SQL commands to create a logical replication slot and grant the replication permission to the DynamoDB Account. You can then view the status of the created logical replication slot.-- Create a logical replication slot. The name 'flink_slot' must match the slot name that is specified in your subsequent Flink configuration. SELECT * FROM pg_create_logical_replication_slot('flink_slot', 'pgoutput'); -- Grant the REPLICATION permission to the dedicated DynamoDB user account that you created earlier. -- Replace <your_dynamodb_user> with the name of your dedicated DynamoDB user account. ALTER ROLE <your_dynamodb_user> REPLICATION; -- Check the replication slot status. At this stage, the active status of 'flink_slot' should be f (false). SELECT * FROM pg_replication_slots;Enable and configure Flink:
Enable Realtime Compute for Apache Flink and create a Flink workspace.
ImportantThe Flink workspace must be in the same VPC as the PolarDB cluster.
Configure public network access for your Flink workspace so it can connect to AWS DynamoDB.
Configure the PolarDB cluster's IP address whitelist:
In the Flink console, click the View Details button for the workspace, and on the Workspace Details page, obtain its CIDR Block information.
Go to the PolarDB console. On the page of the cluster, Add Whitelist and add the CIDR block of Flink.
Verify connectivity between the PolarDB cluster and the Flink workspace:
In the Flink console, go to the workspace and click the Network Probe icon in the upper-right corner.
Enter the private endpoint and port of the primary node of the PolarDB cluster, and click Probe.
A pop-up message that says Network Probe Connection Successful indicates that the cluster's IP address whitelist is configured correctly.
Deploy Flink job
Download the reverse synchronization tool: PolarDBBackSync.jar.
Create a configuration file named
application.yamlwith the following content:snapshot: mode: never source: # Private endpoint of the PolarDB primary node hostname: pc-xxx.pg.polardb.rds.aliyuncs.com # Private port of the PolarDB primary node port: 5432 # Name of the logical replication slot created earlier slotName: flink_slot target: # Region of the target AWS DynamoDB region: cn-north-1 # (Optional) Table filtering configuration. You can declare either whiteTableSet or blackTableSet. filter: # whiteTableSet: tables to be reverse-synchronized # blackTableSet: tables not to be reverse-synchronized whiteTableSet: blackTableSet: # Checkpoint interval for the Flink job, in milliseconds checkpoint: interval: 3000Upload files: In the Flink console, go to the target workspace. On the File Management page, upload
PolarDBBackSync.jarandapplication.yaml.Securely store credentials: To avoid exposing keys in plaintext, we recommend using Flink's Variable Management feature to store sensitive information. On the Variable Management page, add the following four variables:
Parameter
Value
polardbusernameThe DynamoDB account for PolarDB.
polardbpasswordThe original password of the DynamoDB account for PolarDB. This is not the DynamoDB account's secret access key.
dynamodbakThe AccessKey ID of AWS DynamoDB.
dynamodbskThe secret access key of AWS DynamoDB.
configfilename(Optional) The name of the additional dependency file. Default value:
application.yaml.Deploy and start the job:
Go to the Job O&M page, and choose Deploy Job > JAR Job.
Enter the following main parameters and configure other parameters based on your business environment. Then, click Deploy.
Parameter
Reference
Deployment Mode
Set to Stream Mode.
Deployment name
Enter a name for the job deployment, for example, PolarDBBackSync.
Engine Version
Set to vvr-11.3-jdk11-flink-1.20.
JAR URI
Select the uploaded
PolarDBBackSync.jar.Entry point class
Set to
org.example.PolarDBCdcJob.Entry point main arguments
Set to:
--polardbusername ${secret_values.polardbusername}--polardbpassword ${secret_values.polardbpassword}--dynamodbak ${secret_values.dynamodbak}--dynamodbsk ${secret_values.dynamodbsk}(Optional)
--configfilename ${secret_values.configfilename}Additional dependency files
Select the uploaded
application.yaml.ImportantIf your password or other parameter values contain special characters, the Flink job may fail to parse the parameters. To prevent this issue, after the job is created, go to Deployment Details > Run Parameter Configuration, click Edit, and add the following configuration in Other Configurations:
env.java.opts: -Dconfig.disable-inline-comment=true.After the deployment is successful, click Start > Stateless Start.
Validation and cleanup
Validation: After the job starts, use a privileged account to connect to the
polardb_internal_dynamodbdatabase of the PolarDB cluster and runSELECT * FROM pg_replication_slots;. If the value of theactivefield for the flink_slot replication slot changes tot(true), the Flink job is connected. You can then begin directing business traffic to the PolarDB cluster.Cleanup: When reverse synchronization is no longer needed, you can perform the following steps to release related resources and reduce costs.
Realtime Compute for Apache Flink:
Stop the job: Go to the Flink console. In the target workspace, go to the Job O&M page, find the target job, and click Stop.
Release the instance: Return to the Flink console, find the target workspace, and click Release Resources.
PolarDB cluster: Use a privileged account to connect to the
polardb_internal_dynamodbdatabase and run the following command to delete the logical replication slot.SELECT pg_drop_replication_slot('flink_slot');
Step 4: Perform business cutover
Once incremental synchronization latency is low and the data consistency check passes, you can plan the business cutover. When you are ready, follow these steps:
Final check: Before the planned downtime window, run the consistency check tool repeatedly until you confirm that incremental synchronization latency is minimal and the number of data discrepancies is zero or within an acceptable range.
Stop source writes: At the start of the downtime window, stop all applications from writing to the source AWS DynamoDB.
Wait for synchronization to complete: Monitor the
nimo-shakelogs to confirm that no new incremental data needs to be synchronized.Last consistency check: Run the
nimo-full-checktool again to ensure that the data in the source and target is completely consistent.Stop the synchronization tool: After you confirm that the data is fully synchronized, stop the
nimo-shakeprocess.Switch application connections: Stop the business applications and change their database connection configurations from the AWS DynamoDB endpoint to the DynamoDB access endpoint of PolarDB.
(Optional) Start the reverse synchronization task: During the official business switch to PolarDB, start the reverse synchronization task. This task uses Realtime Compute for Apache Flink to implement reverse data replication, which provides a safeguard for business rollbacks.
Start business applications: Restart the business applications. The cutover is complete.
(Optional) Stop the reverse synchronization task: After the cutover is complete and the business is running stably for a period, you can stop the reverse synchronization task (which includes stopping the Flink job and releasing its resources).
Appendix: Simulate real-time traffic
To simulate a real-world migration with continuous data writes in a test environment, use the following Go sample code. This code periodically writes and updates data in the source DynamoDB table.
This step is only for testing and validating the migration process. Do not perform this step in a production migration.
package main

import (
	"context"
	"fmt"
	"log"
	"math/rand"
	"time"

	"github.com/aws/aws-sdk-go-v2/aws"
	"github.com/aws/aws-sdk-go-v2/config"
	"github.com/aws/aws-sdk-go-v2/credentials"
	"github.com/aws/aws-sdk-go-v2/service/dynamodb"
	"github.com/aws/aws-sdk-go-v2/service/dynamodb/types"
)

// --- Configuration for your source AWS DynamoDB ---
var (
    region    = "cn-north-1"       // AWS DynamoDB region
    accessKey = "your-aws-access-key" // AWS DynamoDB access key
    secretKey = "your-aws-secret-key" // AWS DynamoDB secret key
)

// --- Helper function to create a DynamoDB client ---
func createClient() (*dynamodb.Client, context.Context) {
    ctx := context.Background()
    sdkConfig, err := config.LoadDefaultConfig(ctx, config.WithRegion(region))
    if err != nil {
        log.Fatalf("Failed to load AWS config: %v", err)
    }
    client := dynamodb.NewFromConfig(sdkConfig, func(o *dynamodb.Options) {
        o.Credentials = credentials.NewStaticCredentialsProvider(accessKey, secretKey, "")
    })
    return client, ctx
}

// --- Function to create a table and populate it with initial data ---
func initializeData(client *dynamodb.Client, ctx context.Context) {
    tableName := "src1" // Example table name

    // Create table if not exists
    _, err := client.CreateTable(ctx, &dynamodb.CreateTableInput{
        TableName: &tableName,

        AttributeDefinitions: [ ]types.AttributeDefinition{

            {AttributeName: aws.String("pk"), AttributeType: types.ScalarAttributeTypeS},
        },

        KeySchema: [ ]types.KeySchemaElement{

            {AttributeName: aws.String("pk"), KeyType: types.KeyTypeHash},
        },
        ProvisionedThroughput: &types.ProvisionedThroughput{
            ReadCapacityUnits:  aws.Int64(100),
            WriteCapacityUnits: aws.Int64(100),
        },
    })
    if err != nil {
		// Ignore if table already exists, fail on other errors
        if _, ok := err.(*types.ResourceInUseException); !ok {
			log.Fatalf("CreateTable failed for %s: %v", tableName, err)
		}
    }

    fmt.Printf("Waiting for table '%s' to become active...\n", tableName)
    waiter := dynamodb.NewTableExistsWaiter(client)
    err = waiter.Wait(ctx, &dynamodb.DescribeTableInput{TableName: &tableName}, 5*time.Minute)
    if err != nil {
        log.Fatalf("Waiter failed for table %s: %v", tableName, err)
    }

    // Insert 100 sample items
    for i := 0; i < 100; i++ {
        pk := fmt.Sprintf("%s_user_%03d", tableName, i)
        item := map[string]types.AttributeValue{
            "pk":  &types.AttributeValueMemberS{Value: pk},
            "val": &types.AttributeValueMemberN{Value: fmt.Sprintf("%d", i)},
        }
        client.PutItem(ctx, &dynamodb.PutItemInput{TableName: &tableName, Item: item})
    }
    fmt.Printf("Inserted 100 initial items into '%s'.\n", tableName)
}

// --- Function to simulate continuous business traffic ---
func simulateTraffic(client *dynamodb.Client, ctx context.Context) {
    tableName := "src1"
    fmt.Println("Starting periodic updates to simulate traffic. Press Ctrl+C to stop.")
    i := 0
    for {
        pk := fmt.Sprintf("%s_user_%03d", tableName, i%100)
        newValue := fmt.Sprintf("%d", rand.Intn(1000))
        _, err := client.UpdateItem(ctx, &dynamodb.UpdateItemInput{
            TableName: &tableName,
            Key: map[string]types.AttributeValue{
                "pk": &types.AttributeValueMemberS{Value: pk},
            },
            ExpressionAttributeValues: map[string]types.AttributeValue{
                ":newval": &types.AttributeValueMemberN{Value: newValue},
            },
            UpdateExpression: aws.String("SET val = :newval"),
        })
        if err != nil {
            fmt.Printf("Update error: %v\n", err)
        } else {
            fmt.Printf("Updated pk=%s with new val=%s\n", pk, newValue)
        }
        i++
        time.Sleep(1 * time.Second) // Update one record per second
    }
}

func main() {
    client, ctx := createClient()
    initializeData(client, ctx)
    simulateTraffic(client, ctx)
}