After you install a software client of Elastic Desktop Service (EDS) on your local computer, you can connect to a cloud desktop from the client.
Background information
- Windows: 64-bit Windows 7 and 64-bit Windows 10
- macOS: macOS 10.13 and later
Log on to a cloud desktop
- Double-click the
 icon to open the client.
 - Select a cloud desktop that is in the Running state and click Connect. A cloud desktop is displayed as a card that contains the desktop information, including desktop name and status. In the cloud desktop card, click More to view the details about the cloud desktop. The details include the cloud desktop ID and its configurations. You can start, stop, or restart a cloud desktop. The operations that you can perform vary based on the status of the cloud desktop.
- For a running cloud desktop, click Stop to stop the cloud desktop.
- For a running cloud desktop, click Restart to restart the cloud desktop.
- For a stopped cloud desktop, click Start to start the cloud desktop.
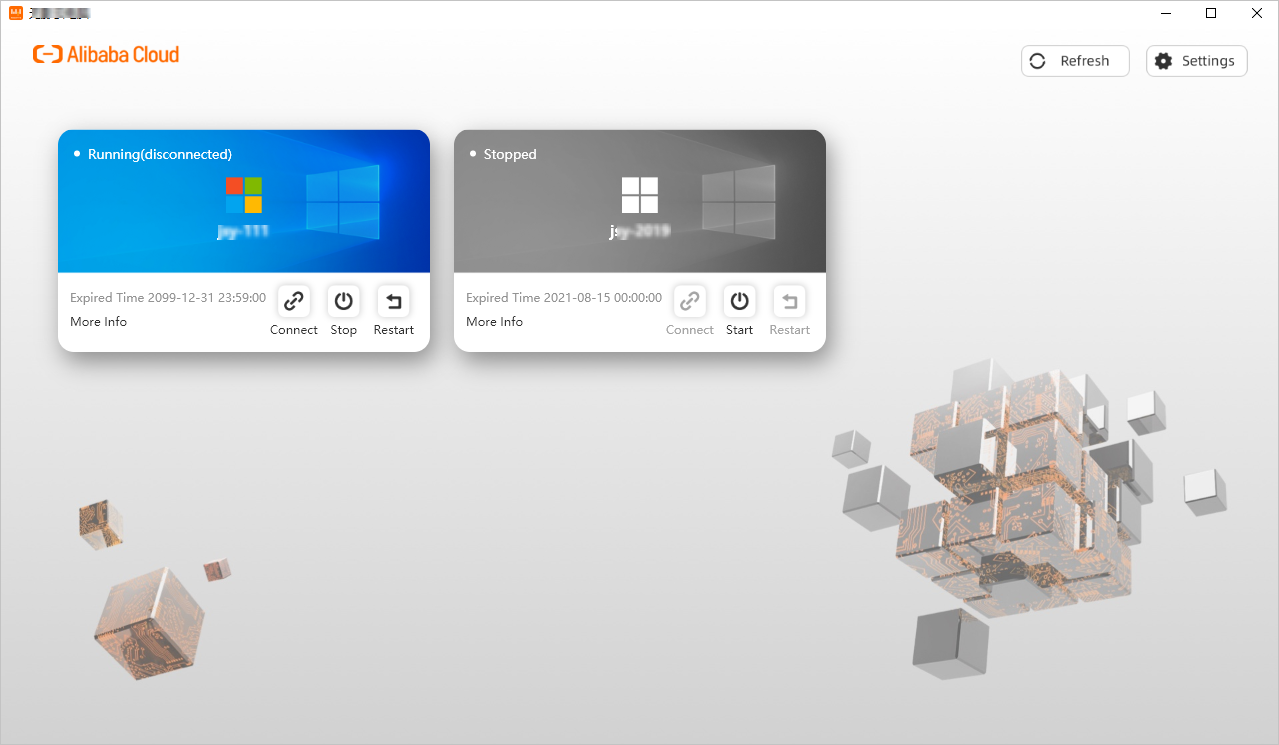 Note The cloud desktops in the workspace that is associated with the account are displayed. You can start multiple cloud desktops in the workspace at the same time. If no cloud desktops are available, contact the administrator to assign a cloud desktop.After you connect to the cloud desktop, the cloud desktop appears in a new window. The desktop shows multiple sections, such as the desktop, toolbar, and taskbar. The options in the toolbar vary based on the logon method and OS. For the cloud desktop that is accessed from a software client, you can click
 in the upper part of the desktop to show the toolbar. The following table describes
the options provided in the toolbar.
in the upper part of the desktop to show the toolbar. The following table describes
the options provided in the toolbar.
Option Description Homepage Switches to the desktop of your local computer. Ctrl+Alt+Del - Windows cloud desktop: Shows the Windows Security page, on which you can launch Task
Manager.
Note You cannot change the password on this page.
- Linux cloud desktop: Disconnects from the cloud desktop.
Preferences Allows you to configure the file access, connection, display, and display layout settings. Note The cloud desktop policies that are configured by the administrator determine whether you can read data from and write data to local disks of your computer from the cloud desktop. You can configure file access settings only to limit permissions on the cloud desktop. You cannot use the settings to grant permissions. For example, if the administrator grants the read-only permissions to your account, you can select Read-only Permissions or No Permissions, but you cannot select Read and Write Permissions. Even if you select Read and Write Permissions, the write permissions cannot take effect.Device Shows the devices that can be used to remotely connect to the cloud desktop from your local computer. You can specify devices based on your business requirements. Full Screen or Window Displays the cloud desktop in full-screen or window mode. Disconnect Disconnects the cloud desktop from the client and closes the cloud desktop window. Shortcuts Shows running applications and allows you to switch between the applications.
Related operations
- Switch between languages
In the upper-right corner of the client, click Settings, select Language, and then select a language based on your business requirements.
- Submit feedback
In the upper-right corner of the client, click Settings and select Feedback. In the dialog box that appears, enter the feedback that you want to submit and click OK.
- View the help documentation
In the upper-right corner of the client, click Settings and select About. In the dialog box that appears, select Help and click FAQ.
- Reset or change a password
Note Only convenience users can reset or change passwords on the client. Enterprise Active Directory (AD) accounts are managed by the AD system of an enterprise. If you use an enterprise AD account, and you want to reset or change the password, contact the administrator. Take note that this does not apply to the scenarios in which you are required to change the password upon the first logon or when the password expires.
- Reset the password
On the Login page, click Forget Password. In the dialog box that appears, enter the username and the email address, and click Submit.Note The email address must be the enterprise email address that the administrator used to create the convenience account. If you forget the email address, contact the administrator. The system sends a password reset email to the email address that you entered. You can click the link in the email to reset the password.
- Change the password
After you log on to the client, the desktop page appears. Click Settings and select Change Password. In the dialog box that appears, enter the current password and the new password, confirm the new password, and then click Submit.
- Reset the password