オンプレミス Linux デバイスに strongSwan をデプロイし、 Alibaba Cloud VPN Gateway とのデュアルトンネル IPsec-VPN 接続を確立して、高可用性なサイト間通信を実現します。
シナリオ例
次の図は、一般的なデプロイメントを示しています。オンプレミスネットワーク上の strongSwan デバイスが Alibaba Cloud とのデュアルトンネル IPsec-VPN 接続を確立し、VPC とオンプレミスデータセンター間の通信を可能にします。

IP アドレス計画
オンプレミスデータセンター側
プライベート CIDR ブロック: 172.16.0.0/16
strongSwan デバイス
ネットワークインターフェイスカード eth0: 172.16.20.80、NAT マッピングされたパブリックエグレス 1: 120.XX.XX.202
(オプション) ネットワークインターフェイスカード eth1: 172.16.21.248、NAT マッピングされたパブリックエグレス 2: 47.XX.XX.127
説明NAT 以外のシナリオについては、「ネットワークインターフェイスにパブリック IP アドレスがある場合 (NAT 以外)、strongSwan をどのように設定しますか?」をご参照ください。
デバイスにパブリックネットワークエグレスが 1 つ (シングルエグレス) であっても、2 つ (デュアルエグレス) であっても、Alibaba Cloud とのデュアルトンネル IPsec-VPN 接続を確立できます。このトピックでは、両方のケースの例を示します。
Alibaba Cloud 側
VPC CIDR ブロック: 192.168.0.0/16
vSwitch 1 CIDR ブロック: 192.168.10.0/24
vSwitch 2 CIDR ブロック: 192.168.20.0/24
vSwitch 3 CIDR ブロック: 192.168.40.0/24
vSwitch 4 CIDR ブロック: 192.168.50.0/24
vSwitch 5 CIDR ブロック: 192.168.55.0/24
VPN Gateway
IPsec アドレス 1: 47.XX.XX.151
IPsec アドレス 2: 47.XX.XX.87
説明VPN ゲートウェイインスタンスを作成すると、システムは自動的に 2 つの IPsec アドレスを VPN ゲートウェイインスタンスに割り当てます。
BGP IP アドレス
このトピックでは、静的ルーティングと Border Gateway Protocol (BGP) による動的ルーティングの両方を扱います。BGP を使用する予定がない場合は、このセクションをスキップしてください。次の表は、このトピックで使用される BGP CIDR ブロック計画を示しています。
リソース | トンネル | BGP トンネル CIDR ブロック | BGP IP アドレス | BGP AS 番号 |
VPN Gateway | トンネル 1 | 169.254.10.0/30 説明 VPN ゲートウェイインスタンスでは、各トンネルの CIDR ブロックは一意である必要があります。 | 169.254.10.1 | 65535 |
トンネル 2 | 169.254.20.0/30 | 169.254.20.1 | ||
strongSwan デバイス | トンネル 1 | 169.254.10.0/30 | 169.254.10.2 | 65530 |
トンネル 2 | 169.254.20.0/30 | 169.254.20.2 |
VPN パラメータ設定計画
この例では、両方のトンネルで同じパラメータ値を使用します。各トンネルについて、strongSwan デバイスの IKE および IPsec 設定は、Alibaba Cloud 側の設定と一致する必要があります。
事前共有鍵: ChangeMe***
IKE 設定:
IKE バージョン: ikev2
ネゴシエーションモード: メイン
暗号化アルゴリズム: aes
認証アルゴリズム: sha1
DH グループ: group2
SA ライフタイム (秒): 86400
IPsec 設定:
暗号化アルゴリズム: aes
認証アルゴリズム: sha1
DH グループ (PFS): group2
SA ライフタイム (秒): 86400
Alibaba Cloud 側での準備
パブリックエグレスの数とルーティング方法に基づいて、Alibaba Cloud の設定を行います。ご利用のシナリオに一致するタブを選択してください。
デュアルエグレス - BGP 動的ルーティング
詳細については、「BGP を使用したデュアルトンネルモード」をご参照ください。[VPN Gateway の作成]、[カスタマーゲートウェイの作成]、[IPsec-VPN 接続の作成]、および [BGP 動的ルーティングの有効化] の手順を完了してください。
strongSwan デバイスはパブリックエグレス IP アドレスを 2 つ持つため、カスタマーゲートウェイを 2 つ作成します。
IPsec-VPN 接続を作成する際、トンネル 1 をパブリックエグレス 1 に、トンネル 2 をパブリックエグレス 2 に関連付けます。この例では [宛先ルーティングモード] を使用します。
デュアルエグレス - 静的ルーティング
詳細については、「標準 VPN Gateway クイックスタート」をご参照ください。[VPN Gateway の作成]、[カスタマーゲートウェイの作成]、[IPsec 接続の作成]、および [VPN Gateway ルートの設定] の手順を完了してください。
strongSwan デバイスはパブリックエグレス IP アドレスを 2 つ持つため、カスタマーゲートウェイを 2 つ作成します。
IPsec 接続を作成する際、トンネル 1 をパブリックエグレス 1 に、トンネル 2 をパブリックエグレス 2 に関連付けます。この例では [宛先ルーティングモード] を使用します。
シングルエグレス - BGP 動的ルーティング
詳細については、「BGP を使用したデュアルトンネルモード」をご参照ください。[VPN Gateway の作成]、[カスタマーゲートウェイの作成]、[IPsec-VPN 接続の作成]、および [BGP 動的ルーティングの有効化] の手順を完了してください。
strongSwan デバイスはパブリックエグレス IP アドレスを 1 つ持つため、カスタマーゲートウェイを 1 つ作成します。
IPsec-VPN 接続を作成する際、両方のトンネルを同じカスタマーゲートウェイに関連付けます。この例では [宛先ルーティングモード] を使用します。
シングルエグレス - 静的ルーティング
詳細については、「標準 VPN Gateway クイックスタート」をご参照ください。[VPN Gateway の作成]、[カスタマーゲートウェイの作成]、[IPsec 接続の作成]、および [VPN Gateway ルートの設定] の手順を完了してください。次の点に注意してください。
strongSwan デバイスはパブリックエグレス IP アドレスを 1 つ持つため、カスタマーゲートウェイを 1 つ作成します。
IPsec 接続を作成する際、[保護されたデータフロー] モードを選択し、両方のトンネルを同じカスタマーゲートウェイに関連付けます。次のパラメータを設定してください。
[ローカルネットワーク] を Alibaba Cloud 側の VPC の CIDR ブロック (192.168.0.0/16) に設定してください。
[リモートネットワーク] をオンプレミスデータセンターのプライベート CIDR ブロック (172.16.0.0/16) に設定してください。
IPsec-VPN 接続が Transit Router に関連付けられているシナリオでは、BGP 動的ルーティングプロトコルを使用することを推奨します。この方法は推奨しません。
Start to configure the strongSwan device
The following steps use a strongSwan device running "CentOS Stream 9 64-bit operating system" as an example. For other operating systems, see official strongSwan documentation.
1. Configure the firewall policy to allow traffic
Allow ESP protocol (IP protocol 50), UDP port 500, and UDP port 4500 on the strongSwan device.
iptables -I INPUT -p 50 -j ACCEPT
iptables -I INPUT -p udp --dport 500 -j ACCEPT
iptables -I INPUT -p udp --dport 4500 -j ACCEPT2. Enable traffic forwarding
echo 1 > /proc/sys/net/ipv4/ip_forwardEnable IP forwarding so that the strongSwan device can route traffic between the on-premises network and the VPC. The following command takes effect immediately and persists across reboots.
3. Install the strongSwan software
dnf install epel-release -y
dnf install strongswan -y4. Configure dual tunnels
Dual egress - static routing and BGP dynamic routing
Dual egress requires XFRM virtual network interfaces. Verify the following before you proceed: strongSwan 5.8.0 or later, Linux kernel 4.19 or later, iproute2 5.1.0 or later, and XFRM module support (run lsmod | grep xfrm to check). For more information, see XFRM Interfaces on Linux.
Add routes so that traffic to IPsec address 1 goes through eth0 and traffic to IPsec address 2 goes through eth1.
ip route add 47.XX.XX.151 via 172.16.20.253 dev eth0  # 172.16.20.253 is the private gateway address of eth0.
ip route add 47.XX.XX.87 via 172.16.21.253 dev eth1   # 172.16.21.253 is the private gateway address of eth1.
Verify connectivity to both IPsec addresses.
ping 47.XX.XX.151
ping 47.XX.XX.87
Create two virtual network interfaces to establish the IPsec-VPN tunnels.
ip link add ipsec0 type xfrm dev eth0 if_id 42 # Create an XFRM virtual network interface for Tunnel 1. The interface ID is 42 and the underlying interface is the public interface eth0. ip link add ipsec1 type xfrm dev eth1 if_id 43 # Create an XFRM virtual network interface for Tunnel 2. The interface ID is 43 and the underlying interface is the public interface eth1. ip link set ipsec0 up # Start the XFRM virtual network interface for Tunnel 1. ip link set ipsec1 up # Start the XFRM virtual network interface for Tunnel 2.重要The configuration for creating a virtual network interface is temporary. After the strongSwan device restarts, you need to add the configuration again and run the
sudo systemctl restart strongswan;swanctl --load-allcommand (this command requires root permissions). You can refer to the following content to add a startup script to the strongSwan device, so that the virtual network interface is automatically added again after the strongSwan device restarts.Modify the strongSwan configuration file.
Back up the original strongSwan configuration file.
mv /etc/strongswan/swanctl/swanctl.conf /etc/strongswan/swanctl/swanctl.conf.bakCreate a new strongSwan configuration file.
vi /etc/strongswan/swanctl/swanctl.confAdd the following configuration. Each parameter value must match the corresponding Alibaba Cloud tunnel configuration.
重要For static routing, uncomment the
updown = /root/connect_1.shandupdown = /root/connect_2.shlines in the configuration.connections { vco1 { # Add the VPN configuration for IPsec-VPN Tunnel 1. version = 2 # Specify the IKE version. It must be the same as the IKE version of Tunnel 1 on the Alibaba Cloud side. 2 indicates IKEv2. local_addrs = 172.16.20.80 # The IP address of the first on-premises network interface card. remote_addrs = 47.XX.XX.151 # Specify the peer IP address of Tunnel 1 as the gateway IP address of Tunnel 1 on the Alibaba Cloud side, which is IPsec address 1. dpd_delay = 10 rekey_time = 84600 # Specify the SA lifetime for Tunnel 1. It must be the same as the SA lifetime in the IKE configurations of Tunnel 1 on the Alibaba Cloud side. over_time = 1800 proposals = aes128-sha1-modp1024 # Specify the encryption algorithm, authentication algorithm, and DH group for Tunnel 1. They must be the same as those in the IKE configurations of Tunnel 1 on the Alibaba Cloud side. group2 corresponds to modp1024. encap = yes local { auth = psk # Set the authentication method for the on-premises side to PSK, which is the pre-shared key method. id = 120.XX.XX.202 # The first on-premises public egress IP address. It must be the same as the RemoteId of Tunnel 1 on the Alibaba Cloud side. } remote { auth = psk # Set the authentication method for the peer to PSK. This means Alibaba Cloud uses the pre-shared key method. id = 47.XX.XX.151 # IPsec address 1 on the Alibaba Cloud side. It must be the same as the LocalId of Tunnel 1 on the Alibaba Cloud side. } children { vco_child1 { local_ts = 0.0.0.0/0 # The policy-based traffic selector for the destination-based routing mode on Alibaba Cloud is 0.0.0.0/0. remote_ts = 0.0.0.0/0 # The policy-based traffic selector for the destination-based routing mode on Alibaba Cloud is 0.0.0.0/0. mode = tunnel rekey_time = 85500 life_time = 86400 # Specify the SA lifetime for Tunnel 1. It must be the same as the SA lifetime in the IPsec configurations of Tunnel 1 on the Alibaba Cloud side. dpd_action = restart start_action = start close_action = start esp_proposals = aes128-sha1-modp1024 # Specify the encryption algorithm, authentication algorithm, and DH group for Tunnel 1. They must be the same as those in the IPsec configurations of Tunnel 1 on the Alibaba Cloud side. group2 corresponds to modp1024. if_id_out = 42 # Specify the egress and ingress interfaces for Tunnel 1 as the XFRM virtual network interface of Tunnel 1. if_id_in = 42 #updown = /root/connect_1.sh # Execute the /root/connect_1.sh script to configure routes based on the UP and DOWN status of Tunnel 1. This parameter is required only when you use static routing. } } } vco2 { # Add the VPN configuration for IPsec-VPN Tunnel 2. version = 2 # Specify the IKE version. It must be the same as the IKE version of Tunnel 2 on the Alibaba Cloud side. 2 indicates IKEv2. local_addrs = 172.16.21.248 # The IP address of the second on-premises network interface card. remote_addrs = 47.XX.XX.87 # IPsec address 2 on the Alibaba Cloud side. dpd_delay = 10 rekey_time = 84600 # SA lifetime. Must match Tunnel 2 IKE configurations. over_time = 1800 # proposals = aes128-sha1-modp1024 # group2 = modp1024. Must match Tunnel 2 IKE configurations. encap = yes local { auth = psk # Pre-shared key authentication. id = 47.XX.XX.127 # Second on-premises public egress IP. Must match RemoteId of Tunnel 2. } remote { auth = psk # Set the authentication method for the peer to PSK. This means Alibaba Cloud uses the pre-shared key method. id = 47.XX.XX.87 # IPsec address 2 on the Alibaba Cloud side. It must be the same as the LocalId of Tunnel 2 on the Alibaba Cloud side. } children { vco_child2 { local_ts = 0.0.0.0/0 # The policy-based traffic selector for the destination-based routing mode on Alibaba Cloud is 0.0.0.0/0. remote_ts = 0.0.0.0/0 # The policy-based traffic selector for the destination-based routing mode on Alibaba Cloud is 0.0.0.0/0. mode = tunnel rekey_time = 85500 life_time = 86400 # Specify the SA lifetime for Tunnel 2. It must be the same as the SA lifetime in the IPsec configurations of Tunnel 2 on the Alibaba Cloud side. dpd_action = restart start_action = start close_action = start esp_proposals = aes128-sha1-modp1024 # Specify the encryption algorithm, authentication algorithm, and DH group for Tunnel 2. They must be the same as those in the IPsec configurations of Tunnel 2 on the Alibaba Cloud side. group2 corresponds to modp1024. if_id_out = 43 # Specify the egress and ingress interfaces for Tunnel 2 as the XFRM virtual network interface of Tunnel 2. if_id_in = 43 #updown = /root/connect_2.sh # Execute the /root/connect_2.sh script to configure routes based on the UP and DOWN status of Tunnel 2. This parameter is required only when you use static routing. } } } } secrets { ike-vco1 { id = 47.XX.XX.151 # The public IP address of Tunnel 1 of the VPN gateway on the Alibaba Cloud side. secret = ChangeMe*** # Specify the pre-shared key for Tunnel 1. The key must be the same as the pre-shared key of Tunnel 1 on the Alibaba Cloud side. } ike-vco2 { id = 47.XX.XX.87 # The public IP address of Tunnel 2 of the VPN gateway on the Alibaba Cloud side. secret = ChangeMe*** # Specify the pre-shared key for Tunnel 2. The key must be the same as the pre-shared key of Tunnel 2 on the Alibaba Cloud side. } }
Restart the strongSwan process, reload the strongSwan configuration, and check the tunnel status.
sudo systemctl restart strongswan
swanctl --load-all
watch swanctl --list-sas
As shown below, if the status after both
vco1andvco2isESTABLISHED, the IPsec-VPN connection between the strongSwan device and the VPN gateway has been established successfully. However, the networks still cannot communicate normally, and you need to configure routes.plugin 'sqlite': failed to load - sqlite_plugin_create not found and no plugin file available vco2: #4, ESTABLISHED, IKEv2, 2d3fbef28a433cfd_i 3f1960ea7d80a293_r* local '47.___.127' @ ___[4500] remote '47.__ __87' @ ___ AES_CBC-128/HMAC_SHA1_96/PRF_HMAC_SHA1/MODP_1024 established 3424s ago, rekeying in 79868s vco_child2: #4, reqid 2, INSTALLED, TUNNEL-in-UDP, ESP:AES_CBC-128/HMAC_SHA1_96 installed 3424s ago, rekeying in 81353s, expires in 82976s in c7f56760 (-|0x0000002b), 16396 bytes, 245 packets, 47s ago out 2b09776f (-|0x0000002b), 9621 bytes, 149 packets, 47s ago local 0.0.0.0/0 remote 0.0.0.0/0 vco1: #1, ESTABLISHED, IKEv2, 96ccc381f9e7693e_i* d1a7dec1832e5cb6_r local '120.___.202' @ ___ remote '47.__ ___.151' @ ___ AES_CBC-128/HMAC_SHA1_96/PRF_HMAC_SHA1/MODP_1024 established 3447s ago, rekeying in 79436s vco_child1: #1, reqid 1, INSTALLED, TUNNEL-in-UDP, ESP:AES_CBC-128/HMAC_SHA1_96 installed 3447s ago, rekeying in 81457s, expires in 82953s in c8f4286f (-|0x0000002a), 16127 bytes, 239 packets, 43s ago out f5bccc3d (-|0x0000002a), 9828 bytes, 152 packets, 43s ago local 0.0.0.0/0Configure routes.
Refer to the section for the routing method that you plan to use.
BGP dynamic routing
説明After the strongSwan device restarts, you need to add the BGP configuration again.
Configure the BGP IP addresses on the XFRM interfaces.
ip address add 169.254.10.2/30 dev ipsec0
ip address add 169.254.20.2/30 dev ipsec1
Install FRR (Free Range Routing) for BGP support.
yum install -y frrRun the
vi /etc/frr/daemonscommand to edit the configuration file and enable BGP dynamic routing.Press the
ikey to enter edit mode; change the value of the bgpd parameter toyesto enable BGP dynamic routing; press theEsckey to exit edit mode, and then enter:wqto save the configuration.Enable and start FRR.
systemctl enable frr
systemctl restart frr
Add the BGP configuration. Replace the IP addresses and AS numbers with your actual values.
Enter the FRR configuration interface.
vtyshEnter configuration mode.
config terminalAdd the BGP configuration with the following commands.
Replace the following values with your actual addresses:
Replace "169.254.10.1" and "169.254.20.1" with the actual BGP IP addresses of the tunnels on the Alibaba Cloud side.
Replace "65535" with the actual BGP AS number of the VPN Gateway.
Replace "172.16.20.0/24" and "172.16.21.0/24" with the actual CIDR blocks of your on-premises data center.
route-map allow-all permit 1
exit

router bgp 65530
 bgp router-id 169.254.10.2
 neighbor 169.254.10.1 remote-as 65535
 neighbor 169.254.10.1 timers 10 30
 neighbor 169.254.20.1 remote-as 65535
 neighbor 169.254.20.1 timers 10 30

 address-family ipv4 unicast
  network 172.16.20.0/24
  network 172.16.21.0/24
  neighbor 169.254.10.1 soft-reconfiguration inbound
  neighbor 169.254.10.1 route-map allow-all in
  neighbor 169.254.10.1 route-map allow-all out
  neighbor 169.254.20.1 soft-reconfiguration inbound
  neighbor 169.254.20.1 route-map allow-all in
  neighbor 169.254.20.1 route-map allow-all out
  maximum-paths 32
 exit-address-family
exit
Run
exitto leave configuration mode, then runshow ip bgpto view the BGP routes.You can see that the strongSwan device has successfully learned the routes of the VPC on the cloud, and the on-premises data center and the VPC on the cloud can communicate normally.
     Network          Next Hop            Metric LocPrf    Weight Path
*>  172.16.20.0/24   0.0.0.0                  0             32768 i
*>  172.16.21.0/24   0.0.0.0                  0             32768 i
*   192.168.10.0/24  169.254.20.1           200                 0 65535 i
*>                   169.254.10.1           100                 0 65535 i
*   192.168.20.0/24  169.254.20.1           200                 0 65535 i
*>                   169.254.10.1           100                 0 65535 i
*   192.168.40.0/24  169.254.20.1           200                 0 65535 i
*>                   169.254.10.1           100                 0 65535 i
*   192.168.50.0/24  169.254.20.1           200                 0 65535 i
*>                   169.254.10.1           100                 0 65535 i
*   192.168.55.0/24  169.254.20.1           200                 0 65535 i
*>                   169.254.10.1           100                 0 65535 i
Static routing
Create two scripts that strongSwan calls to configure routes and control traffic flow.
Create and edit the /root/connect_1.sh script.
vi /root/connect_1.shAdd and save the following content.
#!/usr/bin/env bash
if [ x"$PLUTO_VERB" == "xup-client" ]; then
	echo "ip route add 192.168.0.0/16 dev ipsec0" >> /root/vpn_route.log;ip route add 192.168.0.0/16 dev ipsec0 metric 100
elif [ x"$PLUTO_VERB" == "xdown-client" ]; then
	echo "ip route del 192.168.0.0/16 dev ipsec0" >> /root/vpn_route.log;ip route del 192.168.0.0/16 dev ipsec0 metric 100
fi
This script adds a route for traffic from the on-premises data center to the Alibaba Cloud VPC (192.168.0.0/16) through the XFRM virtual network interface of Tunnel 1 when the tunnel is up. The metric value of this route is set to 100, which gives it a higher priority than the route for Tunnel 2. If Tunnel 1 is down, the script revokes the route.
Create and edit the /root/connect_2.sh script.
vi /root/connect_2.shAdd and save the following content.
#!/usr/bin/env bash
if [ x"$PLUTO_VERB" == "xup-client" ]; then
	echo "ip route add 192.168.0.0/16 dev ipsec1" >> /root/vpn_route.log;ip route add 192.168.0.0/16 dev ipsec1 metric 101
elif [ x"$PLUTO_VERB" == "xdown-client" ]; then
	echo "ip route del 192.168.0.0/16 dev ipsec1" >> /root/vpn_route.log;ip route del 192.168.0.0/16 dev ipsec1 metric 101
fi
This script adds a route for traffic from the on-premises data center to the Alibaba Cloud VPC (192.168.0.0/16) through the XFRM virtual network interface of Tunnel 2 when the tunnel is up. The metric value of this route is set to 101, which gives it a lower priority than the route for Tunnel 1. If Tunnel 2 is down, the script revokes the route.
Grant executable permissions to the two scripts.
sudo chmod +x /root/connect_1.sh
sudo chmod +x /root/connect_2.sh
Restart the strongSwan process.
sudo systemctl restart strongswanVerify the routes.
route -n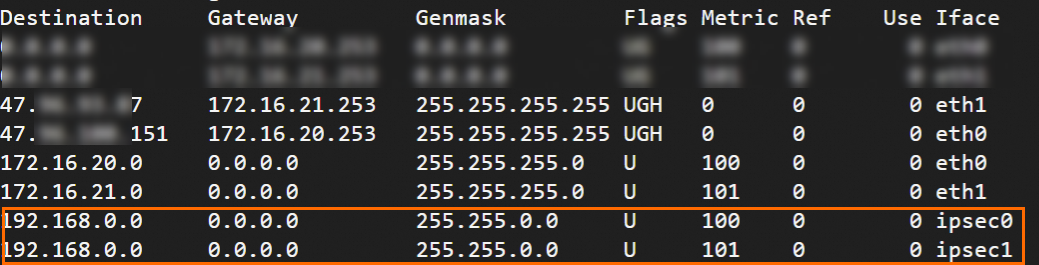
Single egress - BGP dynamic routing
BGP dynamic routing requires XFRM virtual network interfaces. Verify the following: strongSwan 5.8.0 or later, Linux kernel 4.19 or later, iproute2 5.1.0 or later, and XFRM module support (run lsmod | grep xfrm to check). For more information, see XFRM Interfaces on Linux.
Create two virtual network interfaces to establish the IPsec-VPN tunnels.
ip link add ipsec0 type xfrm dev eth0 if_id 42 # Create an XFRM virtual network interface for Tunnel 1. The interface ID is 42 and the underlying interface is the public interface eth0. ip link add ipsec1 type xfrm dev eth0 if_id 43 # Create an XFRM virtual network interface for Tunnel 2. The interface ID is 43 and the underlying interface is the public interface eth0. ip link set ipsec0 up # Start the XFRM virtual network interface for Tunnel 1. ip link set ipsec1 up # Start the XFRM virtual network interface for Tunnel 2.重要The configuration for creating a virtual network interface is temporary. After the strongSwan device restarts, you need to add the configuration again and run the
sudo systemctl restart strongswan;swanctl --load-allcommand (this command requires root permissions). You can refer to the following content to add a startup script to the strongSwan device, so that the virtual network interface is automatically added again after the strongSwan device restarts.Modify the strongSwan configuration file.
Back up the original strongSwan configuration file.
mv /etc/strongswan/swanctl/swanctl.conf /etc/strongswan/swanctl/swanctl.conf.bakCreate a new strongSwan configuration file.
vi /etc/strongswan/swanctl/swanctl.confThe following configuration is similar to the dual-egress example. Only the differences are annotated. Add and save the following configuration.
connections {
   vco1 {
      version = 2
      local_addrs  = 172.16.20.80    # Both tunnels use the same eth0 interface (single egress).
      remote_addrs = 47.XX.XX.151
      dpd_delay = 10
      rekey_time = 84600
      over_time = 1800
      proposals = aes128-sha1-modp1024
      encap = yes

      local {
         auth = psk
         id = 120.XX.XX.202
      }
      remote {
         auth = psk
         id = 47.XX.XX.151
      }
      children {
         vco_child1 {
            local_ts  = 0.0.0.0/0
            remote_ts = 0.0.0.0/0
            mode = tunnel
            rekey_time = 85500
            life_time = 86400
            dpd_action = restart
            start_action = start
            close_action = start
            esp_proposals = aes128-sha1-modp1024

            if_id_out = 42
            if_id_in = 42
         }
      }
   }
  vco2 {
      version = 2
      local_addrs  = 172.16.20.80    # Same as vco1 (single egress).
      remote_addrs = 47.XX.XX.87
      dpd_delay = 10
      rekey_time = 84600
      over_time = 1800               #
      proposals = aes128-sha1-modp1024
      encap = yes

      local {
         auth = psk
         id = 120.XX.XX.202          # Same public egress IP as vco1 (single egress).
      }
      remote {
         auth = psk
         id = 47.XX.XX.87
      }
      children {
         vco_child2 {
            local_ts  = 0.0.0.0/0
            remote_ts = 0.0.0.0/0
            mode = tunnel
            rekey_time = 85500
            life_time = 86400
            dpd_action = restart
            start_action = start
            close_action = start
            esp_proposals = aes128-sha1-modp1024
            if_id_out = 43
            if_id_in = 43

         }
      }
   }
}

secrets {
   ike-vco1 {
      secret = ChangeMe***
   }
   }
   ike-vco2 {
      secret = ChangeMe***
   }
   }
}
Restart the strongSwan process, reload the strongSwan configuration, and check the tunnel status.
sudo systemctl restart strongswan
swanctl --load-all
watch swanctl --list-sas
As shown in the following output, if the status after both
vco1andvco2isESTABLISHED, the IPsec-VPN connection between the strongSwan device and the VPN gateway has been established successfully. However, the networks still cannot communicate normally, and you need to configure routes.plugin 'sqlite': failed to load - sqlite_plugin_create not found and no plugin file available vco2: #5, ESTABLISHED, IKEv2, e9cf2986f8fdcb37_i 6be3688815c6a80f_r* local '120.___.202' @ 172.___[4500] remote '47.___.87' @ 47.___[4500] AES_CBC-128/HMAC_SHA1_96/PRF_HMAC_SHA1/MODP_1024 established 1096s ago, rekeying in 82251s vco_child2: #5, reqid 1, INSTALLED, TUNNEL-in-UDP, ESP:AES_CBC-128/HMAC_SHA1_96 installed 1096s ago, rekeying in 83517s, expires in 85304s in cbc4e224, 0 bytes, 0 packets out 064a42f5, 0 bytes, 0 packets local 172.16.0.0/16 remote 192.168.0.0/16 vco1: #1, ESTABLISHED, IKEv2, 387cbee015ffc74b_i* 70f63f78844ef7de_r local '120.___.202' @ 172.___ remote '47.___.151' @ 47.___[4500] AES_CBC-128/HMAC_SHA1_96/PRF_HMAC_SHA1/MODP_1024 established 1128s ago, rekeying in 82830s vco_child1: #1, reqid 1, INSTALLED, TUNNEL-in-UDP, ESP:AES_CBC-128/HMAC_SHA1_96 installed 1128s ago, rekeying in 83970s, expires in 85272s in cd130507, 0 bytes, 0 packets out 6436d869, 0 bytes, 0 packets local 172.16.0.0/16 remote 192.168.0.0/16Configure BGP dynamic routing.
説明After the strongSwan device restarts, you need to add the BGP configuration again.
Configure the BGP IP addresses on the XFRM interfaces.
ip address add 169.254.10.2/30 dev ipsec0
ip address add 169.254.20.2/30 dev ipsec1
Install FRR (Free Range Routing) for BGP support.
yum install -y frrRun the
vi /etc/frr/daemonscommand to edit the configuration file and enable BGP dynamic routing.Press the
ikey to enter edit mode; change the value of the bgpd parameter toyesto enable BGP dynamic routing; press theEsckey to exit edit mode, and then enter:wqto save the configuration.Enable and start FRR.
systemctl enable frr
systemctl restart frr
Add the BGP configuration. Replace the IP addresses and AS numbers with your actual values.
Enter the FRR configuration interface.
vtyshEnter configuration mode.
config terminalAdd the BGP configuration with the following commands.
Replace the following values with your actual addresses:
Replace "169.254.10.1" and "169.254.20.1" with the actual BGP IP addresses of the tunnels on the Alibaba Cloud side.
Replace "65535" with the actual BGP AS number of the VPN Gateway.
Replace "172.16.20.0/24" and "172.16.21.0/24" with the actual CIDR blocks of your on-premises data center.
route-map allow-all permit 1
exit

router bgp 65530
 bgp router-id 169.254.10.2
 neighbor 169.254.10.1 remote-as 65535
 neighbor 169.254.10.1 timers 10 30
 neighbor 169.254.20.1 remote-as 65535
 neighbor 169.254.20.1 timers 10 30

 address-family ipv4 unicast
  network 172.16.20.0/24
  network 172.16.21.0/24
  neighbor 169.254.10.1 soft-reconfiguration inbound
  neighbor 169.254.10.1 route-map allow-all in
  neighbor 169.254.10.1 route-map allow-all out
  neighbor 169.254.20.1 soft-reconfiguration inbound
  neighbor 169.254.20.1 route-map allow-all in
  neighbor 169.254.20.1 route-map allow-all out
  maximum-paths 32
 exit-address-family
exit
Run
exitto leave configuration mode, then runshow ip bgpto view the BGP routes.You can see that the strongSwan device has successfully learned the routes of the VPC on the cloud, and the on-premises data center and the VPC on the cloud can communicate normally.
     Network          Next Hop            Metric LocPrf    Weight Path
*>  172.16.20.0/24   0.0.0.0                  0             32768 i
*>  172.16.21.0/24   0.0.0.0                  0             32768 i
*   192.168.10.0/24  169.254.20.1           200                 0 65535 i
*>                   169.254.10.1           100                 0 65535 i
*   192.168.20.0/24  169.254.20.1           200                 0 65535 i
*>                   169.254.10.1           100                 0 65535 i
*   192.168.40.0/24  169.254.20.1           200                 0 65535 i
*>                   169.254.10.1           100                 0 65535 i
*   192.168.50.0/24  169.254.20.1           200                 0 65535 i
*>                   169.254.10.1           100                 0 65535 i
*   192.168.55.0/24  169.254.20.1           200                 0 65535 i
*>                   169.254.10.1           100                 0 65535 i
Single egress - static routing
In single-egress static routing mode, Alibaba Cloud may proactively switch traffic to the standby tunnel if it detects a threat in the active tunnel. Monitor the XfrmInTmplMismatch counter in /proc/net/xfrm_stat. If this value keeps increasing, traffic has been switched. Adjust the priority parameter for the standby tunnel in /etc/strongswan/swanctl/swanctl.conf to route on-premises traffic through the standby tunnel.
Back up the original strongSwan configuration file.
mv /etc/strongswan/swanctl/swanctl.conf /etc/strongswan/swanctl/swanctl.conf.bakCreate a new strongSwan configuration file.
vi /etc/strongswan/swanctl/swanctl.confBased on the plan in Example scenario, add and save the following configuration.
connections {
   vco1 {
      version = 2
      local_addrs  = 172.16.20.80
      remote_addrs = 47.XX.XX.151
      dpd_delay = 10
      rekey_time = 84600
      over_time = 1800
      proposals = aes128-sha1-modp1024
      encap = yes

      local {
         auth = psk
         id = 120.XX.XX.202
      }
      remote {
         auth = psk
         id = 47.XX.XX.151
      }
      children {
         vco_child1 {
            local_ts  = 172.16.0.0/16   # Policy-based: on-premises private CIDR block.
            remote_ts = 192.168.0.0/16  # Policy-based: VPC CIDR block.
            mode = tunnel
            rekey_time = 85500
            life_time = 86400
            dpd_action = restart
            start_action = start
            close_action = start
            esp_proposals = aes128-sha1-modp1024
            priority = 1                # Active tunnel (higher priority).
         }
      }
   }
  vco2 {
      version = 2
      local_addrs  = 172.16.20.80
      remote_addrs = 47.XX.XX.87
      dpd_delay = 10
      rekey_time = 84600
      over_time = 1800
      proposals = aes128-sha1-modp1024
      encap = yes

      local {
         auth = psk
         id = 120.XX.XX.202
      }
      remote {
         auth = psk
         id = 47.XX.XX.87
      }
      children {
         vco_child2 {
            local_ts  = 172.16.0.0/16   # Policy-based: on-premises private CIDR block.
            remote_ts = 192.168.0.0/16  # Policy-based: VPC CIDR block.
            mode = tunnel
            rekey_time = 85500
            life_time = 86400
            dpd_action = restart
            start_action = start
            close_action = start
            esp_proposals = aes128-sha1-modp1024
            priority = 2                # Standby tunnel (lower priority).
         }
      }
   }
}

secrets {
   ike-vco1 {
      id = 47.XX.XX.151
      secret = ChangeMe***
   }
   ike-vco2 {
      id = 47.XX.XX.87
      secret = ChangeMe***
   }
}
Restart the strongSwan process, reload the strongSwan configuration, and check the tunnel status.
sudo systemctl restart strongswan
swanctl --load-all
watch swanctl --list-sas
As shown in the following output, if the status after both
vco1andvco2isESTABLISHED, the IPsec-VPN connection between the strongSwan device and the VPN gateway has been established successfully, and the on-premises data center and the VPC can communicate with each other.plugin 'sqlite': failed to load - sqlite_plugin_create not found and no plugin file available vco2: #5, ESTABLISHED, IKEv2, e9cf2986f8fdcb37_i 6be3688815c6a80f_r* local '120.___.202' @ 172.___[4500] remote '47.___.87' @ 47.___[4500] AES_CBC-128/HMAC_SHA1_96/PRF_HMAC_SHA1/MODP_1024 established 1096s ago, rekeying in 82251s vco_child2: #5, reqid 1, INSTALLED, TUNNEL-in-UDP, ESP:AES_CBC-128/HMAC_SHA1_96 installed 1096s ago, rekeying in 83517s, expires in 85304s in cbc4e224, 0 bytes, 0 packets out 064a42f5, 0 bytes, 0 packets local 172.16.0.0/16 remote 192.168.0.0/16 vco1: #1, ESTABLISHED, IKEv2, 387cbee015ffc74b_i* 70f63f78844ef7de_r local '120.___.202' @ 172.___ remote '47.___.151' @ 47.___[4500] AES_CBC-128/HMAC_SHA1_96/PRF_HMAC_SHA1/MODP_1024 established 1128s ago, rekeying in 82830s vco_child1: #1, reqid 1, INSTALLED, TUNNEL-in-UDP, ESP:AES_CBC-128/HMAC_SHA1_96 installed 1128s ago, rekeying in 83970s, expires in 85272s in cd130507, 0 bytes, 0 packets out 6436d869, 0 bytes, 0 packets local 172.16.0.0/16 remote 192.168.0.0/16
5. Verify connectivity and high availability
Verify connectivity between the on-premises data center and the VPC.
From a client in the on-premises data center,
pingan ECS instance in the VPC. Echo reply packets confirm a successful connection.ping <IP_address_of_an_ECS_instance_in_the_VPC>Verify high availability of the IPsec-VPN connection.
While ping is running, interrupt the active tunnel.
One way to interrupt the tunnel is to change its pre-shared key so that the keys on both ends no longer match.
After you interrupt the primary tunnel, you can run the
pingcommand to observe the connectivity between the two sides. You will find that thepingtraffic is briefly interrupted and then resumes communication. This indicates that after the primary tunnel is interrupted, traffic automatically communicates through the secondary tunnel.
よくある質問
IPsec-VPN 接続がトランジットルーターに関連付けられている場合の strongSwan デバイスの設定方法
IPsec-VPN 接続がトランジットルーターに関連付けられている場合、strongSwan デバイスの設定は上記と同じです。BGP 動的ルーティングプロトコルの使用を推奨します。設定が完了すると、strongSwan デバイス上で BGP 動的ルーティングプロトコルを介して学習した VPC のルートを確認でき、IPsec-VPN 接続の 2 つのトンネルが自動的に ECMP リンクを形成します。
以下に示すように、show ip bgp コマンドを入力すると、= multipath はマルチパスを示します。192.168.10.0/24 の左側のステータスが等号で、マルチパスの候補であることを確認できます。
*********Z# show ip bgp
BGP table version is 42, local router ID is 169.254.13.2, vrf id 0
Default local pref 100, local AS 65530
Status codes:  s suppressed, d damped, h history, * valid, > best, = multipath,
               i internal, r RIB-failure, S Stale, R Removed
Nexthop codes: @NNN nexthop's vrf id, < announce-nh-self
Origin codes:  i - IGP, e - EGP, ? - incomplete
RPKI validation codes: V valid, I invalid, N Not found

     Network          Next Hop            Metric LocPrf    Weight Path
*>  172.16.20.0/24   0.0.0.0                  0             32768 i
*>  172.16.21.0/24   0.0.0.0                  0             32768 i
*=  192.168.10.0/24  169.254.20.1             0                 0 65535 i
*>                   169.254.10.1             0                 0 65535 i
*=  192.168.20.0/24  169.254.20.1             0                 0 65535 i
*>                   169.254.10.1             0                 0 65535 i
*=  192.168.40.0/24  169.254.20.1             0                 0 65535 i
*>                   169.254.10.1             0                 0 65535 i
*=  192.168.50.0/24  169.254.20.1             0                 0 65535 i
*>                   169.254.10.1             0                 0 65535 i
*=  192.168.55.0/24  169.254.20.1             0                 0 65535 i
*>                   169.254.10.1             0                 0 65535 i
strongSwan は IKEv1 をサポートしていますか
はい、サポートしています。
/etc/strongswan/swanctl/swanctl.conf ファイルを設定する際に、version = 1 を指定します。
対象データフロー (トラフィックセレクター) の指定方法
/etc/strongswan/swanctl/swanctl.conf ファイルを設定する際に、次の設定で特定の CIDR ブロックを指定します。Alibaba Cloud 側の IPsec-VPN 接続でトラフィックセレクターモードが設定されていることも確認してください。
いずれかの側で複数の CIDR ブロックを指定するには、strongSwan デバイスと Alibaba Cloud の IPsec-VPN 接続の両方で IKEv2 を使用する必要があります。
children {
         vco_child1 {
            local_ts  = 172.16.20.0/24,172.16.21.0/24  # オンプレミスデータセンターの CIDR ブロック。
            remote_ts = 192.168.0.0/16    # Alibaba Cloud 側 VPC の CIDR ブロック。
         }
}
ネットワークインターフェイスにパブリック IP アドレスがある場合 (非 NAT) の strongSwan の設定方法
非 NAT シナリオ、つまり strongSwan デバイスから見えるアドレスがパブリック IP アドレスである場合、/etc/strongswan/swanctl/swanctl.conf 設定ファイル内の各トンネルの local_addrs フィールドをパブリック IP アドレスに変更するだけです。他の設定は変更しないでください。
connections {
   vco1 {
      local_addrs  = 1.1.XX.XX     # strongSwan デバイスのネットワークインターフェイスカードに割り当てられているパブリック IP アドレスを指定します。
   }
}
単一トンネルの設定方法
購入した VPN Gateway が単一トンネルの IPsec-VPN 接続のみをサポートしている場合は、IPsec-VPN 接続をデュアルトンネルモードにアップグレードすることを推奨します。デュアルトンネルモードの IPsec-VPN 接続はゾーンディザスタリカバリをサポートしており、ネットワークの可用性が向上します。
単一トンネルの設定例
シナリオ例
次の図は、strongSwan デバイスが Alibaba Cloud と IPsec-VPN 接続を確立する単一トンネル構成を示しています。

IP アドレスの計画
オンプレミスデータセンター側
プライベート CIDR ブロック:172.16.0.0/16
strongSwan デバイス、ネットワークインターフェイスカード eth0:172.16.20.80、NAT マッピングされたパブリックエグレス:120.XX.XX.202
説明非 NAT シナリオについては、「ネットワークインターフェイスにパブリック IP アドレスがある場合 (非 NAT) の strongSwan の設定方法」をご参照ください。
Alibaba Cloud 側
VPC CIDR ブロック:192.168.0.0/16
vSwitch 1 CIDR ブロック:192.168.10.0/24
vSwitch 2 CIDR ブロック:192.168.20.0/24
VPN Gateway
IPsec アドレス:47.XX.XX.151
説明VPN ゲートウェイインスタンスを作成すると、システムが自動的に IPsec アドレスを VPN ゲートウェイインスタンスに割り当てます。
VPN パラメータの設定計画
strongSwan デバイスの IKE および IPsec 設定は、Alibaba Cloud 側の設定と一致している必要があります。
事前共有キー:ChangeMe***
IKE 設定
IKE バージョン:ikev2
ネゴシエーションモード:main
暗号化アルゴリズム:aes
認証アルゴリズム:sha1
DH グループ:group2
SA ライフタイム (秒):86400
IPsec 設定:
暗号化アルゴリズム:aes
認証アルゴリズム:sha1
DH グループ:group2
SA ライフタイム (秒):86400
Alibaba Cloud 側での準備
strongSwan デバイスを設定する前に、Alibaba Cloud 側で次の手順を完了してください:VPN Gateway の作成、カスタマーゲートウェイの作成、IPsec-VPN 接続の作成、VPN Gateway のルート設定。詳細については、「単一トンネルモード」をご参照ください。
IPsec-VPN 接続を作成する際、ルーティングモードを 対象データフロー に設定します:
ローカルネットワークを Alibaba Cloud 側 VPC の CIDR ブロックである 192.168.0.0/16 に設定します。
リモートネットワークをオンプレミスデータセンターのプライベート CIDR ブロックである 172.16.0.0/16 に設定します。
strongSwan デバイスの設定
以降の手順では、「CentOS Stream 9 64 ビットオペレーティングシステム」を実行している strongSwan デバイスを例として使用します。他のオペレーティングシステムについては、strongSwan の公式ドキュメントをご参照ください。
1. ファイアウォールポリシーを設定してトラフィックを許可
strongSwan デバイスで、ESP プロトコル (IP プロトコル番号 50)、UDP ポート 500、および UDP ポート 4500 を許可します。
iptables -I INPUT -p 50 -j ACCEPT
iptables -I INPUT -p udp --dport 500 -j ACCEPT
iptables -I INPUT -p udp --dport 4500 -j ACCEPT2. トラフィック転送の有効化
echo 1 > /proc/sys/net/ipv4/ip_forwardIP 転送を有効にすると、strongSwan デバイスはオンプレミスネットワークと VPC 間のトラフィックをルーティングできます。このコマンドによる設定は即時に有効になり、システムの再起動後も維持されます。
3. strongSwan ソフトウェアのインストール
dnf install epel-release -y
dnf install strongswan-5.9.10 -y4. トンネルの設定
strongSwan のポリシーベースのトラフィックセレクターに基づいてトンネルを設定します。
元の strongSwan 設定ファイルをバックアップします。
mv /etc/strongswan/swanctl/swanctl.conf /etc/strongswan/swanctl/swanctl.conf.bak新しい strongSwan 設定ファイルを作成します。
vi /etc/strongswan/swanctl/swanctl.confこの設定はデュアルトンネルの例と似ていますが、接続が 1 つである点、ポリシーベースのトラフィックセレクターを使用する点、および XFRM インターフェイスがない点が主な相違点です。次の設定を追加して保存します。
connections {
   vco1 {
      version = 2
      local_addrs  = 172.16.20.80      # オンプレミスのプライベート IP アドレス。
      remote_addrs = 47.XX.XX.151      # Alibaba Cloud 側の IPsec アドレス。
      dpd_delay = 10
      rekey_time = 86400
      over_time = 1800
      proposals = aes128-sha1-modp1024
      encap = yes

      local {
         auth = psk
         id = 120.XX.XX.202            # オンプレミスのパブリックエグレス IP (NAT マッピング)。
      }
      remote {
         auth = psk
         id = 47.XX.XX.151
      }
      children {
         vco_child1 {
            local_ts  = 172.16.0.0/16     # ポリシーベース:オンプレミスのプライベート CIDR ブロック。
            remote_ts = 192.168.0.0/16    # ポリシーベース:VPC CIDR ブロック。
            mode = tunnel
            life_time = 86400
            dpd_action = restart
            start_action = start
            close_action = start
            esp_proposals = aes128-sha1-modp1024
         }
      }
   }

}

secrets {
   ike-vco1 {
      secret = ChangeMe***
   }
   }
}
strongSwan プロセスを再起動し、strongSwan 設定をリロードします。
systemctl restart strongswan
swanctl --load-all
トンネルのステータスを確認します。
watch swanctl --list-sas次の出力に示すように、
vco1の後のステータスがESTABLISHEDの場合、strongSwan デバイスと VPN Gateway 間の IPsec-VPN 接続は正常に確立されています。Every 2.0s: swanctl --list-sas vco1: #1, ESTABLISHED, IKEv2, 76231680bedc2279_i* 5c1e6354830e3df7_r local '120.XX.XX.202' @ 172.16.20.80[4500] remote '47.XX.XX.151' @ 47.XX.XX.151[4500] AES_CBC-128/HMAC_SHA1_96/PRF_HMAC_SHA1/MODP_1024 established 3041s ago, rekeying in 83359s vco_child1: #1, reqid 1, INSTALLED, TUNNEL-in-UDP, ESP:AES_CBC-128/HMAC_SHA1_96 installed 3041s ago, expires in 83359s in ca0e6ace, 255276 bytes, 3039 packets, 0s ago out c7a8b4c2, 255276 bytes, 3039 packets, 0s ago local 172.16.0.0/16 remote 192.168.0.0/16図に示すように、strongSwan デバイスと VPN Gateway 間に IPsec-VPN 接続が正常に確立されています。
5. 検証
strongSwan デバイスと VPC 間の接続性を検証します:
strongSwan デバイスから、VPC 内の ECS インスタンスに ping を実行します。エコー応答パケットにより、接続が成功したことを確認できます。
ping <VPC 内の ECS インスタンスの IP アドレス>