Tablestore のベクトル検索機能と Alibaba Cloud Model Studio のマルチモーダル埋め込みモデルを使用して、マルチモーダル画像検索システムを構築します。このシステムは自然言語による検索と画像による検索をサポートします。E コマースのプロダクト検索、スマートフォトアルバム管理、メディア資産検索などのシナリオに適しています。
ソリューション概要
マルチモーダル画像検索システムの構築プロセスには、以下のコアステップが含まれます:
テーブルとインデックスの作成:画像データを格納するための Tablestore データテーブルと、ベクトル検索を可能にするための検索インデックスを作成します。
画像のベクトル化:Alibaba Cloud Model Studio のマルチモーダル埋め込みモデルを使用して、画像を⾼次元ベクトル表現に変換します。
ベクトルデータの書き込み:生成された画像ベクトルデータと関連メタデータを Tablestore にバッチで書き込みます。
マルチモーダル検索の実行:クエリ画像または自然言語テキストをベクトルに変換します。その後、検索インデックスで類似検索を実行します。メタデータ条件を使用して、正確なフィルターをかけることもできます。
事前準備
検索システムを構築する前に、環境の設定、認証情報の設定、およびデータの準備を行う必要があります。
1. SDK のインストール
Python 3.12 以降がインストールされていることを確認してください。
次のコマンドを実行して、Tablestore Python SDK と Alibaba Cloud Model Studio SDK をインストールします。
pip install tablestore
pip install dashscope
pip install Pillow
2. 環境変数の設定
コードのセキュリティと環境間の移植性を確保するために、アクセス認証情報を環境変数として設定します。
開始する前に、Alibaba Cloud Model Studio プラットフォームから API キーと AccessKey を取得してください。次に、Tablestore コンソールに移動してインスタンスを作成し、その名前とエンドポイントを取得します。
セキュリティ上の理由から、新しい Tablestore インスタンスでは、デフォルトでパブリックネットワークアクセスが無効になっています。パブリックエンドポイントを使用するには、インスタンスの ネットワーク管理 ページに移動して、パブリックネットワークアクセスを有効にしてください。
export DASHSCOPE_API_KEY=<ご利用の Alibaba Cloud Model Studio API キー>
export tablestore_end_point=<ご利用の Tablestore インスタンスのエンドポイント>
export tablestore_instance_name=<ご利用の Tablestore インスタンス名>
export tablestore_access_key_id=<ご利用の AccessKey ID>
export tablestore_access_key_secret=<ご利用の AccessKey Secret>
3. 画像データの準備
独自の画像データを使用するか、チュートリアルで提供されているデモデータセットを使用できます。
git clone https://github.com/aliyun/alibabacloud-tablestore-ai-demo.gitデモプロジェクトファイルを直接ダウンロードすることもできます:alibabacloud-tablestore-ai-demo-main
ステップ 1:テーブルとインデックスの作成
画像ベクトルデータを格納するためのデータテーブルと、ベクトル検索をサポートするための検索インデックスを作成します。データ特性と要件に基づいて、テーブルスキーマとインデックス構成をカスタマイズします。デモを迅速にテストするには、次のサンプル構成を使用できます。
1. データテーブルの作成
# -*- coding: utf-8 -*-
"""
Tablestore データテーブルを作成します。
"""

import os

import tablestore


def main():
    # Tablestore クライアントを初期化します。
    client = tablestore.OTSClient(
        os.getenv("tablestore_end_point"),
        os.getenv("tablestore_access_key_id"),
        os.getenv("tablestore_access_key_secret"),
        os.getenv("tablestore_instance_name"),
        retry_policy=tablestore.WriteRetryPolicy(),
    )

    # データテーブルを作成し、プライマリキーを定義します。
    table_name = "multi_modal_retrieval"
    table_meta = tablestore.TableMeta(table_name, [("image_id", "STRING")])
    table_options = tablestore.TableOptions()
    reserved_throughput = tablestore.ReservedThroughput(tablestore.CapacityUnit(0, 0))

    try:
        client.create_table(table_meta, table_options, reserved_throughput)
        print(f"データテーブル '{table_name}' が正常に作成されました。")
    except tablestore.OTSServiceError as e:
        if "OTSObjectAlreadyExist" in str(e):
            print(f"データテーブル '{table_name}' は既に存在します。")
        else:
            raise


if __name__ == "__main__":
    main()
2. 検索インデックスの作成
ベクトルデータは、Tablestore データテーブルに文字列として格納されます。ベクトル検索を有効にするには、検索インデックスを作成し、ベクトルフィールドタイプを設定する必要があります。これにより、類似度計算と高次元ベクトルの高速検索が可能になります。
# -*- coding: utf-8 -*-
"""
ベクトルフィールドを含む Tablestore 検索インデックスを作成します。
"""

import os

import tablestore


def main():
    # Tablestore クライアントを初期化します。
    client = tablestore.OTSClient(
        os.getenv("tablestore_end_point"),
        os.getenv("tablestore_access_key_id"),
        os.getenv("tablestore_access_key_secret"),
        os.getenv("tablestore_instance_name"),
        retry_policy=tablestore.WriteRetryPolicy(),
    )

    table_name = "multi_modal_retrieval"
    index_name = "index"

    # インデックスフィールドを定義します。
    field_schemas = [
        tablestore.FieldSchema("image_id", tablestore.FieldType.KEYWORD, index=True, enable_sort_and_agg=True),
        tablestore.FieldSchema("city", tablestore.FieldType.KEYWORD, index=True, enable_sort_and_agg=True),
        tablestore.FieldSchema("height", tablestore.FieldType.LONG, index=True, enable_sort_and_agg=True),
        tablestore.FieldSchema("width", tablestore.FieldType.LONG, index=True, enable_sort_and_agg=True),
        tablestore.FieldSchema(
            "vector",
            tablestore.FieldType.VECTOR,
            vector_options=tablestore.VectorOptions(
                data_type=tablestore.VectorDataType.VD_FLOAT_32,
                dimension=1024,
                metric_type=tablestore.VectorMetricType.VM_COSINE,
            ),
        ),
    ]

    try:
        index_meta = tablestore.SearchIndexMeta(field_schemas)
        client.create_search_index(table_name, index_name, index_meta)
        print(f"検索インデックス '{index_name}' が正常に作成されました。")
    except tablestore.OTSServiceError as e:
        if "OTSObjectAlreadyExist" in str(e):
            print(f"検索インデックス '{index_name}' は既に存在します。")
        else:
            raise


if __name__ == "__main__":
    main()
ステップ 2:画像のベクトル化
Alibaba Cloud Model Studio のマルチモーダルベクトル化モデルを呼び出して、画像を処理し、ベクトル化します。次の例は、ローカル画像をベクトル化する方法を示しています。詳細については、「マルチモーダル埋め込み」をご参照ください。
多数の画像をベクトル化するには時間がかかる場合があります。デモプロジェクトには、data.json という名前の前処理済みベクトルデータファイルが用意されており、ステップ 3 で直接使用できます。# -*- coding: utf-8 -*-
"""
ローカル画像のベクトル化のデモです。
Alibaba Cloud Model Studio のマルチモーダルベクトル化モデルを使用してローカル画像をベクトル化する方法を示します。
元の画像の詳細、ベクトル次元、ベクトルの最初の数要素などのキー情報を出力します。
"""
import base64
import os
from pathlib import Path
import dashscope
from PIL import Image
def image_to_base64(image_path):
"""画像ファイルを base64 文字列に変換します。"""
with open(image_path, "rb") as f:
image_data = f.read()
return base64.b64encode(image_data).decode("utf-8")
def get_image_embedding(image_path):
"""
Alibaba Cloud Model Studio のマルチモーダルベクトル化モデルを呼び出して、ローカル画像をベクトル化します。
"""
# ローカル画像を base64 に変換します。
base64_image = image_to_base64(image_path)
# 画像フォーマットを取得します。
suffix = Path(image_path).suffix.lower()
if suffix in [".jpg", ".jpeg"]:
mime_type = "image/jpeg"
elif suffix == ".png":
mime_type = "image/png"
elif suffix == ".gif":
mime_type = "image/gif"
elif suffix == ".webp":
mime_type = "image/webp"
else:
mime_type = "image/jpeg" # デフォルトで jpeg を使用します。
# データ URI を構築します。
data_uri = f"data:{mime_type};base64,{base64_image}"
# マルチモーダルベクトル化 API を呼び出します。
resp = dashscope.MultiModalEmbedding.call(
model="multimodal-embedding-v1",
input=[{"image": data_uri, "factor": 1.0}]
)
if resp.status_code == 200:
return resp.output["embeddings"][0]["embedding"]
else:
raise Exception(f"ベクトル化に失敗しました: {resp.code} - {resp.message}")
def get_image_info(image_path):
"""画像の基本情報を取得します。"""
with Image.open(image_path) as img:
return {
"filename": os.path.basename(image_path),
"format": img.format,
"mode": img.mode,
"width": img.width,
"height": img.height,
"size_bytes": os.path.getsize(image_path),
}
def main():
# パスを設定します。
current_dir = Path(__file__).parent
project_root = current_dir
image_dir = project_root / "data" / "photograph"
print("=" * 60)
print("ローカル画像のベクトル化デモ")
print("=" * 60)
# 画像のリストを取得します。
image_files = [f for f in os.listdir(image_dir) if f.lower().endswith(('.jpg', '.jpeg', '.png', '.gif', '.webp'))]
if not image_files:
print("画像ファイルが見つかりません。")
return
# デモ用に最初の画像を選択します。
demo_image = image_files[0]
image_path = image_dir / demo_image
print(f"\n[1/3] 画像情報の読み取り")
print("-" * 60)
# 画像情報を取得します。
image_info = get_image_info(image_path)
print(f"ファイル名: {image_info['filename']}")
print(f"フォーマット: {image_info['format']}")
print(f"モード: {image_info['mode']}")
print(f"幅: {image_info['width']} px")
print(f"高さ: {image_info['height']} px")
print(f"ファイルサイズ: {image_info['size_bytes']:,} バイト")
print(f"\n[2/3] ベクトル化 API の呼び出し")
print("-" * 60)
print("Alibaba Cloud Model Studio のマルチモーダルベクトル化モデルを呼び出しています...")
# ベクトル化します。
vector = get_image_embedding(str(image_path))
print(f"\n[3/3] ベクトル化の結果")
print("-" * 60)
print(f"ベクトル次元: {len(vector)}")
print(f"ベクトルタイプ: {type(vector[0]).__name__}")
print(f"ベクトルの最初の 10 要素:")
for i, v in enumerate(vector[:10]):
print(f" [{i}] {v:.8f}")
print(" ...")
print(f"ベクトルの最後の 5 要素:")
for i, v in enumerate(vector[-5:], start=len(vector)-5):
print(f" [{i}] {v:.8f}")
# ベクトルノルムを計算します。
import math
norm = math.sqrt(sum(v * v for v in vector))
print(f"\nベクトル L2 ノルム: {norm:.8f}")
print("\n" + "=" * 60)
print("ベクトル化デモが完了しました!")
print("=" * 60)
if __name__ == "__main__":
main()
ステップ 3:ベクトルデータの書き込み
画像ベクトルデータを Tablestore データテーブルにバッチでインポートします。次の例では、デモプロジェクトから前処理済みのベクトルデータを読み取り、バッチで書き込みます。独自のビジネスデータを使用する場合は、画像のベクトル化とデータ書き込み操作を組み合わせることができます。
# -*- coding: utf-8 -*-
"""
画像データを Tablestore にバッチで書き込みます。
"""

import json
import os
from pathlib import Path

import tablestore


def main():
    # Tablestore クライアントを初期化します。
    client = tablestore.OTSClient(
        os.getenv("tablestore_end_point"),
        os.getenv("tablestore_access_key_id"),
        os.getenv("tablestore_access_key_secret"),
        os.getenv("tablestore_instance_name"),
        retry_policy=tablestore.WriteRetryPolicy(),
    )

    table_name = "multi_modal_retrieval"
    batch_size = 100

    # JSON ファイルからデータをロードします。
    data_path = Path(__file__).parent / "data" / "data.json"
    with open(data_path, "r", encoding="utf-8") as f:
        data_array = json.load(f)

    print(f"{len(data_array)} 件のレコードをロードしました。")

    # Tablestore にバッチで書き込みます。
    put_row_items = []
    success_count = 0

    for idx, item in enumerate(data_array):
        primary_key = [("image_id", item["image_id"])]
        attribute_columns = [
            ("city", item.get("city", "unknown")),
            ("vector", json.dumps(item["vector"])),
            ("width", item.get("width", 0)),
            ("height", item.get("height", 0)),
        ]
        row = tablestore.Row(primary_key, attribute_columns)
        condition = tablestore.Condition(tablestore.RowExistenceExpectation.IGNORE)
        put_row_items.append(tablestore.PutRowItem(row, condition))

        # バッチ書き込み。
        if len(put_row_items) >= batch_size or idx == len(data_array) - 1:
            request = tablestore.BatchWriteRowRequest()
            request.add(tablestore.TableInBatchWriteRowItem(table_name, put_row_items))
            result = client.batch_write_row(request)
            if result.is_all_succeed():
                success_count += len(put_row_items)
                print(f"進捗: {idx + 1}/{len(data_array)} - {len(put_row_items)} 行の書き込みに成功しました。")
            put_row_items = []

    print(f"完了: {success_count} 行の書き込みに成功しました。")


if __name__ == "__main__":
    main()
ステップ 4:マルチモーダル検索の実行
マルチモーダル画像検索システムは、自然言語による検索と画像による検索の 2 つの検索モードをサポートします。システムはクエリコンテンツをベクトル表現に変換し、ベクトルインデックスで類似度計算を実行し、クエリセマンティクスに最も一致する画像を返します。都市や画像サイズなどのメタデータ条件を使用して、正確なフィルターをかけることもできます。
自然言語による検索
# -*- coding: utf-8 -*-
"""
セマンティック検索の例です。
複数のクエリシナリオが含まれます:
1. クエリテキストのみを使用したセマンティック検索。
2. クエリテキストとフィルター条件 (都市、高さ、幅) を使用したセマンティック検索。
"""

import os

import dashscope
import tablestore
from dashscope import MultiModalEmbeddingItemText


def get_client():
    """Tablestore クライアントを作成します。"""
    endpoint = os.getenv("tablestore_end_point")
    instance_name = os.getenv("tablestore_instance_name")
    access_key_id = os.getenv("tablestore_access_key_id")
    access_key_secret = os.getenv("tablestore_access_key_secret")

    client = tablestore.OTSClient(
        endpoint,
        access_key_id,
        access_key_secret,
        instance_name,
        retry_policy=tablestore.WriteRetryPolicy(),
    )
    return client


def text_to_embedding(text: str) -> list[float]:
    """テキストを埋め込みに変換します。"""
    resp = dashscope.MultiModalEmbedding.call(
        model="multimodal-embedding-v1",
        input=[MultiModalEmbeddingItemText(text=text, factor=1.0)]
    )
    if resp.status_code == 200:
        return resp.output["embeddings"][0]["embedding"]
    else:
        raise Exception(f"Text vectorization failed: {resp.code} - {resp.message}")


def search_by_text_only(client, table_name, index_name, query_text: str, top_k: int = 10):
    """
    シナリオ 1:クエリテキストのみを使用したセマンティック検索。
    """
    print(f"\n{'='*60}")
    print(f"Scenario 1: Search using only query text")
    print(f"Query text: '{query_text}'")
    print(f"Number of results: {top_k}")
    print("="*60)

    # テキストをベクトルに変換します。
    query_vector = text_to_embedding(query_text)

    # ベクトルクエリを構築します。
    query = tablestore.KnnVectorQuery(
        field_name='vector',
        top_k=top_k,
        float32_query_vector=query_vector,
    )

    # スコアでソートします。
    sort = tablestore.Sort(sorters=[tablestore.ScoreSort(sort_order=tablestore.SortOrder.DESC)])
    search_query = tablestore.SearchQuery(
        query,
        limit=top_k,
        get_total_count=False,
        sort=sort
    )

    # 検索を実行します。
    search_response = client.search(
        table_name=table_name,
        index_name=index_name,
        search_query=search_query,
        columns_to_get=tablestore.ColumnsToGet(
            column_names=["image_id", "city", "height", "width"],
            return_type=tablestore.ColumnReturnType.SPECIFIED
        )
    )

    print(f"\nRequest ID: {search_response.request_id}")
    print(f"\nSearch results:")
    print("-" * 60)

    for idx, hit in enumerate(search_response.search_hits):
        row_item = parse_search_hit(hit)
        print(f"{idx + 1}. Score: {hit.score:.4f} | {row_item}")

    return search_response.search_hits


def search_with_city_filter(client, table_name, index_name, query_text: str, city: str, top_k: int = 10):
    """
    シナリオ 2:クエリテキストと都市フィルターを使用した検索。
    """
    print(f"\n{'='*60}")
    print(f"Scenario 2: Query text + City filter")
    print(f"Query text: '{query_text}'")
    print(f"City filter: {city}")
    print(f"Number of results: {top_k}")
    print("="*60)

    query_vector = text_to_embedding(query_text)

    # 都市フィルター付きのベクトルクエリを構築します。
    query = tablestore.KnnVectorQuery(
        field_name='vector',
        top_k=top_k,
        float32_query_vector=query_vector,
        filter=tablestore.TermQuery(field_name='city', column_value=city)
    )

    sort = tablestore.Sort(sorters=[tablestore.ScoreSort(sort_order=tablestore.SortOrder.DESC)])
    search_query = tablestore.SearchQuery(query, limit=top_k, get_total_count=False, sort=sort)

    search_response = client.search(
        table_name=table_name,
        index_name=index_name,
        search_query=search_query,
        columns_to_get=tablestore.ColumnsToGet(
            column_names=["image_id", "city", "height", "width"],
            return_type=tablestore.ColumnReturnType.SPECIFIED
        )
    )

    print(f"\nRequest ID: {search_response.request_id}")
    print(f"\nSearch results:")
    print("-" * 60)

    for idx, hit in enumerate(search_response.search_hits):
        row_item = parse_search_hit(hit)
        print(f"{idx + 1}. Score: {hit.score:.4f} | {row_item}")

    return search_response.search_hits


def search_with_size_filter(client, table_name, index_name, query_text: str,
                             height_range: tuple = None, width_range: tuple = None, top_k: int = 10):
    """
    シナリオ 3:クエリテキストとサイズフィルター (高さ、幅) を使用した検索。
    """
    print(f"\n{'='*60}")
    print(f"Scenario 3: Query text + Size filter")
    print(f"Query text: '{query_text}'")
    print(f"Height range: {height_range}")
    print(f"Width range: {width_range}")
    print(f"Number of results: {top_k}")
    print("="*60)

    query_vector = text_to_embedding(query_text)

    # フィルター条件を構築します。
    must_queries = []
    if height_range:
        must_queries.append(tablestore.RangeQuery(
            field_name='height',
            range_from=height_range[0],
            range_to=height_range[1],
            include_lower=True,
            include_upper=True
        ))
    if width_range:
        must_queries.append(tablestore.RangeQuery(
            field_name='width',
            range_from=width_range[0],
            range_to=width_range[1],
            include_lower=True,
            include_upper=True
        ))

    vector_filter = tablestore.BoolQuery(must_queries=must_queries) if must_queries else None

    query = tablestore.KnnVectorQuery(
        field_name='vector',
        top_k=top_k,
        float32_query_vector=query_vector,
        filter=vector_filter
    )

    sort = tablestore.Sort(sorters=[tablestore.ScoreSort(sort_order=tablestore.SortOrder.DESC)])
    search_query = tablestore.SearchQuery(query, limit=top_k, get_total_count=False, sort=sort)

    search_response = client.search(
        table_name=table_name,
        index_name=index_name,
        search_query=search_query,
        columns_to_get=tablestore.ColumnsToGet(
            column_names=["image_id", "city", "height", "width"],
            return_type=tablestore.ColumnReturnType.SPECIFIED
        )
    )

    print(f"\nRequest ID: {search_response.request_id}")
    print(f"\nSearch results:")
    print("-" * 60)

    for idx, hit in enumerate(search_response.search_hits):
        row_item = parse_search_hit(hit)
        print(f"{idx + 1}. Score: {hit.score:.4f} | {row_item}")

    return search_response.search_hits


def search_with_combined_filters(client, table_name, index_name, query_text: str,
                                  cities: list = None, height_range: tuple = None,
                                  width_range: tuple = None, top_k: int = 10):
    """
    シナリオ 4:クエリテキストと組み合わせたフィルター (都市リスト、高さ、幅) を使用した検索。
    """
    print(f"\n{'='*60}")
    print(f"Scenario 4: Query text + Combined filters")
    print(f"Query text: '{query_text}'")
    print(f"City list: {cities}")
    print(f"Height range: {height_range}")
    print(f"Width range: {width_range}")
    print(f"Number of results: {top_k}")
    print("="*60)

    query_vector = text_to_embedding(query_text)

    # 組み合わせたフィルター条件を構築します。
    must_queries = []

    if cities and len(cities) > 0:
        must_queries.append(tablestore.TermsQuery(field_name='city', column_values=cities))

    if height_range:
        must_queries.append(tablestore.RangeQuery(
            field_name='height',
            range_from=height_range[0],
            range_to=height_range[1],
            include_lower=True,
            include_upper=True
        ))

    if width_range:
        must_queries.append(tablestore.RangeQuery(
            field_name='width',
            range_from=width_range[0],
            range_to=width_range[1],
            include_lower=True,
            include_upper=True
        ))

    vector_filter = tablestore.BoolQuery(must_queries=must_queries) if must_queries else None

    query = tablestore.KnnVectorQuery(
        field_name='vector',
        top_k=top_k,
        float32_query_vector=query_vector,
        filter=vector_filter
    )

    sort = tablestore.Sort(sorters=[tablestore.ScoreSort(sort_order=tablestore.SortOrder.DESC)])
    search_query = tablestore.SearchQuery(query, limit=top_k, get_total_count=False, sort=sort)

    search_response = client.search(
        table_name=table_name,
        index_name=index_name,
        search_query=search_query,
        columns_to_get=tablestore.ColumnsToGet(
            column_names=["image_id", "city", "height", "width"],
            return_type=tablestore.ColumnReturnType.SPECIFIED
        )
    )

    print(f"\nRequest ID: {search_response.request_id}")
    print(f"\nSearch results:")
    print("-" * 60)

    for idx, hit in enumerate(search_response.search_hits):
        row_item = parse_search_hit(hit)
        print(f"{idx + 1}. Score: {hit.score:.4f} | {row_item}")

    return search_response.search_hits


def parse_search_hit(hit):
    """検索結果を解析します。"""
    row_item = {}
    primary_key = hit.row[0]
    row_item["image_id"] = primary_key[0][1]
    attribute_columns = hit.row[1]
    for col in attribute_columns:
        key = col[0]
        val = col[1]
        row_item[key] = val
    return row_item


def main():
    # パラメーターを設定します。
    table_name = "multi_modal_retrieval"
    index_name = "index"

    print("=" * 60)
    print("Tablestore multimodal semantic search demo")
    print("=" * 60)

    # クライアントを作成します。
    client = get_client()
    print("Tablestore client created successfully.")

    # シナリオ 1:自然言語の説明のみを使用したセマンティック検索。
    # 単純なキーワードだけでなく、完全な自然言語の文章を使用します。
    search_by_text_only(
        client, table_name, index_name,
        "芝生の上を走るふわふわの子犬",
        top_k=5
    )

    # シナリオ 2:自然言語の説明 + 都市フィルター。
    search_with_city_filter(
        client, table_name, index_name,
        "遠くに山脈を望む湖畔の柳",
        city="hangzhou",
        top_k=5
    )

    # シナリオ 3:自然言語の説明 + サイズフィルター。
    # 高解像度の風景画像を検索します。
    search_with_size_filter(
        client, table_name, index_name,
        "夜に明るく照らされた近代的な都市のスカイライン",
        height_range=(500, 1024),
        width_range=(800, 1024),
        top_k=5
    )

    # シナリオ 4:自然言語の説明 + 組み合わせたフィルター。
    search_with_combined_filters(
        client, table_name, index_name,
        "遠くの雪をかぶった山々、雪に太陽の光が輝いている",
        cities=["hangzhou", "shanghai", "beijing"],
        height_range=(0, 1024),
        width_range=(0, 1024),
        top_k=5
    )

    print("\n" + "=" * 60)
    print("All search scenario demos are complete!")
    print("=" * 60)


if __name__ == "__main__":
    main()
画像による検索
# -*- coding: utf-8 -*-
"""
画像による検索の例です。
ローカル画像をベクトル化し、Tablestore から類似画像を検索します。
"""

import base64
import os
from pathlib import Path

import dashscope
import tablestore


def get_client():
    """Tablestore クライアントを作成します。"""
    endpoint = os.getenv("tablestore_end_point")
    instance_name = os.getenv("tablestore_instance_name")
    access_key_id = os.getenv("tablestore_access_key_id")
    access_key_secret = os.getenv("tablestore_access_key_secret")

    client = tablestore.OTSClient(
        endpoint,
        access_key_id,
        access_key_secret,
        instance_name,
        retry_policy=tablestore.WriteRetryPolicy(),
    )
    return client


def image_to_embedding(image_path: str) -> list[float]:
    """
    ローカル画像を埋め込みに変換します。
    """
    # 画像を読み取り、base64 に変換します。
    with open(image_path, "rb") as f:
        image_data = f.read()
    base64_image = base64.b64encode(image_data).decode("utf-8")

    # ファイル拡張子に基づいて MIME タイプを決定します。
    suffix = Path(image_path).suffix.lower()
    if suffix in [".jpg", ".jpeg"]:
        mime_type = "image/jpeg"
    elif suffix == ".png":
        mime_type = "image/png"
    elif suffix == ".gif":
        mime_type = "image/gif"
    elif suffix == ".webp":
        mime_type = "image/webp"
    else:
        mime_type = "image/jpeg"  # デフォルトで jpeg を使用します。

    # データ URI を構築します。
    data_uri = f"data:{mime_type};base64,{base64_image}"

    # マルチモーダルベクトル化 API を呼び出します。
    resp = dashscope.MultiModalEmbedding.call(
        model="multimodal-embedding-v1",
        input=[{"image": data_uri, "factor": 1.0}]
    )

    if resp.status_code == 200:
        return resp.output["embeddings"][0]["embedding"]
    else:
        raise Exception(f"Image vectorization failed: {resp.code} - {resp.message}")


def search_by_image(client, table_name, index_name, image_path: str, top_k: int = 10):
    """
    画像による検索:ローカル画像を使用してセマンティック検索を実行します。
    """
    print(f"\n{'='*60}")
    print(f"Search by image")
    print(f"Query image: {image_path}")
    print(f"Number of results: {top_k}")
    print("="*60)

    # 画像をベクトル化します。
    print("Vectorizing the query image...")
    query_vector = image_to_embedding(image_path)
    print(f"Vectorization complete. Dimension: {len(query_vector)}")

    # ベクトルクエリを構築します。
    query = tablestore.KnnVectorQuery(
        field_name='vector',
        top_k=top_k,
        float32_query_vector=query_vector,
    )

    # スコアでソートします。
    sort = tablestore.Sort(sorters=[tablestore.ScoreSort(sort_order=tablestore.SortOrder.DESC)])
    search_query = tablestore.SearchQuery(
        query,
        limit=top_k,
        get_total_count=False,
        sort=sort
    )

    # 検索を実行します。
    search_response = client.search(
        table_name=table_name,
        index_name=index_name,
        search_query=search_query,
        columns_to_get=tablestore.ColumnsToGet(
            column_names=["image_id", "city", "height", "width"],
            return_type=tablestore.ColumnReturnType.SPECIFIED
        )
    )

    print(f"\nRequest ID: {search_response.request_id}")
    print(f"\nSearch results:")
    print("-" * 60)

    for idx, hit in enumerate(search_response.search_hits):
        row_item = parse_search_hit(hit)
        print(f"{idx + 1}. Score: {hit.score:.4f} | {row_item}")

    return search_response.search_hits


def search_by_image_with_filter(client, table_name, index_name, image_path: str,
                                 cities: list = None, height_range: tuple = None,
                                 width_range: tuple = None, top_k: int = 10):
    """
    フィルター付きの画像による検索:ローカル画像を使用してセマンティック検索を実行し、フィルター条件を適用します。
    """
    print(f"\n{'='*60}")
    print(f"Search by image + Filters")
    print(f"Query image: {image_path}")
    print(f"City list: {cities}")
    print(f"Height range: {height_range}")
    print(f"Width range: {width_range}")
    print(f"Number of results: {top_k}")
    print("="*60)

    # 画像をベクトル化します。
    print("Vectorizing the query image...")
    query_vector = image_to_embedding(image_path)
    print(f"Vectorization complete. Dimension: {len(query_vector)}")

    # フィルター条件を構築します。
    must_queries = []

    if cities and len(cities) > 0:
        must_queries.append(tablestore.TermsQuery(field_name='city', column_values=cities))

    if height_range:
        must_queries.append(tablestore.RangeQuery(
            field_name='height',
            range_from=height_range[0],
            range_to=height_range[1],
            include_lower=True,
            include_upper=True
        ))

    if width_range:
        must_queries.append(tablestore.RangeQuery(
            field_name='width',
            range_from=width_range[0],
            range_to=width_range[1],
            include_lower=True,
            include_upper=True
        ))

    vector_filter = tablestore.BoolQuery(must_queries=must_queries) if must_queries else None

    # ベクトルクエリを構築します。
    query = tablestore.KnnVectorQuery(
        field_name='vector',
        top_k=top_k,
        float32_query_vector=query_vector,
        filter=vector_filter
    )

    # スコアでソートします。
    sort = tablestore.Sort(sorters=[tablestore.ScoreSort(sort_order=tablestore.SortOrder.DESC)])
    search_query = tablestore.SearchQuery(query, limit=top_k, get_total_count=False, sort=sort)

    # 検索を実行します。
    search_response = client.search(
        table_name=table_name,
        index_name=index_name,
        search_query=search_query,
        columns_to_get=tablestore.ColumnsToGet(
            column_names=["image_id", "city", "height", "width"],
            return_type=tablestore.ColumnReturnType.SPECIFIED
        )
    )

    print(f"\nRequest ID: {search_response.request_id}")
    print(f"\nSearch results:")
    print("-" * 60)

    for idx, hit in enumerate(search_response.search_hits):
        row_item = parse_search_hit(hit)
        print(f"{idx + 1}. Score: {hit.score:.4f} | {row_item}")

    return search_response.search_hits


def parse_search_hit(hit):
    """検索結果を解析します。"""
    row_item = {}
    primary_key = hit.row[0]
    row_item["image_id"] = primary_key[0][1]
    attribute_columns = hit.row[1]
    for col in attribute_columns:
        key = col[0]
        val = col[1]
        row_item[key] = val
    return row_item


def main():
    # パラメーターを設定します。
    table_name = "multi_modal_retrieval"
    index_name = "index"

    print("=" * 60)
    print("Tablestore search by image demo")
    print("=" * 60)

    # クライアントを作成します。
    client = get_client()
    print("Tablestore client created successfully.")

    # プロジェクトのルートディレクトリを取得します。
    current_dir = Path(__file__).parent
    data_dir = current_dir / "data" / "photograph"

    # クエリ画像として使用するサンプル画像を取得します。
    sample_images = list(data_dir.glob("*.jpg"))
    if not sample_images:
        print("Error: No sample image found. Make sure there are .jpg images in the data/photograph folder.")
        return

    # 最初の画像をクエリの例として使用します。
    query_image_path = str(sample_images[0])
    print(f"\nUsing sample image: {query_image_path}")

    # シナリオ 1:画像のみを使用した画像による検索。
    search_by_image(client, table_name, index_name, query_image_path, top_k=5)

    # シナリオ 2:画像による検索 + フィルター。
    # 特定の都市でのみ類似画像を検索します。
    search_by_image_with_filter(
        client, table_name, index_name,
        query_image_path,
        cities=["hangzhou", "shanghai"],
        top_k=5
    )

    # シナリオ 3:画像による検索 + サイズフィルター。
    # 類似の風景画像 (幅が高さより大きい) を検索します。
    search_by_image_with_filter(
        client, table_name, index_name,
        query_image_path,
        width_range=(800, 1024),
        top_k=5
    )

    print("\n" + "=" * 60)
    print("Search by image demo complete!")
    print("=" * 60)


if __name__ == "__main__":
    main()
可視化検索インターフェイス
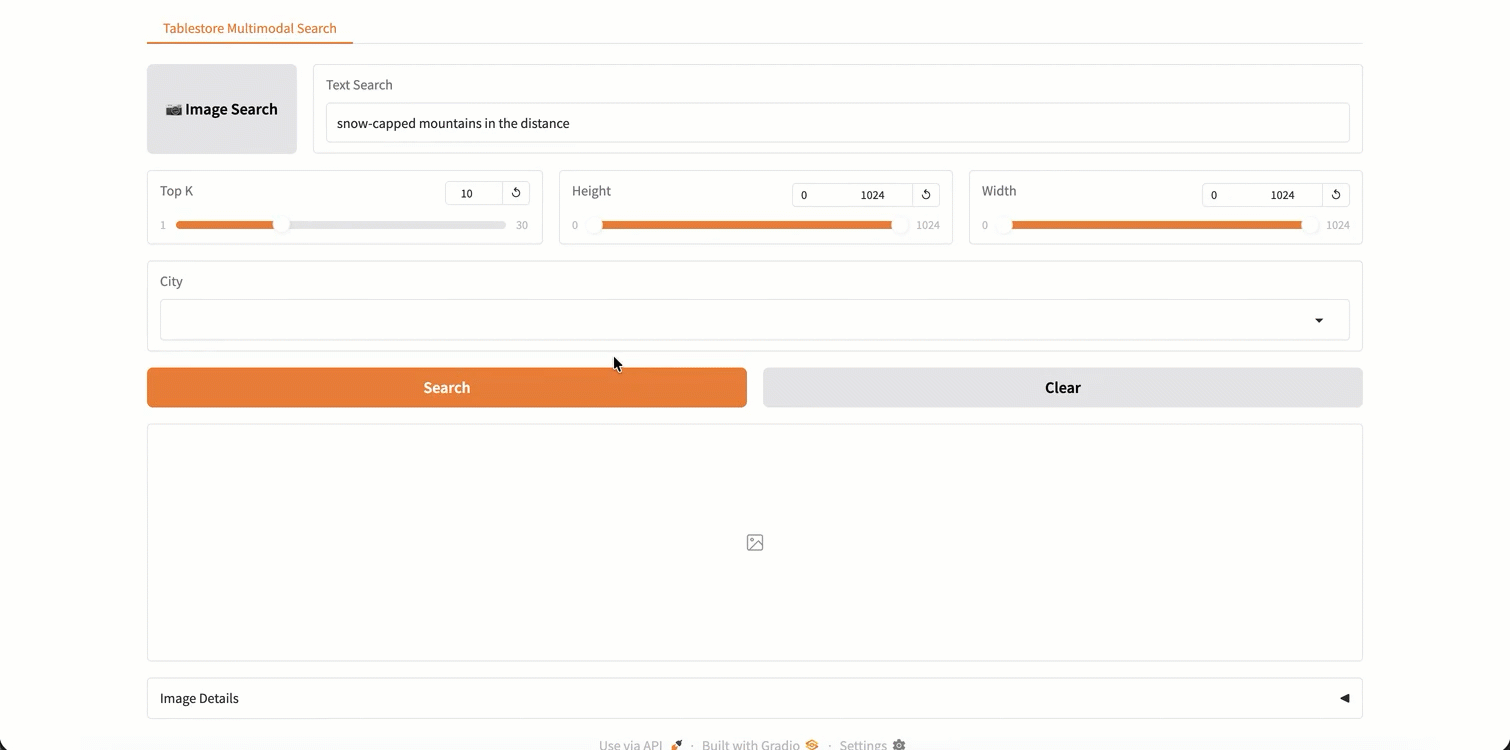
Gradio に基づいて対話型検索インターフェイスを構築し、直感的なグラフィカルユーザーエクスペリエンスを提供できます。このインターフェイスは、デモプロジェクトのローカル画像フォルダに依存しており、迅速なテストやデモンストレーションに適しています。独自のデータを使用する場合は、コードを参照して同様のインターフェイスを実装できます。
Gradio とその依存関係をインストールします。
pip install gradio gradio_rangeslider可視化インターフェイスを起動します。
python src/gradio_app.pyアプリケーションが起動したら、アプリケーション URL (例:
http://localhost:7860) を開いて検索インターフェイスを開きます。機能
説明
画像による検索
ローカル画像をアップロードして、類似画像をクエリします。
自然言語による検索
「遠くの雪をかぶった山々」や「芝生の上を走るふわふわの子犬」などの自然言語の説明を入力します。
トップ K
返す結果の数を設定します (1〜30)。
高さ/幅の範囲
画像の寸法でフィルターをかけます。
都市フィルター
都市でフィルターをかけます (複数選択がサポートされています)。
関連ドキュメント
完全なチュートリアルプロジェクトについては、GitHub リポジトリをご参照ください