このトピックでは、Alibaba Cloud Toolkitを使用してアプリケーションをServerless App Engine (SAE) にデプロイし、アプリケーションを監視する方法について説明します。
前提条件
SAEが活性化される。 詳細については、「SAEを使い始める」をご参照ください。
Mavenがダウンロードされ、環境変数が設定されます。
Java Development Kit (JDK) 1.8以降をダウンロードしてインストールします。
IntelliJ IDEA 2018.3以降がダウンロードされ、インストールされます。
説明JetBrainsプラグインの公式サーバーは中国国外に配備されています。 ネットワーク応答が遅いためにIntelliJ IDEAをダウンロードできない場合は、IntelliJ IDEAのオフラインインストールパッケージを入手してインストールします。 詳細については、「お問い合わせ」をご参照ください。
Alibaba Cloud ToolkitはIntelliJ IDEAにインストールおよび設定されています。
ステップ1: SAEでデモアプリケーションを作成する
SAEでは、コードパッケージとイメージを使用してアプリケーションをデプロイできます。 詳細については、「JavaアプリケーションをSAE 1.0にデプロイする」「」をご参照ください。
この例では、JARパッケージを使用して、SAEでプロバイダーアプリケーションとコンシューマーアプリケーションを作成します。 詳細については、「SAEコンソールでJARパッケージを使用したマイクロサービスアプリケーションのデプロイ」をご参照ください。
ステップ2: プロバイダーの作成
オンプレミス環境でプロバイダーアプリケーションプロジェクトを作成し、依存関係を追加し、サービスの登録と検出を有効にしてから、サービスレジストリとしてNacosサーバーを指定します。
nacos-service-providerという名前のMavenプロジェクトを作成します。pom.xmlファイルに依存関係を追加します。次のサンプルコードは、Spring Boot 2.1.4.RELEASEおよびSpring Cloud Greenwich.SR1の依存関係を追加する方法の例を示しています。
<parent>
    <groupId>org.springframework.boot</groupId>
    <artifactId>spring-boot-starter-parent</artifactId>
    <version>2.1.4.RELEASE</version>
    <relativePath/>
</parent>

<dependencies>
    <dependency>
        <groupId>com.alibaba.cloud</groupId>
        <artifactId>spring-cloud-starter-alibaba-nacos-discovery</artifactId>
        <version>2.1.1.RELEASE</version>
    </dependency>
    <dependency>
        <groupId>org.springframework.boot</groupId>
        <artifactId>spring-boot-starter-web</artifactId>
    </dependency>
</dependencies>

<dependencyManagement>
    <dependencies>
        <dependency>
            <groupId>org.springframework.cloud</groupId>
            <artifactId>spring-cloud-dependencies</artifactId>
            <version>Greenwich.SR1</version>
            <type>pom</type>
            <scope>import</scope>
        </dependency>
    </dependencies>
</dependencyManagement>

<build>
    <plugins>
        <plugin>
            <groupId>org.springframework.boot</groupId>
            <artifactId>spring-boot-maven-plugin</artifactId>
        </plugin>
    </plugins>
</build>
この例では、Spring Cloud Greenwichが使用されています。 Spring Cloud Greenwich用のSpring Cloud Alibabaのバージョンは2.1.1.RELEASEです。
Spring Cloud FinchleyのSpring Cloud Alibabaのバージョンは2.0.1.RELEASEです。
Spring Cloud Edgware用のSpring Cloud Alibabaのバージョンは1.5.1.RELEASEです。
説明Spring Cloud Edgwareは廃止されました。 アプリケーションの開発にSpring Cloud Edgwareを使用しないことを推奨します。
src\main\javaで、com.aliware.edasという名前のパッケージを作成します。com.aliware.edasパッケージで、プロバイダーの
ProviderApplicationというスタートアップクラスを作成し、次のサンプルコードを追加します。@ EnableDiscoveryClientアノテーションは、プロバイダーアプリケーションのサービス登録および検出機能を有効にするために使用されます。package com.aliware.edas; import org.springframework.boot.SpringApplication; import org.springframework.boot.autoconfigure.SpringBootApplication; import org.springframework.cloud.client.discovery.EnableDiscoveryClient; @SpringBootApplication @EnableDiscoveryClient public class ProviderApplication { public static void main(String[] args) { SpringApplication.run(ProviderApplication.class, args); } }com.aliware.edasパッケージで、EchoControllerを作成し、URLマッピングとして/echo/{String}を、HTTPメソッドとしてGETを指定します。 URLパスからmethodパラメーターを取得し、受信したパラメーターをエコーします。package com.aliware.edas; import org.springframework.web.bind.annotation.PathVariable; import org.springframework.web.bind.annotation.RequestMapping; import org.springframework.web.bind.annotation.RequestMethod; import org.springframework.web.bind.annotation.RestController; @RestController public class EchoController { @RequestMapping(value = "/echo/{string}", method = RequestMethod.GET) public String echo(@PathVariable String string) { return string; } }src\main\resourcesで、application.propertiesという名前のファイルを作成し、application.propertiesに次の設定を追加してNacos ServerのIPアドレスを指定します。spring.application.name=service-provider server.port=18081 spring.cloud.nacos.discovery.server-addr=127.0.0.1:8848上記の構成では、
127.0.0.1はNacos ServerのIPアドレスを示します。 Nacos Serverが別のサーバーにデプロイされている場合は、値をサーバーのIPアドレスに変更する必要があります。説明サービスレジストリが自己管理サービスレジストリの場合は、
127.0.0.1を自己管理サービスレジストリのアドレスに置き換えます。結果を確認します。
nacos-service-providerプロジェクトでProviderApplicationのmain関数を実行して、プロバイダーアプリケーションを起動します。オンプレミスNacos Serverコンソール (
http:// 127.0.0.1:8848/nacos) にログインします。 Nacos Serverコンソールへのログインに使用できるデフォルトのユーザー名とパスワードはnacosです。左側のナビゲーションウィンドウで、 を選択します。
サービスリストでservice-providerを表示できます。 サービスの詳細を照会することもできます。
ステップ3: コンシューマーを作成する
このセクションでは、サービス登録機能と、Nacos ServerがRestTemplateおよびFeignClientでどのように動作するかについて説明します。
nacos-service-consumerという名前のMavenプロジェクトを作成します。pom.xmlファイルに依存関係を追加します。<parent> <groupId>org.springframework.boot</groupId> <artifactId>spring-boot-starter-parent</artifactId> <version>2.1.4.RELEASE</version> <relativePath/> </parent> <dependencies> <dependency> <groupId>com.alibaba.cloud</groupId> <artifactId>spring-cloud-starter-alibaba-nacos-discovery</artifactId> <version>2.1.1.RELEASE</version> </dependency> <dependency> <groupId>org.springframework.boot</groupId> <artifactId>spring-boot-starter-web</artifactId> </dependency> <dependency> <groupId>org.springframework.cloud</groupId> <artifactId>spring-cloud-starter-openfeign</artifactId> </dependency> </dependencies> <dependencyManagement> <dependencies> <dependency> <groupId>org.springframework.cloud</groupId> <artifactId>spring-cloud-dependencies</artifactId> <version>Greenwich.SR1</version> <type>pom</type> <scope>import</scope> </dependency> </dependencies> </dependencyManagement> <build> <plugins> <plugin> <groupId>org.springframework.boot</groupId> <artifactId>spring-boot-maven-plugin</artifactId> </plugin> </plugins> </build>src\main\javaで、com.aliware.edasという名前のパッケージを作成します。com.aliware.edasパッケージで、RestTemplateとFeignClientを設定します。com.aliware.edasパッケージで、EchoServiceという名前のインターフェイスクラスを作成し、@ FeignClientアノテーションを追加してから、HTTP URLとHTTPメソッドを指定します。package com.aliware.edas; import org.springframework.cloud.openfeign.FeignClient; import org.springframework.web.bind.annotation.PathVariable; import org.springframework.web.bind.annotation.RequestMapping; import org.springframework.web.bind.annotation.RequestMethod; @FeignClient(name = "service-provider") public interface EchoService { @RequestMapping(value = "/echo/{str}", method = RequestMethod.GET) String echo(@PathVariable("str") String str); }com.aliware.edasパッケージで、ConsumerApplicationという名前のスタートアップクラスを作成し、関連する設定を追加します。@ EnableDiscoveryClientアノテーションを追加して、サービスの登録と検出を有効にします。@ EnableFeignClientsアノテーションを追加して、FeignClientを有効にします。@ LoadBalancedアノテーションを追加して、RestTemplateをサービス検出と統合します。
package com.aliware.edas;

import org.springframework.boot.SpringApplication;
import org.springframework.boot.autoconfigure.SpringBootApplication;
import org.springframework.cloud.client.discovery.EnableDiscoveryClient;
import org.springframework.cloud.client.loadbalancer.LoadBalanced;
import org.springframework.cloud.openfeign.EnableFeignClients;
import org.springframework.context.annotation.Bean;
import org.springframework.web.client.RestTemplate;

@SpringBootApplication
@EnableDiscoveryClient
@EnableFeignClients
public class ConsumerApplication {

    @LoadBalanced
    @Bean
    public RestTemplate restTemplate() {
        return new RestTemplate();
    }

    public static void main(String[] args) {
        SpringApplication.run(ConsumerApplication.class, args);
    }
}
com.aliware.edasパッケージで、TestControllerという名前のクラスを作成して、サービス検出機能をテストおよび検証します。package com.aliware.edas; import org.springframework.beans.factory.annotation.Autowired; import org.springframework.web.bind.annotation.PathVariable; import org.springframework.web.bind.annotation.RequestMapping; import org.springframework.web.bind.annotation.RequestMethod; import org.springframework.web.bind.annotation.RestController; import org.springframework.web.client.RestTemplate; @RestController public class TestController { @Autowired private RestTemplate restTemplate; @Autowired private EchoService echoService; @RequestMapping(value = "/echo-rest/{str}", method = RequestMethod.GET) public String rest(@PathVariable String str) { return restTemplate.getForObject("http://service-provider/echo/" + str, String.class); } @RequestMapping(value = "/echo-feign/{str}", method = RequestMethod.GET) public String feign(@PathVariable String str) { return echoService.echo(str); } }src\main\resourcesで、application.propertiesという名前のファイルを作成し、application.propertiesに次の設定を追加してNacos ServerのIPアドレスを指定します。spring.application.name=service-consumer server.port=18082 spring.cloud.nacos.discovery.server-addr=127.0.0.1:8848上記の構成では、
127.0.0.1はNacos ServerのIPアドレスを示します。 Nacos Serverが別のサーバーにデプロイされている場合は、値をサーバーのIPアドレスに変更する必要があります。説明サービスレジストリが自己管理サービスレジストリの場合は、
127.0.0.1:8848を自己管理サービスレジストリのアドレスに置き換えます。結果を確認します。
nacos-service-consumerプロジェクトでConsumerApplicationのmain関数を実行して、コンシューマーアプリケーションを起動します。オンプレミスNacos Serverコンソール (
http:// 127.0.0.1:8848/nacos) にログインします。 Nacos Serverコンソールへのログインに使用できるデフォルトのユーザー名とパスワードはnacosです。左側のナビゲーションウィンドウで、 を選択します。
サービスリストでservice-consumerを表示できます。 サービスの詳細を照会することもできます。
手順4: オンプレミス環境でサービスをテストする
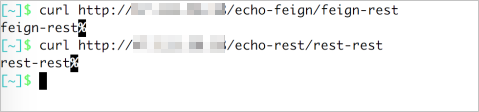
オンプレミス環境でプロバイダーを呼び出すには、コンシューマーを使用します。
Linux、UNIX、またはmacOSの場合、次のコマンド
curl http://127.0.0.1:18082/echo-rest/rest-rest curl http://127.0.0.1:18082/echo-feign/feign-restWindowsでは、ブラウザのアドレスバーにhttp:// 127.0.0.1:18082/echo-rest/rest-restと入力し、次にhttp:// 127.0.0.1:18082/echo-feign/feign-restと入力し、enterキーを押します。
この例では、サービスはWindowsでテストされます。

上の図は、マイクロサービスプロバイダーがオンプレミス環境でマイクロサービスコンシューマーによって呼び出されることを示しています。
ステップ5: アプリケーションをSAEにデプロイする
アプリケーションを開発した後、Alibaba Cloud Toolkitで展開タスクを設定して、手順1: SAEでデモアプリケーションを作成するで作成したアプリケーションにビジネスコードを公開する必要があります。
Alibaba Cloud Toolkitでアカウントを設定します。
Alibaba Cloud Toolkitアイコン
 をクリックし、ドロップダウンリストから [設定...] を選択します。 [設定] ページの左側のナビゲーションウィンドウで、 を選択します。
 [アカウント] ページで、[Access Key ID] および [Access Key Secret] パラメーターを設定し、[OK] をクリックします。
説明Access Key IDとAccess Key Secretを取得するには、次の手順を実行します。
[アカウント] ページで、[既存のAK/SKを取得] をクリックしてAlibaba Cloudログインページに移動し、Alibaba Cloudにログインします。 [セキュリティ管理] ページで、[Access Key ID] と [Access Key Secret] を取得します。
展開タスクの設定
IntelliJ IDEAで、Cloud Toolkitアイコン
 をクリックし、ドロップダウンリストから [SAEにデプロイ] を選択します。
 [SAEにデプロイ] ページで、パラメーターを設定します。 設定後、[適用] をクリックして設定を保存します。
説明自己管理サービスレジストリを使用する場合は、[詳細] タブで
-Dnacos.use.endpoint.parsing.ru le=falseおよび-Dnacos.use.cloud.nameスペース. parsing=falseの起動コマンドを設定する必要があります。プロバイダーアプリケーションの設定を構成します。
[アプリケーション] セクションで、[ステップ1: SAEでデモアプリケーションを作成] で作成したアプリケーションのリージョン、名前空間、および名前を指定します。
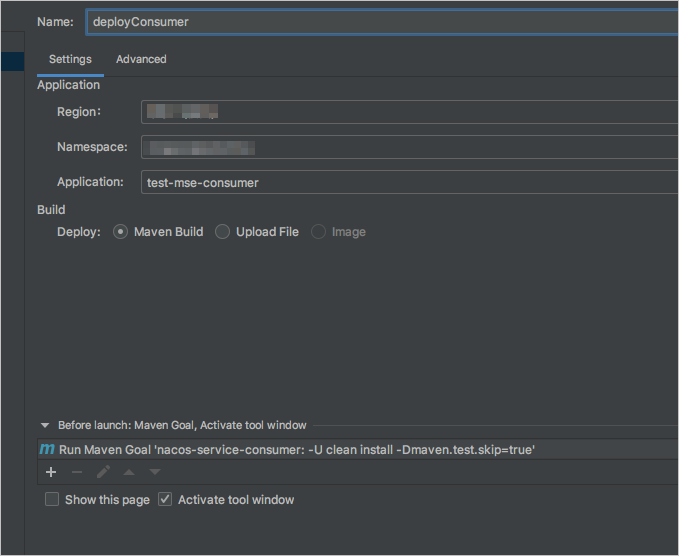
コンシューマアプリケーションの設定を構成します。
[アプリケーション] セクションで、SAEで作成したアプリケーションのリージョン、名前空間、および名前を指定します。

アプリケーションをデプロイします。
[実行] をクリックしてプロバイダーアプリケーションを実行し、コンシューマーアプリケーションを実行します。

結果を確認します。
Server Load Balancer (SLB) インスタンスをコンシューマアプリケーションにバインドします。
詳細については、「SLBインスタンスのアプリケーションへのバインド」をご参照ください。

コンシューマーにアクセスします。
コンシューマーへのHTTPリクエストを開始します。
curl http:// 47.111.XX.XX/echo-feign/feign-restコンシューマーへのHTTPリクエストを開始します。 消費者はプロバイダを呼び出す。
curl http:// 47.111.XX.XX/echo-rest/rest-rest
関連するアプリケーションモニタリングダッシュボードの呼び出しデータを表示します。