DataWorks は、複数のデータマスキングシナリオをサポートしています。このトピックでは、DataWorks でシナリオを選択し、データマスキングルールを作成し、マスキングされたクエリを実行する方法について説明します。
背景情報
DataWorks は、静的と動的の 2 種類のデータマスキングを提供します。
動的データマスキングには、データ開発 / データマップ表示のマスキング、データ分析と表示のマスキング、MaxCompute エンジンレイヤーのマスキング、Hologres レイヤーのマスキングなどのシナリオが含まれます。
静的データマスキングは、データ統合シナリオで使用されます。
デフォルトでは、データマスキングルールは作成後に非アクティブ状態になります。関連するシナリオで自動データマスキングを有効にするには、ルールを手動で有効化する必要があります。
データマスキングルールを有効化または無効化する方法の詳細については、「データマスキングルールの有効化または無効化」をご参照ください。
データマスキングシナリオの詳細については、「データマスキングシナリオ」をご参照ください。
前提条件
(任意、動的データマスキングのみ) 必要に応じて機密データ検出ルールを設定します。これにより、データマスキングルールを作成する際に、マスキングが必要なフィールドを関連付けることができます。詳細については、「機密データ検出ルール」をご参照ください。
(任意、動的データマスキングのみ) ホワイトリストを使用して、特定のユーザーが指定された期間、生データを表示できるようにすることができます。そのためには、ユーザーをユーザーグループに追加する必要があります。詳細については、「ユーザーグループの設定」をご参照ください。
(任意、MaxCompute エンジンレイヤーでのデータマスキングのみ) MaxCompute エンジンレイヤーでデータマスキングを設定するには、Data Security Guard の IP アドレスを MaxCompute ネットワークホワイトリストに追加する必要があります。これにより、データマスキング関数を呼び出して、MaxCompute コマンドラインクライアント (odpscmd) や Logview など、DataWorks 以外のソースから取得したクエリ結果の機密データをマスキングできます。詳細については、「例:E-MapReduce での基盤となるデータマスキングの使用」をご参照ください。
アクセス制御
データマスキングルールの設定権限 (作成、編集、削除):
テナント管理者およびテナントセキュリティ管理者は、すべてのシナリオでデータマスキングルールを管理できます。
ワークスペース管理者およびワークスペースセキュリティ管理者は、権限を持つシナリオでのみデータマスキングルールを管理できます。
ホワイトリストの設定権限 (作成、編集、削除):
テナント管理者およびテナントセキュリティ管理者は、すべてのシナリオでホワイトリストを管理できます。
ワークスペース管理者およびワークスペースセキュリティ管理者は、権限を持つシナリオでのみホワイトリストを管理できます。
これらの操作を実行するには、必要なロール権限が付与されている必要があります。権限付与の詳細については、「ワークスペースレベルのモジュールに対する権限の管理」および「グローバルレベルのモジュールに対する権限の管理」をご参照ください。
データマスキングルール設定のエントリポイント
DataWorks コンソールにログインします。上部のナビゲーションバーで、目的のリージョンを選択します。左側のナビゲーションウィンドウで、を選択します。表示されたページで、セキュリティセンターへ移動をクリックします。
左側のナビゲーションウィンドウで、をクリックして、データセキュリティガードページに移動します。
説明Alibaba Cloud アカウントに必要な権限が付与されている場合、データセキュリティガードページに直接アクセスできます。
Alibaba Cloud アカウントに必要な権限が付与されていない場合、データセキュリティガードの権限付与ページにリダイレクトされます。Alibaba Cloud アカウントに必要な権限が付与された後にのみ、データセキュリティガードの機能を使用できます。
左側のナビゲーションウィンドウで、をクリックします。
左側のナビゲーションウィンドウでデータマスキングシナリオを選択し、右側でマスキングルールをクリックして、そのシナリオのルールを作成します。
動的データマスキング:ルール設定は、すべての動的データマスキングシナリオで類似しています。このトピックでは、データ開発およびデータマップシナリオでの表示データマスキングを例に、主要な設定手順を説明します。要件に応じてデータマスキングシナリオを選択できます。詳細については、「動的データマスキングルールの作成:データ開発およびデータマップシナリオでの表示データマスキング」をご参照ください。
静的データマスキング:詳細については、「静的データマスキングルールの作成:Data Integration シナリオでの静的データマスキング」をご参照ください。
動的データマスキングルールの作成:データ開発およびデータマップシナリオでの表示データマスキング
データマスキングシナリオを選択します。
データマスキング管理ページのマスキングシーンセクションで、を選択します。次に、右側の+ マスキングルールをクリックします。
データマスキングルールを作成します。
データマスキングルールの作成ダイアログボックスで、ルールのパラメーターを設定します。
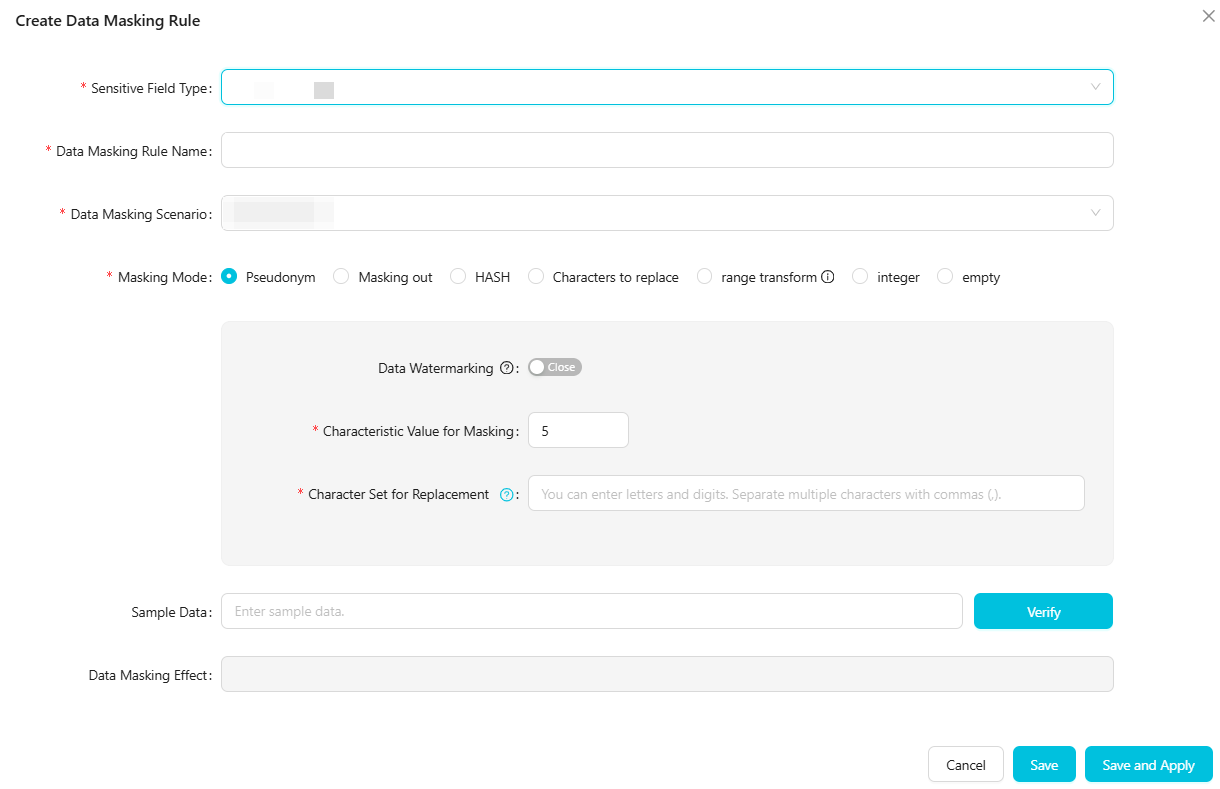
機密フィールドタイプを選択し、ルール名を指定します。
パラメーター
説明
機密フィールドタイプ
マスキングするフィールドのタイプを選択します。
組み込みの機密フィールドタイプ、または機密データ検出で追加したカスタムの機密フィールドタイプを選択できます。機密フィールドタイプの追加方法の詳細については、「機密データ検出ルール」をご参照ください。
同じシナリオに対してすでにデータマスキングルールを作成している場合、DataWorks は選択済みの機密フィールドタイプをフィルタリングして、同じシナリオ内の同じ機密フィールドに対して矛盾したルールが作成されるのを防ぎます。
データマスキングルール名
デフォルトでは、機密フィールドタイプと同じです。カスタム名を指定することもできます。ルール名は一意である必要があります。
データマスキングシナリオを設定します。
このルールを適用するシナリオを選択します。デフォルトでは、ステップ 1 で選択したシナリオが使用されます。必要に応じてシナリオを変更したり、追加したりできます。
データマスキング方法を設定します。
DataWorks は、仮名化、マスキングアウト、ハッシュ、置換文字、範囲変換、整数、空など、いくつかの方法をサポートしています。要件に応じて方法を選択できます。
エイリアス
この方法は、値を同じ特性を持つマスクされた値に置き換え、データ形式を保持します。以下のパラメーターが利用可能です。
パラメーター
説明
(任意) データウォーターマーク
ウォーターマークは、データのソースを追跡するのに役立ちます。データ侵害が発生した場合、漏洩の潜在的なソースを特定できます。必要に応じてデータウォーターマークを有効または無効にします。
説明DataWorks Enterprise Edition のみデータウォーターマーク機能をサポートしています。
マスキング特性値
異なる特性値は、異なるマスキングポリシーになります。つまり、同じソースデータでも、特性値が異なると、マスクされた結果も異なります。特性値が同じ場合、同じソースデータは常に同じマスク結果を生成します。
たとえば、生データが a123 の場合:
特性値が 0 に設定されている場合、データは b124 にマスクされます。
特性値が 1 に設定されている場合、データは c234 にマスクされます。
デフォルト値は 5 です。値の範囲は 0 から 9 です。
置換文字セット
選択した機密フィールドタイプが組み込みタイプでない場合は、置換文字セットを設定する必要があります。このセットに一致するソースデータ内の文字は、同じタイプの他の文字に置き換えられます。
たとえば、マスキング前の機密データが 0 から 3 までの数字と a から d までの文字で構成されている場合、マスクされたデータもその範囲内の数字と文字で構成されます。
説明セット内の文字は、同じ範囲の文字に置き換えられます。文字セットは、大文字、小文字、数字をサポートします。複数の文字はカンマ (,) で区切ります。漢字はサポートされていません。マスキング対象のデータが文字セットと一致しない場合、マスキングは行われません。
マスキングアウト
この方法は、特定の位置の文字をアスタリスク (*) に置き換えることで、情報の一部を隠します。この方法を使用する場合、マスキングモードを選択する必要があります。DataWorks は、いくつかの組み込みマスキングモードを提供し、カスタムモードもサポートしています。
パラメーター (いずれかを選択)
説明
推奨メソッド
ドロップダウンリストから推奨されるマスキング方法を選択します。利用可能な方法は、マスキングするフィールドによって異なります。
DataWorks は 3 つの組み込みメソッドを提供します。これらには、「最初の文字と最後の文字のみ表示」、「最初の 3 文字と最後の 2 文字のみ表示」、「最初の 3 文字と最後の 4 文字のみ表示」が含まれます。必要に応じてドロップダウンリストからメソッドを選択します。
カスタム
これにより、より柔軟にマスキングを設定できます。左から右にセグメントを設定し、各セグメントをマスクするかどうか、およびマスクする (またはマスクしない) 文字数を指定します。最大 10 個のセグメントを追加できます。少なくとも 1 つのセグメントが必要で、そのうち 1 つのセグメントは必ず残りの文字である必要があります。
例:最初の 3 文字をマスクし、残りの文字はマスクしない。
ハッシュ
データマスキングにハッシュ暗号化を使用する場合、次のパラメーターを設定する必要があります。
パラメーター
説明
データウォーターマーク
ウォーターマークは、データのソースを追跡するのに役立ちます。データ侵害が発生した場合、漏洩の潜在的なソースを特定できます。必要に応じてデータウォーターマークを有効または無効にします。
説明DataWorks Enterprise Edition のみデータウォーターマーク機能をサポートしています。
暗号化アルゴリズム
MD5、SHA256、SHA512、SM3 が含まれます。
ソルト値
暗号化アルゴリズムのソルト値を設定します。デフォルト値は 5 です。値の範囲は 0 から 9 です。
説明ソルトは、データに挿入される特定の文字列です。暗号技術では、パスワードの固定位置に特定の文字列を挿入すると、結果のハッシュが元のパスワードのハッシュとは異なるものになります。このプロセスはソルティングと呼ばれます。
置換文字
置換文字は、選択した置換方法に基づいて、指定された位置の文字を置き換えます。以下のパラメーターが利用可能です。
パラメーター
説明
(必須) 置換位置
ドロップダウンリストから、すべて置換、最初の 3 文字を置換、または最後の 4 文字を置換を選択できます。カスタムを選択して、カスタムの置換位置を定義することもできます。
カスタムを選択した場合、左から右にセグメントを定義し、各セグメントで置換する文字数と置換方法を設定できます。最大 10 個のセグメントを追加できます。少なくとも 1 つのセグメントが必要で、そのうち 1 つのセグメントは必ず残りの文字である必要があります。
(必須) 置換方法
ランダム置換、サンプル値置換、静的フィールド置換が含まれます。
ランダム置換:指定された位置の文字をランダムに置換します。置換後も文字数は変わりません。
サンプル値置換:サンプルライブラリを選択します。指定された位置の文字は、選択されたサンプルライブラリの値で置換されます。
静的フィールド置換:置換値テキストボックスに、置換に使用する文字を入力します。値の長さは 1~100 文字で、null 文字を含めることはできません。指定された位置の文字は、この値で置換されます。
範囲変換
範囲変換は、数値データをマスキングするために使用されます。この方法は、指定された数値範囲内の値を固定値に置き換えます。最大 10 個の範囲を定義できます。
パラメーター
説明
元の値の範囲 [m,n)
生データの数値範囲。値は 0 以上で、小数点以下 2 桁まで指定できます。
マスク後の値
マスキング後の値。値は 0 以上で、小数点以下 2 桁まで指定できます。
整数
整数は、数値データのマスキングにのみ使用されます。
パラメーター
説明
生データの型
数値型のみがサポートされています。
保持する小数点以下の桁数
値の範囲は 0 から 5 です。残りの部分は四捨五入されます。たとえば、元の値が 3.1415 で、小数点以下 2 桁を保持する場合、マスクされた値は 3.14 になります。
空
空マスキングは、対応する機密フィールドを空の文字列に設定します。
マスキング結果を検証します。
サンプルデータテキストボックスにサンプルの生データ (0~100 文字) を入力します。検証をクリックします。マスクされた結果がデータマスキング効果フィールドに表示されます。
保存または保存して適用をクリックして、データマスキングルールを作成します。
ルールを作成した後:
動的データマスキングシナリオでは、ルールのホワイトリストを設定できます。ホワイトリストに登録されたユーザーは、指定された期間内に生データをクエリできます。ホワイトリストの追加方法の詳細については、「データマスキングルールのホワイトリストの設定 (動的データマスキングのみ)」をご参照ください。
デフォルトでは、データマスキングルールは作成後に非アクティブ状態になります。対応するシナリオで適用される前に、ルールを手動で有効化する必要があります。ルールのステータスを変更する方法の詳細については、「データマスキングルールの有効化または無効化」をご参照ください。
静的データマスキングルールの作成:Data Integration シナリオでの静的データマスキング
データマスキング管理ページのマスキングシーンで、を選択し、右側の+ マスキングルールをクリックします。
データマスキングルールを作成します。
データマスキングルールの作成ダイアログボックスで、ルールのパラメーターを設定します。
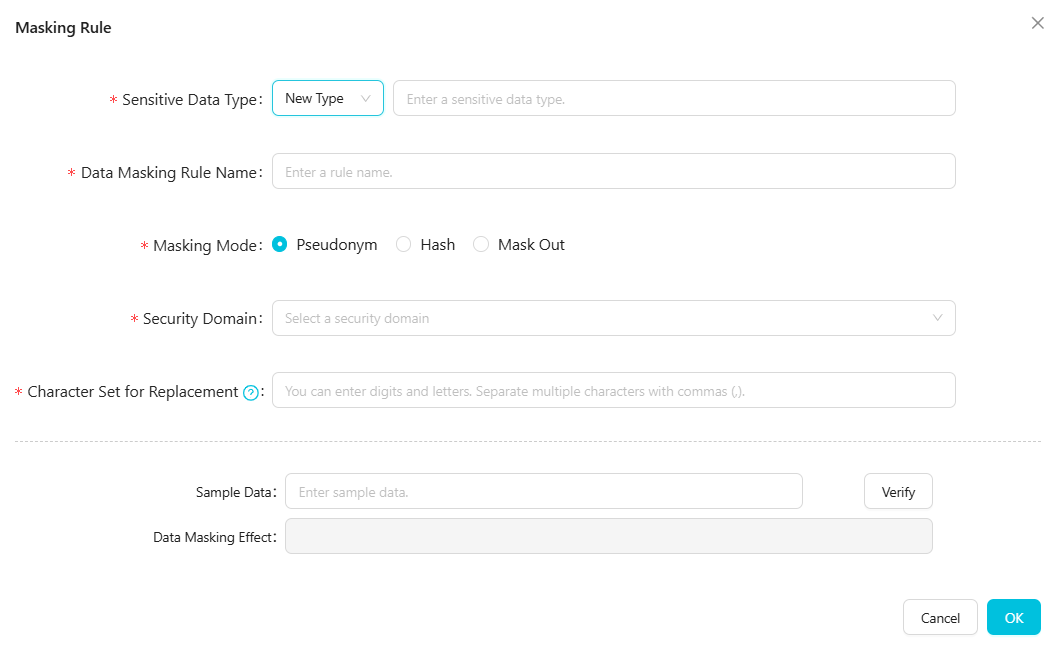
機密データの型を選択し、ルール名を指定します。
パラメーター
説明
機密データの型
既存:既存の機密データの型 (組み込みまたはカスタム) を選択します。
新しいタイプ:新しい機密データの型の名前を入力します。名前は一意である必要があり、既存の型と同じにすることはできません。
説明組み込みの機密データの型には、携帯電話番号、ID カード番号、銀行カード番号、Email_Built-in、IP、ナンバープレート番号、郵便番号、固定電話番号、MAC アドレス、住所、氏名、会社名、民族、星座、性別、国籍が含まれます。
データマスキングルール名
デフォルトでは、機密データの型と同じです。カスタム名を指定することもできます。ルール名は一意である必要があります。
データマスキング方法を設定します。
DataWorks は、仮名化、ハッシュ、マスキングアウトの 3 つの方法をサポートしています。適切な方法を選択できます。
仮名化
この方法は、値を同じ特性を持つマスクされた値に置き換え、データ形式を保持します。仮名化は、一部の既存のフィールドでのみサポートされています。
選択した機密データの型が組み込みタイプ (携帯電話番号、ID カード番号、銀行カード番号、Email_Built-in、IP、ナンバープレート番号、郵便番号、固定電話番号、MAC アドレス、住所、氏名、会社名など) の場合、セキュリティドメインを設定する必要があります。
セキュリティドメイン:値は 0 から 9 までの整数です。異なるセキュリティドメインは異なるマスキングポリシーを使用するため、同じソースデータでもセキュリティドメインが異なるとマスクされた結果も異なります。たとえば、生データが a123 の場合、セキュリティドメイン 0 では b124 にマスクされますが、セキュリティドメイン 1 では c234 にマスクされます。同じセキュリティドメイン内では、同じソースデータは常に同じ結果にマスクされます。
選択した機密データの型が組み込みタイプでない場合は、置換文字セットを設定する必要があります。
置換文字セット:このセットに一致するソースデータ内の文字は、同じタイプの他の文字に置き換えられます。文字セットは、大文字、小文字、数字をサポートします。複数の文字を区切るにはカンマ (,) を使用します。漢字はサポートされていません。マスキング対象のデータにこのセットの文字が含まれていない場合、マスキングは行われません。たとえば、置換文字セットが 0 から 3 までの数字と a から d までの文字で構成されている場合、ソースデータ内の一致する数字は 0 から 3 までの別の数字に置き換えられ、一致する文字は a から d までの別の文字に置き換えられます。
ハッシュ
ハッシュメソッドは、生データを固定長の値に暗号化し、セキュリティドメインを選択する必要があります。
セキュリティドメイン:値は 0 から 9 までの整数です。各セキュリティドメインは異なるマスキングポリシーを使用します。つまり、同じソースデータでも、セキュリティドメインによってマスクされた結果は異なります。ただし、同じセキュリティドメイン内では、同じソースデータは常に同じマスク結果を生成します。
たとえば、生データが a123 の場合:
セキュリティドメインが 0 に設定されている場合、データは b124 にマスクされます。
セキュリティドメインが 1 に設定されている場合、データは c234 にマスクされます。
マスキングアウト
マスキングアウトメソッドは、特定の文字をアスタリスク (*) に置き換えることで部分的な情報を隠します。このメソッドでは、マスキングモードを選択する必要があります。DataWorks は、いくつかの組み込みマスキングモードを提供し、カスタムモードもサポートしています。
推奨メソッド:一部のフィールドでは、ドロップダウンリストから推奨されるマスキング方法を選択できます。利用可能な方法は、選択したフィールドによって異なります。DataWorks は 3 つの組み込みメソッドを提供します:最初の文字と最後の文字のみ表示、最初の 3 文字と最後の 2 文字のみ表示、最初の 3 文字と最後の 4 文字のみ表示。必要なメソッドを選択できます。一部のフィールドでは、デフォルトのメソッドしか選択できません。
カスタム:このオプションは、マスキングを柔軟に設定する方法を提供します。左から右に最大 10 個のセグメントを定義できます。各セグメントについて、マスキングを適用するかどうか、およびマスクする文字数またはマスクしない文字数を指定できます。少なくとも 1 つのセグメントを設定する必要があり、そのうち 1 つのセグメントは必ず残りの文字に設定する必要があります。
例 1:最初の 3 文字をマスクし、残りの文字はマスクしない。
例 2:最後の 3 文字をマスクし、残りの文字はマスクしない。
マスキング結果を検証します。
サンプルデータテキストボックスにサンプルの生データ (0~100 文字) を入力し、検証をクリックします。マスクされた結果がデータマスキング効果フィールドに表示されます。
OK をクリックして、データマスキングルールを作成します。
ルールを作成した後:
デフォルトでは、データマスキングルールは作成後に非アクティブ状態になります。対応するシナリオで適用される前に、ルールを手動で有効化する必要があります。ルールのステータスを変更する方法の詳細については、「データマスキングルールの有効化または無効化」をご参照ください。
データ統合用のデータマスキングルールを作成した後、単一テーブルのリアルタイム同期タスクを作成する際にそのルールを使用できます。詳細については、「データマスキングの設定」をご参照ください。
データマスキングルールのホワイトリストの設定 (動的データマスキングのみ)
動的データマスキングシナリオでは、データマスキングルールのホワイトリストを設定できます。ルールが有効化された後、ホワイトリストに登録されたユーザーは指定された期間、ルールの影響を受けず、マスクされていない生データを表示できます。
ホワイトリストを作成する前に、ユーザーをユーザーグループに追加する必要があります。詳細については、「ユーザーグループの設定」をご参照ください。
ホワイトリストを追加するには、次の手順を実行します:
データマスキング管理ページで、ホワイトリストの設定をクリックします。
右上隅で、ホワイトリストをクリックします。
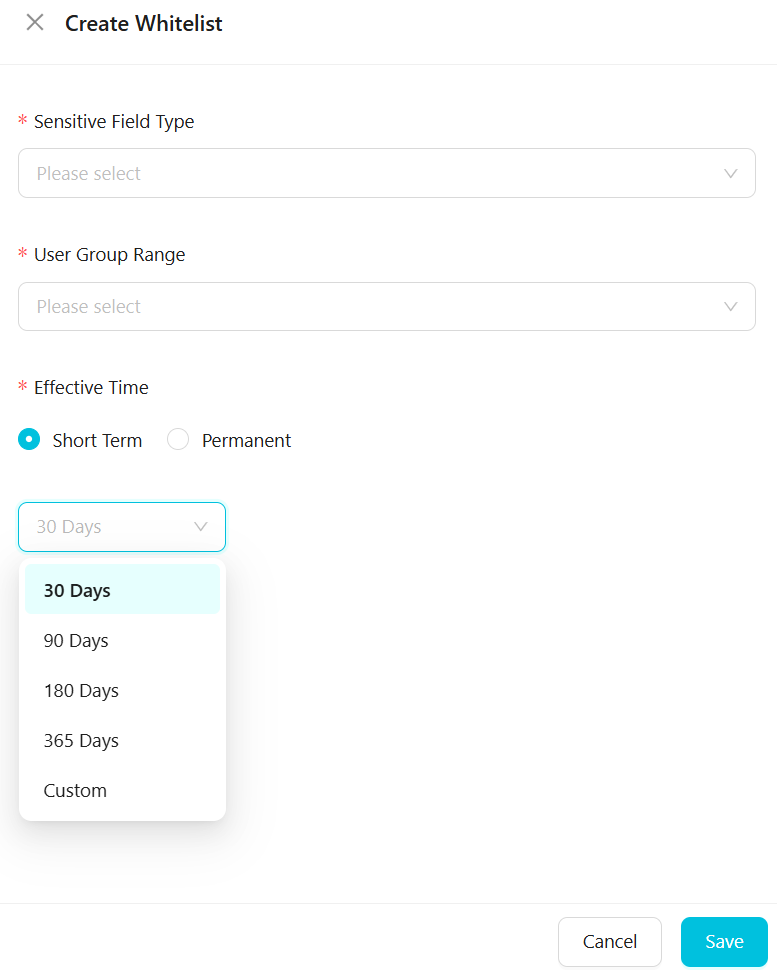
ホワイトリストの作成ダイアログボックスで、パラメーターを設定できます。
説明Hologres レイヤーのマスキングまたはData Integration の静的マスキングシナリオでは、ホワイトリストの設定はサポートされていません。
ホワイトリストの有効期間を設定すると、その期間中、ホワイトリストの条件を満たす機密データはマスキングされません。
パラメーターは次のとおりです。
パラメーター
説明
機密フィールドタイプ
現在選択されているデータマスキングシナリオでアクティブな機密フィールドタイプのみを選択できます。
ユーザーグループの範囲
設定済みのユーザーグループを選択します。最大 50 のユーザーグループを選択できます。ユーザーグループをホワイトリストに追加すると、それらのグループ内のアカウントは元のマスクされていないデータを取得できます。ユーザーグループの設定方法の詳細については、「ユーザーグループの設定」をご参照ください。
有効期間
ホワイトリストの有効期間を設定します。短期または永続的な期間を選択できます。短期オプションには、30 日、90 日、180 日、365 日、またはカスタム期間が含まれます。カスタム期間の場合、現在の日付または将来の時間範囲を選択できます。
ユーザーがホワイトリストの有効期間外に機密情報をクエリした場合、データはマスキングされます。
説明短期期間を選択した場合、現在時刻から指定された日数が経過するまでデータはマスキングされません。
保存をクリックして、ホワイトリストの設定を保存します。
データマスキングルールの有効化または無効化
データマスキングルールページで、ルールを見つけ、ステータススイッチをクリックして有効または無効に設定します。
ステータスが設定された後、ルールを編集または削除したり、その詳細を表示したりできます。
マスキングルールが有効状態の間は、削除または編集することはできません。そのためには、まずステータスを無効に変更する必要があります。ステータスを変更する前に、ルールがどのタスクでも使用されていないかを確認し、セキュリティ管理者に確認を依頼する必要があります。
ルールが無効の場合、編集または削除できますが、機密データの型やデータマスキングルール名を変更することはできません。
変更を加えた後、ステータスを有効に戻します。これにより、このルールを使用するタスクがデータマスキングを再開できます。
データマスキングルールアプリケーションの例
データ統合用のデータマスキングルールを作成した後、単一テーブルのリアルタイム同期タスクを作成する際にそのルールを使用できます。詳細については、「データマスキングの設定」をご参照ください。