このドキュメントでは、VeRL フレームワークおよび Qwen2.5-3B-Instruct モデルを使用して、ACK クラスター上で典型的な強化学習ジョブを実行する方法について説明します。環境準備、イメージのビルド、ジョブの送信、リソースのモニタリング、ベストプラクティスが含まれます。
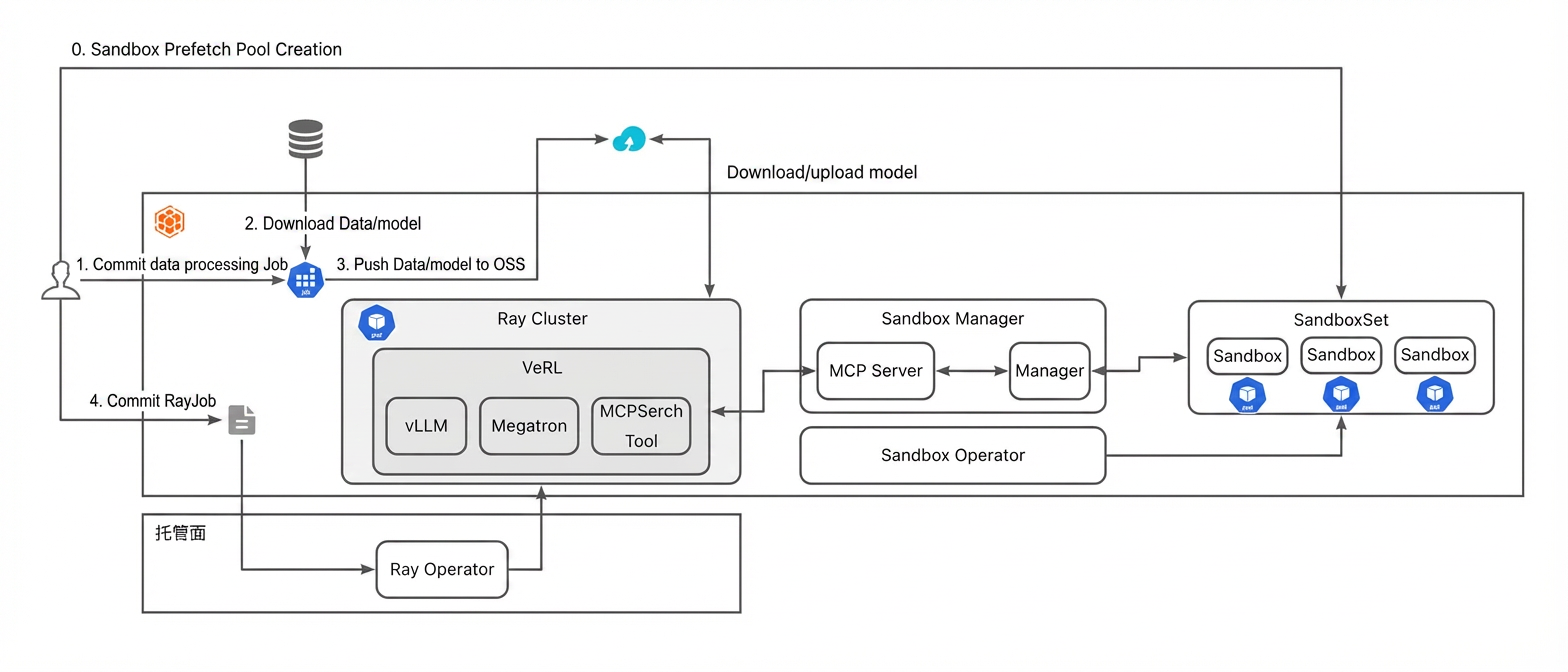
Container Service for Kubernetes (ACK) は、企業向けに効率的で弾力性があり、スケーラブルなコンテナ化プラットフォームを提供します。強化学習(RL)は人工知能の主要な分野の一つであり、多くの場合、大量のコンピューティングリソース、分散トレーニング、複雑な環境シミュレーションを必要とします。ACK を使用することで、Kubernetes のスケジューリング機能と Alibaba Cloud の弾力的なインフラストラクチャを利用して、強化学習のトレーニングジョブを簡単にデプロイ、管理、スケーリングできます。次の図は、このジョブのコンポーネントアーキテクチャを示しています。
前提条件
トレーニングを高速化するために GPU インスタンスの使用を推奨します。この例では、8 個の GU8TF GPU を搭載した Lingjun ノード 1 台を使用します。
(オプション)Object Storage Service (OSS) を有効にして、モデルチェックポイント、ログ、トレーニングデータを永続化します。
ステップ 1:トレーニングイメージの準備
この例では、強化学習ジョブを実行するために VeRL フレームワークを使用します。公式の VeRL イメージを使用するか、独自にビルドできます。独自のイメージをビルドする場合は、VeRL、vLLM、SGLang、Ray などの必要なすべての依存関係が含まれていることを確認してください。以下は Dockerfile の例です:
from verl/verl:vllm012.latest

WORKDIR /home/verl

COPY . .

RUN apt update && apt install -y openssh-server vim
RUN apt remove python3-blinker -y; pip install -e .
ステップ 2:MCP Server および ACK Sandbox の構成
MCP Server および Sandbox コンポーネントをインストールします。
オープンソース版
# コードリポジトリをクローン
git clone https://github.com/openkruise/agents
cd agents
# エージェントオペレーターのデプロイ YAML を生成
kubectl kustomize config/default >operator-install.yaml
# 必要に応じて operator-install.yaml の構成を変更
kubectl apply -f operator-install.yaml

# テスト用 sandbox-manager をデプロイ。詳細については、https://github.com/openkruise/agents/blob/master/config/sandbox-manager/README.md を参照
kubectl kustomize config/sandbox-manager >sandbox-manager.yaml
# MCP コードはまだマージされていないため、sandbox-manager イメージを手動で次のように変更する必要があります:
# baicun-business-registry.cn-beijing.cr.aliyuncs.com/baicun-dev/sandbox:sandbox-manager-v12

# 管理用 Pod が正しく実行されていることを確認
kubectl get pod -l "app.kubernetes.io/name=sandbox-manager" -A
kubectl get pod -l "app.kubernetes.io/name=sandbox-controller-manager" -A
マーケットプレイス バージョン
クラスターリストページで、対象のクラスター名をクリックします。左側のナビゲーションウィンドウで、Add-onsを選択します。
Ingress Controller および Sandbox 関連コンポーネントをインストールします。
インストール
ack-agent-sandbox-controllerデフォルト構成でコンポーネントをインストールします。
インストール
ack-sandbox-managerE2B ドメイン名を準備します。
ドメイン名の準備、DNS 解決の構成、証明書の申請に関する詳細な手順については、「本番環境での使用」をご参照ください。
コンポーネントパラメーターを構成します。
classNameはalb(この例では インストール済みの ALB Ingress Controller を使用)、domainは実際のドメイン名、adminApiKeyはカスタム API キーに設定します。その他の設定はデフォルト値のままにしてください。インストール後、sandbox-system名前空間にsandbox-managerという名前の Ingress が作成されます。ALB Ingress Controller を使用している場合は、ALB インスタンスおよび Ingress の両方に HTTPS:443 リスナー構成を追加する必要があります。
左側のナビゲーションウィンドウで、を選択します。リソースオブジェクト タブで AlbConfig を検索し、検索結果をクリックします。
AlbConfig リソースオブジェクトの一覧で、
albリソースを見つけ、YAML の編集をアクション列でクリックします。spec.listeners.port: 443およびspec.listeners.protocol: HTTPSフィールドを追加し、OK をクリックします。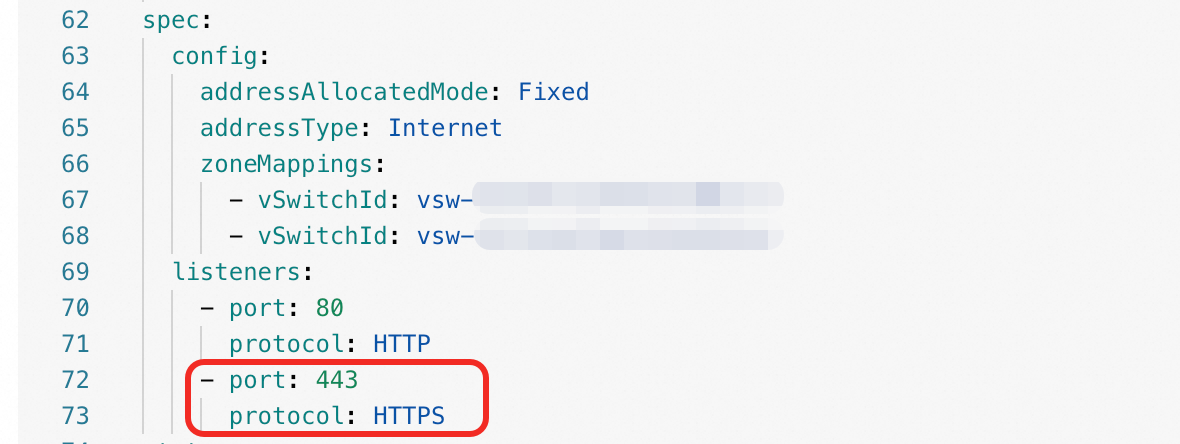
以下の内容を
sandbox.yamlとして保存し、kubectl apply -f sandbox.yamlを実行して Sandbox 定義をデプロイします。SandboxSet はサイズ 3 のウォームプールを作成します。強化学習中、SandboxManager はこのウォームプールから継続的に Sandbox を消費します。--- apiVersion: v1 kind: Service metadata: name: mcp-sandbox spec: selector: app.kubernetes.io/instance: release-name app.kubernetes.io/name: ack-sandbox-manager component: sandbox-manager type: ClusterIP sessionAffinity: None sessionAffinityConfig: clientIP: timeoutSeconds: 10800 ports: - name: vllm protocol: TCP port: 8000 targetPort: 18082 --- apiVersion: agents.kruise.io/v1alpha1 kind: SandboxSet metadata: annotations: # SandboxManager の Envd 初期化機能を有効化。 e2b.agents.kruise.io/should-init-envd: "true" name: code-interpreter namespace: default spec: # ウォームプールのサイズ。リクエストバーストの見積もりよりやや大きく設定することを推奨します。 replicas: 3 template: spec: initContainers: - name: init image: registry-cn-hangzhou.ack.aliyuncs.com/acs/agent-runtime:v0.0.1 imagePullPolicy: IfNotPresent terminationMessagePolicy: File volumeMounts: - name: envd-volume mountPath: /mnt/envd env: - name: ENVD_DIR value: /mnt/envd restartPolicy: Always containers: - name: sandbox image: acs-image-test-01-registry.cn-hangzhou.cr.aliyuncs.com/e2b/code-interpreter:v1.6 imagePullPolicy: IfNotPresent terminationMessagePolicy: File env: - name: ENVD_DIR value: /mnt/envd volumeMounts: - name: envd-volume mountPath: /mnt/envd lifecycle: postStart: exec: command: - bash - /mnt/envd/envd-run.sh startupProbe: failureThreshold: 20 successThreshold: 1 httpGet: path: /health port: 49999 scheme: HTTP initialDelaySeconds: 1 periodSeconds: 2 timeoutSeconds: 1 # 再利用の確率を高めるために、コンテナの終了を迅速に行います。 terminationGracePeriodSeconds: 1 restartPolicy: Always dnsPolicy: ClusterFirst volumes: - name: envd-volume emptyDir: { }
(オプション)ステップ 3:データセットの準備
VeRL では、data.train_files を指定することで、リモートソースからデータセットをダウンロードできます。ただし、データセットは通常大規模で前処理が必要なため、本番環境では前処理ジョブを使用してデータをダウンロード・前処理し、クラウドストレージにアップロードすることを推奨します。
以下の内容を
data.yamlとして保存し、kubectl apply -f data.yamlを実行して Hugging Face からデータをダウンロード・前処理し、OSS バケットにアップロードします。apiVersion: v1 kind: Secret metadata: name: hf-oss-credentials namespace: default type: Opaque stringData: # Hugging Face トークン HF_TOKEN: "hf_xxxxx" # Alibaba Cloud OSS 認証情報(alibabacloud-oss-v2 SDK は環境変数による認証を使用) akId: "xxx" akSecret: "xxx" OSS_REGION: "xxx" OSS_BUCKET: "xxx" --- apiVersion: v1 kind: ConfigMap metadata: name: preprocess-script namespace: default data: preprocess.py: | #!/usr/bin/env python3 """ データセット前処理スクリプトの例 """ import os import json from datasets import load_from_disk def preprocess_dataset(input_dir, output_dir): """データセットを前処理""" print(f"データセットを {input_dir} から読み込み中") dataset = load_from_disk(input_dir) train_dataset = dataset["train"] test_dataset = dataset["test"] instruction_following = "Let's think step by step and output the final answer after `####`." # 各データ項目に一意の ID を表す行を追加 def make_map_fn(split): def process_fn(example, idx): question_raw = example.pop("question") question = question_raw + " " + instruction_following answer_raw = example.pop("answer") solution = extract_solution(answer_raw) data = { "data_source": data_source, "agent_name": "tool_agent", "prompt": [ { "role": "system", "content": ( "You are a math expert. You are given a question and you need to solve it step by step. " "Reasoning step by step before any tool call. " "You should use the `calc_gsm8k_reward` tool after step by step solving the question, " "before generate final answer at least once and refine your answer if necessary. " "Put your final answer in the format of `#### <answer>`." ), }, { "role": "user", "content": question, }, ], "ability": "math", "reward_model": {"style": "rule", "ground_truth": solution}, "extra_info": { "split": split, "index": idx, "answer": answer_raw, "question": question_raw, "need_tools_kwargs": True, "tools_kwargs": { "calc_gsm8k_reward": { "create_kwargs": {"ground_truth": solution}, # "execute_kwargs": {}, # "calc_reward_kwargs": {}, # "release_kwargs": {}, }, }, "interaction_kwargs": { "query": question, "ground_truth": solution, }, }, } return data return process_fn train_dataset = train_dataset.map(function=make_map_fn("train"), with_indices=True, num_proc=8) test_dataset = test_dataset.map(function=make_map_fn("test"), with_indices=True, num_proc=8) # 処理済みデータセットを保存 os.makedirs(output_dir, exist_ok=True) train_dataset.to_parquet(os.path.join(output_dir, "train.parquet")) test_dataset.to_parquet(os.path.join(output_dir, "test.parquet")) print(f"処理済みデータセットを {output_dir} に保存しました") return output_dir if __name__ == "__main__": input_path = os.environ.get("INPUT_PATH", "/data/raw") output_path = os.environ.get("OUTPUT_PATH", "/data/processed") preprocess_dataset(input_path, output_path) --- apiVersion: batch/v1 kind: Job metadata: name: dataset-pipeline namespace: default labels: app: dataset-pipeline spec: backoffLimit: 3 template: metadata: labels: app: dataset-pipeline spec: restartPolicy: OnFailure volumes: # 前処理スクリプト - name: scripts configMap: name: preprocess-script defaultMode: 0755 containers: - name: dataset-pipeline image: python:3.10-slim command: - /bin/bash - -c - | set -e #========================================== # ステップ 1:すべての依存関係をインストール #========================================== echo "=== 依存関係をインストール中 ===" pip install --no-cache-dir datasets huggingface_hub pandas numpy alibabacloud-oss-v2 Pillow #========================================== # ステップ 2:Hugging Face からデータセットをダウンロード #========================================== echo "=== Hugging Face からデータセットをダウンロード中 ===" python3 << 'EOF' import os from datasets import load_dataset from huggingface_hub import login # Hugging Face にログイン(非公開データセットに必要) hf_token = os.environ.get("HF_TOKEN") if hf_token: login(token=hf_token) # データセットをダウンロード dataset_name = os.environ.get("DATASET_NAME", "hiyouga/geometry3k") dataset_config = os.environ.get("DATASET_CONFIG", None) print(f"データセットをダウンロード中: {dataset_name}") dataset = load_dataset(dataset_name, dataset_config) # ローカルに保存 output_path = "/data/raw" dataset.save_to_disk(output_path) print(f"データセットを {output_path} に保存しました") EOF echo "=== ダウンロード完了 ===" #========================================== # ステップ 3:前処理スクリプトを実行 #========================================== echo "=== 前処理スクリプトを実行中 ===" python3 /scripts/preprocess.py echo "=== 前処理完了 ===" #========================================== # ステップ 4:OSS にアップロード(alibabacloud-oss-v2 SDK を使用) #========================================== echo "=== OSS にアップロード中 ===" python3 << 'EOF' import os from pathlib import Path import alibabacloud_oss_v2 as oss # OSS 構成 bucket_name = os.environ["OSS_BUCKET"] region = os.environ["OSS_REGION"] oss_prefix = os.environ.get("OSS_PREFIX", "data/geo3k-processed/") local_path = os.environ.get("OUTPUT_PATH", "/data/processed") # 環境変数認証情報プロバイダーを使用(OSS_ACCESS_KEY_ID および OSS_ACCESS_KEY_SECRET を自動的に読み取り) credentials_provider = oss.credentials.EnvironmentVariableCredentialsProvider() # デフォルト構成を読み込み、認証情報プロバイダーを設定 cfg = oss.config.load_default() cfg.credentials_provider = credentials_provider cfg.region = region # OSS クライアントを作成 client = oss.Client(cfg) def upload_directory(local_dir, oss_prefix): """ディレクトリを再帰的に OSS にアップロード""" local_path = Path(local_dir) uploaded_count = 0 failed_count = 0 for file_path in local_path.rglob("*"): if file_path.is_file(): relative_path = file_path.relative_to(local_path) oss_key = f"{oss_prefix}{relative_path}" try: # ファイル内容を読み取り with open(file_path, 'rb') as f: data = f.read() # OSS にアップロード result = client.put_object(oss.PutObjectRequest( bucket=bucket_name, key=oss_key, body=data, )) print(f"アップロード完了: {file_path} -> {oss_key} (ステータス: {result.status_code})") uploaded_count += 1 except Exception as e: print(f"{file_path} のアップロードに失敗: {e}") failed_count += 1 return uploaded_count, failed_count uploaded, failed = upload_directory(local_path, oss_prefix) print(f"=== アップロード完了: {uploaded} 件のファイルをアップロード、{failed} 件のファイルが失敗 ===") if failed > 0: raise Exception(f"{failed} 件のファイルのアップロードに失敗しました") EOF echo "=== パイプラインが正常に完了しました ===" env: # Hugging Face 構成 - name: HF_TOKEN valueFrom: secretKeyRef: name: hf-oss-credentials key: HF_TOKEN - name: DATASET_NAME value: "hiyouga/geometry3k" - name: HF_HOME value: "/tmp/huggingface" # 前処理構成 - name: INPUT_PATH value: "/data/raw" - name: OUTPUT_PATH value: "/data/processed" # OSS 構成 - name: OSS_ACCESS_KEY_ID valueFrom: secretKeyRef: name: hf-oss-credentials key: akId - name: OSS_ACCESS_KEY_SECRET valueFrom: secretKeyRef: name: hf-oss-credentials key: akSecret - name: OSS_REGION valueFrom: secretKeyRef: name: hf-oss-credentials key: OSS_REGION - name: OSS_BUCKET valueFrom: secretKeyRef: name: hf-oss-credentials key: OSS_BUCKET - name: OSS_PREFIX value: "data/geo3k-processed/" volumeMounts: - name: scripts mountPath: /scripts resources: requests: memory: "2Gi" cpu: "1" limits: memory: "16Gi" cpu: "4"
ステップ 4:ジョブ構成の適用
以下の内容を
pvpvc.yamlとして保存し、kubectl apply -f pvpvc.yamlを実行して、PersistentVolume および PersistentVolumeClaim を使用して OSS 静的 PersistentVolume をマウントします。以下の例では、AccessKey ペアを使用した認証を行っています。RRSA 認証を使用する場合は、「ossfs 2.0 を使用した静的 PersistentVolume の利用」をご参照ください。
apiVersion: v1
kind: PersistentVolume
metadata:
  name: ym-dataset
  labels:
    alicloud-pvname: ym-dataset
spec:
  capacity:
    storage: 20Gi
  accessModes:
    - ReadWriteMany
  persistentVolumeReclaimPolicy: Retain
  csi:
    driver: ossplugin.csi.alibabacloud.com
    volumeHandle: ym-dataset # PV 名と同じである必要があります。
    nodePublishSecretRef:
      name: hf-oss-credentials
      namespace: default
    volumeAttributes:
      bucket: "xxxx" # 実際のバケット名に置き換えてください。
      url: "oss-ap-southeast-1-internal.aliyuncs.com" # 実際の OSS エンドポイントに置き換えてください。
      otherOpts: "-o umask=022 -o max_stat_cache_size=100000 -o allow_other -o dbglevel=debug -o curldbg"
      path: "/"
---
apiVersion: v1
kind: PersistentVolumeClaim
metadata:
  name: ym-dataset
spec:
  accessModes:
    - ReadWriteMany
  resources:
    requests:
      storage: 20Gi
  selector:
    matchLabels:
      alicloud-pvname: ym-dataset

# (オプション)Hugging Face リポジトリパスを指定することで、モデルをオンデマンドでダウンロードできます。
---
apiVersion: v1
kind: PersistentVolume
metadata:
  name: ym-models
  labels:
    alicloud-pvname: ym-models
spec:
  capacity:
    storage: 20Gi
  accessModes:
    - ReadWriteMany
  persistentVolumeReclaimPolicy: Retain
  csi:
    driver: ossplugin.csi.alibabacloud.com
    volumeHandle: ym-models # PV 名と同じである必要があります。
    nodePublishSecretRef:
      name: hf-oss-credentials
      namespace: default
    volumeAttributes:
      bucket: "xxxx" # 実際のバケット名に置き換えてください。
      url: "oss-ap-southeast-1-internal.aliyuncs.com" # 実際の OSS エンドポイントに置き換えてください。
      otherOpts: "-o umask=022 -o max_stat_cache_size=100000 -o allow_other -o dbglevel=debug -o curldbg"
      path: "/"
---
apiVersion: v1
kind: PersistentVolumeClaim
metadata:
  name: ym-models
spec:
  accessModes:
    - ReadWriteMany
  resources:
    requests:
      storage: 20Gi
  selector:
    matchLabels:
      alicloud-pvname: ym-models
以下の内容を
configs.yamlとして保存し、kubectl apply -f configs.yamlを実行して、ジョブ関連の構成を適用します。--- apiVersion: v1 kind: ConfigMap metadata: name: gsm8k-configs namespace: default data: gsm8k_multiturn_grpo.yaml: | hydra: searchpath: - file://verl/trainer/config defaults: - ppo_trainer - _self_ data: max_prompt_length: 1024 max_response_length: 1024 train_batch_size: 256 return_raw_chat: True actor_rollout_ref: hybrid_engine: True rollout: name: vllm multi_turn: enable: True max_assistant_turns: 5 mcp_server.json: | { "mcpServers": { "Tavily Expert": { "url": "xxxxx", # Sandbox MCP Ingress エンドポイントに置き換えてください。 "api_key": "xxxxx" # API キーが必要な場合は、Ray クラスターに NGINX コンテナをプロキシとして追加できます。 } } } gsm8k_mcp_tool_config.yaml: | tools: - class_name: verl.tools.mcp_search_tool.MCPSearchTool config: rate_limit: 120 timeout: 120 type: mcp mcp: mcp_servers_config_path: /var/configs/mcp_server.json tool_selected_list: - run_code_once - class_name: "verl.tools.gsm8k_tool.Gsm8kTool" config: type: native tool_schema: type: "function" function: name: "calc_gsm8k_reward" description: "GSM8K の報酬を計算するツール。(解析された回答が正しい場合は 1.0、解析された回答が間違っているか正しく解析されていない場合は 0.0)" parameters: type: "object" properties: answer: type: "string" description: "GSM8K 数学問題に対するモデルの回答。数字である必要があります。" required: ["answer"]
ステップ 5:ジョブの送信
VeRL では、MCPSearchTool を使用して MCP Server が提供するツールをクエリできます。各ユースケースの開始時に、AgentLoop が MCP Server に接続し、マルチターン対話中にツールを呼び出します。
以下の内容を
rayjob.yamlとして保存し、kubectl apply -f rayjob.yamlを実行して強化学習ジョブを送信します。--- apiVersion: ray.io/v1 kind: RayJob metadata: name: rayjob-example namespace: default spec: shutdownAfterJobFinishes: false # ttlSecondsAfterFinished: 300 runtimeEnvYAML: | working_dir: /home/verl submissionMode: SidecarMode entrypoint: | python3 -m verl.trainer.main_ppo \ --config-path=/var/configs \ --config-name='gsm8k_multiturn_grpo' \ algorithm.adv_estimator=grpo \ data.train_batch_size=16 \ data.max_prompt_length=1024 \ data.max_response_length=1024 \ data.filter_overlong_prompts=True \ data.truncation='error' \ data.return_raw_chat=True \ actor_rollout_ref.model.path=/var/model/Qwen2.5-3B-Instruct \ actor_rollout_ref.actor.optim.lr=1e-6 \ actor_rollout_ref.model.use_remove_padding=True \ actor_rollout_ref.actor.ppo_mini_batch_size=8 \ actor_rollout_ref.actor.ppo_micro_batch_size_per_gpu=1 \ actor_rollout_ref.actor.use_kl_loss=True \ actor_rollout_ref.actor.kl_loss_coef=0.001 \ actor_rollout_ref.actor.kl_loss_type=low_var_kl \ actor_rollout_ref.actor.entropy_coeff=0 \ actor_rollout_ref.model.enable_gradient_checkpointing=True \ actor_rollout_ref.actor.fsdp_config.param_offload=False \ actor_rollout_ref.actor.fsdp_config.optimizer_offload=False \ actor_rollout_ref.rollout.log_prob_micro_batch_size_per_gpu=1 \ actor_rollout_ref.rollout.tensor_model_parallel_size=2 \ actor_rollout_ref.rollout.name=vllm \ actor_rollout_ref.rollout.mode=async \ actor_rollout_ref.rollout.gpu_memory_utilization=0.5 \ actor_rollout_ref.rollout.n=16 \ actor_rollout_ref.ref.log_prob_micro_batch_size_per_gpu=1 \ actor_rollout_ref.ref.fsdp_config.param_offload=True \ actor_rollout_ref.rollout.trace.backend=mlflow \ actor_rollout_ref.rollout.trace.token2text=True \ algorithm.use_kl_in_reward=False \ trainer.critic_warmup=0 \ trainer.logger='["console","mlflow"]' \ trainer.project_name='gsm8k_tool-agent' \ trainer.experiment_name='qwen2.5-3b_function_rm-gsm8k-vllm-tool-agent-verify-n16' \ trainer.n_gpus_per_node=8 \ trainer.nnodes=1 \ trainer.save_freq=1 \ trainer.test_freq=20 \ trainer.total_training_steps=1 \ data.train_files=/var/model-dataset/processed-gsm8k/train20.parquet \ data.val_files=/var/model-dataset/processed-gsm8k/test100.parquet \ actor_rollout_ref.rollout.multi_turn.tool_config_path="/var/configs/gsm8k_mcp_tool_config.yaml" \ actor_rollout_ref.actor.checkpoint.save_contents='["hf_model", "model"]' \ trainer.total_epochs=1 rayClusterSpec: headGroupSpec: rayStartParams: dashboard-host: 0.0.0.0 serviceType: ClusterIP template: metadata: annotations: labels: spec: affinity: {} tolerations: - key: node-role.alibabacloud.com/lingjun containers: - env: - name: VERL_ROOT value: /home/verl image: registry-ap-southeast-1.ack.aliyuncs.com/dev/verl:vllm012.latest.43dc9a44 imagePullPolicy: IfNotPresent name: ray-head resources: limits: cpu: "100" memory: 500Gi nvidia.com/gpu: "8" securityContext: runAsUser: 0 volumeMounts: - mountPath: /var/configs name: configs - mountPath: /var/model name: model - mountPath: /var/model-dataset name: model-dataset imagePullSecrets: - name: regcred-hangzhou - name: regcred-ap-southeast volumes: - name: configs configMap: name: gsm8k-configs - name: model persistentVolumeClaim: claimName: ym-models - name: model-dataset persistentVolumeClaim: claimName: ym-dataset