Topik ini menjelaskan cara melakukan migrasi data penuh atau inkremental dari kluster Elasticsearch yang dikelola sendiri ke Alibaba Cloud Elasticsearch dengan men-deploy Logstash pada instance ECS dan mengonfigurasi pipeline migrasi.
Pertimbangan
-
Instance ECS yang menjalankan Logstash harus berada dalam VPC yang sama dengan kluster Alibaba Cloud Elasticsearch dan memiliki akses jaringan ke kedua kluster sumber dan tujuan.
-
Jika aplikasi Anda terus-menerus menulis atau memperbarui data, lakukan migrasi penuh terlebih dahulu, kemudian lanjutkan dengan migrasi inkremental berdasarkan timestamp atau bidang identifikasi lainnya. Jika tidak, data lama dapat menimpa data baru di kluster tujuan. Jika kluster tujuan sudah berisi semua data terkini, cukup lakukan migrasi inkremental.
Prosedur
-
Langkah 1: Siapkan lingkungan dan instans
Buat kluster Alibaba Cloud Elasticsearch, deploy Elasticsearch dan Logstash yang dikelola sendiri pada instance ECS, serta siapkan data migrasi.
-
Langkah 2 (Opsional): Migrasi metadata indeks (settings dan mappings)
Jalankan skrip Python pada instance ECS untuk melakukan migrasi metadata indeks.
-
Langkah 3: Lakukan migrasi data penuh
Gunakan Logstash untuk melakukan migrasi seluruh data dari kluster yang dikelola sendiri ke Alibaba Cloud Elasticsearch.
Langkah 1: Siapkan lingkungan dan instans
-
Buat instance Alibaba Cloud Elasticsearch.
Buat instance Alibaba Cloud Elasticsearch. Lingkungan pengujian menggunakan konfigurasi berikut.
Parameter
Deskripsi
Region
China (Hangzhou).
Edition
Standard Edition 7.10.0.
Spesifikasi instans
Tiga zona, tiga node data. Setiap node memiliki 4 vCPU, memori 16 GB, dan SSD ditingkatkan (ESSD) 100 GB.
-
Buat instance ECS untuk instans Elasticsearch, Kibana, dan Logstash yang dikelola sendiri.
Buat instans menggunakan wizard. Lingkungan pengujian menggunakan konfigurasi berikut.
Parameter
Deskripsi
Region
China (Hangzhou).
Tipe instans
4 vCPU, memori 16 GiB.
Image
Image publik, CentOS 7.9 64-bit.
Storage
Disk sistem, SSD ditingkatkan (ESSD) 100 GiB.
Jaringan
Pilih virtual private cloud (VPC) yang sama dengan kluster Alibaba Cloud Elasticsearch Anda. Pilih Assign Public IPv4 Addresses, atur metode penagihan menjadi pay-by-traffic, dan atur bandwidth puncak menjadi 100 Mbit/s.
Security group
Tambahkan aturan masuk untuk mengizinkan akses pada port 5601 (port default Kibana). Atur objek otorisasi ke alamat IP klien Anda.
Penting-
Jika klien Anda berada di jaringan rumah atau perusahaan, gunakan IP egress publik jaringan tersebut, bukan IP privat komputer Anda. Temukan IP publik Anda di https://www.whatismyip.com.
-
Mengatur 0.0.0.0/0 sebagai objek otorisasi mengizinkan semua alamat IPv4 tetapi membuka instance ECS Anda ke internet publik. Hindari hal ini di lingkungan produksi.
-
-
Deploy kluster Elasticsearch yang dikelola sendiri.
Topik ini menggunakan kluster Elasticsearch 7.6.2 yang dikelola sendiri dengan satu node data.
-
Koneksikan ke instance ECS.
-
Sebagai pengguna root, buat pengguna baru bernama
elastic.useradd elastic -
Atur kata sandi untuk pengguna
elastic.passwd elasticIkuti prompt untuk memasukkan dan mengonfirmasi kata sandi baru.
-
Beralih ke pengguna
elastic.su -l elastic -
Unduh dan ekstrak paket instalasi Elasticsearch.
wget https://artifacts.elastic.co/downloads/elasticsearch/elasticsearch-7.6.2-linux-x86_64.tar.gz tar -zvxf elasticsearch-7.6.2-linux-x86_64.tar.gz -
Jalankan Elasticsearch.
Buka direktori instalasi Elasticsearch dan jalankan layanan di latar belakang.
cd elasticsearch-7.6.2 ./bin/elasticsearch -d -
Verifikasi bahwa layanan Elasticsearch sedang berjalan.
cd ~
curl localhost:9200
Tanggapan sukses mencakup nomor versi Elasticsearch dan tagline
"You Know, for Search".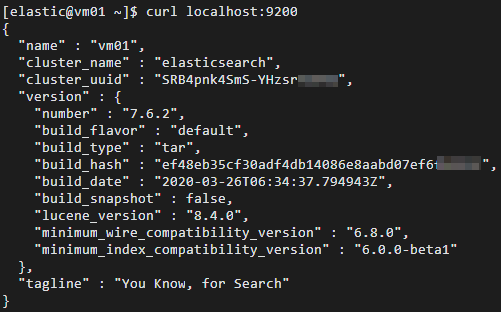
-
-
Deploy instans Kibana yang dikelola sendiri dan siapkan data sampel.
Topik ini menggunakan instans Kibana 7.6.2 yang dikelola sendiri.
-
Koneksikan ke instance ECS.
Koneksikan ke instans Linux menggunakan Workbench.
CatatanLangkah-langkah dalam topik ini mengasumsikan Anda menjalankan perintah sebagai pengguna non-root kecuali dinyatakan lain.
-
Unduh dan ekstrak paket instalasi Kibana.
wget https://artifacts.elastic.co/downloads/kibana/kibana-7.6.2-linux-x86_64.tar.gz tar -zvxf kibana-7.6.2-linux-x86_64.tar.gz -
Edit file konfigurasi Kibana config/kibana.yml dan tambahkan
server.host: "0.0.0.0"untuk mengaktifkan akses remote.Buka direktori instalasi Kibana dan edit kibana.yml.
cd kibana-7.6.2-linux-x86_64
vi config/kibana.yml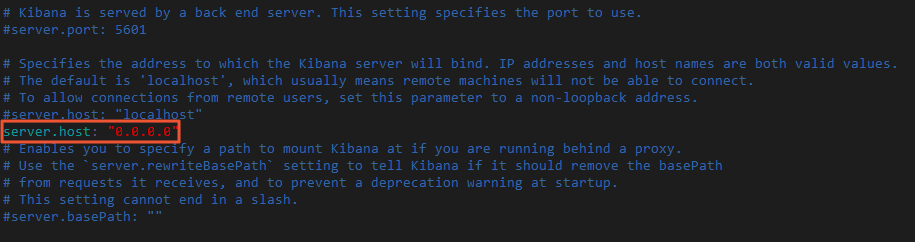
-
Jalankan Kibana sebagai pengguna non-root.
sudo nohup ./bin/kibana & -
Masuk ke konsol Kibana dan tambahkan data sampel.
-
Akses konsol Kibana menggunakan alamat IP publik instance ECS.
URL berformat: http://<your_ecs_instance_public_ip>:5601/app/kibana#/home.
-
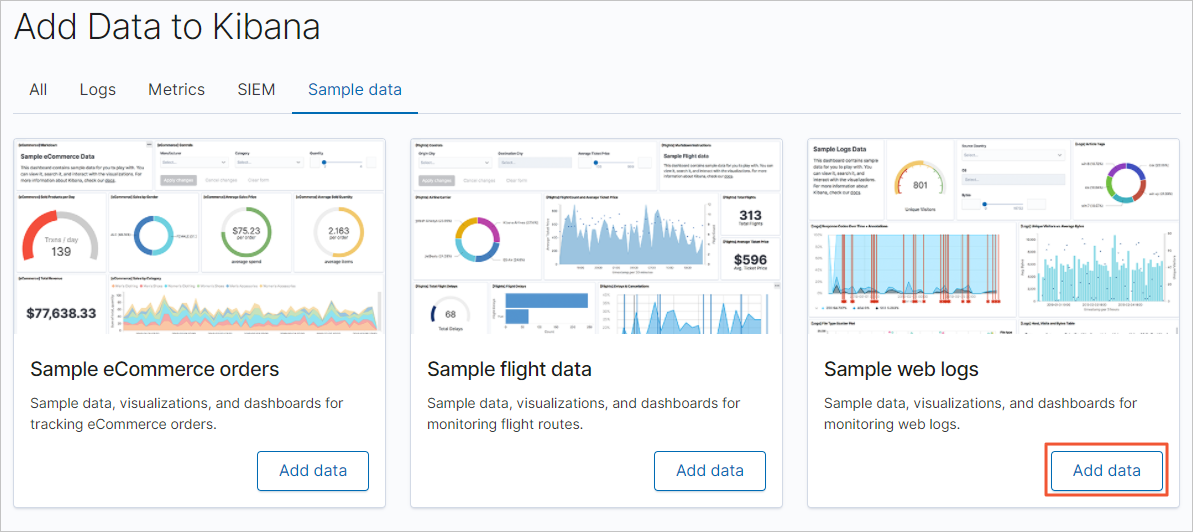
Pada halaman utama Kibana, klik Try our sample data.
-
Pada halaman Sample data, temukan kartu log web sampel dan klik Add data.
-
-
-
Deploy instans Logstash yang dikelola sendiri.
Topik ini menggunakan instans Logstash 7.10.0 yang dikelola sendiri dengan satu node.
-
Koneksikan ke instance ECS.
Koneksikan ke instans Linux menggunakan Workbench.
CatatanLangkah-langkah dalam topik ini mengasumsikan Anda menjalankan perintah sebagai pengguna non-root.
-
Kembali ke direktori home, lalu unduh dan ekstrak paket instalasi Logstash.
cd ~ wget https://artifacts.elastic.co/downloads/logstash/logstash-7.10.0-linux-x86_64.tar.gz tar -zvxf logstash-7.10.0-linux-x86_64.tar.gz -
Sesuaikan ukuran heap Logstash.
Ukuran heap default adalah 1 GB. Sesuaikan berdasarkan spesifikasi instance ECS Anda untuk meningkatkan kinerja migrasi.
Buka direktori instalasi Logstash dan edit
config/jvm.optionsuntuk mengatur ukuran heap awal dan maksimum menjadi 8 GB (-Xms8gdan-Xmx8g).cd logstash-7.10.0 sudo vi config/jvm.options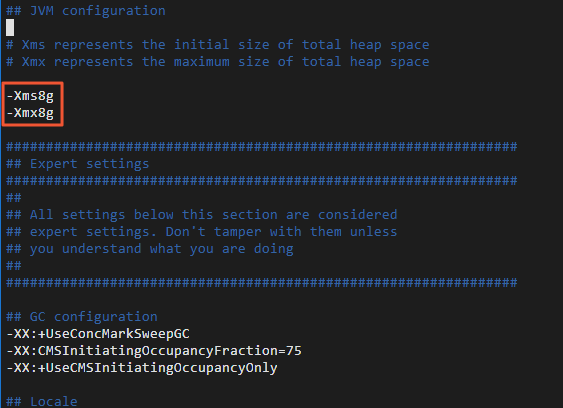
-
Ubah ukuran batch Logstash.
Menulis data dalam batch berukuran 5 MB hingga 15 MB mempercepat migrasi data.
Edit config/pipelines.yml dan ubah
pipeline.batch.sizedari 125 menjadi 5000.vi config/pipelines.yml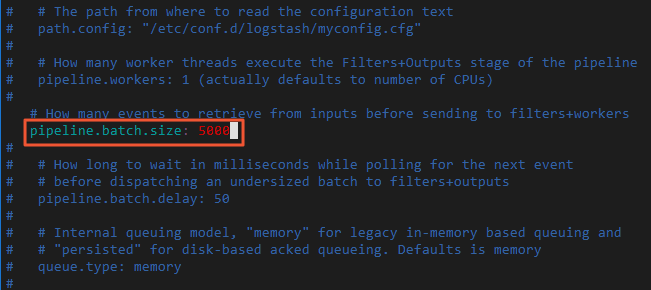
-
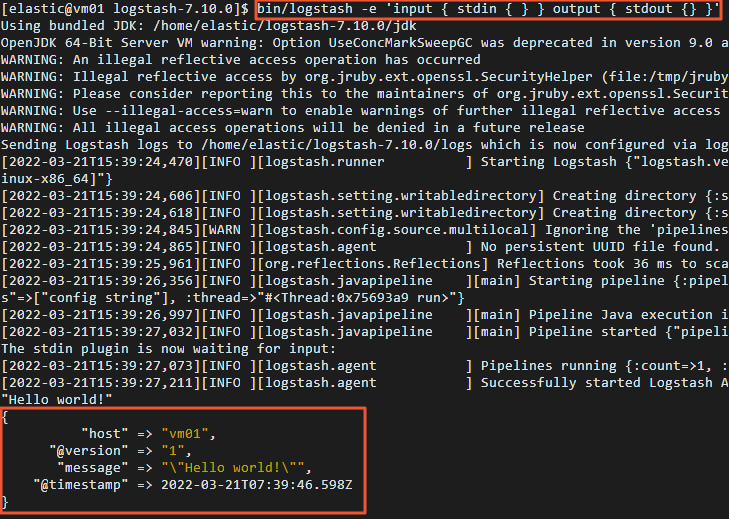
Verifikasi bahwa Logstash berfungsi dengan benar.
-
Jalankan pipeline sederhana yang menerima input standar dan mengirimkannya ke output standar.
bin/logstash -e 'input { stdin { } } output { stdout {} }' -
Setelah pipeline dimulai, ketik "Hello world!" dan tekan Enter.
Jika Logstash berfungsi, ia akan mencetak pesan log terstruktur yang berisi "Hello world!" ke konsol.
-
-
Langkah 2 (Opsional): Migrasi metadata indeks
Logstash secara otomatis membuat indeks jika indeks tersebut tidak ada di kluster tujuan, tetapi settings dan mappings yang dibuat otomatis mungkin berbeda dari sumber. Untuk memastikan struktur indeks konsisten, buat indeks tujuan secara manual sebelum migrasi.
Gunakan skrip Python berikut untuk membuat indeks tujuan.
-
Koneksikan ke instance ECS.
Koneksikan ke instans Linux menggunakan Workbench.
CatatanLangkah-langkah dalam topik ini mengasumsikan Anda menjalankan perintah sebagai pengguna non-root.
-
Buat dan buka file skrip Python. Topik ini menggunakan
indiceCreate.pysebagai nama file.sudo vi indiceCreate.py -
Salin kode berikut ke dalam file skrip Python dan ganti nilai placeholder untuk titik akhir kluster, username, dan password dengan kredensial aktual Anda.
#!/usr/bin/python # -*- coding: UTF-8 -*- # Filename: indiceCreate.py import sys import base64 import time import httplib import json ## Host of the source cluster. oldClusterHost = "localhost:9200" ## Username for the source cluster. Can be left empty. oldClusterUserName = "elastic" ## Password for the source cluster. Can be left empty. oldClusterPassword = "xxxxxx" ## Host of the destination cluster. You can find this on the Basic Information page of your Alibaba Cloud Elasticsearch instance. newClusterHost = "es-cn-zvp2m4bko0009****.elasticsearch.aliyuncs.com:9200" ## Username for the destination cluster. newClusterUser = "elastic" ## Password for the destination cluster. newClusterPassword = "xxxxxx" DEFAULT_REPLICAS = 0 def httpRequest(method, host, endpoint, params="", username="", password=""): conn = httplib.HTTPConnection(host) headers = {} if (username != "") : 'Hello {name}, your age is {age} !'.format(name = 'Tom', age = '20') base64string = base64.encodestring('{username}:{password}'.format(username = username, password = password)).replace('\n', '') headers["Authorization"] = "Basic %s" % base64string; if "GET" == method: headers["Content-Type"] = "application/x-www-form-urlencoded" conn.request(method=method, url=endpoint, headers=headers) else : headers["Content-Type"] = "application/json" conn.request(method=method, url=endpoint, body=params, headers=headers) response = conn.getresponse() res = response.read() return res def httpGet(host, endpoint, username="", password=""): return httpRequest("GET", host, endpoint, "", username, password) def httpPost(host, endpoint, params, username="", password=""): return httpRequest("POST", host, endpoint, params, username, password) def httpPut(host, endpoint, params, username="", password=""): return httpRequest("PUT", host, endpoint, params, username, password) def getIndices(host, username="", password=""): endpoint = "/_cat/indices" indicesResult = httpGet(oldClusterHost, endpoint, oldClusterUserName, oldClusterPassword) indicesList = indicesResult.split("\n") indexList = [] for indices in indicesList: if (indices.find("open") > 0): indexList.append(indices.split()[2]) return indexList def getSettings(index, host, username="", password=""): endpoint = "/" + index + "/_settings" indexSettings = httpGet(host, endpoint, username, password) print (index + " Original settings:\n" + indexSettings) settingsDict = json.loads(indexSettings) ## The number of shards defaults to matching the source index. number_of_shards = settingsDict[index]["settings"]["index"]["number_of_shards"] ## The default number of replicas is 0. number_of_replicas = DEFAULT_REPLICAS newSetting = "\"settings\": {\"number_of_shards\": %s, \"number_of_replicas\": %s}" % (number_of_shards, number_of_replicas) return newSetting def getMapping(index, host, username="", password=""): endpoint = "/" + index + "/_mapping" indexMapping = httpGet(host, endpoint, username, password) print (index + " Original mapping:\n" + indexMapping) mappingDict = json.loads(indexMapping) mappings = json.dumps(mappingDict[index]["mappings"]) newMapping = "\"mappings\" : " + mappings return newMapping def createIndexStatement(oldIndexName): settingStr = getSettings(oldIndexName, oldClusterHost, oldClusterUserName, oldClusterPassword) mappingStr = getMapping(oldIndexName, oldClusterHost, oldClusterUserName, oldClusterPassword) createstatement = "{\n" + str(settingStr) + ",\n" + str(mappingStr) + "\n}" return createstatement def createIndex(oldIndexName, newIndexName=""): if (newIndexName == "") : newIndexName = oldIndexName createstatement = createIndexStatement(oldIndexName) print ("Settings and mapping for the new index " + newIndexName + ":\n" + createstatement) endpoint = "/" + newIndexName createResult = httpPut(newClusterHost, endpoint, createstatement, newClusterUser, newClusterPassword) print ("Result of creating new index " + newIndexName + ": " + createResult) ## main indexList = getIndices(oldClusterHost, oldClusterUserName, oldClusterPassword) systemIndex = [] for index in indexList: if (index.startswith(".")): systemIndex.append(index) else : createIndex(index, index) if (len(systemIndex) > 0) : for index in systemIndex: print (index + " might be a system index and will not be recreated. If required, handle it separately.") -
Jalankan skrip Python untuk membuat indeks tujuan.
sudo /usr/bin/python indiceCreate.py -
Masuk ke konsol Kibana kluster tujuan dan verifikasi bahwa indeks telah dibuat.
GET /_cat/indices?v
Langkah 3: Migrasi data penuh
-
Koneksikan ke instance ECS.
-
Di direktori config, buat dan buka file konfigurasi Logstash.
cd logstash-7.10.0/config vi es2es_all.conf -
Tambahkan konfigurasi berikut ke file tersebut.
Catatan-
Parameter konfigurasi Logstash berubah pada versi 8.5. Topik ini menyediakan contoh konfigurasi untuk versi 7.10.0 dan versi 8.5.1.
-
Untuk memastikan akurasi data, buat file konfigurasi pipeline Logstash terpisah dan migrasi data secara batch.
Versi 7.10.0
input{
    elasticsearch{
        # Endpoints of the source Elasticsearch cluster.
        hosts =>  ["http://localhost:9200"]
        # Username and password for the source cluster.
        user => "xxxxxx"
        password => "xxxxxx"
        # List of indices to migrate. Separate multiple indices with commas (,).
        index => "kibana_sample_data_*"
        # The following three items can be left as default. They relate to the thread count, migration data size, and Logstash JVM configuration.
        docinfo=>true
        slices => 5
        size => 5000
    }
}

filter {
  # Remove metadata fields added by Logstash.
  mutate {
    remove_field => ["@timestamp", "@version"]
  }
}

output{
    elasticsearch{
        # Endpoints of the destination cluster. You can find this on the Basic Information page of your Alibaba Cloud Elasticsearch instance.
        hosts => ["http://es-cn-zvp2m4bko0009****.elasticsearch.aliyuncs.com:9200"]
        # Username and password for the destination cluster.
        user => "elastic"
        password => "xxxxxx"
        # Name of the destination index. This configuration keeps the index name the same as the source.
        index => "%{[@metadata][_index]}"
        # Type of the destination index. This configuration keeps the index type the same as the source.
        document_type => "%{[@metadata][_type]}"
        # The ID for the data in the destination cluster. To improve performance, you can remove this line if you do not need to preserve the original document IDs.
        document_id => "%{[@metadata][_id]}"
        ilm_enabled => false
        manage_template => false
    }
}
Versi 8.5.1
input{
    elasticsearch{
        # Endpoints of the source Elasticsearch cluster.
        hosts =>  ["http://es-cn-uqm3811160002***.elasticsearch.aliyuncs.com:9200"]
        # Username and password for the source cluster.
        user => "elastic"
        password => ""
        # List of indices to migrate. Separate multiple indices with commas (,).
        index => "test_ecommerce"
        # The following items can be left as default. They relate to the thread count, migration data size, and Logstash JVM configuration.
        docinfo => true
        size => 10000
        docinfo_target => "[@metadata]"
    }
}

filter {
  # Remove metadata fields added by Logstash.
  mutate {
    remove_field => ["@timestamp","@version"]
  }
}

output{
    elasticsearch{
        # Endpoints of the destination cluster. You can find this on the Basic Information page of your Alibaba Cloud Elasticsearch instance.
        hosts => ["http://es-cn-nwy38aixp0001****.elasticsearch.aliyuncs.com:9200"]
        # Username and password for the destination cluster.
        user => "elastic"
        password => ""
        # Name of the destination index. This configuration keeps the index name the same as the source.
        index => "%{[@metadata][_index]}"
        # The ID for the data in the destination cluster. To improve performance, you can remove this line if you do not need to preserve the original document IDs.
        document_id => "%{[@metadata][_id]}"
        ilm_enabled => false
        manage_template => false
    }
}
Plugin input Elasticsearch berhenti setelah membaca semua data. Di beberapa lingkungan, Logstash mungkin restart secara otomatis, menyebabkan penulisan duplikat. Gunakan parameter
scheduledengan ekspresi cron untuk menjalankan tugas pada waktu tertentu dan mencegah hal ini (Scheduling).Contohnya, untuk menjalankan tugas pada pukul 13.20 tanggal 5 Maret:
schedule => "20 13 5 3 *" -
-
Buka direktori Logstash.
cd ~/logstash-7.10.0 -
Mulai tugas migrasi data penuh.
nohup bin/logstash -f config/es2es_all.conf >/dev/null 2>&1 &
Langkah 4: Migrasi data inkremental
-
Koneksikan ke instance ECS. Di direktori config, buat dan buka file konfigurasi Logstash baru untuk migrasi inkremental.
cd config vi es2es_kibana_sample_data_logs.confCatatanLangkah-langkah dalam topik ini mengasumsikan Anda menjalankan perintah sebagai pengguna non-root.
-
Tambahkan konfigurasi berikut ke file tersebut.
Berikut adalah contoh konfigurasi untuk versi 7.10.0.
Catatan-
Untuk Logstash 8.5 dan versi setelahnya, Anda harus menghapus baris
document_type => "%{[@metadata][_type]}"karena tipe dokumen sudah tidak digunakan lagi. -
Setelah mengonfigurasi file, menjalankan tugas Logstash terjadwal akan memicu migrasi inkremental.
input{ elasticsearch{ # Endpoints of the source Elasticsearch cluster. hosts => ["http://localhost:9200"] # Username and password for the source cluster. user => "xxxxxx" password => "xxxxxx" # List of indices to migrate. Separate multiple indices with commas (,). index => "kibana_sample_data_logs" # Query incremental data within a time range. The following configuration queries data from the last five minutes. query => '{"query":{"range":{"@timestamp":{"gte":"now-5m","lte":"now/m"}}}}' # Scheduled task. The following configuration runs the task every minute. schedule => "* * * * *" scroll => "5m" docinfo=>true size => 5000 } } filter { # Remove metadata fields added by Logstash. mutate { remove_field => ["@timestamp", "@version"] } } output{ elasticsearch{ # Endpoints of the destination cluster. You can find this on the Basic Information page of your Alibaba Cloud Elasticsearch instance. hosts => ["http://es-cn-zvp2m4bko0009****.elasticsearch.aliyuncs.com:9200"] # Username and password for the destination cluster. user => "elastic" password => "xxxxxx" # Name of the destination index. This configuration keeps the index name the same as the source. index => "%{[@metadata][_index]}" # Type of the destination index. This configuration keeps the index type the same as the source. document_type => "%{[@metadata][_type]}" # The ID for the data in the destination cluster. To improve performance, you can remove this line if you do not need to preserve the original document IDs. document_id => "%{[@metadata][_id]}" ilm_enabled => false manage_template => false } }Penting-
Logstash menggunakan timestamp UTC. Jika data sumber Anda menggunakan zona waktu berbeda, sesuaikan rentang kueri tersebut. Nilai
now-5mpada bidang@timestampdidasarkan pada jam UTC server. -
Indeks sumber Anda harus berisi bidang waktu untuk sinkronisasi inkremental. Jika tidak, gunakan ingest pipeline dengan bidang metadata
_ingest.timestampuntuk menambahkan@timestampke dokumen selama pengindeksan.
-
-
Buka direktori Logstash.
cd ~/logstash-7.10.0 -
Jalankan tugas migrasi data inkremental.
sudo nohup bin/logstash -f config/es2es_kibana_sample_data_logs.conf >/dev/null 2>&1 & -
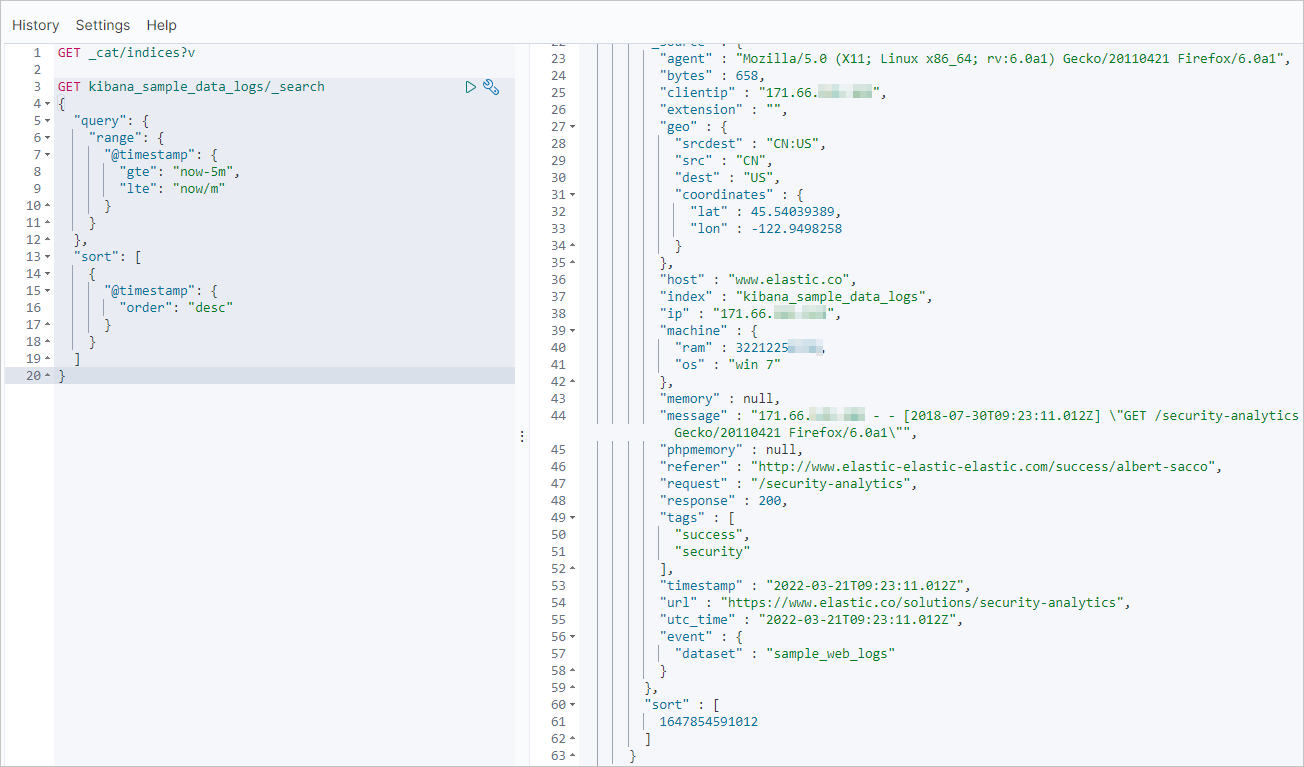
Di konsol Kibana kluster Elasticsearch tujuan, kueri catatan terbaru untuk memverifikasi bahwa data inkremental sedang disinkronkan.
Kueri berikut menemukan catatan dalam indeks
kibana_sample_data_logsdari lima menit terakhir.GET kibana_sample_data_logs/_search { "query": { "range": { "@timestamp": { "gte": "now-5m", "lte": "now/m" } } }, "sort": [ { "@timestamp": { "order": "desc" } } ] }
Langkah 5: Verifikasi hasil migrasi
-
Verifikasi migrasi data penuh.
-
Periksa informasi jumlah indeks dan dokumen di kluster sumber yang dikelola sendiri.
GET _cat/indices?vHasil berikut adalah contoh.

-
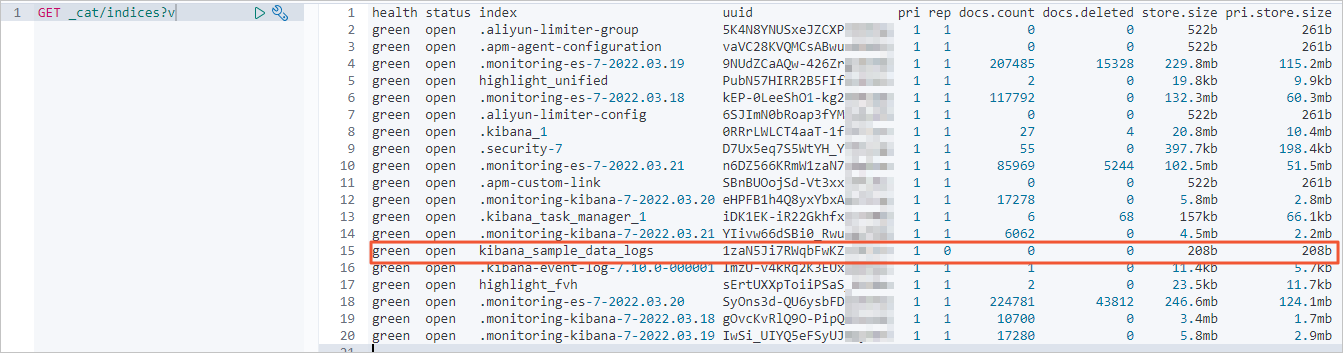
Periksa jumlah indeks dan dokumen di kluster tujuan Alibaba Cloud sebelum migrasi.
-
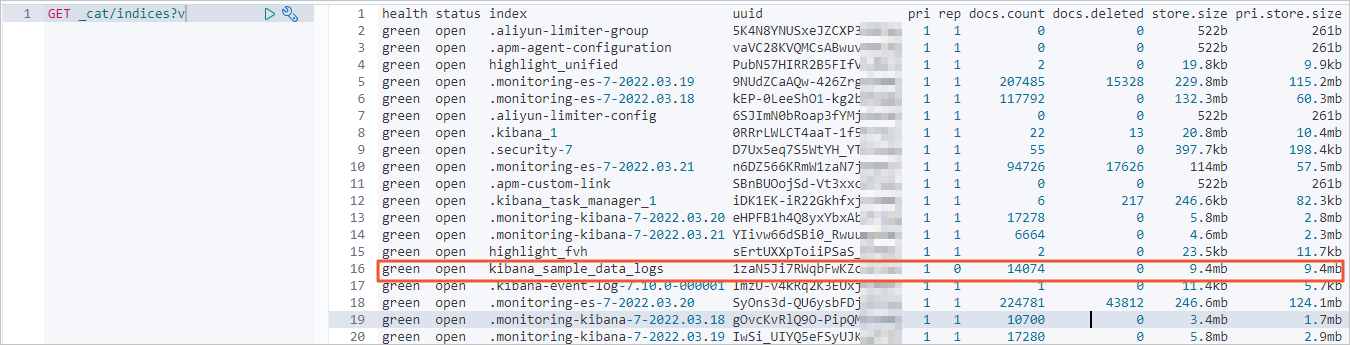
Setelah migrasi data penuh, periksa kembali informasi jumlah indeks dan dokumen di kluster tujuan Alibaba Cloud.
Jumlah dokumen harus sesuai dengan jumlah di kluster sumber.
-
-
Verifikasi migrasi data inkremental.
Periksa catatan terbaru di kluster sumber yang dikelola sendiri.
GET kibana_sample_data_logs/_search { "query": { "range": { "@timestamp": { "gte": "now-5m", "lte": "now/m" } } }, "sort": [ { "@timestamp": { "order": "desc" } } ] }Hasil berikut adalah contoh.
Jalankan kueri yang sama di konsol Kibana kluster tujuan. Hasil yang sesuai mengonfirmasi sinkronisasi inkremental berhasil.