This topic describes how to use the Iceberg REST Catalog protocol to connect a Spark session on EMR on ECS to a Data Lake Formation (DLF) Catalog, and then read and write Iceberg tables.
Prerequisites
Before you begin, make sure you have:
-
An EMR cluster running EMR V5.12.0 or later, with the Spark3 component selected and Spark3 configured to use JDK 11
-
The EMR cluster and DLF in the same region, with the EMR cluster VPC added to the DLF whitelist
-
(For RAM users) The required permissions granted before performing data operations. See Data authorization management
Download dependency packages
The Spark session requires four JAR files: two standard Apache Iceberg packages and two Alibaba Cloud-specific dependencies for DLF REST authentication and file I/O.
Download all four files before proceeding:
| JAR file | Description |
|---|---|
| iceberg-spark-runtime-3.5_2.12-1.10.1.jar | Apache Iceberg runtime for Spark 3.5 |
| iceberg-aws-bundle-1.10.1.jar | Apache Iceberg AWS integration bundle |
| bennett-iceberg-plugin-2.8.0.jar | DLF plugin for Iceberg REST authentication |
| guava-31.1-jre.jar | Google Guava library required by the DLF plugin |
bennett-iceberg-pluginandguavamust be downloaded from the links above.
After downloading, copy all four JAR files to the $SPARK_HOME/jars directory on your EMR cluster.
Grant DLF permissions to the role
Before connecting Spark to DLF, grant the AliyunECSInstanceForEMRRole role two sets of permissions: one in the RAM console (to allow the role to call DLF APIs), and one in the DLF console (to allow data operations on specific catalogs).
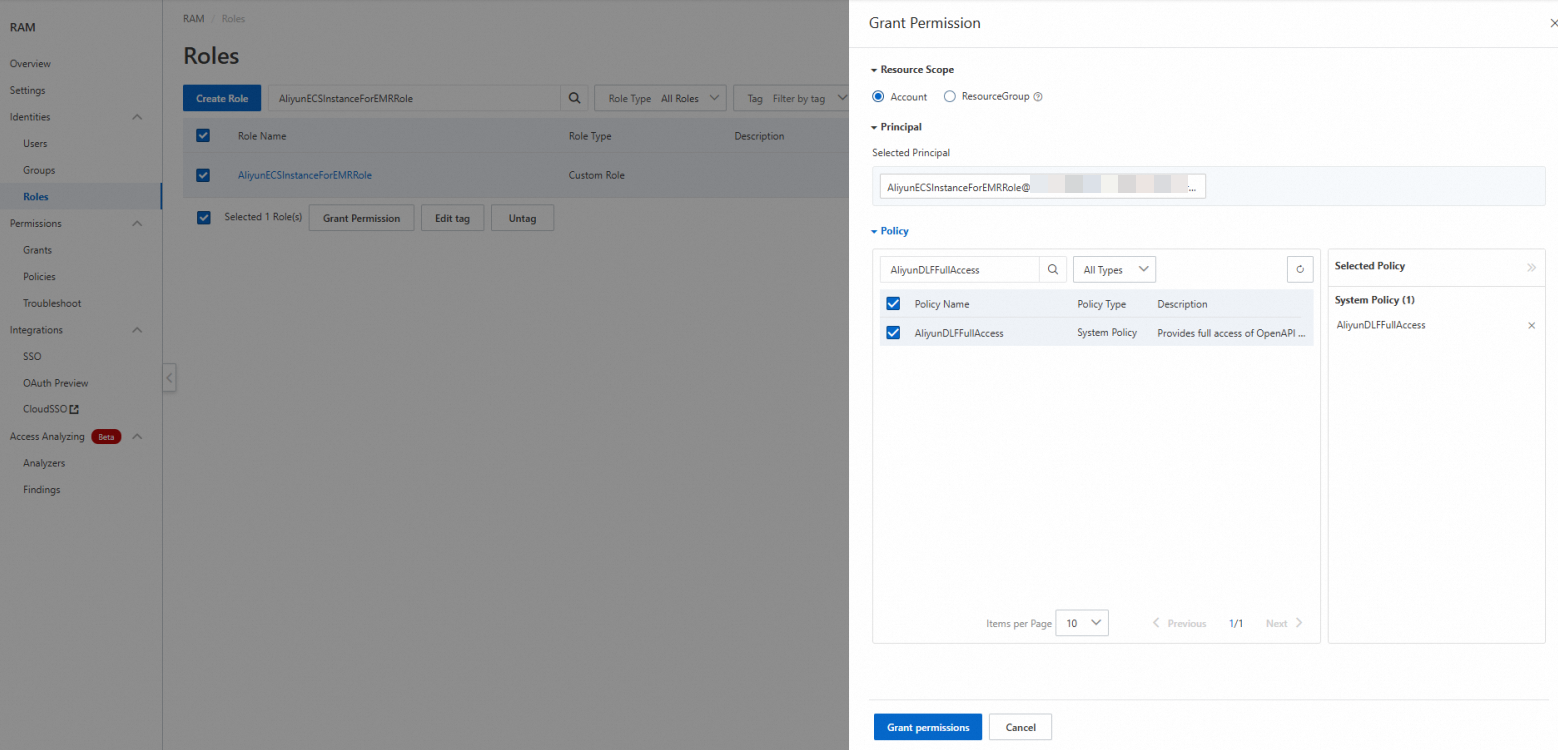
Step 1: Grant the RAM policy
Skip this step after EMR product integration is complete.
-
Log on to the RAM console as an Alibaba Cloud account or a RAM administrator.
-
Go to Identity Management > Roles, then find the AliyunECSInstanceForEMRRole role.
-
In the Actions column, click Add Permissions.
-
In the Access Policy section, search for and select AliyunDLFFullAccess, then click Confirm Add Permissions.
Step 2: Grant catalog permissions in DLF
-
Log on to the DLF console.
-
On the Catalogs page, click the catalog name to view its details.
-
Click the Permissions tab, then click Grant.
-
On the Grant page, configure the following parameters, then click OK:
NoteIf AliyunECSInstanceForEMRRole is not in the drop-down list, go to the user management page and click Sync.
Parameter Value User/Role RAM User/RAM Role Select Authorization Object AliyunECSInstanceForEMRRole Preset Permission Type Data Editor
Connect to a catalog
Run the following spark-sql command to start a Spark session connected to your DLF Catalog. Replace ${regionID} and ${catalogName} with your actual values.
spark-sql \
  # Enable Iceberg Spark extensions (required for DML operations like UPDATE and DELETE)
  --conf spark.sql.extensions=org.apache.iceberg.spark.extensions.IcebergSparkSessionExtensions \
  # Register the DLF catalog under the name "iceberg_catalog"
  --conf spark.sql.catalog.iceberg_catalog=org.apache.iceberg.spark.SparkCatalog \
  --conf spark.sql.catalog.iceberg_catalog.catalog-impl=org.apache.iceberg.rest.RESTCatalog \
  # DLF Iceberg REST endpoint (VPC endpoint keeps traffic within Alibaba Cloud)
  --conf spark.sql.catalog.iceberg_catalog.uri=http://${regionID}-vpc.dlf.aliyuncs.com/iceberg \
  # The catalog name in DLF maps to the Iceberg "warehouse" parameter
  --conf spark.sql.catalog.iceberg_catalog.warehouse=${catalogName} \
  # DLF-specific file I/O implementation for DLF-managed storage access
  --conf spark.sql.catalog.iceberg_catalog.io-impl=org.apache.iceberg.rest.DlfFileIO \
  # Authentication: SigV4 signing with ECS instance credentials
  --conf spark.sql.catalog.iceberg_catalog.rest.auth.type=sigv4 \
  --conf spark.sql.catalog.iceberg_catalog.rest.auth.sigv4.delegate-auth-type=none \
  --conf spark.sql.catalog.iceberg_catalog.rest.signing-region=${regionID} \
  --conf spark.sql.catalog.iceberg_catalog.client.credentials-provider=org.apache.iceberg.rest.credentials.DlfEcsTokenCredentialsProvider \
  --conf spark.sql.catalog.iceberg_catalog.rest.signing-name=DlfNext \
  --master local
Parameters to replace:
| Parameter | Description | Example |
|---|---|---|
${regionID} |
The region where your EMR cluster and DLF are located | cn-hangzhou |
${catalogName} |
The name of the catalog created in DLF | my_catalog |
Read and write data
Iceberg tables do not have an automatic storage reclamation mechanism. To avoid a sharp increase in storage costs, see Spark Procedures to periodically clean up expired snapshots and orphan files.
If you do not specify a database, tables are created in the default database of the catalog. The examples below create a separate database to keep data organized.
-- Switch to the Iceberg catalog registered in the Spark session
USE iceberg_catalog;

-- Create a database
CREATE DATABASE db;

-- Create a non-partitioned table
CREATE TABLE iceberg_catalog.db.tbl (
    id BIGINT NOT NULL COMMENT 'unique id',
    data STRING
)
USING iceberg;

-- Insert rows
INSERT INTO iceberg_catalog.db.tbl VALUES
(1, 'Alice'),
(2, 'Bob'),
(3, 'Charlie');

-- Query all rows
SELECT * FROM iceberg_catalog.db.tbl;

-- Query with a filter
SELECT * FROM iceberg_catalog.db.tbl WHERE id = 2;

-- Update a row
UPDATE iceberg_catalog.db.tbl SET data = 'David' WHERE id = 3;

-- Verify the update
SELECT * FROM iceberg_catalog.db.tbl WHERE id = 3;

-- Delete a row
DELETE FROM iceberg_catalog.db.tbl WHERE id = 1;

-- Verify the deletion
SELECT * FROM iceberg_catalog.db.tbl;

-- Create a partitioned table
-- Partitioned by bucket(16, id), days(ts), and category
CREATE TABLE iceberg_catalog.db.part_tbl (
    id BIGINT,
    data STRING,
    category STRING,
    ts TIMESTAMP
)
USING iceberg
PARTITIONED BY (bucket(16, id), days(ts), category);

-- Insert rows into the partitioned table
INSERT INTO iceberg_catalog.db.part_tbl VALUES
(100, 'Data1', 'A', to_timestamp('2025-01-01 12:00:00')),
(200, 'Data2', 'B', to_timestamp('2025-01-02 14:00:00')),
(300, 'Data3', 'A', to_timestamp('2025-01-01 15:00:00')),
(400, 'Data4', 'C', to_timestamp('2025-01-03 10:00:00'));

-- Query all rows
SELECT * FROM iceberg_catalog.db.part_tbl;

-- Query by bucket partition
SELECT * FROM iceberg_catalog.db.part_tbl WHERE bucket(16, id) = 0;

-- Query by day partition
SELECT * FROM iceberg_catalog.db.part_tbl WHERE days(ts) = '2025-01-01';

-- Query by category partition
SELECT * FROM iceberg_catalog.db.part_tbl WHERE category = 'A';

-- Query using multiple partition conditions
SELECT * FROM iceberg_catalog.db.part_tbl
WHERE bucket(16, id) = 0
  AND days(ts) = '2025-01-01'
  AND category = 'A';

-- Aggregate by category
SELECT category, COUNT(*) AS count
FROM iceberg_catalog.db.part_tbl
GROUP BY category;

-- (Optional) Clean up test data
TRUNCATE TABLE iceberg_catalog.db.tbl;
TRUNCATE TABLE iceberg_catalog.db.part_tbl;

-- (Caution) Delete the database
DROP DATABASE iceberg_catalog.db;
What's next
-
To manage table maintenance, see Spark Procedures for how to expire snapshots and remove orphan files.
-
To configure access control for additional RAM users, see Data authorization management.