Gateway multi-kluster ACK One memungkinkan Anda membangun pemulihan bencana tingkat zona untuk aplikasi di beberapa kluster Kubernetes tanpa perlu mengelola alamat IP load balancer terpisah per kluster atau menginstal Ingress controller di setiap kluster. Topik ini menjelaskan dua mode pemulihan — zona redundansi aktif dan primer/sekunder — menggunakan aplikasi contoh yang dideploy melalui GitOps ke dua kluster ACK di zona ketersediaan (AZ) berbeda di wilayah China (Hong Kong).
Gateway multi-kluster hanya menangani failover trafik Lapisan 7. Pemulihan bencana data berada di luar cakupan fitur ini.
Cara kerja
Gateway multi-kluster ACK One dibangun di atas Ingress Microservices Engine (MSE) yang dikelola. Dikombinasikan dengan ACK One GitOps (Argo CD), pengaturannya bekerja sebagai berikut:
Deploy aplikasi Anda ke beberapa kluster ACK di AZ berbeda menggunakan Argo CD.
Buat gateway multi-kluster (
MseIngressConfig) di instans fleet. Gateway menyediakan satu alamat IP Server Load Balancer (SLB) tingkat wilayah dan secara otomatis menemukan resource Ingress denganingressClasstertentu di semua kluster terkait.Buat objek Ingress di instans fleet untuk menentukan aturan routing trafik. Gateway meneruskan permintaan ke layanan Backend di kluster terkait dan secara otomatis melakukan failover trafik jika suatu kluster menjadi tidak sehat.
Komponen utama:
| Komponen | Peran |
|---|---|
| Instans fleet ACK One | Control plane untuk mengelola resource multi-kluster; tempat Anda membuat gateway dan objek Ingress |
| MSE Ingress (MseIngressConfig) | Gateway cloud-native yang menangani routing Lapisan 7, load balancing, dan failover lintas kluster |
| Argo CD (GitOps) | Deploy dan sinkronisasi aplikasi ke beberapa kluster ACK dari repositori Git |
| Kluster ACK (Kluster 1, Kluster 2) | Kluster workload di AZ terpisah yang menjalankan aplikasi; ditambahkan ke gateway sebagai backend |
Mode pemulihan
Kedua mode melindungi dari kegagalan tingkat AZ. Perbedaannya terletak pada cara distribusi trafik dalam kondisi normal.
| Mode | Distribusi trafik normal | Perilaku failover | Paling cocok untuk |
|---|---|---|---|
| Active zone redundancy | Dibagi merata di semua kluster berdasarkan rasio replika | Secara otomatis dialihkan ke kluster sehat | Aplikasi stateless yang dapat diskalakan secara horizontal |
| Primer/sekunder | Seluruh trafik dialihkan ke kluster primer | Secara otomatis dialihkan ke sekunder saat primer tidak sehat | Aplikasi dengan backend stateful (database, cache) di mana konfigurasi aktif-aktif menambah kompleksitas |
Prasyarat
Sebelum memulai, pastikan Anda telah:
Mengaktifkan fitur Manajemen fleet
Mengasosiasikan dua kluster ACK dengan instans fleet dalam Virtual Private Cloud (VPC) yang sama — lihat Asosiasikan kluster
Mengunduh file kubeconfig untuk instans fleet dari Konsol ACK One dan menghubungkan kubectl ke instans tersebut
Mengaktifkan fitur gateway multi-kluster — lihat Aturan penagihan untuk informasi harga
Membuat namespace
gateway-demodi instans fleet (harus sesuai dengan namespace tempat aplikasi dideploy di kluster terkait)
Langkah 1: Deploy aplikasi ke beberapa kluster
Gunakan Argo CD untuk deploy aplikasi web-demo ke Kluster 1 dan Kluster 2. Aplikasi ini terdiri dari Deployment dan Service.
Pilih antara UI atau CLI Argo CD.
Deploy menggunakan UI Argo CD
Masuk ke Konsol ACK One. Di panel navigasi kiri, pilih Fleet > Multi-cluster Applications.
Di halaman Multi-cluster GitOps, klik GitOps Console.
Jika GitOps belum diaktifkan, klik Enable GitOps. Untuk mengakses GitOps melalui jaringan publik, lihat Aktifkan akses publik ke Argo CD.
Tambahkan repositori aplikasi.
Di panel navigasi kiri Argo CD, klik Settings, lalu pilih Repositories > + Connect Repo.
Konfigurasikan parameter berikut dan klik CONNECT.
Bagian Parameter Nilai Pilih metode koneksi Anda — VIA HTTP/HTTPS CONNECT REPO USING HTTP/HTTPS Type git Project default Repository URL https://github.com/AliyunContainerService/gitops-demo.gitSkip server verification Centang kotak ini 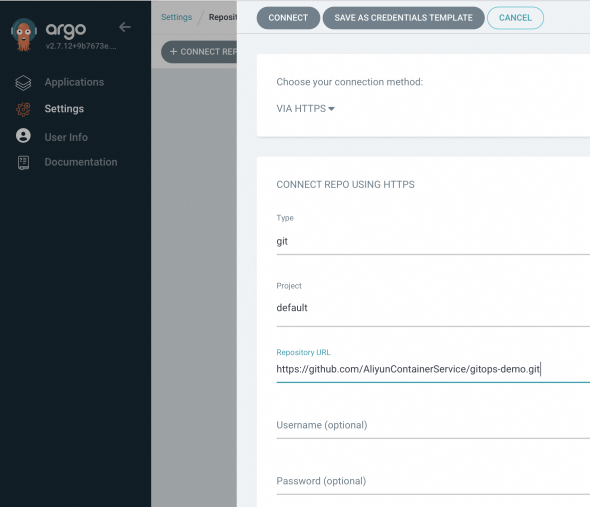
Jika koneksi berhasil, CONNECTION STATUS menampilkan Successful.

Buat aplikasi untuk setiap kluster. Di halaman Applications, klik + NEW APP dan konfigurasikan parameter berikut. Ulangi langkah ini untuk Kluster 2, ganti URL kluster dan nilai
envClustersesuai kebutuhan.Bagian Parameter Nilai GENERAL Application Name Nama unik untuk aplikasi Project Name defaultSYNC POLICY Manual (sinkronisasi sesuai permintaan) atau Automatic (Argo CD memeriksa repositori Git setiap 3 menit dan menerapkan perubahan secara otomatis) SYNC OPTIONS — Pilih AUTO-CREATE NAMESPACESOURCE Repository URL https://github.com/AliyunContainerService/gitops-demo.gitRevision Branches: gateway-demoPath manifests/helm/web-demoDESTINATION Cluster URL Pilih URL untuk Kluster 1 (atau Kluster 2 untuk aplikasi kedua) Namespace gateway-demoHelm > Parameters envClustercluster-demo-1untuk Kluster 1,cluster-demo-2untuk Kluster 2
Deploy menggunakan CLI Argo CD
Tambahkan repositori Git.
argocd repo add https://github.com/AliyunContainerService/gitops-demo.git --name ackone-gitops-demosOutput yang diharapkan:
Repository 'https://github.com/AliyunContainerService/gitops-demo.git' addedVerifikasi repositori telah ditambahkan dan pastikan kedua kluster terdaftar.
argocd repo listOutput yang diharapkan:
TYPE  NAME  REPO                                                       INSECURE  OCI    LFS    CREDS  STATUS      MESSAGE  PROJECT
git         https://github.com/AliyunContainerService/gitops-demo.git  false     false  false  false  Successful           default
argocd cluster listOutput daftar kluster yang diharapkan:
SERVER                          NAME                                        VERSION  STATUS      MESSAGE                                                  PROJECT
https://1.1.XX.XX:6443      c83f3cbc90a****-temp01   1.22+    Successful
https://2.2.XX.XX:6443      c83f3cbc90a****-temp02   1.22+    Successful
https://kubernetes.default.svc  in-cluster                                           Unknown     Cluster has no applications and is not being monitored.
Buat manifes aplikasi. Ganti
repoURLdengan URL repositori aktual Anda, dan ganti${cluster1_url}dan${cluster2_url}dengan URL server API kluster dari langkah sebelumnya. apps-web-demo.yamlapiVersion: argoproj.io/v1alpha1 kind: Application metadata: name: app-demo-cluster1 namespace: argocd spec: destination: namespace: gateway-demo # https://1.1.XX.XX:6443 server: ${cluster1_url} project: default source: helm: releaseName: "web-demo" parameters: - name: envCluster value: cluster-demo-1 valueFiles: - values.yaml path: manifests/helm/web-demo repoURL: https://github.com/AliyunContainerService/gitops-demo.git targetRevision: gateway-demo syncPolicy: syncOptions: - CreateNamespace=true --- apiVersion: argoproj.io/v1alpha1 kind: Application metadata: name: app-demo-cluster2 namespace: argocd spec: destination: namespace: gateway-demo server: ${cluster2_url} project: default source: helm: releaseName: "web-demo" parameters: - name: envCluster value: cluster-demo-2 valueFiles: - values.yaml path: manifests/helm/web-demo repoURL: https://github.com/AliyunContainerService/gitops-demo.git targetRevision: gateway-demo syncPolicy: syncOptions: - CreateNamespace=trueDeploy aplikasi.
kubectl apply -f apps-web-demo.yamlVerifikasi kedua aplikasi telah tersinkronisasi dan dalam kondisi sehat.
argocd app listOutput yang diharapkan:
NAME                      CLUSTER                  NAMESPACE  PROJECT  STATUS  HEALTH   SYNCPOLICY  CONDITIONS  REPO                                                       PATH                     TARGET
argocd/web-demo-cluster1  https://10.1.XX.XX:6443             default  Synced  Healthy  Auto        <none>      https://github.com/AliyunContainerService/gitops-demo.git  manifests/helm/web-demo  main
argocd/web-demo-cluster2  https://10.1.XX.XX:6443             default  Synced  Healthy  Auto        <none>      https://github.com/AliyunContainerService/gitops-demo.git  manifests/helm/web-demo  main
Langkah 2: Buat gateway multi-kluster
Buat resource MseIngressConfig di instans fleet untuk menyediakan gateway dan mengasosiasikan kedua kluster sebagai backend.
Dapatkan ID vSwitch untuk instans fleet — lihat Dapatkan ID vSwitch.
Buat manifes gateway. gateway.yaml
Ganti
${vsw-id1}dan${vsw-id2}dengan ID vSwitch, dan${cluster1}dan${cluster2}dengan ID kluster terkait. Untuk setiap kluster terkait, konfigurasikan aturan masuk grup keamanannya agar mengizinkan akses dari semua alamat IP dan port dalam blok CIDR vSwitch.Parameter Deskripsi mse.alibabacloud.com/remote-clustersID kluster yang akan ditambahkan ke gateway, dipisahkan koma. Harus merupakan kluster yang sudah diasosiasikan dengan instans fleet. spec.nameNama instans gateway. spec.common.instance.spec(Opsional) Tipe instans. Default: 4c8g.spec.common.instance.replicas(Opsional) Jumlah replika gateway. Default: 3.spec.ingress.local.ingressClass(Opsional) Nama kelas Ingress yang akan didengarkan. Gateway mendengarkan semua resource Ingress di instans fleet di mana ingressClassdiatur kemse.apiVersion: mse.alibabacloud.com/v1alpha1 kind: MseIngressConfig metadata: annotations: mse.alibabacloud.com/remote-clusters: ${cluster1},${cluster2} name: ackone-gateway-hongkong spec: common: instance: replicas: 3 spec: 2c4g network: vSwitches: - ${vsw-id} ingress: local: ingressClass: mse name: mse-ingressDeploy gateway.
kubectl apply -f gateway.yamlTunggu hingga gateway mencapai status
Listening. FasePending, saat gateway cloud-native sedang dibuat, mungkin memerlukan waktu sekitar 3 menit.Status Deskripsi PendingGateway sedang disediakan (~3 menit) RunningGateway telah dibuat dan berjalan ListeningGateway berjalan dan memantau resource Ingress FailedGateway tidak valid; periksa bidang Statusuntuk detailnyakubectl get mseingressconfig ackone-gateway-hongkongOutput yang diharapkan:
NAME                      STATUS      AGE
ackone-gateway-hongkong   Listening   3m15s
Nilai status gateway:
Konfirmasi kedua kluster telah berhasil ditambahkan.
kubectl get mseingressconfig ackone-gateway-hongkong -ojsonpath="{.status.remoteClusters}"Output yang diharapkan:
[{"clusterId":"c7fb82****"},{"clusterId":"cd3007****"}]Kedua ID kluster muncul tanpa pesan
Failed, yang mengonfirmasi kluster terhubung ke gateway.
Langkah 3: Konfigurasikan pemulihan bencana antarzona menggunakan Ingress
Gateway multi-kluster menggunakan resource Ingress yang didefinisikan di instans fleet untuk meneruskan trafik lintas kluster. Buat objek Ingress di namespace gateway-demo — namespace yang sama tempat aplikasi dideploy.
Namespace gateway-demo harus ada di instans fleet sebelum Anda membuat resource Ingress.
Pilih mode pemulihan yang sesuai dengan aplikasi Anda:
Zona redundansi aktif
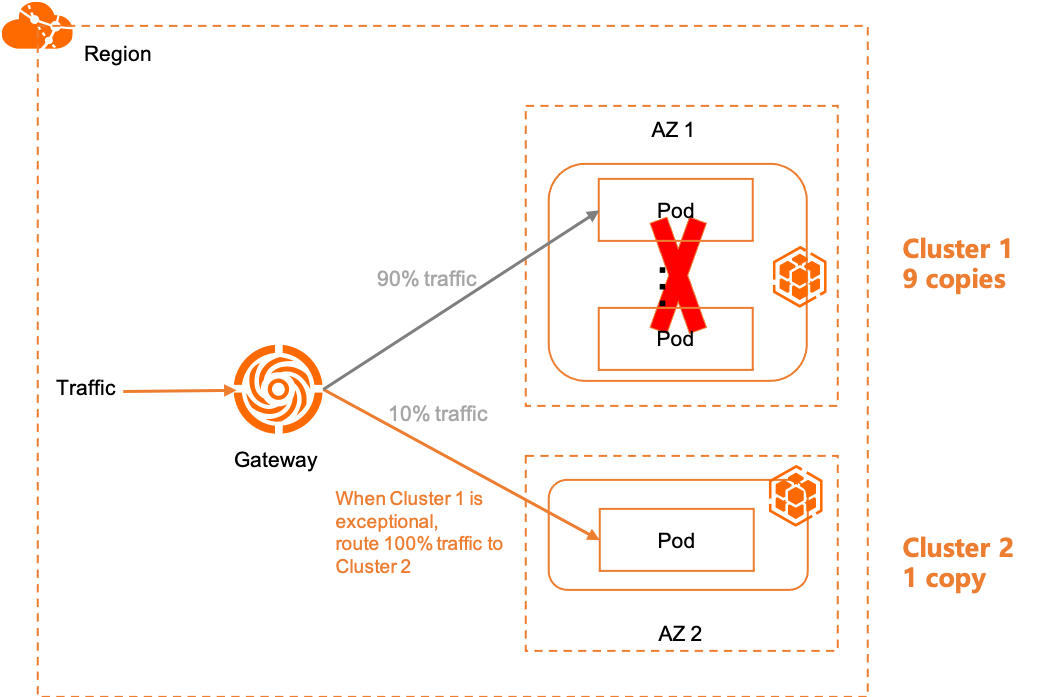
Dalam mode zona redundansi aktif, trafik dibagi merata di semua backend kluster berdasarkan rasio replika. Jika suatu kluster menjadi tidak sehat, gateway secara otomatis mengalihkan bagian trafiknya ke kluster sehat yang tersisa.
Contoh: Dengan 9 replika di Kluster 1 dan 1 replika di Kluster 2, 90% trafik dialihkan ke Kluster 1 dan 10% ke Kluster 2 secara default. Jika semua backend Kluster 1 gagal, 100% trafik dialihkan ke Kluster 2.
Buat Ingress untuk zona redundansi aktif
Buat Ingress yang meneruskan trafik ke service1 di domain example.com. Gateway mendistribusikan permintaan ke Service dengan nama yang sama di kedua kluster.
ingress-demo.yaml
apiVersion: networking.k8s.io/v1
kind: Ingress
metadata:
  name: web-demo
spec:
  ingressClassName: mse
  rules:
  - host: example.com
    http:
      paths:
      - path: /svc1
        pathType: Exact
        backend:
          service:
            name: service1
            port:
              number: 80
Deploy Ingress di instans fleet.
kubectl apply -f ingress-demo.yaml -n gateway-demoVerifikasi zona redundansi aktif
Dapatkan Alamat IP publik gateway multi-kluster.
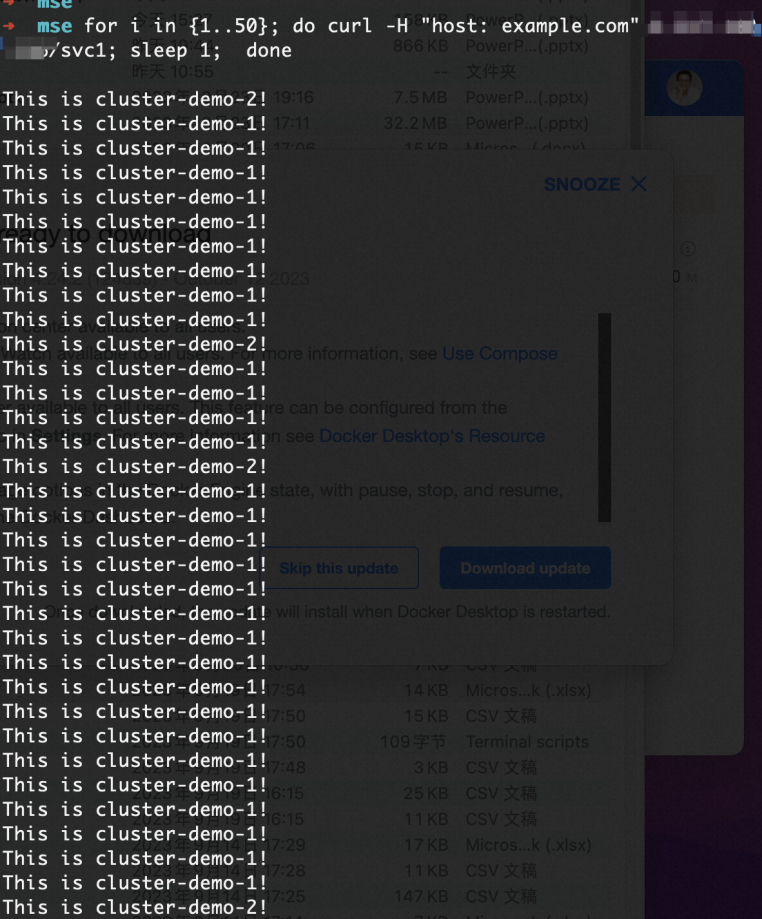
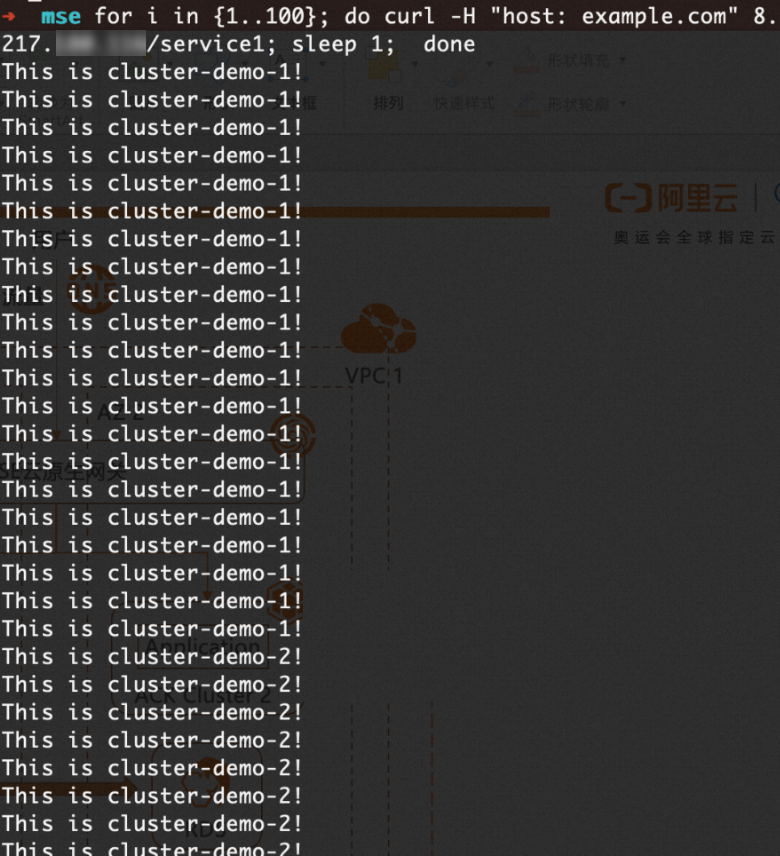
kubectl get ingress web-demo -n gateway-demo -ojsonpath="{.status.loadBalancer}"Kirim 100 permintaan dan amati distribusi trafik. Ganti
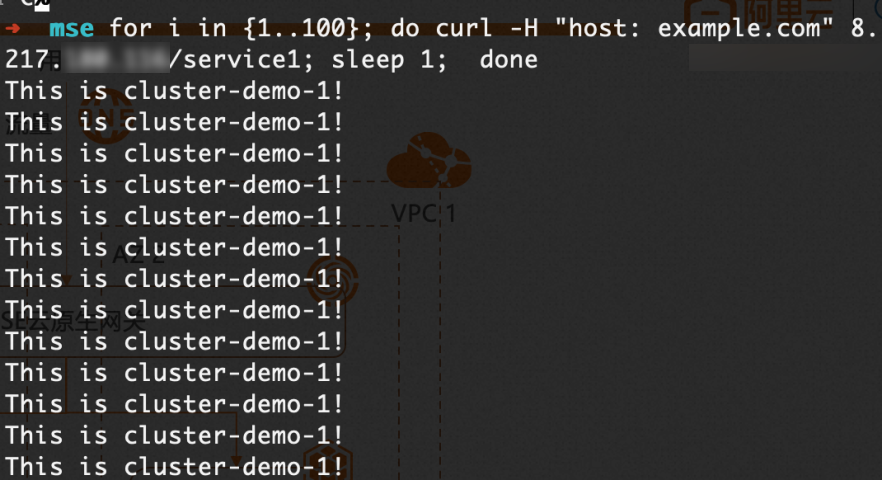
XX.XX.XX.XXdengan alamat IP gateway.for i in {1..100}; do curl -H "host: example.com" XX.XX.XX.XX; doneHasil yang diharapkan: Trafik didistribusikan antara Kluster 1 dan Kluster 2 dengan rasio 9:1.
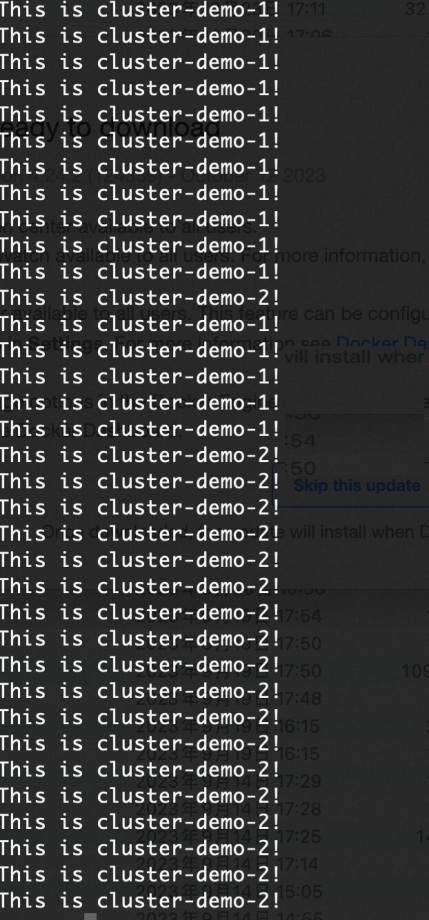
Simulasikan kegagalan kluster dengan menskalakan replika Deployment di Kluster 1 menjadi 0. Seluruh trafik secara otomatis dialihkan ke Kluster 2.
Lakukan rilis canary dengan routing berbasis header
Dalam mode zona redundansi aktif, Anda dapat menguji rilis canary di satu kluster tanpa memengaruhi trafik langsung. Deploy versi canary sebagai Service dan Deployment terpisah, lalu gunakan anotasi Ingress untuk meneruskan permintaan dengan header tertentu ke versi tersebut.
Deploy aplikasi canary di Kluster 1. new-app.yaml
apiVersion: v1
kind: Service
metadata:
  name: service1-canary-1
  namespace: gateway-demo
spec:
  ports:
  - port: 80
    protocol: TCP
    targetPort: 8080
  selector:
    app: web-demo-canary-1
  sessionAffinity: None
  type: ClusterIP
---
apiVersion: apps/v1
kind: Deployment
metadata:
  name: web-demo-canary-1
  namespace: gateway-demo
spec:
  replicas: 1
  selector:
    matchLabels:
      app: web-demo-canary-1
  template:
    metadata:
      labels:
        app: web-demo-canary-1
    spec:
      containers:
        - env:
            - name: ENV_NAME
              value: cluster-demo-1-canary
          image: 'registry-cn-hangzhou.ack.aliyuncs.com/acs/web-demo:0.6.0'
          imagePullPolicy: Always
          name: web-demo
kubectl apply -f new-app.yamlBuat Ingress canary berbasis header di instans fleet. Permintaan dengan header
canary-dest: cluster1akan diteruskan ke Service canary. new-ingress.yamlAnotasi Deskripsi nginx.ingress.kubernetes.io/canaryDiatur ke "true"untuk mengaktifkan routing berbasis header untuk Ingress ininginx.ingress.kubernetes.io/canary-by-headerKunci header yang dicocokkan ( canary-dest)nginx.ingress.kubernetes.io/canary-by-header-valueNilai header yang dicocokkan ( cluster1)apiVersion: networking.k8s.io/v1 kind: Ingress metadata: name: web-demo-canary-1 namespace: gateway-demo annotations: nginx.ingress.kubernetes.io/canary: "true" nginx.ingress.kubernetes.io/canary-by-header: "canary-dest" nginx.ingress.kubernetes.io/canary-by-header-value: "cluster1" spec: ingressClassName: mse rules: - host: example.com http: paths: - path: /svc1 pathType: Exact backend: service: name: service1-canary-1 port: number: 80kubectl apply -f new-ingress.yamlVerifikasi bahwa permintaan dengan header tersebut diteruskan ke versi canary.
for i in {1..100}; do curl -H "host: example.com" -H "canary-dest: cluster1" XX.XX.XX.XX/svc1; sleep 1; doneHasil yang diharapkan: Semua permintaan dengan
canary-dest: cluster1ditangani oleh rilis canary di Kluster 1.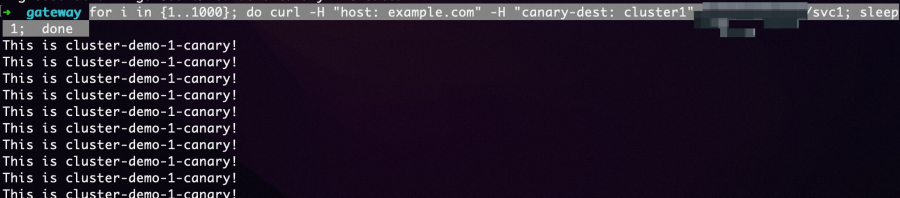
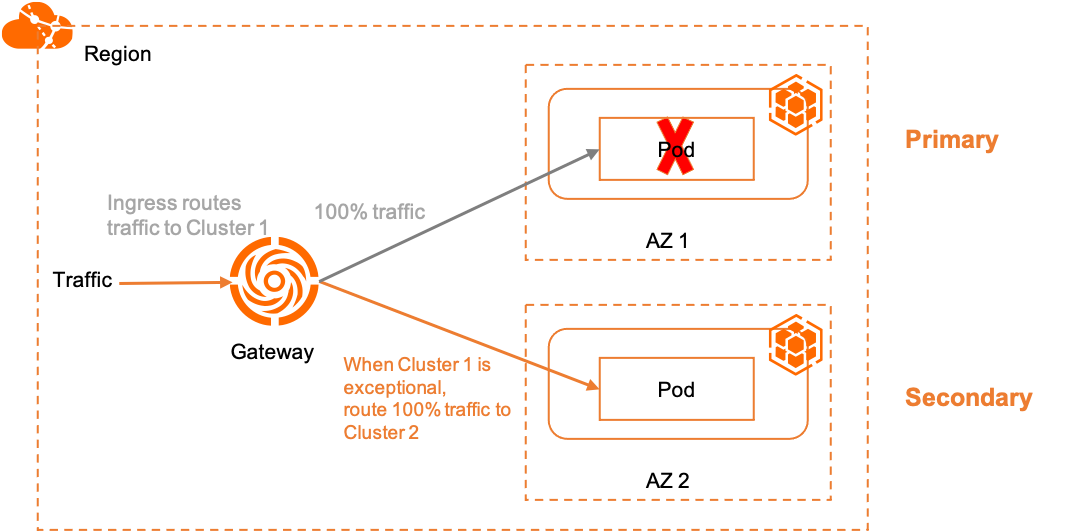
Pemulihan bencana primer/sekunder
Dalam mode primer/sekunder, seluruh trafik dialihkan ke Kluster 1 (primer) dalam kondisi normal. Jika Kluster 1 menjadi tidak sehat, gateway secara otomatis mengalihkan trafik ke Kluster 2 (sekunder).
Mode ini menggunakan dua anotasi spesifik MSE untuk mengikat rute Ingress ke kluster tertentu:
| Anotasi | Deskripsi |
|---|---|
mse.ingress.kubernetes.io/service-subset | Label deskriptif untuk subset layanan. Gunakan nama yang menunjukkan kluster target. |
mse.ingress.kubernetes.io/subset-labels | ID kluster yang dituju, menggunakan label topology.istio.io/cluster. |
Untuk daftar lengkap anotasi Ingress MSE, lihat Anotasi yang didukung oleh gateway Ingress MSE.
Buat Ingress untuk pemulihan bencana primer/sekunder
Buat Ingress primer yang mengikat trafik ke Kluster 1. Ganti
${cluster1-id}dengan ID kluster aktual. ingress-demo-cluster-one.yamlapiVersion: networking.k8s.io/v1 kind: Ingress metadata: annotations: mse.ingress.kubernetes.io/service-subset: cluster-demo-1 mse.ingress.kubernetes.io/subset-labels: | topology.istio.io/cluster ${cluster1-id} name: web-demo-cluster-one spec: ingressClassName: mse rules: - host: example.com http: paths: - path: /service1 pathType: Exact backend: service: name: service1 port: number: 80kubectl apply -f ingress-demo-cluster-one.yaml -n gateway-demo
Lakukan rilis canary tingkat kluster
Gunakan Ingress canary berbasis header bersama Ingress primer untuk meneruskan permintaan tertentu ke Kluster 2 guna validasi, tanpa mengubah jalur trafik default.
Buat Ingress canary yang menargetkan Kluster 2. Ganti
${cluster2-id}dengan ID kluster aktual. ingress-demo-cluster-gray.yamlapiVersion: networking.k8s.io/v1 kind: Ingress metadata: annotations: mse.ingress.kubernetes.io/service-subset: cluster-demo-2 mse.ingress.kubernetes.io/subset-labels: | topology.istio.io/cluster ${cluster2-id} nginx.ingress.kubernetes.io/canary: "true" nginx.ingress.kubernetes.io/canary-by-header: "app-web-demo-version" nginx.ingress.kubernetes.io/canary-by-header-value: "gray" name: web-demo-cluster-gray spec: ingressClassName: mse rules: - host: example.com http: paths: - path: /service1 pathType: Exact backend: service: name: service1 port: number: 80kubectl apply -f ingress-demo-cluster-gray.yaml -n gateway-demo
Verifikasi pemulihan bencana primer/sekunder
Dapatkan Alamat IP publik gateway multi-kluster.
kubectl get ingress web-demo -n gateway-demo -ojsonpath="{.status.loadBalancer}"Konfirmasi trafik default dialihkan ke Kluster 1.
for i in {1..100}; do curl -H "host: example.com" XX.XX.XX.XX/service1; sleep 1; doneHasil yang diharapkan: Seluruh trafik default ditangani oleh Kluster 1.
Konfirmasi trafik canary dialihkan ke Kluster 2.
for i in {1..50}; do curl -H "host: example.com" -H "app-web-demo-version: gray" XX.XX.XX.XX/service1; sleep 1; doneHasil yang diharapkan: Semua permintaan dengan
app-web-demo-version: grayditangani oleh Kluster 2.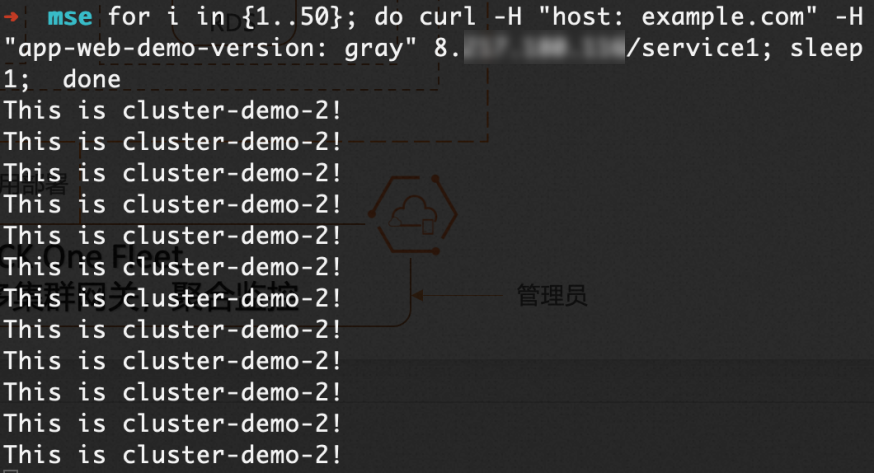
Simulasikan kegagalan Kluster 1 dengan menskalakan replika Deployment menjadi 0. Seluruh trafik default secara otomatis dialihkan ke Kluster 2.
Langkah selanjutnya
Kelola trafik utara-selatan — jelajahi kemampuan manajemen trafik lengkap gateway multi-kluster ACK One
Panduan cepat GitOps — pelajari lebih lanjut tentang deploy aplikasi dengan Argo CD di ACK One