GPU sharing memungkinkan beberapa Pod berbagi sumber daya komputasi dari satu GPU, sehingga meningkatkan pemanfaatan GPU dan mengurangi biaya. Kontainer pada GPU yang sama berjalan secara terisolasi satu sama lain, sehingga satu kontainer tidak dapat melebihi alokasi sumber dayanya dan memengaruhi kontainer lain.
Topik ini menjelaskan cara mengaktifkan GPU sharing di kluster ACK Edge.
Dukungan fitur berdasarkan tipe node
Kelompok node cloud dan kelompok node edge mendukung kemampuan GPU sharing yang berbeda. Pilih jalur konfigurasi berdasarkan tipe node dan kebutuhan isolasi Anda.
| Feature | Cloud nodes | Edge node pools |
|---|---|---|
| GPU sharing | Supported | Supported |
| GPU memory isolation | Supported | Not supported |
| Computing power isolation | Supported | Not supported |
Kelompok node edge hanya mendukung GPU sharing. Isolasi memori dan daya komputasi tidak tersedia untuk node edge. Jika beban kerja Anda memerlukan isolasi memori atau daya komputasi, gunakan cloud nodes.
Prasyarat
Sebelum memulai, pastikan Anda telah:
Kluster ACK Edge yang menjalankan Kubernetes 1.18 atau versi lebih baru. Untuk informasi selengkapnya, lihat Create an ACK Edge cluster.
Mengaktifkan cloud-native AI suite. Untuk informasi selengkapnya, lihat Cloud-native AI suite overview dan Billing of the cloud-native AI suite
Memperoleh file kubeconfig kluster ACK Edge dan menghubungkan kubectl ke kluster tersebut. Untuk informasi selengkapnya, lihat Obtain the kubeconfig file and connect to the cluster
Catatan penggunaan
Untuk node GPU yang dikelola di kluster ACK, ikuti aturan berikut saat meminta dan menggunakan sumber daya GPU.
Jangan gunakan metode berikut untuk meminta sumber daya GPU:
Menjalankan aplikasi berat GPU secara langsung di node
Menggunakan Docker, Podman, atau nerdctl untuk membuat kontainer dengan permintaan GPU — misalnya,
docker run --gpus allataudocker run -e NVIDIA_VISIBLE_DEVICES=allMenambahkan
NVIDIA_VISIBLE_DEVICES=allatauNVIDIA_VISIBLE_DEVICES=<GPU ID>ke bagianenvdalam file YAML PodMenyetel
NVIDIA_VISIBLE_DEVICES=allsaat membangun gambar kontainer jikaNVIDIA_VISIBLE_DEVICEStidak ditentukan dalam file YAML PodMenambahkan
privileged: trueke bagiansecurityContextdalam file YAML Pod
Metode-metode ini melewati buku besar sumber daya perangkat dari scheduler. Akibatnya, alokasi sumber daya GPU aktual menyimpang dari yang dilacak oleh scheduler, sehingga scheduler menjadwalkan Pod tambahan ke node yang sama. Aplikasi kemudian saling bersaing untuk GPU yang sama, dan beberapa mungkin gagal dimulai karena sumber daya GPU tidak mencukupi. Metode ini juga dapat memicu masalah tak terduga lainnya, seperti yang dilaporkan oleh komunitas NVIDIA.
Langkah 1: Instal komponen GPU sharing
Komponen GPU sharing (ack-ai-installer) merupakan bagian dari cloud-native AI suite. Ikuti langkah-langkah sesuai status deployment Anda saat ini.
Jika cloud-native AI suite belum di-deploy
Login ke ACK console. Di panel navigasi sebelah kiri, klik Clusters.
Pada halaman Clusters, temukan kluster dan klik namanya. Di panel navigasi sebelah kiri, pilih Applications > Cloud-native AI Suite.
Pada halaman Cloud-native AI Suite, klik Deploy.
Pada halaman Deploy Cloud-native AI Suite, pilih Scheduling Policy Extension (Batch Task Scheduling, GPU Sharing, Topology-aware GPU Scheduling).
(Opsional) Klik Advanced di samping komponen tersebut. Di panel Parameters, ubah parameter
policycGPU lalu klik OK. Jika Anda tidak memiliki persyaratan khusus untuk pembagian daya komputasi, gunakan nilai defaultpolicy: 5. Untuk detail kebijakan yang didukung, lihat Install and use cGPU on a Docker container.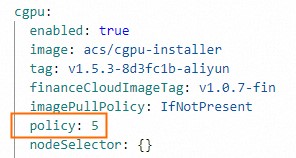
Di bagian bawah halaman, klik Deploy Cloud-native AI Suite.
Setelah deployment selesai, ack-ai-installer akan muncul dalam status Deployed di halaman Cloud-native AI Suite.
Jika cloud-native AI suite sudah di-deploy
Login ke ACK console. Di panel navigasi sebelah kiri, klik Clusters.
Pada halaman Clusters, temukan kluster dan klik namanya. Di panel navigasi sebelah kiri, pilih Applications > Cloud-native AI Suite.
Temukan ack-ai-installer dan klik Deploy di kolom Actions.
(Opsional) Di panel Parameters, ubah parameter
policycGPU. Jika Anda tidak memiliki persyaratan khusus untuk pembagian daya komputasi, gunakan nilai defaultpolicy: 5. Untuk detail kebijakan yang didukung, lihat Install and use cGPU on a Docker container.Klik OK.
Setelah ack-ai-installer diinstal, statusnya berubah menjadi Deployed.
Langkah 2: Buat kelompok node GPU
Kelompok node cloud
Pada halaman Clusters, temukan kluster dan klik namanya. Di panel navigasi sebelah kiri, pilih Nodes > Node Pools.
Di pojok kanan atas halaman Node Pools, klik Create Node Pool.
Pada kotak dialog Create Node Pool, konfigurasikan parameter dan klik Confirm Order. Tabel berikut menjelaskan parameter utama. Untuk parameter lainnya, lihat Create and manage a node pool.
PentingSetelah menambahkan label GPU sharing ke node, jangan gunakan
kubectl label nodesatau fitur manajemen label di Konsol ACK untuk mengubah nilai label tersebut. Tindakan ini dapat menyebabkan masalah penjadwalan. Konfigurasikan GPU sharing di tingkat kelompok node. Untuk detailnya, lihat Configure GPU scheduling policies for node pools dan Issues that may occur if you change label values.Parameter Description Expected nodes Jumlah awal node. Atur ke 0untuk membuat kelompok node kosong.Node label Klik ikon  , atur Key ke
 ack.node.gpu.schedule, dan atur Value kecgpu. Label ini mengaktifkan GPU sharing dengan isolasi memori GPU dan pembagian daya komputasi — Pod pada node hanya meminta memori GPU, dan beberapa Pod dapat berbagi GPU yang sama. Untuk informasi selengkapnya, lihat Labels for enabling GPU scheduling policies.
Kelompok node edge
Pada halaman Clusters, temukan kluster dan klik namanya. Di panel navigasi sebelah kiri, pilih Nodes > Node Pools.
Pada halaman Node Pools, klik Create Node Pool.
Pada kotak dialog Create Node Pool, konfigurasikan parameter dan klik Confirm Order. Di bagian Node Labels, klik ikon
, atur Key ke ack.node.gpu.schedule, dan atur Value keshare. Label ini mengaktifkan GPU sharing. Untuk parameter lainnya, lihat Edge node pool management. Untuk informasi selengkapnya tentang label node, lihat Labels for enabling GPU scheduling policies.
Langkah 3: Tambahkan node berakselerasi GPU
Cloud nodes
Lewati langkah ini jika Anda sudah menambahkan node berakselerasi GPU saat membuat kelompok node.
Tambahkan Instance ECS dengan arsitektur GPU-accelerated ke kelompok node cloud. Untuk informasi selengkapnya, lihat Add existing ECS instances atau Create and manage a node pool.
Edge nodes
Untuk informasi selengkapnya, lihat Add a GPU-accelerated node.
Langkah 4: Instal tool inspeksi GPU (hanya untuk cloud nodes)
Gunakan kubectl-inspect-cgpu untuk memeriksa alokasi memori GPU di seluruh kluster. Langkah ini hanya berlaku untuk cloud nodes.
Unduh kubectl-inspect-cgpu ke direktori dalam PATH Anda. Contoh ini menggunakan
/usr/local/bin/.Linux: ``
bash wget http://aliacs-k8s-cn-beijing.oss-cn-beijing.aliyuncs.com/gpushare/kubectl-inspect-cgpu-linux -O /usr/local/bin/kubectl-inspect-cgpu``macOS: ``
bash wget http://aliacs-k8s-cn-beijing.oss-cn-beijing.aliyuncs.com/gpushare/kubectl-inspect-cgpu-darwin -O /usr/local/bin/kubectl-inspect-cgpu``
Beri izin eksekusi:
chmod +x /usr/local/bin/kubectl-inspect-cgpuPeriksa penggunaan GPU di seluruh kluster:
kubectl inspect cgpuOutput yang diharapkan:
NAME                       IPADDRESS      GPU0(Allocated/Total)  GPU Memory(GiB)
cn-shanghai.192.168.6.104  192.168.6.104  0/15                   0/15
----------------------------------------------------------------------
Allocated/Total GPU Memory In Cluster:
0/15 (0%)
Untuk melihat detail alokasi GPU per-Pod, jalankan
kubectl inspect cgpu -d.
Langkah 5: Deploy beban kerja contoh
Kelompok node cloud
Periksa alokasi memori GPU saat ini:
kubectl inspect cgpuOutput yang diharapkan:
NAME                     IPADDRESS    GPU0(Allocated/Total)  GPU1(Allocated/Total)  GPU Memory(GiB)
cn-shanghai.192.168.0.4  192.168.0.4  0/7                    0/7                    0/14
---------------------------------------------------------------------
Allocated/Total GPU Memory In Cluster:
0/14 (0%)
Deploy Job contoh yang meminta 3 GiB memori GPU. Ganti
npxxxxxxxxxxxxxxdengan ID kelompok node Anda.apiVersion: batch/v1 kind: Job metadata: name: gpu-share-sample spec: parallelism: 1 template: metadata: labels: app: gpu-share-sample spec: nodeSelector: alibabacloud.com/nodepool-id: npxxxxxxxxxxxxxx # Replace with your node pool ID containers: - name: gpu-share-sample image: registry.cn-hangzhou.aliyuncs.com/ai-samples/gpushare-sample:tensorflow-1.5 command: - python - tensorflow-sample-code/tfjob/docker/mnist/main.py - --max_steps=100000 - --data_dir=tensorflow-sample-code/data resources: limits: aliyun.com/gpu-mem: 3 # GPU memory to request, in GiB workingDir: /root restartPolicy: NeverField
aliyun.com/gpu-memmenentukan jumlah memori GPU dalam satuan GiB. Misalnya,3meminta 3 GiB memori GPU dari GPU bersama.
Kelompok node edge
Deploy Job contoh yang meminta 4 GiB memori GPU. Ganti npxxxxxxxxxxxxxx dengan ID kelompok node edge Anda.
apiVersion: batch/v1
kind: Job
metadata:
  name: tensorflow-mnist-share
spec:
  parallelism: 1
  template:
    metadata:
      labels:
        app: tensorflow-mnist-share
    spec:
      nodeSelector:
        alibabacloud.com/nodepool-id: npxxxxxxxxxxxxxx # Replace with your edge node pool ID
      containers:
      - name: tensorflow-mnist-share
        image: registry.cn-beijing.aliyuncs.com/ai-samples/gpushare-sample:tensorflow-1.5
        command:
        - python
        - tensorflow-sample-code/tfjob/docker/mnist/main.py
        - --max_steps=100000
        - --data_dir=tensorflow-sample-code/data
        resources:
          limits:
            aliyun.com/gpu-mem: 4 # GPU memory to request, in GiB
        workingDir: /root
      restartPolicy: Never
Langkah 6: Verifikasi hasil
Kelompok node cloud
Login ke lapisan kontrol.
Cetak baris log terakhir Pod untuk memastikan isolasi memori GPU aktif:
kubectl logs gpu-share-sample --tail=1Output yang diharapkan:
2023-08-07 09:08:13.931003: I tensorflow/core/common_runtime/gpu/gpu_device.cc:1326] Created TensorFlow device (/job:localhost/replica:0/task:0/device:GPU:0 with 2832 MB memory) -> physical GPU (device: 0, name: Tesla T4, pci bus id: 0000:00:07.0, compute capability: 7.5)Output tersebut menunjukkan bahwa kontainer meminta 2.832 MiB memori GPU.
Jalankan nvidia-smi di dalam kontainer untuk melihat memori yang terlihat oleh kontainer:
`3043MiB / 3231MiB` — kontainer hanya melihat 3.231 MiB (sekitar 3 GiB), bukan memori GPU penuh. Ini mengonfirmasi bahwa isolasi memori GPU berfungsi.
kubectl exec -it gpu-share-sample nvidia-smiOutput yang diharapkan:
Mon Aug 7 08:52:18 2023
+-----------------------------------------------------------------------------+
| NVIDIA-SMI 418.87.01    Driver Version: 418.87.01    CUDA Version: 10.1     |
|-------------------------------+----------------------+----------------------+
| GPU  Name        Persistence-M| Bus-Id        Disp.A | Volatile Uncorr. ECC |
| Fan  Temp  Perf  Pwr:Usage/Cap|         Memory-Usage | GPU-Util  Compute M. |
|===============================+======================+======================|
|   0  Tesla T4            On   | 00000000:00:07.0 Off |                    0 |
| N/A   41C    P0    26W /  70W |   3043MiB /  3231MiB |      0%      Default |
+-------------------------------+----------------------+----------------------+

+-----------------------------------------------------------------------------+
| Processes:                                                       GPU Memory |
|  GPU       PID   Type   Process name                             Usage      |
|=============================================================================|
+-----------------------------------------------------------------------------+
Pertimbangan penting:
Jalankan nvidia-smi di node untuk melihat total memori GPU:
`15079MiB` — total memori GPU di node (Tesla T4 penuh)
`3053MiB / 15079MiB` — kontainer menggunakan 3.053 MiB dari total 15.079 MiB, sehingga sisa memori tersedia bagi Pod lain untuk berbagi GPU yang sama
nvidia-smiOutput yang diharapkan:
Mon Aug  7 09:18:26 2023
+-----------------------------------------------------------------------------+
| NVIDIA-SMI 418.87.01    Driver Version: 418.87.01    CUDA Version: 10.1     |
|-------------------------------+----------------------+----------------------+
| GPU  Name        Persistence-M| Bus-Id        Disp.A | Volatile Uncorr. ECC |
| Fan  Temp  Perf  Pwr:Usage/Cap|         Memory-Usage | GPU-Util  Compute M. |
|===============================+======================+======================|
|   0  Tesla T4            On   | 00000000:00:07.0 Off |                    0 |
| N/A   40C    P0    26W /  70W |   3053MiB / 15079MiB |      0%      Default |
+-------------------------------+----------------------+----------------------+

+-----------------------------------------------------------------------------+
| Processes:                                                       GPU Memory |
|  GPU       PID   Type   Process name                             Usage      |
|=============================================================================|
|    0      8796      C   python3                                     3043MiB |
+-----------------------------------------------------------------------------+
Pertimbangan penting:
Kelompok node edge
Pada halaman Clusters, temukan kluster dan klik namanya. Di panel navigasi sebelah kiri, pilih Workloads > Pods.
Pada kolom Actions untuk Pod Anda (misalnya,
tensorflow-mnist-multigpu-*), klik Terminal lalu jalankan perintah berikut:`16384MiB` — Pod melihat memori GPU penuh (V100 SXM2, 16 GiB). Kelompok node edge mendukung GPU sharing tetapi tidak mendukung isolasi memori GPU, sehingga tampilan Pod tidak dibatasi pada 4 GiB yang dimintanya.
Penggunaan memori GPU aktual Pod diatur oleh variabel lingkungan yang disetel secara otomatis oleh komponen GPU sharing: ``
ALIYUN_COM_GPU_MEM_CONTAINER=4 # GPU memory the pod is allocated (GiB) ALIYUN_COM_GPU_MEM_DEV=16 # Total memory of the physical GPU (GiB)``Rasio alokasi terhadap total memori GPU adalah:
4 / 16 = 0.25(25%)
nvidia-smiOutput yang diharapkan:
Wed Jun 14 06:45:56 2023
+-----------------------------------------------------------------------------+
| NVIDIA-SMI 515.105.01   Driver Version: 515.105.01   CUDA Version: 11.7     |
|-------------------------------+----------------------+----------------------+
| GPU  Name        Persistence-M| Bus-Id        Disp.A | Volatile Uncorr. ECC |
| Fan  Temp  Perf  Pwr:Usage/Cap|         Memory-Usage | GPU-Util  Compute M. |
|                               |                      |               MIG M. |
|===============================+======================+======================|
|   0  Tesla V100-SXM2...  On   | 00000000:00:09.0 Off |                    0 |
| N/A   35C    P0    59W / 300W |    334MiB / 16384MiB |      0%      Default |
|                               |                      |                  N/A |
+-------------------------------+----------------------+----------------------+

+-----------------------------------------------------------------------------+
| Processes:                                                                  |
|  GPU   GI   CI        PID   Type   Process name                  GPU Memory |
|        ID   ID                                                   Usage      |
|=============================================================================|
+-----------------------------------------------------------------------------+
Pertimbangan penting:
Langkah selanjutnya
GPU sharing overview — pelajari mekanisme cGPU yang mendasari
Install the GPU sharing component — perbarui ack-ai-installer
Disable the memory isolation feature of cGPU — jalankan beban kerja tanpa isolasi memori GPU pada cloud nodes
Advanced capabilities — penjadwalan topology-aware dan fitur GPU sharing lanjutan lainnya