IoT Platform le permite implementar una penetración de pseudo-intranet para controlar de forma remota un servidor Raspberry Pi que no cuenta con una dirección IP pública. Este tema describe cómo usar IoT Platform para controlar remotamente un servidor Raspberry Pi e incluye código de ejemplo.
Contexto
Por ejemplo, si utiliza una Raspberry Pi para construir un servidor en su empresa o en casa y ejecutar tareas sencillas, como iniciar un script o descargar archivos, es posible que enfrente limitaciones. Si el servidor Raspberry Pi no tiene una dirección IP pública y usted no se encuentra en la empresa ni en casa, no podrá gestionar el servidor. Además, si utiliza otras herramientas de penetración de intranet, pueden ocurrir desconexiones frecuentes. Para resolver este problema, utilice la función RRPC de IoT Platform junto con la biblioteca JSch para controlar de forma remota el servidor Raspberry Pi.
Versión anterior
En este ejemplo se utilizan un producto y un dispositivo dentro de una instancia pública.
Proceso
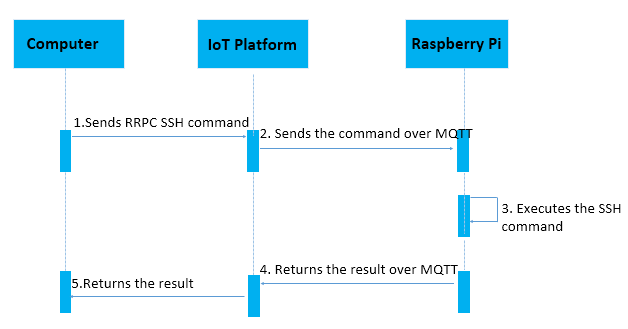
A continuación se muestra el proceso para utilizar IoT Platform y controlar de forma remota un servidor Raspberry Pi:
Llame al SDK RRPC operation de IoT Platform desde su computadora para enviar un comando de Secure Shell (SSH).
Cuando IoT Platform recibe el comando SSH, lo envía al servidor Raspberry Pi mediante Message Queuing Telemetry Transport (MQTT).
El sistema ejecuta el comando SSH en el servidor.
El sistema encapsula el resultado del comando SSH como una respuesta RRPC en el servidor y envía dicha respuesta a IoT Platform mediante MQTT.
IoT Platform envía la respuesta RRPC a su computadora.
El tiempo de espera de RRPC es de 5 segundos. Si IoT Platform no recibe una respuesta del servidor Raspberry Pi en ese lapso, se genera un error de tiempo de espera agotado. Si envía un comando que requiere mucho tiempo de procesamiento, ignore el mensaje de error de tiempo de espera.
Descargar los SDK y el código de ejemplo
Antes de controlar de forma remota el servidor Raspberry Pi, desarrolle el SDK de IoT Platform y Link SDK.
Instale el SDK IoT Platform SDK de IoT Platform en su computadora. Utilice el código de ejemplo de Java para desarrollar el SDK de IoT Platform.
Instale el SDK Link SDK de enlace en el servidor Raspberry Pi. Utilice el código de ejemplo de Java para desarrollar Link SDK.
A continuación se presenta el código de ejemplo para desarrollar el SDK de IoT Platform y Link SDK.
Este código de ejemplo solo admite comandos sencillos de Linux, como uname, touch y mv. No es compatible con comandos complejos, por ejemplo, aquellos que modifican archivos. Si necesita comandos complejos, escriba el código según sus requisitos de negocio.
Desarrollar Link SDK
Una vez que instale Link SDK y descargue el código de ejemplo, agregue las dependencias del proyecto y los archivos Java obligatorios.
El proyecto se puede exportar como un paquete JAR y ejecutar en el servidor Raspberry Pi.
-
Agregue las siguientes dependencias al archivo pom.xml:
<! -- Link SDK --> <dependency> <groupId>com.aliyun.alink.linksdk</groupId> <artifactId>iot-linkkit-java</artifactId> <version>1.1.0</version> <scope>compile</scope> </dependency> <dependency> <groupId>com.google.code.gson</groupId> <artifactId>gson</artifactId> <version>2.8.1</version> <scope>compile</scope> </dependency> <dependency> <groupId>com.alibaba</groupId> <artifactId>fastjson</artifactId> <version>1.2.83</version> <scope>compile</scope> </dependency> <! -- SSH client --> <!-- https://mvnrepository.com/artifact/com.jcraft/jsch --> <dependency> <groupId>com.jcraft</groupId> <artifactId>jsch</artifactId> <version>0.1.55</version> </dependency> -
Cree un archivo llamado SSHShell.java para ejecutar comandos SSH.
public class SSHShell { private String host; private String username; private String password; private int port; private Vector<String> stdout; public SSHShell(final String ipAddress, final String username, final String password, final int port) { this.host = ipAddress; this.username = username; this.password = password; this.port = port; this.stdout = new Vector<String>(); } public int execute(final String command) { System.out.println("ssh command: " + command); int returnCode = 0; JSch jsch = new JSch(); SSHUserInfo userInfo = new SSHUserInfo(); try { Session session = jsch.getSession(username, host, port); session.setPassword(password); session.setUserInfo(userInfo); session.connect(); Channel channel = session.openChannel("exec"); ((ChannelExec) channel).setCommand(command); channel.setInputStream(null); BufferedReader input = new BufferedReader(new InputStreamReader(channel.getInputStream())); channel.connect(); String line = null; while ((line = input.readLine()) != null) { stdout.add(line); } input.close(); if (channel.isClosed()) { returnCode = channel.getExitStatus(); } channel.disconnect(); session.disconnect(); } catch (JSchException e) { e.printStackTrace(); } catch (Exception e) { e.printStackTrace(); } return returnCode; } public Vector<String> getStdout() { return stdout; } } -
Cree un archivo llamado SSHUserInfo.java para comprobar el nombre de usuario y la contraseña de SSH.
public class SSHUserInfo implements UserInfo { @Override public String getPassphrase() { return null; } @Override public String getPassword() { return null; } @Override public boolean promptPassphrase(final String arg0) { return false; } @Override public boolean promptPassword(final String arg0) { return false; } @Override public boolean promptYesNo(final String arg0) { if (arg0.contains("The authenticity of host")) { return true; } return false; } @Override public void showMessage(final String arg0) { } } -
Cree un archivo llamado Device.java para establecer una conexión MQTT.
public class Device { /** * Establish a connection. * * @param productKey The ProductKey of the product. * @param deviceName The DeviceName of the device. * @param deviceSecret The DeviceSecret of the device. * @throws InterruptedException */ public static void connect(String productKey, String deviceName, String deviceSecret) throws InterruptedException { // Initialize parameters. LinkKitInitParams params = new LinkKitInitParams(); // Configure the required parameters to establish an MQTT connection. IoTMqttClientConfig config = new IoTMqttClientConfig(); config.productKey = productKey; config.deviceName = deviceName; config.deviceSecret = deviceSecret; params.mqttClientConfig = config; // Specify the certificate information about the device. DeviceInfo deviceInfo = new DeviceInfo(); deviceInfo.productKey = productKey; deviceInfo.deviceName = deviceName; deviceInfo.deviceSecret = deviceSecret; params.deviceInfo = deviceInfo; // Initialize a client. LinkKit.getInstance().init(params, new ILinkKitConnectListener() { public void onError(AError aError) { System.out.println("init failed !! code=" + aError.getCode() + ",msg=" + aError.getMsg() + ",subCode=" + aError.getSubCode() + ",subMsg=" + aError.getSubMsg()); } public void onInitDone(InitResult initResult) { System.out.println("init success !!"); } }); // Before you perform the following steps, make sure that the initialization is complete. You can specify a reasonable value based on your business scenario. Thread.sleep(2000); } /** * Send a message. * @param topic The topic to which the message is sent. * @param payload The content of the message. */ public static void publish(String topic, String payload) { MqttPublishRequest request = new MqttPublishRequest(); request.topic = topic; request.payloadObj = payload; request.qos = 0; LinkKit.getInstance().getMqttClient().publish(request, new IConnectSendListener() { @Override public void onResponse(ARequest aRequest, AResponse aResponse) { } @Override public void onFailure(ARequest aRequest, AError aError) { } }); } /** * Subscribe to messages. * * @param topic The topic whose messages to which you want to subscribe. */ public static void subscribe(String topic) { MqttSubscribeRequest request = new MqttSubscribeRequest(); request.topic = topic; request.isSubscribe = true; LinkKit.getInstance().getMqttClient().subscribe(request, new IConnectSubscribeListener() { @Override public void onSuccess() { } @Override public void onFailure(AError aError) { } }); } /** * Unsubscribe from messages. * * @param topic The topic whose messages from which you want to unsubscribe. */ public static void unsubscribe(String topic) { MqttSubscribeRequest request = new MqttSubscribeRequest(); request.topic = topic; request.isSubscribe = false; LinkKit.getInstance().getMqttClient().unsubscribe(request, new IConnectUnscribeListener() { @Override public void onSuccess() { } @Override public void onFailure(AError aError) { } }); } /** * Terminate the connection. */ public static void disconnect() { // Deinitialize the parameters. LinkKit.getInstance().deinit(); } } -
Cree un archivo llamado SSHDevice.java. El archivo SSHDevice.java contiene el método principal que se usa para recibir comandos RRPC. También puede llamar a
SSHShellpara ejecutar comandos SSH y devolver respuestas RRPC. En el archivo SSHDevice.java, introduzca la información del certificado del dispositivo, así como el nombre de usuario y la contraseña de SSH. La información del certificado del dispositivo incluye ProductKey, DeviceName y DeviceSecret.public class SSHDevice { // ===================The start of the segment in which you configure the required parameters.=========================== // The ProductKey of the product. private static String productKey = ""; // private static String deviceName = ""; // The DeviceSecret of the device. private static String deviceSecret = ""; // The topic that you want to use for messaging. You can use the topic without the need to create or define the topic. private static String rrpcTopic = "/sys/" + productKey + "/" + deviceName + "/rrpc/request/+"; // The endpoint or the IP address to which the SSH client needs to access. private static String host = "127.0.0.1"; // The username that is used to log on to the SSH client. private static String username = ""; // The password for the username. private static String password = ""; // The number of the port that is used to log on to the SSH client. private static int port = 22; // ===================The end of the segment in which you configure the required parameters.=========================== public static void main(String[] args) throws InterruptedException { // Listen to downstream data. registerNotifyListener(); // Establish a connection. Device.connect(productKey, deviceName, deviceSecret); // Subscribe to a topic. Device.subscribe(rrpcTopic); } public static void registerNotifyListener() { LinkKit.getInstance().registerOnNotifyListener(new IConnectNotifyListener() { @Override public boolean shouldHandle(String connectId, String topic) { // Process messages only from specific topics. if (topic.contains("/rrpc/request/")) { return true; } else { return false; } } @Override public void onNotify(String connectId, String topic, AMessage aMessage) { // Receive RRPC requests and return RRPC responses. try { // Run a remote command. String payload = new String((byte[]) aMessage.getData(), "UTF-8"); SSHShell sshExecutor = new SSHShell(host, username, password, port); sshExecutor.execute(payload); // Obtain the output of the command. StringBuffer sb = new StringBuffer(); Vector<String> stdout = sshExecutor.getStdout(); for (String str : stdout) { sb.append(str); sb.append("\n"); } // Return the output to the server. String response = topic.replace("/request/", "/response/"); Device.publish(response, sb.toString()); } catch (UnsupportedEncodingException e) { e.printStackTrace(); } } @Override public void onConnectStateChange(String connectId, ConnectState connectState) { } }); } }
Desarrollar el SDK de IoT Platform
Después de instalar el SDK de IoT Platform y descargar el código de ejemplo, agregue las dependencias del proyecto y los archivos Java obligatorios.
-
Agregue las siguientes dependencias al archivo pom.xml:
ImportantePara obtener más información sobre la versión más reciente del SDK de IoT Platform, consulte
.
<! -- IoT Platform SDK --> <dependency> <groupId>com.aliyun</groupId> <artifactId>aliyun-java-sdk-iot</artifactId> <version>7.38.0</version> </dependency> <dependency> <groupId>com.aliyun</groupId> <artifactId>aliyun-java-sdk-core</artifactId> <version>4.5.6</version> </dependency> <!-- commons-codec --> <dependency> <groupId>commons-codec</groupId> <artifactId>commons-codec</artifactId> <version>1.8</version> </dependency> -
Cree un archivo llamado OpenApiClient.java para llamar a las operaciones de API de IoT Platform.
public class OpenApiClient { private static DefaultAcsClient client = null; public static DefaultAcsClient getClient(String accessKeyID, String accessKeySecret) { if (client != null) { return client; } try { IClientProfile profile = DefaultProfile.getProfile("cn-shanghai", accessKeyID, accessKeySecret); DefaultProfile.addEndpoint("cn-shanghai", "cn-shanghai", "Iot", "iot.cn-shanghai.aliyuncs.com"); client = new DefaultAcsClient(profile); } catch (Exception e) { System.out.println("create OpenAPI Client failed !! exception:" + e.getMessage()); } return client; } } -
Cree un archivo llamado SSHCommandSender.java. El archivo SSHCommandSender.java contiene el método principal que se usa para enviar comandos SSH y recibir sus respuestas. En el archivo SSHCommandSender.java, especifique la información del certificado del dispositivo, el par de AccessKey de su cuenta de Alibaba Cloud y los comandos SSH. La información del certificado del dispositivo incluye ProductKey, DeviceName y DeviceSecret.
public class SSHCommandSender {

    // ===================The start of the segment in which you configure the required parameters.===========================

    // The AccessKey ID of your Alibaba Cloud account.

    private static String accessKeyID = "";

    // The AccessKey secret of your Alibaba Cloud account.

    private static String accessKeySecret = "";

    // The ProductKey of the product.

    private static String productKey = "";

    // The DeviceName of the device.

    private static String deviceName = "";

    // ===================The end of the segment in which you configure the required parameters.===========================

    public static void main(String[] args) throws ServerException, ClientException, UnsupportedEncodingException {

        // The remote Linux command.

        String payload = "uname -a";

        // Create an RRPC request.

        RRpcRequest request = new RRpcRequest();

        request.setProductKey(productKey);

        request.setDeviceName(deviceName);

        request.setRequestBase64Byte(Base64.encodeBase64String(payload.getBytes()));

        request.setTimeout(5000);

        // The client that is used to receive requests from the server.

        DefaultAcsClient client = OpenApiClient.getClient(accessKeyID, accessKeySecret);

        // Send an RRPC request.

        RRpcResponse response = (RRpcResponse) client.getAcsResponse(request);

        // Process RRPC responses.

        // The result that is returned after the execution of the response.getSuccess() function indicates only that the RRPC request is sent. The returned response does not indicate whether the request is received by the device or whether the device returned a response based on the result.

        // You must check the result based on the RRPC response code that is returned. For more information, see https://www.alibabacloud.com/help/doc-detail/69797.htm.

        if (response != null && "SUCCESS".equals(response.getRrpcCode())) {

            // The output.

            System.out.println(new String(Base64.decodeBase64(response.getPayloadBase64Byte()), "UTF-8"));

        } else {

            // Failed to obtain the output and print the related RRPC response code.

            System.out.println(response.getRrpcCode());

        }

    }

}