Use a Resource Orchestration Service (ROS) template to deploy a scalable, highly available WordPress environment with phpMyAdmin.
Background information
You can use the Create a Scalable WordPress Cluster Based on Resources Such as ApsaraDB for RDS sample template to create a stack with a virtual private cloud (VPC), Server Load Balancer (SLB) instance, Auto Scaling group, Elastic Compute Service (ECS) instance, and ApsaraDB RDS instance. ROS automatically provisions all resources to deploy WordPress with phpMyAdmin.
-
WordPress is a PHP-based blogging platform backed by MySQL.
-
phpMyAdmin is a PHP-based web tool for managing MySQL databases.
Step 1: Create a stack
-
Log on to the Resource Orchestration Service console.
-
In the left-side navigation pane, choose .
-
In the top menu bar, select the region where you want to create the stack, such as China (Hangzhou).
-
Search for the Create a Scalable WordPress Cluster Based on Resources Such as ApsaraDB for RDS sample template.
-
Click Create Stack.
-
In the Configure Parameters step, configure Stack Name and the following parameters.
Parameter
Description
Example
Zone ID
The zone ID of the vSwitch.
Qingdao Zone C
Instance Type
The ECS instance type.
Select a valid instance type. For more information, see Instance family.
ecs.g6.large
Image ID
The ECS image ID.
For more information, see Overview.
centos_7_04_64_20G_alibase_201701015.vhd
System Disk Category
The ECS system disk category. Valid values:
-
cloud_efficiency: ultra disk
-
cloud_ssd: standard SSD
-
cloud_essd: Enterprise SSD (ESSD)
-
cloud: basic disk
-
ephemeral_ssd: local SSD
For more information, see Disks.
cloud_efficiency
Instance Password
The ECS instance password.
Test_12****
Specifications
The SLB instance specification.
Valid specifications are listed in Instance specifications.
slb.s1.small
Instance Type
The ApsaraDB RDS instance type.
Select a valid instance type. For more information, see Primary ApsaraDB RDS instance types.
rds.mysql.s1.small
Engine Version
The ApsaraDB RDS engine version.
5.7
Instance Storage
The ApsaraDB RDS storage capacity.
Valid values: 5 to 2000, in increments of 5.
Unit: GB.
20
Database Name
The ApsaraDB RDS database name.
wordpress
User Name
The ApsaraDB RDS database username.
wpuser
User Password
The ApsaraDB RDS database password.
Test_13****
-
-
Click Next:Check and Confirm. Then, click Create.
-
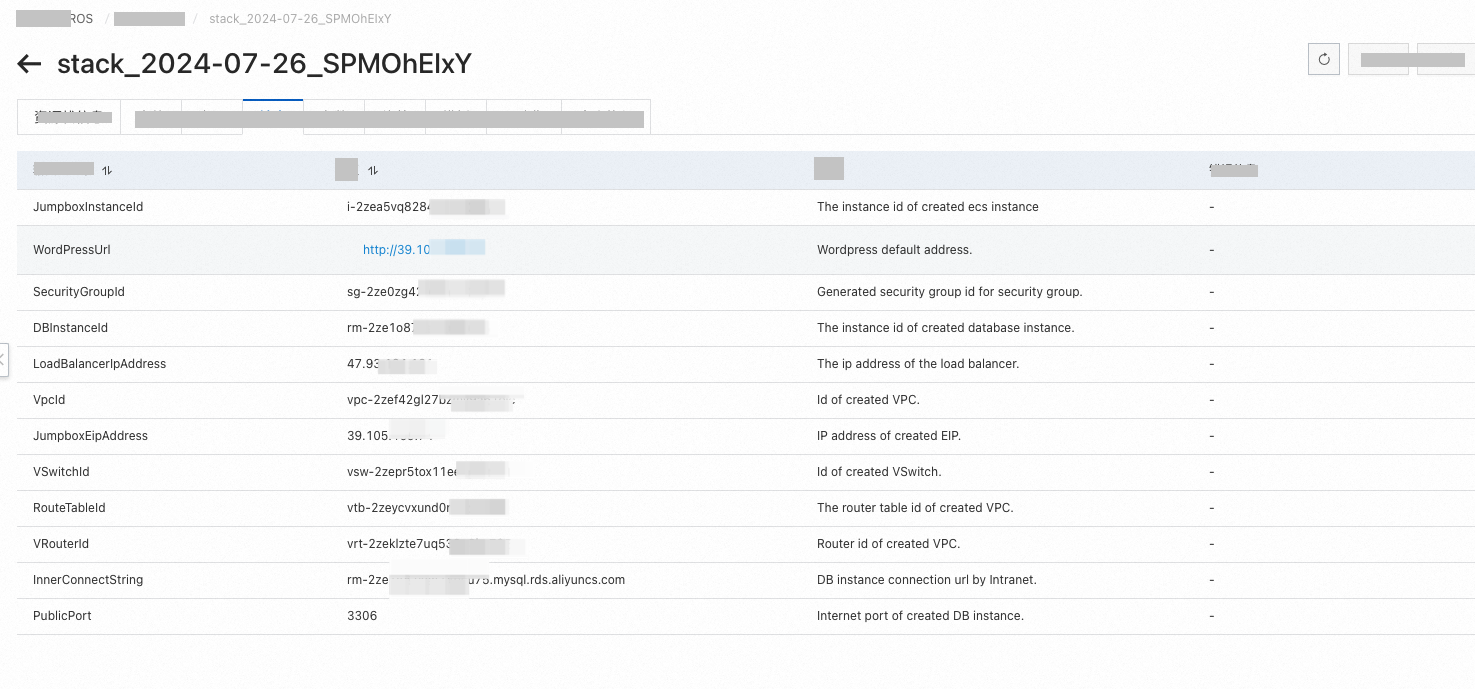
On the Stack Information tab, wait until the stack is created. Click the Output tab to get the WordPressUrl value.
-
Access WordPressUrl to open the WordPress management page.

Step 2: View resources
In the left-side navigation pane, choose .
On the Stacks page, click the ID of the desired stack.
-
Click the Resources tab to view the stack resources.
Resources created in this stack:
Resource
Quantity
Resource description
Specification description
ALIYUN::ECS::Instance
1
Creates an ECS instance to deploy the WordPress service.
-
Specifications:
-
Instance type: ecs.g6.large.
-
Disk category: ultra disk.
-
System disk size: 40 GB.
-
Public IP address: Allocated.
ALIYUN::ECS::VPC
1
Creates a VPC to enhance network security in the cloud.
None.
ALIYUN::ECS::vSwitch
1
Creates a vSwitch in the VPC to manage instances in a zone.
None.
ALIYUN::RDS::DBInstance
1
Creates an ApsaraDB RDS database to store WordPress data.
-
Instance storage: 5 GB.
-
Default instance type: rds.mysql.s1.small.
ALIYUN::VPC::EIP
2
Creates elastic IP addresses (EIPs) for Internet access to the ECS instance.
None.
ALIYUN::ESS::ScalingGroup
1
Creates a scaling group that runs WordPress and phpMyAdmin across multiple instances with auto-scaling.
None.
ALIYUN::VPC::NatGateway
1
Creates a NAT gateway to manage inbound and outbound VPC traffic. Supports SNAT, DNAT, up to 10 Gbit/s forwarding, and cross-zone disaster recovery.
None.
ALIYUN::SLB::LoadBalancer
1
Creates an SLB instance to distribute traffic across ECS instances, improving application availability and eliminating single points of failure.
-
Specification: slb.s1.small. You can use this specification for free.
-
Network type: VPC.
NoteFor pricing details, see the pricing documentation for each product.
-