This topic describes how to create and use cloud disks on an RDS Custom container series node.
Prerequisites
An RDS Custom container series AI node is created.
Node Lingjun of the container series does not support mounting cloud disks.
Billing
Cloud disks are billed on a pay-as-you-go basis in RDS.
When you declare a persistent volume (PV) claim (PVC) and start a pod for the first time, a cloud disk is created and billing begins. The billing cycle continues until the cloud disk is released.
After a pod is released, the cloud disk continues to exist and incur charges. You can use the cloud disk through the PVC when you start a new pod. If you no longer need the disk, you must manually release the Custom container cloud disk.
Cloud disk bills are calculated based on the disk performance level (PL0, PL1, PL2, and PL3). For example, if you use three 50 GB PL0 disks and two 100 GB PL1 disks in an ACK cluster, two bills are generated: one for 150 GB of usage (PL0) and another for 200 GB of usage (PL1). The disk instance ID is in the format of `vnd-****`.
Notes
You can mount Custom container cloud disks only on Custom container nodes.
You cannot scale out disk capacity by modifying a PVC.
You can use a PVC to declare only cloud disks with performance levels that the cluster supports.
Step 1: Configure supported cloud disk performance levels for the ACK cluster
You can configure the performance levels when you create an RDS Custom container series node in the ACK cluster for the first time.
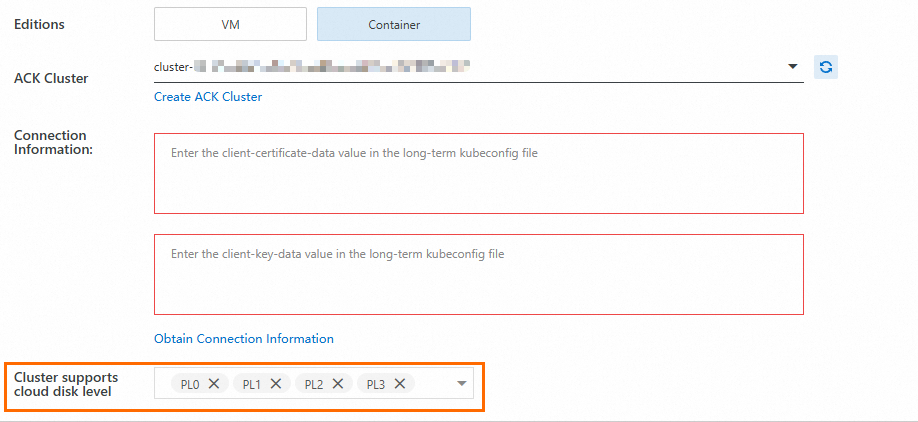
You can modify the supported cloud disk performance levels for an existing ACK cluster.
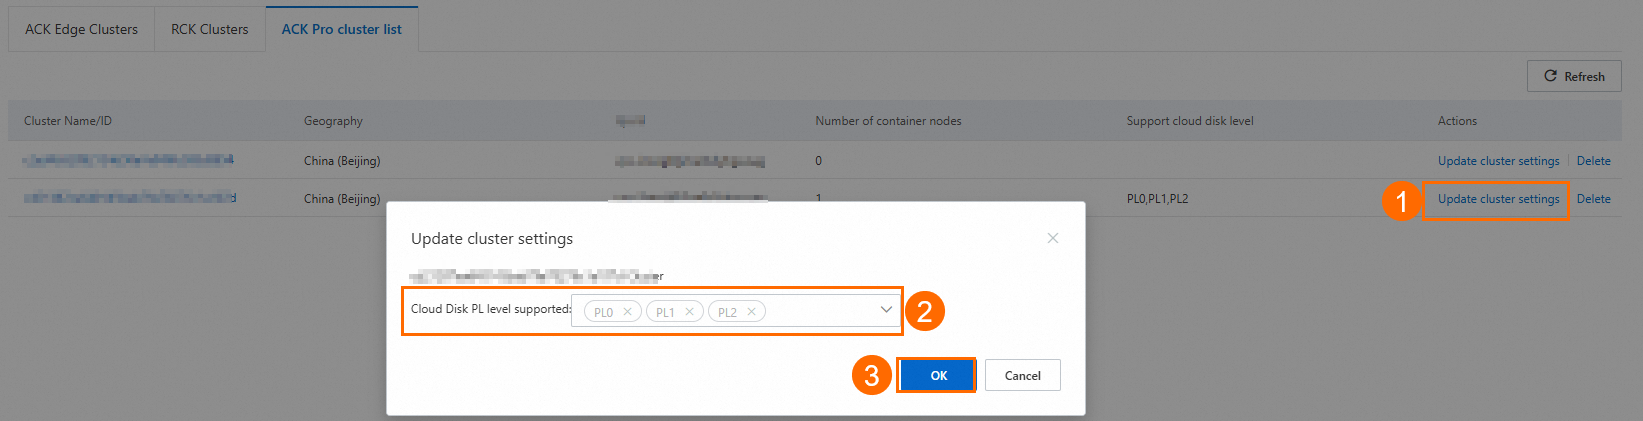
Log on to the RDS console. In the navigation pane on the left, click RDS Custom > Custom Container Cluster.
On the Custom Container Cluster page, click the ACK Pro Cluster List tab.
Find the cluster that you want to manage and click Update Cluster Settings in the Actions column.
On the page that appears, configure the supported cloud disk performance levels for the cluster and click OK.
 Important
You can only add new cloud disk performance levels.
Step 2: Use a cloud disk on an RDS Custom container node
To create and use a Custom container cloud disk, declare a PVC in the ACK cluster. When you use the PVC to start a pod for the first time, the system creates a cloud disk in the cluster with the specified performance level and storage capacity.
Create a PVC.
Create a YAML file, such as
pvc-disk-test-pl0.yaml. Set thestorageClassNamefield toaliclouddb-vnode-disk-essd-<disk performance level>. For example:apiVersion: v1 kind: PersistentVolumeClaim metadata: name: disk-test-pl0 namespace: default spec: accessModes: - ReadWriteOnce # The persistent volume can be mounted as read-write by a single node. resources: requests: storage: 30Gi storageClassName: aliclouddb-vnode-disk-essd-pl0 volumeMode: FilesystemRun the following command to create the PVC.
kubectl create -f pvc-disk-test-pl0.yaml
Deploy a pod and mount the PVC.
Create a YAML file, such as
pod.yaml, and specify the mount path for the cloud disk. For example, to mount the cloud disk to the/datapath:# Pod configuration apiVersion: v1 kind: Pod metadata: name: disktest-pl0 spec: containers: - command: - sh - -c - echo hello world; sleep infinity; image: aliclouddb-pub-registry-vpc.cn-beijing.cr.aliyuncs.com/aliclouddb-public/des-ai-nv:25.05-sglang0.4.6.post4-pytorch2.6-cu124-20250513-serverless imagePullPolicy: IfNotPresent name: disktest-pl0 ports: - containerPort: 8000 name: restful protocol: TCP resources: requests: cpu: "10" memory: "100Gi" limits: cpu: "10" memory: "100Gi" volumeMounts: - mountPath: /data name: data-volume volumes: - name: data-volume persistentVolumeClaim: claimName: disk-test-pl0 restartPolicy: Always nodeSelector: alibabacloud.com/virtual-node: "true" tolerations: - effect: NoSchedule key: virtual-kubelet.io/provider value: aliclouddbRun the following command to deploy the pod and mount the PVC.
kubectl apply -f pod.yaml
(Optional) Log on to the pod to view the mounted Custom container cloud disk.
kubectl get pods  # Check the pod status

kubectl exec -it <pod_name> -- /bin/bash   # Enter the container

df -h  # Check the mount path
Example response:

Release a Custom container cloud disk
Before you release a Custom container cloud disk, you must first delete the pod that uses the disk. To delete the pod, run the command kubectl delete pod <pod_name>.
To release the Custom container cloud disk, delete the PVC and the associated persistent volume (PV).
Delete using commands
Run the following commands to delete the PVC and the associated PV.
kubectl delete pvc <pvc_name>

kubectl delete pv <pv_name>
Delete in the ACK console
Log on to the Container Service for Kubernetes (ACK) console. In the navigation pane on the left, click Clusters.
On the Clusters page, click the name of the cluster that you want to manage. In the navigation pane on the left, choose .
Find the PVC that you want to delete and click Delete in the Actions column. In the dialog box that appears, select the Delete Bound PVs checkbox and click OK.

References
For more information, see Introduction to RDS Custom.