When you create an RDS Custom AI node, the system installs the NVIDIA Tesla driver, CUDA, and cuDNN by default. If the default versions of these components no longer meet your requirements, you can uninstall the existing versions and install the versions you need.
Prerequisites
Uninstall the Tesla driver, CUDA, and cuDNN
This topic uses the installation of Tesla driver 575.57.08, CUDA 12.9.0, and cuDNN 9.10.2 on Alibaba Cloud Linux 3 as an example. The procedure is as follows:
Run the following command and follow the interface prompts to uninstall the Tesla driver.
/usr/bin/nvidia-uninstallUninstall CUDA.
Method 1: Manually delete the CUDA package and related configuration files
Manually delete the CUDA package and related configurations.
# Uninstall CUDA packages
sudo dnf remove 'cuda*'

# Delete repository configurations
sudo rm /etc/yum.repos.d/cuda*.repo

# Clean cache
sudo dnf clean all
Run the
nvcc --versioncommand to confirm whether CUDA is uninstalled.When the prompt
command not foundappears, CUDA is successfully uninstalled.
Method 2: Uninstall using the uninstall_cuda file
NoteDifferent CUDA versions may have different uninstall commands. If the
cuda-uninstallerfile is not found, check whether a file starting withuninstall_cudaexists in the/usr/local/cuda/bin/directory.If it exists, replace
cuda-uninstallerin the command with that file name.If it does not exist, uninstall using Method 1.
/usr/local/cuda/bin/cuda-uninstaller
rm -rf /usr/local/cuda-12.9
When
Successfullyappears in the output, the uninstallation is successful.Uninstall cuDNN.
Run the following command to check the names of the installed cuDNN-related packages.
rpm -qa | grep cudnnThe following result is returned:
cudnn9-cuda-12-9.10.2.21-1.x86_64
libcudnn9-cuda-12-9.10.2.21-1.x86_64
libcudnn9-static-cuda-12-9.10.2.21-1.x86_64
...
Run the
dnf removecommand to uninstall each target package.sudo dnf remove cudnn9-cuda-12-9.10.2.21-1.x86_64 sudo dnf remove libcudnn9-cuda-12-9.10.2.21-1.x86_64 sudo dnf remove libcudnn9-static-cuda-12-9.10.2.21-1.x86_64Run the following command to clean up remaining dependencies.
sudo dnf autoremoveVerify the uninstallation result.
rpm -qa | grep cudnnIf the output is empty, the uninstallation is successful. Otherwise, continue to run
dnf removeto uninstall the remaining packages.
Install the Tesla driver
Step 1: Download the NVIDIA Tesla driver
Visit the NVIDIA driver download page.
NoteFor more information about installing and configuring NVIDIA drivers, see NVIDIA Driver Installation Quickstart Guide.
Set the appropriate search criteria based on the RDS Custom instance type to find and select a suitable driver.
Find the driver you want to download and click View next to the corresponding driver.
On the product page of the driver you want to download, right-click Download and copy the link address.
Run the following command to download the driver installation package.
The driver download URL in the example command is the driver download link you obtained in Step 4.
wget https://us.download.nvidia.com/tesla/575.57.08/NVIDIA-Linux-x86_64-575.57.08.run
Step 2: Install the NVIDIA Tesla driver
Alibaba Cloud Linux/CentOS
Run the following command to check whether the kernel-devel and kernel-headers packages are installed on the GPU-accelerated instance.
sudo rpm -qa | grep $(uname -r)If the command output includes the version information about the kernel-devel and kernel-headers packages, the packages are installed. Sample command output:
kernel-3.10.0-1062.18.1.el7.x86_64
kernel-devel-3.10.0-1062.18.1.el7.x86_64
kernel-headers-3.10.0-1062.18.1.el7.x86_64
If you cannot find kernel-devel-* and kernel-headers-* in the command output, you need to download and install the kernel-devel and kernel-headers packages that match your kernel version.
ImportantIf the kernel-devel version is different from the kernel version, a compilation error occurs when you install RPM Package Manager (RPM) for your driver. Therefore, check the version number of kernel-* in the command output before you download the corresponding kernel-devel version. In the preceding command output, the kernel version is 3.10.0-1062.18.1.el7.x86_64.
Grant the permissions on the installation package to your Tesla driver and install the driver.
In this example, a Linux 64-bit Tesla driver is used. We recommend that you use a .run installation package for your Tesla driver, such as the NVIDIA-Linux-x86_64-xxxx.run package. Run the following commands to grant the execution permissions on the installation package and install the Tesla driver.
NoteIf you use a Tesla driver in other formats such as .deb or .rpm, see NVIDIA CUDA Installation Guide for Linux for the specific installation method.
# Grant permissions
sudo chmod +x NVIDIA-Linux-x86_64-xxxx.run
# Install
sudo sh NVIDIA-Linux-x86_64-xxxx.run
Run the following command to check whether the Tesla driver is installed:
nvidia-smiWhen the detailed information of the Tesla driver appears in the output, the installation is successful.
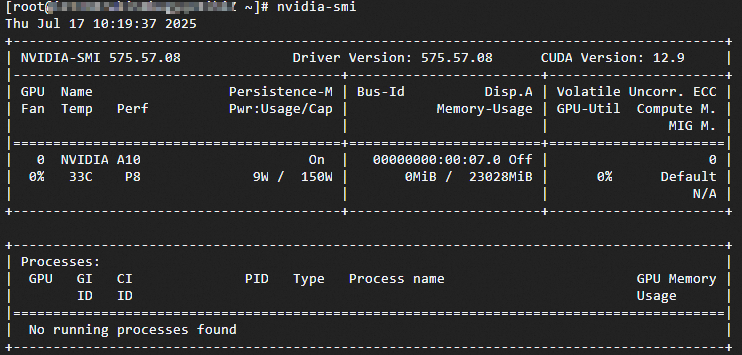
(Optional) Enable Persistence-M using the NVIDIA Persistence Daemon.
After the Tesla driver is installed, Persistence-M is disabled (
off) by default. The Tesla driver is more stable when Persistence-M is enabled. To ensure business continuity, we recommend that you enable Persistence-M using the NVIDIA Persistence Daemon. For more information, see Persistence Daemon.NotePersistence-M is a term for a user-settable driver property that keeps a GPU in the initialized state.
Enabling Persistence-M using
nvidia-smi -pm 1can cause issues such as the setting becoming invalid after the instance is restarted. For more information, see Persistence Mode becomes invalid after a GPU-accelerated instance is restarted, and ECC status or MIG feature settings also fail. We recommend that you enable Persistence-M using the NVIDIA Persistence Daemon.
Run the following command to run the NVIDIA Persistence Daemon:
sudo nvidia-persistenced --user username
# username is your username.
Run the following command to view the status of Persistence-M:
nvidia-smiIf the following command output is displayed, Persistence-M is enabled (
on).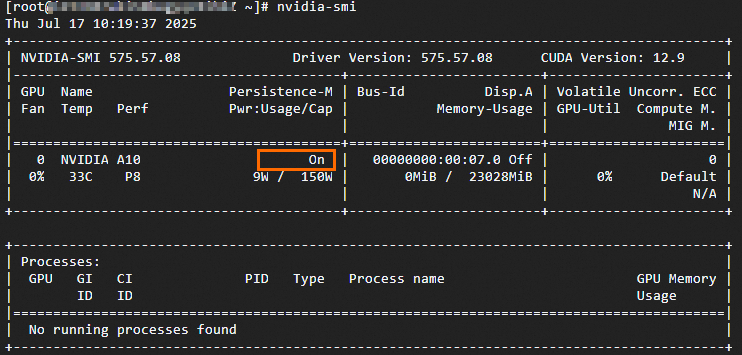
(Optional) Enable Persistence-M after the system is restarted.
If the system is restarted, Persistence-M will be disabled (
on). You can perform the following operations to re-enable Persistence-M.By installing the Tesla driver installation package, the installation script provided by NVIDIA (such as sample scripts and installer scripts) is installed to the
/usr/share/doc/NVIDIA_GLX-1.0/samples/nvidia-persistenced-init.tar.bz2path.Run the following commands to decompress and install the installation script provided by NVIDIA:
cd /usr/share/doc/NVIDIA_GLX-1.0/samples/
sudo tar xf nvidia-persistenced-init.tar.bz2
cd nvidia-persistenced-init
sudo sh install.sh
Run the following command to check whether the NVIDIA Persistence Daemon runs as expected:
sudo systemctl status nvidia-persistencedIf the following command output is displayed, the NVIDIA Persistence Daemon runs as expected.
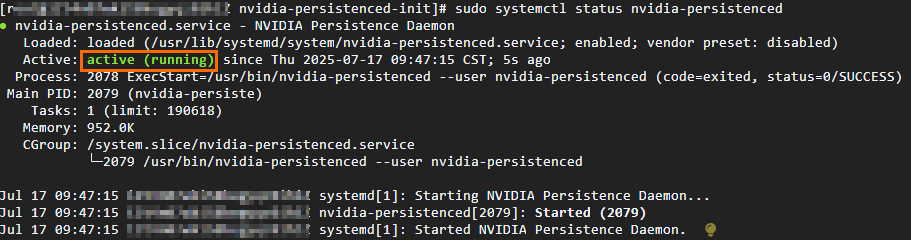 Note
NoteYou can adapt the NVIDIA Persistence Daemon installation script based on your operating system to ensure that the NVIDIA Persistence Daemon works as expected.
Run the following command to confirm that Persistence-M is enabled (
on) again.nvidia-smi(Optional) Run the following command to disable the NVIDIA Persistence Daemon.
You can disable the NVIDIA Persistence Daemon as needed.
sudo systemctl stop nvidia-persistenced
sudo systemctl disable nvidia-persistenced
Ubuntu and others
Grant the permissions on the installation package to your Tesla driver and install the driver.
In this example, a Linux 64-bit Tesla driver is used. We recommend that you use a .run installation package for your Tesla driver, such as the NVIDIA-Linux-x86_64-xxxx.run package. Run the following commands to grant the execution permissions on the installation package and install the Tesla driver.
NoteIf you use a Tesla driver in other formats such as .deb or .rpm, see NVIDIA CUDA Installation Guide for Linux for the specific installation method.
# Grant permissions
sudo chmod +x NVIDIA-Linux-x86_64-xxxx.run
# Install
sudo sh NVIDIA-Linux-x86_64-xxxx.run
Run the following command to check whether the Tesla driver is installed:
nvidia-smiWhen the detailed information of the Tesla driver appears in the output, the installation is successful.
(Optional) Enable Persistence-M using the NVIDIA Persistence Daemon.
After the Tesla driver is installed, Persistence-M is disabled (
off) by default. The Tesla driver is more stable when Persistence-M is enabled. To ensure business continuity, we recommend that you enable Persistence-M using the NVIDIA Persistence Daemon. For more information, see Persistence Daemon.NotePersistence-M is a term for a user-settable driver property that keeps a GPU in the initialized state.
Enabling Persistence-M using
nvidia-smi -pm 1can cause issues such as the setting becoming invalid after the instance is restarted. For more information, see Persistence Mode becomes invalid after a GPU-accelerated instance is restarted, and ECC status or MIG feature settings also fail. We recommend that you enable Persistence-M using the NVIDIA Persistence Daemon.
Run the following command to run the NVIDIA Persistence Daemon:
sudo nvidia-persistenced --user username
# username is your username.
Run the following command to view the status of Persistence-M:
nvidia-smiIf the following command output is displayed, Persistence-M is enabled (
on).
(Optional) Enable Persistence-M after the system is restarted.
If the system is restarted, Persistence-M will be disabled (
on). You can perform the following operations to re-enable Persistence-M.By installing the Tesla driver installation package, the installation script provided by NVIDIA (such as sample scripts and installer scripts) is installed to the
/usr/share/doc/NVIDIA_GLX-1.0/samples/nvidia-persistenced-init.tar.bz2path.Run the following commands to decompress and install the installation script provided by NVIDIA:
cd /usr/share/doc/NVIDIA_GLX-1.0/samples/
sudo tar xf nvidia-persistenced-init.tar.bz2
cd nvidia-persistenced-init
sudo sh install.sh
Run the following command to check whether the NVIDIA Persistence Daemon runs as expected:
sudo systemctl status nvidia-persistencedIf the following command output is displayed, the NVIDIA Persistence Daemon runs as expected.
NoteYou can adapt the NVIDIA Persistence Daemon installation script based on your operating system to ensure that the NVIDIA Persistence Daemon works as expected.
Run the following command to confirm that Persistence-M is enabled (
on) again.nvidia-smi(Optional) Run the following command to disable the NVIDIA Persistence Daemon.
You can disable the NVIDIA Persistence Daemon as needed.
sudo systemctl stop nvidia-persistenced
sudo systemctl disable nvidia-persistenced
Install CUDA
Obtain the CUDA installation package.
Go to the CUDA Toolkit Archive page.
Click the CUDA version that corresponds to your driver.
In Operating System, select the operating system, architecture, or version parameters as needed to obtain the download URL and installation commands for the corresponding CUDA installation package.
NoteThis topic uses CUDA 12.9.0 and the Linux operating system RHEL 8 (Alibaba Cloud Linux 3 is compatible with RHEL 8) as an example.
Install CUDA.
Run the following commands in sequence to install CUDA.
wget https://developer.download.nvidia.com/compute/cuda/12.9.0/local_installers/cuda-repo-rhel8-12-9-local-12.9.0_575.51.03-1.x86_64.rpm
sudo rpm -i cuda-repo-rhel8-12-9-local-12.9.0_575.51.03-1.x86_64.rpm
sudo dnf clean all
sudo dnf -y install cuda-toolkit-12-9
Run the following commands in sequence to configure CUDA environment variables:
echo 'export PATH=/usr/local/cuda/bin:$PATH' | sudo tee /etc/profile.d/cuda.sh
source /etc/profile
Check whether CUDA is installed on the instance.
Run the
nvcc -Vcommand to check whether the CUDA installation version is correct.The following result is returned:
nvcc: NVIDIA (R) Cuda compiler driver
Copyright (c) 2005-2025 NVIDIA Corporation
Built on Wed_Apr__9_19:24:57_PDT_2025
Cuda compilation tools, release 12.9, V12.9.41
Build cuda_12.9.r12.9/compiler.35813241_0
Install cuDNN
Obtain the cuDNN installation package.
Go to the CUDA Deep Neural Network (cuDNN) | NVIDIA Developer page.
Click Download cuDNN Library.
In Operating System, select the operating system, architecture, or version parameters as needed to obtain the download URL and installation commands for the corresponding cuDNN installation package.
The latest version of cuDNN is downloaded by default. You can also click Archive of Previous Releases to select and download the version you need.
NoteThis topic uses cuDNN 9.10.2 and the Linux operating system RHEL 8 (Alibaba Cloud Linux 3 is compatible with RHEL 8) as an example.
Install cuDNN.
Run the following commands in sequence to install cuDNN.
wget https://developer.download.nvidia.com/compute/cudnn/9.10.2/local_installers/cudnn-local-repo-rhel8-9.10.2-1.0-1.x86_64.rpm
sudo rpm -i cudnn-local-repo-rhel8-9.10.2-1.0-1.x86_64.rpm
sudo dnf clean all
sudo dnf -y install cudnn-cuda-12
(Optional) If the system installs
cudnn.h,libcudnn.so*, andcudnn_version.hin the /usr/include/ directory by default, run the following commands to link these files to the corresponding directories under /usr/local/cuda/.Run the following commands to link libcudnn.so* and other cuDNN library files to
/usr/local/cuda/lib64/.sudo ln -s /usr/lib64/libcudnn.so.9.10.2 /usr/local/cuda/lib64/libcudnn.so.9.10.2 sudo ln -s /usr/local/cuda/lib64/libcudnn.so.9.10.2 /usr/local/cuda/lib64/libcudnn.so.9 sudo ln -s /usr/local/cuda/lib64/libcudnn.so.9 /usr/local/cuda/lib64/libcudnn.soRun
ls -l /usr/local/cuda/lib64/libcudnn.so*to verify the link result.Run the following commands to link
cudnn.handcudnn_version.hto/usr/local/cuda/include.sudo ln -s /usr/include/cudnn.h /usr/local/cuda/include/cudnn.h sudo ln -s /usr/include/cudnn_version.h /usr/local/cuda/include/cudnn_version.hRun
ls -l /usr/local/cuda/include/cudnn*to verify the link result.
Check whether cuDNN is successfully installed.
cat /usr/local/cuda/include/cudnn_version.h | grep CUDNN_MAJOR -A 2The following result is returned:
#define CUDNN_MAJOR 9
#define CUDNN_MINOR 10
#define CUDNN_PATCHLEVEL 2
--