When your service resource is a Network Load Balancer (NLB) instance, you can use ProxyProtocol v2 to pass the service consumer's real source information to backend servers. This information includes the real client IP and Alibaba Cloud extension information, such as the endpoint ID, VPC ID, and endpoint service ID. You can use this information to trace request sources.
How it works
Get the real client IP
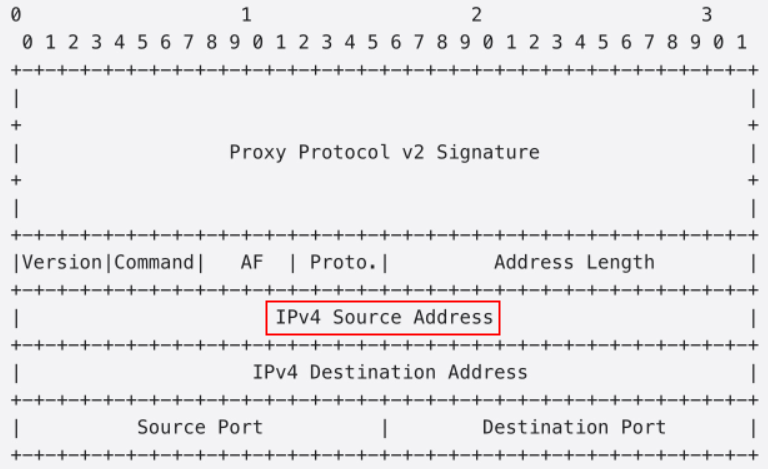
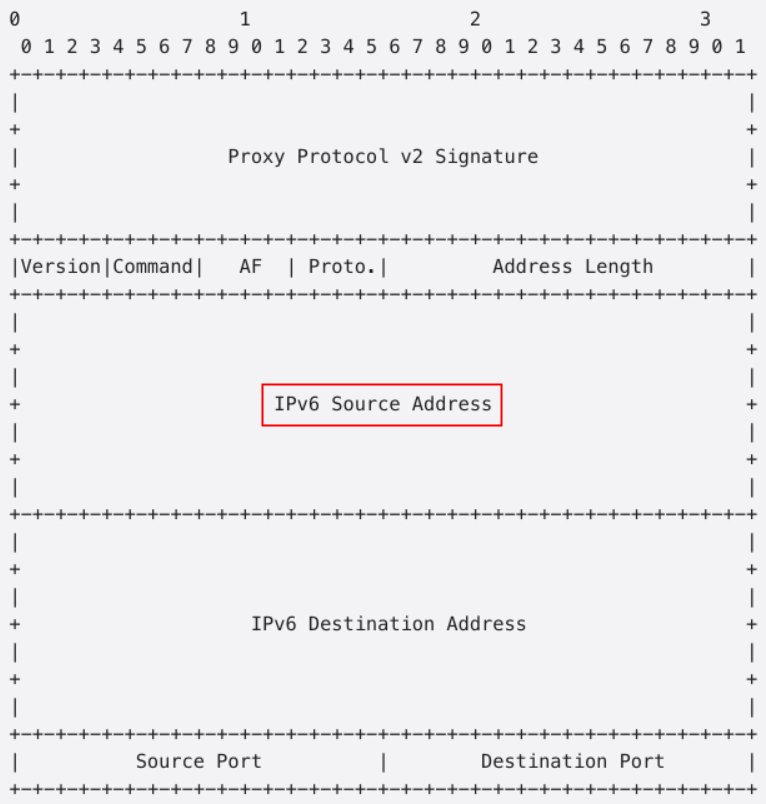
ProxyProtocol v2 is used to transparently pass client connection information between an NLB instance and its backend servers. After you enable ProxyProtocol for an NLB listener, NLB appends the client's real source information, such as the IP address and port, to the beginning of the payload of the first TCP packet sent to the backend server after a successful TCP three-way handshake.
ProxyProtocol v2 binary header format that carries a client IPv4 address | ProxyProtocol v2 binary header format that carries a client IPv6 address |
|
|
Get Alibaba Cloud extension information
NLB supports the Type-Length-Value (TLV) extension mechanism of ProxyProtocol v2 to carry identifiers specific to PrivateLink.
According to the ProxyProtocol v2 specification, Type values from
0xE0to0xEFare reserved for custom extensions. Alibaba Cloud uses0xE1as the custom Type identifier.Format of Alibaba Cloud extension information:
Type:
0xE1, which identifies the Alibaba Cloud custom extension.Length: The total length of the subsequent data, including SubType and Custom Data.
SubType: The type of the extension field.
0x01: VPC ID.0x02: endpoint ID.0x03: endpoint service ID.
Custom Data: The specific ID of the extension information.
 * 0 1 2 3 4 5 6 7 8 9 0 1 2 3 4 5 6 7 8 9 0 1 2 3 4 5 6 7 8 9 0 1
 *+-+-+-+-+-+-+-+-+-+-+-+-+-+-+-+-+-+-+-+-+-+-+-+-+-+-+-+-+-+-+-+-+
 *|  Type = 0xE1  |            Length             | SubType       |
 *+-+-+-+-+-+-+-+-+-+-+-+-+-+-+-+-+-+-+-+-+-+-+-+-+-+-+-+-+-+-+-+-+
 *|                                                               |
 *|                                                               |
 *|                        Custom Data                            |
 *|                                                               |
 *|                                                               |
 *+-+-+-+-+-+-+-+-+-+-+-+-+-+-+-+-+-+-+-+-+-+-+-+-+-+-+-+-+-+-+-+-+
Applicability
Only service resources that are Network Load Balancer (NLB) instances support the ProxyProtocol v2 feature. Application Load Balancer (ALB) and Classic Load Balancer (CLB) do not support this feature.
For ProxyProtocol to function correctly, your backend servers must support the protocol. If a backend server cannot parse the ProxyProtocol header, enabling this feature may cause application parsing errors and affect service availability.
NLB listeners support using ProxyProtocol to carry original connection information, such as source IP, destination IP, source port, and destination port, by adding it to the TCP or UDP data stream. This process does not discard or overwrite any original data.
NLB supports only ProxyProtocol v2. ProxyProtocol v2 supports multiple transport protocols, such as TCP and UDP. For more information, see The PROXY protocol.
Get the real client IP
This topic describes only how a service provider can get the real client IP. For the complete workflow of private service access, see Share a user-created service.
Enable ProxyProtocol for the NLB listener. Go to the NLB console - Instances page and click the ID of the target NLB instance. In the Instance Property section, make sure that Configuration Read-only Mode is disabled.
If no listener is configured: On the Listener tab, click Create Listener, go to the Advanced Settings section, and turn on the Enable Proxy Protocol switch.
If a listener is already configured: Click the listener ID, click Modify Listener, go to the Advanced Settings section, and turn on the Enable Proxy Protocol switch.
Configure the backend application to parse the protocol.
The following example shows the configuration for Nginx 1.20.1 on CentOS 7.9. The actual configuration may vary based on your environment.
Log on to the backend server and run the
nginx -tcommand to find the path to the configuration file. By default, the path is/etc/nginx/nginx.conf.Modify the Nginx configuration file to add the
proxy_protocolparameter to thelistendirective.http { # Configure the log format to use the $proxy_protocol_addr variable to record the real client IP. log_format main '$proxy_protocol_addr - $remote_addr - $remote_user [$time_local] "$request" ' '$status $body_bytes_sent "$http_referer" ' '"$http_user_agent" "$http_x_forwarded_for"'; server { # Add the proxy_protocol parameter to the listening port. listen 80 proxy_protocol; #... } }Run the
sudo nginx -s reloadcommand to reload the Nginx configuration file.
Verify that the backend server can get the real client IP:
As the service consumer, log on to an Elastic Compute Service (ECS) instance in the Virtual Private Cloud (VPC) where the endpoint resides and run the
curl http://<endpoint domain name>command.As the service provider, log on to the backend server and run the
tail -f /var/log/nginx/access.logcommand to view the Nginx access logs.The default path for Nginx log files is
/var/log/nginx/access.log.In each log entry, the IP address corresponding to the
$proxy_protocol_addrvariable is the real client IP.[root@iZxxx ~]# tail -f /var/log/nginx/access.log 172.16.1.171 192.168.1.151 - - [15/Jan/2026:10:55:04 +0800] "GET / HTTP/1.1" 200 121 "-" "curl/7.29.0" "-" 172.16.1.171 192.168.1.151 - - [15/Jan/2026:10:55:32 +0800] "GET / HTTP/1.1" 200 121 "-" "curl/7.29.0" "-" 172.16.1.171 192.168.1.151 - - [15/Jan/2026:10:55:33 +0800] "GET / HTTP/1.1" 200 121 "-" "curl/7.29.0" "-" 172.16.1.171 192.168.1.151 - - [15/Jan/2026:10:55:40 +0800] "GET / HTTP/1.1" 200 121 "-" "curl/7.29.0" "-"
Get Alibaba Cloud extension information
This topic describes only how a service provider can get Alibaba Cloud extension information. For the complete workflow of private service access, see Share a user-created service.
Enable ProxyProtocol for the NLB listener. Go to the NLB console - Instances page and click the ID of the target NLB instance. In the Instance Property section, make sure that Configuration Read-only Mode is disabled.
If no listener is configured: On the Listener tab, click Create Listener, go to the Advanced Settings section, and turn on the Enable Proxy Protocol switch.
If a listener is already configured: Click the listener ID, click Modify Listener, go to the Advanced Settings section, and turn on the Enable Proxy Protocol switch.
Call the UpdateListenerAttribute API operation. Set the
ProxyProtocolEnabled,Ppv2VpcIdEnabled,Ppv2PrivateLinkEpIdEnabled, andPpv2PrivateLinkEpsIdEnabledparameters totrueto pass PrivateLink-related information to backend servers via ProxyProtocol.Configure the backend application to parse the extension fields.
Standard applications cannot directly parse the Alibaba Cloud extension fields. This example uses the
scapypacket capture library to parse and output the Alibaba Cloud extension information.As the service provider, log on to the backend server and run the
pip3 install scapycommand to install scapy.Save the following script as
parse_ppv2_extensions.py:#!/usr/bin/env python3 from scapy.all import sniff import argparse import sys # Disable output buffering sys.stdout = open(sys.stdout.fileno(), mode='w', buffering=1) sys.stderr = open(sys.stderr.fileno(), mode='w', buffering=1) ppv2_signature = [13, 10, 13, 10, 0, 13, 10, 81, 85, 73, 84, 10] # "\r\n\r\n\0\r\nQUIT\n" ep_id = "null" vpc_id = "null" eps_id = "null" client_ip = "" client_port = 0 endpoint_ip = "" endpoint_id = "" parser = argparse.ArgumentParser(description="input parameter") parser.add_argument('--dstport', default='destination port', required=True) args = parser.parse_args() rs_port = args.dstport ppv2_cnt = 0 def convert_list_to_string(l): tmp = "" for c in l: tmp += chr(c) return tmp def convert_list_to_ip(l): return ".".join(map(str, l)) def pack_callback(packet): global endpoint_id, client_port, client_ip, vpc_id, ppv2_cnt, endpoint_ip, eps_id if ('Raw' in packet): byte_list = list(packet['Raw'].load) if (byte_list[0:12] == ppv2_signature): ppv2_cnt += 1 client_ip = convert_list_to_ip(byte_list[16:20]) endpoint_ip = convert_list_to_ip(byte_list[20:24]) client_port = byte_list[24] * 256 + byte_list[25] tlv = byte_list[28:] i = 0 while i < len(tlv): tlv_type = tlv[i] tlv_length = tlv[i + 1] * 256 + tlv[i + 2] tlv_value_first_byte = tlv[i + 3] tlv_value_true_value = tlv[i + 4: i + 4 + tlv_length - 1] if tlv_type == 225: # 0xE1 if tlv_value_first_byte == 1: # vpc_id vpc_id = convert_list_to_string(tlv_value_true_value) if tlv_value_first_byte == 2: # endpoint_id endpoint_id = convert_list_to_string(tlv_value_true_value) if tlv_value_first_byte == 3: # eps_id eps_id = convert_list_to_string(tlv_value_true_value) i += 1 + 2 + tlv_length print("receive total %d ppv2 packet, ClientIp: %s, ClientPort: %d, EndpointIp: %s, EndpointId: %s, VpcId: %s, EndpointServiceId: %s" % ( ppv2_cnt, client_ip, client_port, endpoint_ip, endpoint_id, vpc_id, eps_id)) sys.stdout.flush() # Force flush output filterstr = "ip and tcp and dst port " + rs_port print("start to capture ppv2 packet on port " + rs_port) sys.stdout.flush() sniff(iface="eth0", filter=filterstr, prn=pack_callback)Run the command:
sudo python3 parse_ppv2_extensions.py --dstport <backend service port of the NLB server group>.As the service consumer, log on to an ECS instance in the VPC where the endpoint resides. After you access the service by running the
curl http://<endpoint domain name>command, you can view the Alibaba Cloud extension information on the backend server.[root@iZb ~]# sudo python3 ppv2_scapy_parser.py --dstport 80 start to capture ppv2 packet on port 80 receive total 1 ppv2 packet, ClientIp: 172.16.1.171, ClientPort: 41396, EndpointIp: 172.16.1.172, EndpointId: ep-bpxxx, VpcId: vpc-bpxxx, EndpointServiceId: epsrv-bpxxx receive total 2 ppv2 packet, ClientIp: 172.16.1.171, ClientPort: 41396, EndpointIp: 172.16.1.172, EndpointId: ep-bpxxx, VpcId: vpc-bpxxx, EndpointServiceId: epsrv-bpxxx receive total 3 ppv2 packet, ClientIp: 172.16.1.171, ClientPort: 41484, EndpointIp: 172.16.1.172, EndpointId: ep-bpxxx, VpcId: vpc-bpxxx, EndpointServiceId: epsrv-bpxxx receive total 4 ppv2 packet, ClientIp: 172.16.1.171, ClientPort: 41484, EndpointIp: 172.16.1.172, EndpointId: ep-bpxxx, VpcId: vpc-bpxxx, EndpointServiceId: epsrv-bpxxx