This topic describes how to use multiple Alibaba Cloud services to deploy the Digital Imaging and Communications in Medicine (DICOM) service on Alibaba Cloud.
What is DICOM?
DICOM is an international standard to transmit, store, retrieve, print, process, and display medical imaging information, and is the primary medical imaging standard accepted in the healthcare industry. With hundreds of thousands of medical imaging devices in use, DICOM is one of the most widely deployed healthcare messaging standards in the world. DICOM can be used to ensure that medical images meet quality standards, so that the accuracy of diagnosis can be preserved. Most imaging modalities, including computed tomography (CT), magnetic resonance imaging (MRI), and ultrasound must conform to the DICOM standard. For more information, see DICOM.
Architecture
The following figure shows the deployment architecture of the DICOM service.
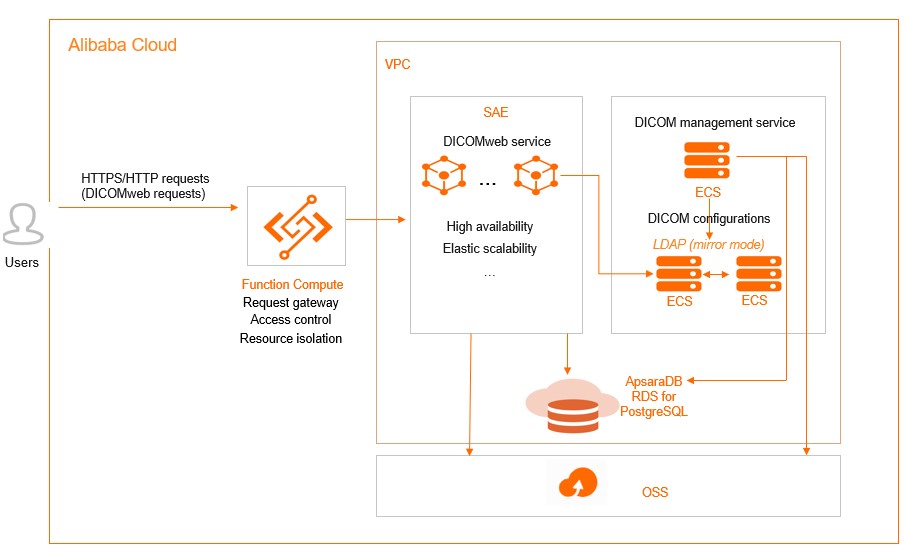
The following Alibaba Cloud services are involved in the architecture:
- Function Compute: processes user requests, performs request authentication and resource access control, and routes the user requests to the DICOMweb service.
- Virtual Private Cloud (VPC): a custom private network that is created by Alibaba Cloud. VPCs are logically isolated from each other. You can create and manage cloud service instances, such as Elastic Compute Service (ECS) instances and ApsaraDB RDS for PostgreSQL instances, in your VPC.
- Serverless App Engine (SAE): processes the DICOMweb protocol, stores DICOM files in Object Storage Service (OSS), and stores structured data in ApsaraDB RDS for PostgreSQL instances.
- ECS: Three ECS instances are deployed. The DICOM management module is deployed on an ECS instance to provide a web console. The Lightweight Directory Access Protocol (LDAP) service is deployed on the other two ECS instances, and data is synchronized between the LDAP services in mirror mode.
- ApsaraDB RDS for PostgreSQL: stores structured DICOM resources.
- OSS: stores unstructured DICOM resources.
Step 1: Create a VPC and vSwitches
VPCs are logically isolated from each other. You can create and manage your cloud service instances, such as ECS instances and ApsaraDB RDS for PostgreSQL instances, in your VPC. After you create a VPC, you can create vSwitches to divide the VPC into one or more subnets. vSwitches in the same VPC can communicate with each other.
- Create a VPC named
vpc-dicom-sh in the China (Shanghai) region. Specify 172.18.0.0/16 as the CIDR block of the VPC. For more information, see Create and manage a VPC. - Create two vSwitches in different zones in the China (Shanghai) region.
- Create a vSwitch named
vsw-dicom-sh-l in Zone L. Specify 172.18.80.0/20 as the CIDR block of the vSwitch. - Create a vSwitch named
vsw-dicom-sh-g in Zone G. Specify 172.18.16.0/20 as the CIDR block of the vSwitch.
For more information, see Create a vSwitch.
Step 2: Create and configure an ApsaraDB RDS for PostgreSQL instance
You can create an ApsaraDB RDS for PostgreSQL instance to store structured DICOM resources. After you create an ApsaraDB RDS for PostgreSQL instance, you must perform operations, for example, configure a whitelist, to make sure that the instance can be accessed as expected.
- Create an ApsaraDB RDS for PostgreSQL instance.
- Go to the ApsaraDB RDS buy page.
- On the Basic Configurations tab, configure the parameters and click Next:Instance Configuration. The following table describes the parameters.
| Parameter | Description |
|---|
| Billing Method | Select Pay-As-You-Go or Subscription based on your business requirements. |
| Region | Select China (Shanghai). |
| Database Engine | Select PostgreSQL and then select 13 from the engine drop-down list. |
| Edition | Select High-availability. |
| Storage Type | Select ESSD PL3. |
| Zone of Primary Node | Select Shanghai Zone L. |
| Zone of Secondary Node | Select Shanghai Zone G. |
| Instance Type | Select General-purpose. Then, select 2 for CPU (Cores), 4GB for Memory, and 400 for Maximum Connections. |
| Capacity | Enter 1500. |
- On the Instance Configuration tab, configure the parameters that are described in the following table, use the default settings for other parameters, and then click Next:Confirm Order.
| Parameter | Description |
|---|
| VPC | Select the vpc-dicom-sh VPC that you created in Step 1. |
| VSwitch of Primary Node | Select the vsw-dicom-sh-l vSwitch that you created in Zone L in Step 1. |
| VSwitch of Secondary Node | Select the vsw-dicom-sh-g vSwitch that you created in Zone G in Step 1. |
- Configure the ApsaraDB RDS for PostgreSQL instance.
After you create the ApsaraDB RDS for PostgreSQL instance, you must perform the following steps to make sure that the instance can be accessed as expected.
- Create an account and a database for the ApsaraDB RDS for PostgreSQL instance. For more information, see Create a database and an account on an ApsaraDB RDS for PostgreSQL instance.
- Configure a whitelist for the ApsaraDB RDS for PostgreSQL instance. For more information, see Configure an IP address whitelist for an ApsaraDB RDS for PostgreSQL instance.
- Connect to the ApsaraDB RDS for PostgreSQL instance. For more information, see Connect to an ApsaraDB RDS for PostgreSQL instance.
Step 3: Deploy the LDAP service
To deploy the LDAP service with the OpenLDAP replication policy based on the dcm4che/slapd-dcm4chee image, perform the following steps:
- Create two ECS instances named
ecs-dicom-ldap-l-01 and ecs-dicom-ldap-g-01. For more information, see Create and manage an ECS instance by using the ECS console (express version). When you create the
ecs-dicom-ldap-l-01 instance in the ECS console, configure the parameters that are described in the following table and use the default settings for other parameters.
| Parameter | Description |
|---|
| Region | Select China (Shanghai). |
| Zone | Select Zone L. |
| Storage | Select Enhanced SSD (ESSD) with 40 GiB capacity and set the Performance Level parameter to PL0 (up to 10,000 IOPS per disk). |
| Instance Type | Select Shared Standard Type s6 (ecs.s6-c1m2.large with 2 vCPUs and 4 GiB memory). |
| VPC | Select the vpc-dicom-sh VPC that you created in Step 1. |
| Public Image | Select Ubuntu 18.04 64-bit |
After you create the ecs-dicom-ldap-l-01 instance, use the same method to create the ecs-dicom-ldap-g-01 instance. Select Zone G when you create the ecs-dicom-ldap-g-01 instance.
- Log on to the ECS instances and run the following commands to initialize the ECS instances:
apt-get update
apt-get upgrade -y
apt install ca-certificates curl gnupg pass lsb-release docker  docker-compose ldap-utils -y
- Run the following commands to pull the image from the Container Registry Enterprise Edition instance:
docker login --username=****@test.aliyunid.com acr-ee-***-registry-vpc.cn-shanghai.cr.aliyuncs.com
docker pull acr-ee-***-registry-vpc.cn-shanghai.cr.aliyuncs.com/dicom/slapd-dcm4chee:2.6.0-25.0
- Configure the image startup scripts for the
ecs-dicom-ldap-l-01 and ecs-dicom-ldap-g-01 instances. - The following example shows the content of the docker-compose.yml file for the
ecs-dicom-ldap-l-01 instance:version: "3"
services:
ldap1:
image: acr-ee-***-registry-vpc.cn-shanghai.cr.aliyuncs.com/dicom/slapd-dcm4chee:2.6.0-25.0
environment:
LDAP_URLS: "ldap://ldap1:389/"
LDAP_REPLICATION_HOSTS: "ldap://ldap1:389/ ldap://172.18.18.105:389/"
ports:
- "389:389"
volumes:
- /var/local/dcm4chee-arc/ldap:/var/lib/openldap/openldap-data
- /var/local/dcm4chee-arc/slapd.d:/etc/openldap/slapd.d
- The following example shows the content of the docker-compose.yml file for the
ecs-dicom-ldap-g-01 instance:version: "3"
services:
ldap2:
image: acr-ee-***-registry-vpc.cn-shanghai.cr.aliyuncs.com/dicom/slapd-dcm4chee:2.6.0-25.0
environment:
LDAP_URLS: "ldap://ldap2:389/"
LDAP_REPLICATION_HOSTS: "ldap://172.18.92.187:389/ ldap://ldap2:389/"
SKIP_INIT_CONFIG: "true"
ports:
- "389:389"
volumes:
- /var/local/dcm4chee-arc/ldap:/var/lib/openldap/openldap-data
- /var/local/dcm4chee-arc/slapd.d:/etc/openldap/slapd.d
- Perform the following steps in the directory in which the docker-compose.yml file is located:
- Start the LDAP service.
docker-compose -p dcm4chee up -d
- Obtain the container ID of the LDAP service.
- Enable the synchronization feature.
docker exec <ldap-container-id> prepare-replication
docker exec <ldap-container-id> enable-replication
- Optional:Check the status of the synchronization configuration.
# -xw**** indicates the key configured when you start the LDAP service. You can configure this parameter by using the LDAP_ROOTPASS environment variable. Default value: secret.
ldapsearch -LLLsbase -xw**** -Dcn=admin,dc=dcm4che,dc=org -b "dicomDeviceName=dcm4chee-arc,cn=Devices,cn=DICOM Configuration,dc=dcm4che,dc=org" dicomVendorData | head
If the synchronization task starts as expected, the information similar to the following output is returned:
dn: dicomDeviceName=dcm4chee-arc,cn=Devices,cn=DICOM Configuration,dc=dcm4che,
 dc=org
dicomVendorData:: UEsDBBQAAAAAAKVbclMAAAAAAAAAAAAAAAALAAAAdGh1bWJuYWlscy9QSwME
 FAACAAgANWxIUhxjQjGkBgAAeQcAABEAAAB0aHVtYm5haWxzL2tvLnBuZ83V+zub5xsA8JdQh1Bpa
 ****
Note In addition to the preceding configurations, you can configure other parameters for the slapd-dcm4chee image. For more information, see
dcm4che-dockerfiles.
- Create a Classic Load Balancer (CLB) instance.
- Log on to the CLB console.
- On the Instances page, click Create CLB.
- On the instance buy page, configure the parameters that are described in the following table and use the default settings for other parameters.
| Parameter | Description |
|---|
| Region and Primary Zone | Select China (Shanghai) as the region and China East 2 Zone L as the primary zone. |
| Backup Zone | Select China East 2 Zone G. |
| Instance Name | Enter slb-dicom-ldap. |
| Instance Spec | Select Small Ⅰ (slb.s1.small). |
| Instance Type | Select Intranet. |
| Network type | Select VPC. |
| VPC | Select the vpc-dicom-sh VPC that you created in Step 1. |
- Click Buy Now and complete the payment.
- Configure the CLB instance.
- On the Instances page, find the
slb-dicom-ldap instance, and then click Configure Listener in the Actions column of the instance. - In the Protocol and Listener wizard, select TCP as the listener protocol, enter 389 as the listening port, and then click Next.
- In the Backend Servers wizard, click Primary/Secondary Server Group, and select ecs-dicom-ldap-l-01 and ecs-dicom-ldap-g-01.
Step 4: Deploy the DICOM management service
In this example, the dcm4che/dcm4chee-arc-psql image is used to deploy the DICOM management service. The DICOM management service provides management and query pages for O&M staff. In this example, the DICOM management service is deployed in standalone mode. You can select another deployment method based on your business requirements.
- Create an ECS instance named
ecs-dicom-arc-l-01. For more information, see Create and manage an ECS instance by using the ECS console (express version). When you create the
ecs-dicom-arc-l-01 instance in the ECS console, configure the parameters that are described in the following table and use the default settings for other parameters.
| Parameter | Description |
|---|
| Region | Select China (Shanghai). |
| Zone | Select Zone L. |
| Storage | Select Enhanced SSD (ESSD) with 100 GiB capacity and set the Performance Level parameter to PL0 (up to 10,000 IOPS per disk). |
| Instance Type | Select General Purpose Type g7 (ecs.g7.xlarge with 4 vCPUs and 16 GiB memory). |
| VPC | Select the vpc-dicom-sh VPC that you created in Step 1. |
| Public Image | Select Ubuntu 18.04 64-bit |
- Log on to the ECS instance and run the following commands to initialize the ECS instance:
apt-get update
apt-get upgrade -y
apt install ca-certificates curl gnupg pass lsb-release docker  docker-compose postgresql-client-10 -y
- Run the following commands to pull the image from the Container Registry Enterprise Edition instance:
docker login --username=****@test.aliyunid.com acr-ee-***-registry-vpc.cn-shanghai.cr.aliyuncs.com
docker pull acr-ee-***-registry-vpc.cn-shanghai.cr.aliyuncs.com/dicom/dcm4chee-arc-psql:5.25.0
- Initialize the database.
- Upload the
dcm4chee-arc-5.25.0-psql.zip package to the /home directory of the ECS instance, and then decompress the package. - Run the following commands to create a table and an index:
psql -h pgm-uf***.pg.rds.aliyuncs.com pacsdb pacs < /home/dcm4chee-arc-5.25.0-psql/sql/create-psql.sql
psql -h pgm-uf***.pg.rds.aliyuncs.com pacsdb pacs < /home/dcm4chee-arc-5.25.0-psql/sql/create-fk-index.sql
psql -h pgm-uf***.pg.rds.aliyuncs.com pacsdb pacs < /home/dcm4chee-arc-5.25.0-psql/sql/create-case-insensitive-index.sql
- Configure the image startup scripts.
- The following example shows the content of the
docker-compose.yml file: version: "3"
services:
arc:
image: acr-ee-***-registry-vpc.cn-shanghai.cr.aliyuncs.com/dicom/dcm4chee-arc-psql:5.25.0
logging:
driver: json-file
options:
max-size: "10m"
ports:
- "8080:8080"
- "8443:8443"
- "9990:9990"
- "9993:9993"
- "11112:11112"
- "2762:2762"
- "2575:2575"
- "12575:12575"
env_file: docker-compose.env
environment:
WILDFLY_CHOWN: /opt/wildfly/standalone
volumes:
- /etc/localtime:/etc/localtime:ro
- /etc/timezone:/etc/timezone:ro
- /var/local/dcm4chee-arc/wildfly:/opt/wildfly/standalone
- The following example shows the content of he
docker-compose.env file: The URL of the LDAP service is set to the endpoint of the
ecs-dicom-ldap-l-01 ECS instance.
POSTGRES_DB=pacsdb
POSTGRES_USER=pacs
POSTGRES_PASSWORD=pacs***
POSTGRES_HOST=pgm-uf***.pg.rds.aliyuncs.com
LDAP_URL=ldap://172.18.92.187:389
- Run the following command in the directory in which the
docker-compose.yml file is located to start Container Registry: docker-compose -p dcm4chee up -d
- Optional:Run the following command to check the startup status of the Container Registry service:
tail -f /var/local/dcm4chee-arc/wildfly/log/server.log
- Add OSS storage media.
- Create a file named
ldap_config.ldif and import configuration parameters into the file by using the ldapadd command of LDAP. The following example shows the content of the ldap_config.ldif file:version: 1
dn: dcmStorageID=alicloud-oss,dicomDeviceName=dcm4chee-arc,cn=Devices,cn=DICOM Configuration,dc=dcm4che,dc=org
objectClass: dcmStorage
dcmStorageID: alicloud-oss
dcmURI: jclouds:s3:https://oss-cn-shanghai-internal.aliyuncs.com
dcmDigestAlgorithm: MD5
dcmProperty: container=examplebucket
dcmProperty: jclouds.s3.virtual-host-buckets=true
dcmProperty: credential=<secret-key>
dcmProperty: identity=<access-key>
dcmProperty: jclouds.strip-expect-header=true
dcmProperty: containerExists=true
dcmProperty: jclouds.trust-all-certs=true
- Run the following command to import the configuration file:
# -xw**** indicates the key configured when you start the LDAP service.
#172.18.92.175
ldapadd -xw**** -D cn=admin,dc=dcm4che,dc=org -H ldap://172.18.92.187:389 -f ldap_config.ldif
- Configure OSS as the storage backend.
- Create a file named
ldap_config.ldif and import configuration parameters into the file by using the ldapadd command of LDAP. The following example shows the content of the ldap_config.ldif file:version: 1
dn: dicomAETitle=DCM4CHEE,dicomDeviceName=dcm4chee-arc,cn=Devices,cn=DICOM Configuration,dc=dcm4che,dc=org
changetype: modify
replace: dcmObjectStorageID
dcmObjectStorageID: alicloud-oss
- Run the following command to import the configuration file:
ldapmodify -xw**** -D cn=admin,dc=dcm4che,dc=org -H ldap://172.18.92.187:389 -f ldap_config.ldif
- Run the following command to import test data:
docker run --network=dcm4chee_default --rm acr-ee-***-registry-vpc.cn-shanghai.cr.aliyuncs.com/dicom/dcm4che-tools:5.25.0 storescu -cDCM4CHEE@dcm4chee_arc_1:11112 /opt/dcm4che/etc/testdata/dicom
Step 5: Deploy the DICOMweb service
You must deploy the DICOMweb service on SAE. Then, you can add an intranet SLB instance to allow applications that reside in the same VPC to communicate with each other.
Important Currently, the SAE console is only available in Chinese. The following steps are described in English for your reference.
- Create an application.
- Log on to the SAE console.
- In the left-side navigation pane, click Applications, and then click Create Application.
- On the Basic Information tab, configure the parameters and click Next: Deployment Configurations. The following table describes the parameters.
| Parameter | Description |
|---|
| Name | Enter DicomSerivce. |
| VPC | Select Custom Configuration and select the vpc-dicom-sh VPC from the drop-down list. |
| Namespace | Select Default from the drop-down list. |
| vSwitch | Select the vsw-dicom-sh-l and vsw-dicom-sh-g vSwitches. |
| Security Group | Select a security group. If no security group exists, follow the on-screen instructions to create a security group. |
| Instances | Enter 2. |
| vCPU | Select 8 Core. |
| Memory | Select 32 GiB. |
- On the Deployment Configurations tab, configure the parameters that are described in the following table, use the default settings for other parameters, and then click Next: Confirm Specifications.
| Parameter | Description |
|---|
| Deployment Mode | Select Image. |
| Configure Image | Select My Alibaba Cloud Image and set it to dicom/dcm4chee-arc-psql:5.25.0. |
| Environment Variables | Enter the following content:POSTGRES_USER = pacs
POSTGRES_HOST = pgm-uf**.pg.rds.aliyuncs.com
POSTGRES_PASSWORD = pacs****
POSTGRES_DB = pacsdb
LDAP_URL = ldap://172.18.92.189:389
|
- Follow the on-screen instructions to create the application. After you create the application, the instances assign the following two IP addresses to the application:
172.18.92.190 and 172.18.18.113.
- Bind an intranet SLB instance to the application and set the HTTP port to
8080. After you complete the configuration, the internal endpoint of the application is 172.18.92.191:8080.
- Log on to the
ecs-dicom-arc-l-01 ECS instance. Then, run the following commands in sequence to check whether the ECS instances and the intranet SLB instance run as expected: curl -v "http://172.18.92.190:8080/dcm4chee-arc/aets/DCM4CHEE/rs/patients?limit=21&includefield=all&offset=0"
curl -v "http://172.18.18.113:8080/dcm4chee-arc/aets/DCM4CHEE/rs/patients?limit=21&includefield=all&offset=0"
curl -v "http://172.18.92.191:8080/dcm4chee-arc/aets/DCM4CHEE/rs/patients?limit=21&includefield=all&offset=0"
In normal cases, the information similar to the following output is returned:
HTTP/1.1 200 OK
< Date: Thu, 23 Dec 2021 13:25:25 GMT
< Content-Type: application/dicom+json
< Transfer-Encoding: chunked
< Connection: keep-alive
< Access-Control-Allow-Origin: *
< Cache-Control: no-cache
< Access-Control-Allow-Headers: origin, content-type, accept, authorization
< Access-Control-Allow-Credentials: true
< Access-Control-Allow-Methods: GET, POST, PUT, DELETE, OPTIONS, HEAD
<
* Connection #0 to host 172.18.92.191 left intact
[{"00100010":{"vr":"PN","Value":[{"Alphabetic":"DOE^J1"}]},"00100020":{"vr":"LO","Value":["583295"]},"00100021":{"vr":"LO"},"00100030":{"vr":"DA"},"00100040":{"vr":"CS","Value":["M"]},"00201200":{"vr":"IS","Value":["1"]},"77770010":{"vr":"LO","Value":["DCM4CHEE Archive 5"]},"77771010":{"vr":"DT","Value":["20211223143303.778+0000"]},"77771011":{"vr":"DT","Value":["20211223143303.786+0000"]}
Step 6: Deploy a request gateway
You can deploy the NGINX proxy in Function Compute to forward requests. This way, you can perform access control and resource isolation.
- Build a reverse proxy image.
- Log on to the
ecs-dicom-arc-l-01 instance. Then, compile forwarding rules in the default.conf.template configuration file. The following example shows the content of the
default.conf.template configuration file:
upstream dicom_server
{
    server ${DICOM_SERVER_HOST}:${DICOM_SERVER_PORT};
}

upstream ${DICOM_CUSTOM_DOMAIN}
{
    server ${DICOM_SERVER_HOST}:${DICOM_SERVER_PORT};
}

server
{
    listen 80;
    server_name  localhost;

    location ~/${DICOM_FUNCTION_PATH}/dcm4chee-arc/aets/DCM4CHEE/(rs|wado|dimes)/(.+){
        proxy_pass http://dicom_server/dcm4chee-arc/aets/DCM4CHEE/$1/$2;
    }

    location ~/dcm4chee-arc/aets/DCM4CHEE/(rs|wado|dimes)/(.+){
        proxy_pass http://${DICOM_CUSTOM_DOMAIN}/dcm4chee-arc/aets/DCM4CHEE/$1/$2;
    }

    location / {
        return 403;
    }
}
- Compile the
Dockerfile file in the directory in which the default.conf.template file is located. The following example shows the content of the Dockerfile file:FROM acr-ee-test-registry-vpc.cn-shanghai.cr.aliyuncs.com/dicom/nginx:1.21.4
RUN mkdir -p /etc/nginx/templates/
COPY default.conf.template /etc/nginx/templates/default.conf.template
- Run the following commands to generate an image and push the image to Container Registry for later use in Function Compute configuration:
docker build -t acr-ee-***-registry-vpc.cn-shanghai.cr.aliyuncs.com/dicom/nginx:1.21.4-dicom-revproxy-0.1 .
docker push acr-ee-***-registry-vpc.cn-shanghai.cr.aliyuncs.com/dicom/nginx:1.21.4-dicom-revproxy-0.1
- Configure domain name resolution to resolve a domain name to an endpoint of the corresponding region in the Function Compute service of your account. For more information, see Configure a custom domain name.
- Create a service.
- Log on to the Function Compute console.
- In the left-side navigation pane, click Services & Functions.
- In the top navigation bar, select the China (Shanghai) region.
- On the Services page, click Create Service.
- In the Create Service panel, enter dicomweb for the Name parameter and click OK.
- Modify the service.
- On the Services page, find the dicomweb service and click Configure in the Actions column of the service.
- On the Modify Service dicomweb page, use the default settings in the Role Settings, Log Settings, Tracing Analysis Settings, and Storage Configuration sections. You need to modify only the parameters that are described in the following table in the Network Settings section.
| Parameter | Description |
|---|
| Access to VPC Resources | Select Yes. |
| Configuration Mode | Select Custom Configuration. |
| VPC | Select the vpc-dicom-sh VPC. |
| vSwitch | Select the vsw-dicom-sh-g vSwitch. |
| Access to Internet | Select No. |
| Function Invocation only by Specified VPCs | Select No. |
- Create a function.
- Click the
dicomweb service. - Click Functions in the left-side navigation pane, and then click Create Function.
- On the Create Function page, select Use Container Image, configure the parameters that are described in the following table, and use the default settings for other parameters.
| Parameter | Description |
|---|
| Name | Enter do. |
| Container Image | Select acr-ee-***-registry-vpc.cn-shanghai.cr.aliyuncs.com/dicom/nginx:1.21.4-dicom-revproxy-0.1. |
| Listening Port | Enter 80. |
| Runtime Environments | Select Custom Container. |
| Instance Concurrency | Select 100. |
| Memory Capacity | Select 4 GB. |
| Environment Variables | Enter the following content:# Enter the custom domain name that is bound to the function.
DICOM_CUSTOM_DOMAIN = www.dicomweb-***.com
# Enter the value of PATH in the address of the request to invoke the function.
DICOM_FUNCTION_PATH = 2016-08-15/proxy/dicomweb.LATEST/do
# Enter the internal endpoint generated in Step 5.
DICOM_SERVER_HOST = 172.18.92.191
# Enter the port number configured in Step 5.
DICOM_SERVER_PORT = 8080
|
Important It takes 200 to 300 ms to start a gateway service that is created in custom container mode in the Function Compute console. You can configure reserved instances to reduce the impact of a cold start on your business. In this example, the minimum number of instances is set to 1, and the default settings are used for other parameters. You can configure the parameters based on your business requirements. For more information, see
Configure provisioned instances and auto scaling rules.
- Add a custom domain name
www.dicomweb-***.com and then add routing configurations. For more information, see Configure a custom domain name. Configure the parameters that are described in the following table and use the default settings for other parameters.
| Parameter | Description |
|---|
| Path | Enter /dcm4chee-arc/aets/DCM4CHEE/*. |
| Service Name | Select dicomweb. |
| Function Name | Select do. |
| Version or Alias | Select LATEST. |
- Test the function.
- Click the do function.
- Click the Triggers tab and record the internet endpoint http://13****.cn-shanghai.fc.aliyuncs.com/2016-08-15/proxy/dicomweb.LATEST/do/ in the Configurations column.
- Use one of the following methods to test the function:
- Use the default address to test the function
- Query the information about patients
curl -v "http://13****.cn-shanghai.fc.aliyuncs.com/2016-08-15/proxy/dicomweb.LATEST/do/dcm4chee-arc/aets/DCM4CHEE/rs/patients?limit=21&includefield=all&offset=0"
In normal cases, the information similar to the following output is returned:
[{"00100010":{"vr":"PN","Value":[{"Alphabetic":"DOE^J1"}]},"00100020":{"vr":"LO","Value":["583295"]},"00100030":{"vr":"DA"},"00100040":{"vr":"CS","Value":["M"]}}]
- Query the information about the studies whose PatientID is 583295
curl -v "http://www.dicomweb-***.com//dcm4chee-arc/aets/DCM4CHEE/rs/studies?limit=21&includefield=all&offset=0&PatientID=583295"
In normal cases, the information similar to the following output is returned:
[{"00080020":{"vr":"DA","Value":["20170716"]},"00080030":{"vr":"TM","Value":["154736"]},"00080050":{"vr":"SH","Value":["MOF5026"]},"00080054":{"vr":"AE","Value":["DCM4CHEE"]},"00080056":{"vr":"CS","Value":["ONLINE"]},"00080061":{"vr":"CS","Value":["MR"]},"00080090":{"vr":"PN","Value":[{"Alphabetic":"NELL^FREDERICK^P^DR"}]},"00081190":{"vr":"UR","Value":["http://dicom_server/dcm4chee-arc/aets/DCM4CHEE/rs/studies/1.113654.3.13.1026"]},"00100010":{"vr":"PN","Value":[{"Alphabetic":"DOE^J1"}]},"00100020":{"vr":"LO","Value":["583295"]},"00100030":{"vr":"DA"},"00100040":{"vr":"CS","Value":["M"]},"0020000D":{"vr":"UI","Value":["1.113654.3.13.1026"]},"00200010":{"vr":"SH","Value":["RP1026"]},"00201206":{"vr":"IS","Value":["1"]},"00201208":{"vr":"IS","Value":["16"]}}]
- Use a domain name to test the function
- Query the information about patients
curl -v "http://www.dicomweb-***.com/dcm4chee-arc/aets/DCM4CHEE/rs/patients?limit=21&includefield=all&offset=0"
In normal cases, the information similar to the following output is returned:
[{"00100010":{"vr":"PN","Value":[{"Alphabetic":"DOE^J1"}]},"00100020":{"vr":"LO","Value":["583295"]},"00100030":{"vr":"DA"},"00100040":{"vr":"CS","Value":["M"]}}]
- Query the information about the studies whose PatientID is 583295
curl -v "http://www.dicomweb-***.com/dcm4chee-arc/aets/DCM4CHEE/rs/studies?limit=21&includefield=all&offset=0&PatientID=583295"
In normal cases, the information similar to the following output is returned:
[{"00080020":{"vr":"DA","Value":["20170716"]},"00080030":{"vr":"TM","Value":["154736"]},"00080050":{"vr":"SH","Value":["MOF5026"]},"00080054":{"vr":"AE","Value":["DCM4CHEE"]},"00080056":{"vr":"CS","Value":["ONLINE"]},"00080061":{"vr":"CS","Value":["MR"]},"00080090":{"vr":"PN","Value":[{"Alphabetic":"NELL^FREDERICK^P^DR"}]},"00081190":{"vr":"UR","Value":["http://www.dicomweb-***.com/dcm4chee-arc/aets/DCM4CHEE/rs/studies/1.113654.3.13.1026"]},"00100010":{"vr":"PN","Value":[{"Alphabetic":"DOE^J1"}]},"00100020":{"vr":"LO","Value":["583295"]},"00100030":{"vr":"DA"},"00100040":{"vr":"CS","Value":["M"]},"0020000D":{"vr":"UI","Value":["1.113654.3.13.1026"]},"00200010":{"vr":"SH","Value":["RP1026"]},"00201206":{"vr":"IS","Value":["1"]},"00201208":{"vr":"IS","Value":["16"]}}]
- Upload DICOM data
echo -ne "\r\n--myboundary\r\nContent-Type: application/dicom\r\n\r\n" > mime.dicom.head
echo -ne "\r\n--myboundary--" > mime.tail
cat mime.dicom.head dicom-file1.dcm mime.tail > dicom.mime
curl -X POST -H "Content-Type: multipart/related; type=\"application/dicom\"; boundary=myboundary"  http://www.dicomweb-***.com/dcm4chee-arc/aets/DCM4CHEE/rs/studies --data-binary @dicom.mime
In normal cases, the information similar to the following output is returned:
{"00081190":{"vr":"UR","Value":["http://www.dicomweb-***.com/dcm4chee-arc/aets/DCM4CHEE/rs/studies/2.25.69929638918751914792556351597790946979"]},"00081199":{"vr":"SQ","Value":[{"00081150":{"vr":"UI","Value":["2.25.326410046515557697819279767240864278552"]},"00081155":{"vr":"UI","Value":["2.25.117261743442166561672617116550216377921"]},"00081190":{"vr":"UR","Value":["http://www.dicomweb-***.com/dcm4chee-arc/aets/DCM4CHEE/rs/studies/2.25.69929638918751914792556351597790946979/series/2.25.144996685350575051252979153755370108609/instances/2.25.117261743442166561672617116550216377921"]}}]}}
- Configure access authentication.
By default, a trigger function can be anonymously invoked, which means that all users can invoke the function. To configure access authentication to reduce the risks in function invocation, perform the following steps:
- Enable the authentication feature on the Triggers tab of the function. For more information, see Trigger management.
- Invoke the trigger function.
- Invoke the trigger function by using the default domain name
The following example uses Function Compute SDK for Python to invoke a trigger function by using the default domain name. For examples on how to use Function Compute SDKs for other programming languages to invoke a trigger function, see Use SDKs to execute HTTP trigger functions.
import fc2
client = fc2.Client(
    endpoint='http://13**.cn-shanghai.fc.aliyuncs.com',
    # An Alibaba Cloud account has permissions on all API operations. If you use the AccessKey pair of an Alibaba Cloud to invoke a trigger function, security risks may arise. We recommend that you use a RAM user to call API operations or perform routine O&M. To create a RAM user, log on to the RAM console.
    accessKeyID = 'yourAccessKeyId',
    accessKeySecret = 'yourAccessKeySecret'

params = {
    'offset': '0',
    'includefield': 'all',
    'limit': '21',
}

req = client.do_http_request( "GET", "dicom.LATEST", "do", "dcm4chee-arc/aets/DCM4CHEE/rs/patients", headers={}, params=params)
print (req)
- Invoke the trigger function by using a custom domain name
# -*- coding: utf-8 -*-
import requests
import fc2
import email

fc_host = 'http://www.dicomweb-***.com'
fc_path = '/dcm4chee-arc/aets/DCM4CHEE/rs/studies'

client = fc2.Client(
    endpoint='http://13**.cn-shanghai.fc.aliyuncs.com',
    # An Alibaba Cloud account has permissions on all API operations. If you use the AccessKey pair of an Alibaba Cloud to invoke a trigger function, security risks may arise. We recommend that you use a RAM user to call API operations or perform routine O&M. To create a RAM user, log on to the RAM console.
    accessKeyID = 'yourAccessKeyId',
    accessKeySecret = 'yourAccessKeySecret'

headers = {
    'date': email.utils.formatdate(usegmt=True),
    'content-type': 'application/json',
    'content-length': '0',
}

params = {
    'offset': '0',
    'includefield': 'all',
    'limit': '21',
}
headers['authorization'] = client.auth.sign_request("GET", fc_path, headers, unescaped_queries=params)
response = requests.get(fc_host + fc_path, headers=headers, params=params)
print (response)