Background
For security reasons, you need to frequently update your custom images as needed, for example, installing the latest patch for the operating system at regular intervals, upgrading middleware software, or reinstalling the latest third-party software.
Manually updating an existing image involves four steps. First, create an Elastic Compute Service (ECS) instance based on the existing image. Then, log on to the ECS instance and perform related operations, such as upgrading software. Next, generate a new image based on the updated ECS instance. Lastly, release the ECS instance. The preceding procedure is time-consuming and error-prone.
Scheme
CloudOps Orchestration Service (OOS) provides a public template for you to update custom images. In this way, you only need to create an execution based on the template before OOS automatically updates your images.
To use OOS to update a custom image, select a source image, that is, the image to be updated, set the required parameters, such as the shell commands for updating Linux-based ECS instances, and then click Create Execution.
No extra tools are required by OOS for image updates. In addition, you do not need to manually create, log on to, edit, or release a new ECS instance, or configure environment variables and AccessKey.
OOS allows you to create custom templates for scheduling automatic image updates or updating multiple images at a time.
Procedure
Log on to the ECS console.
In the left-side navigation pane, choose Maintenance & Monitoring > Operation Orchestration Service. On the page that appears, click Public Templates.
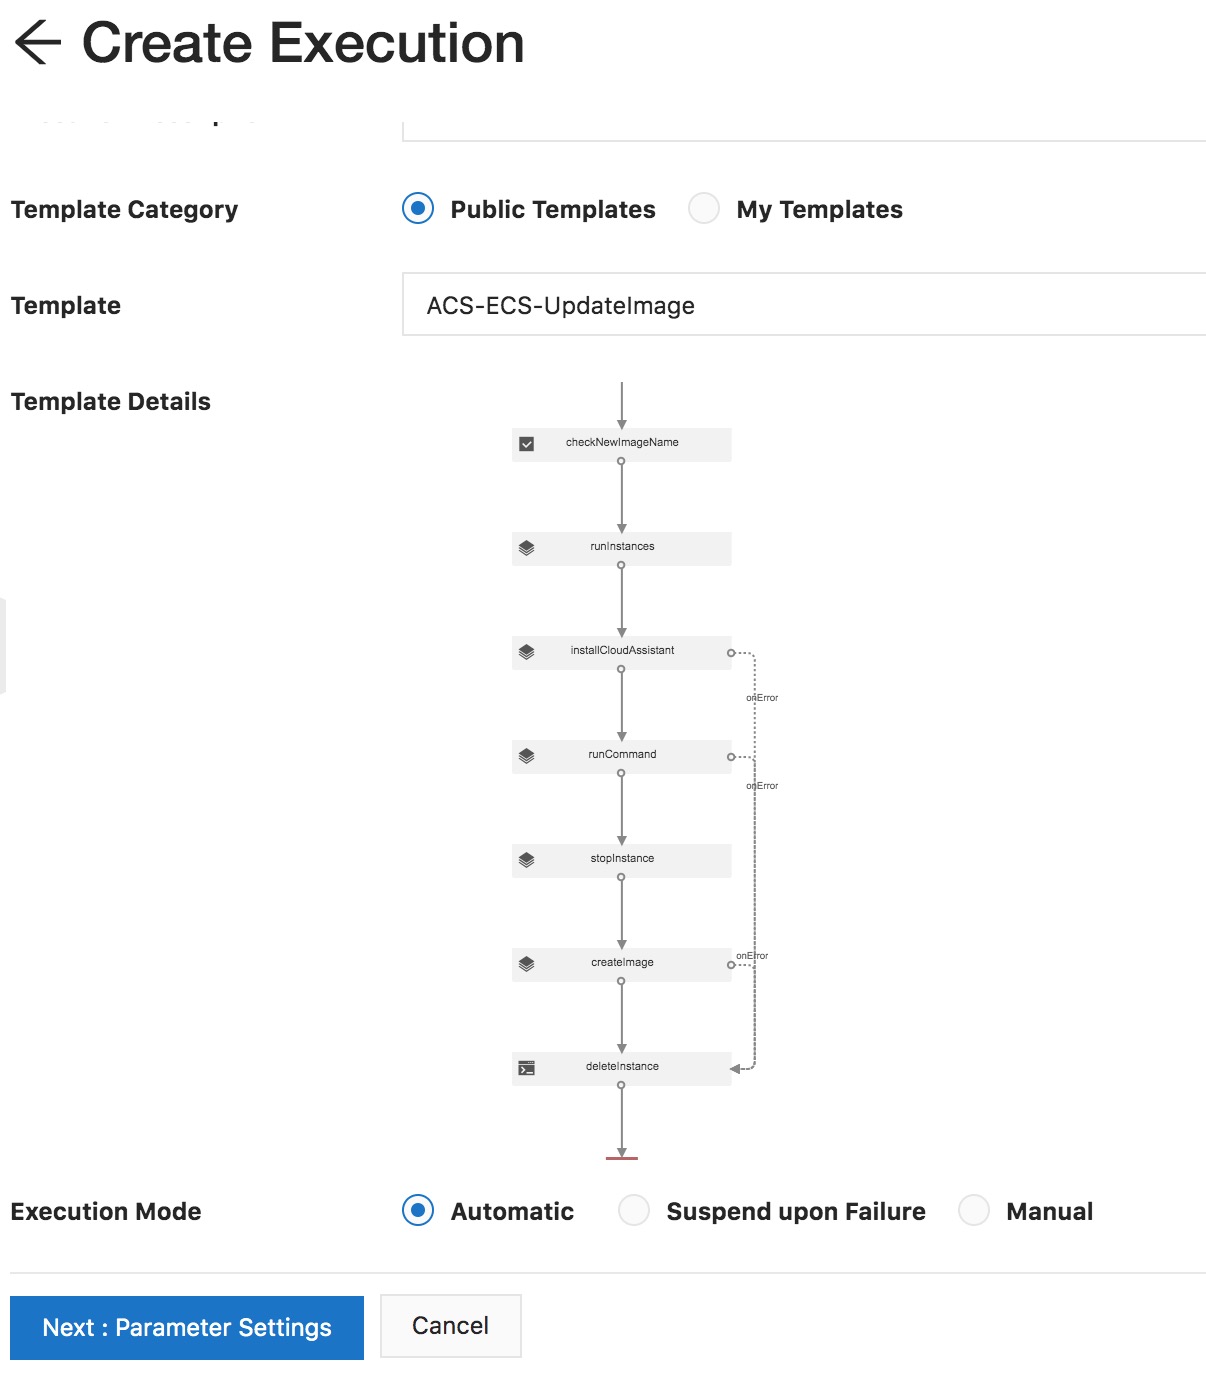
In the ACS-ECS-UpdateImage section, click Create Execution.

Click Next: Parameter Settings.

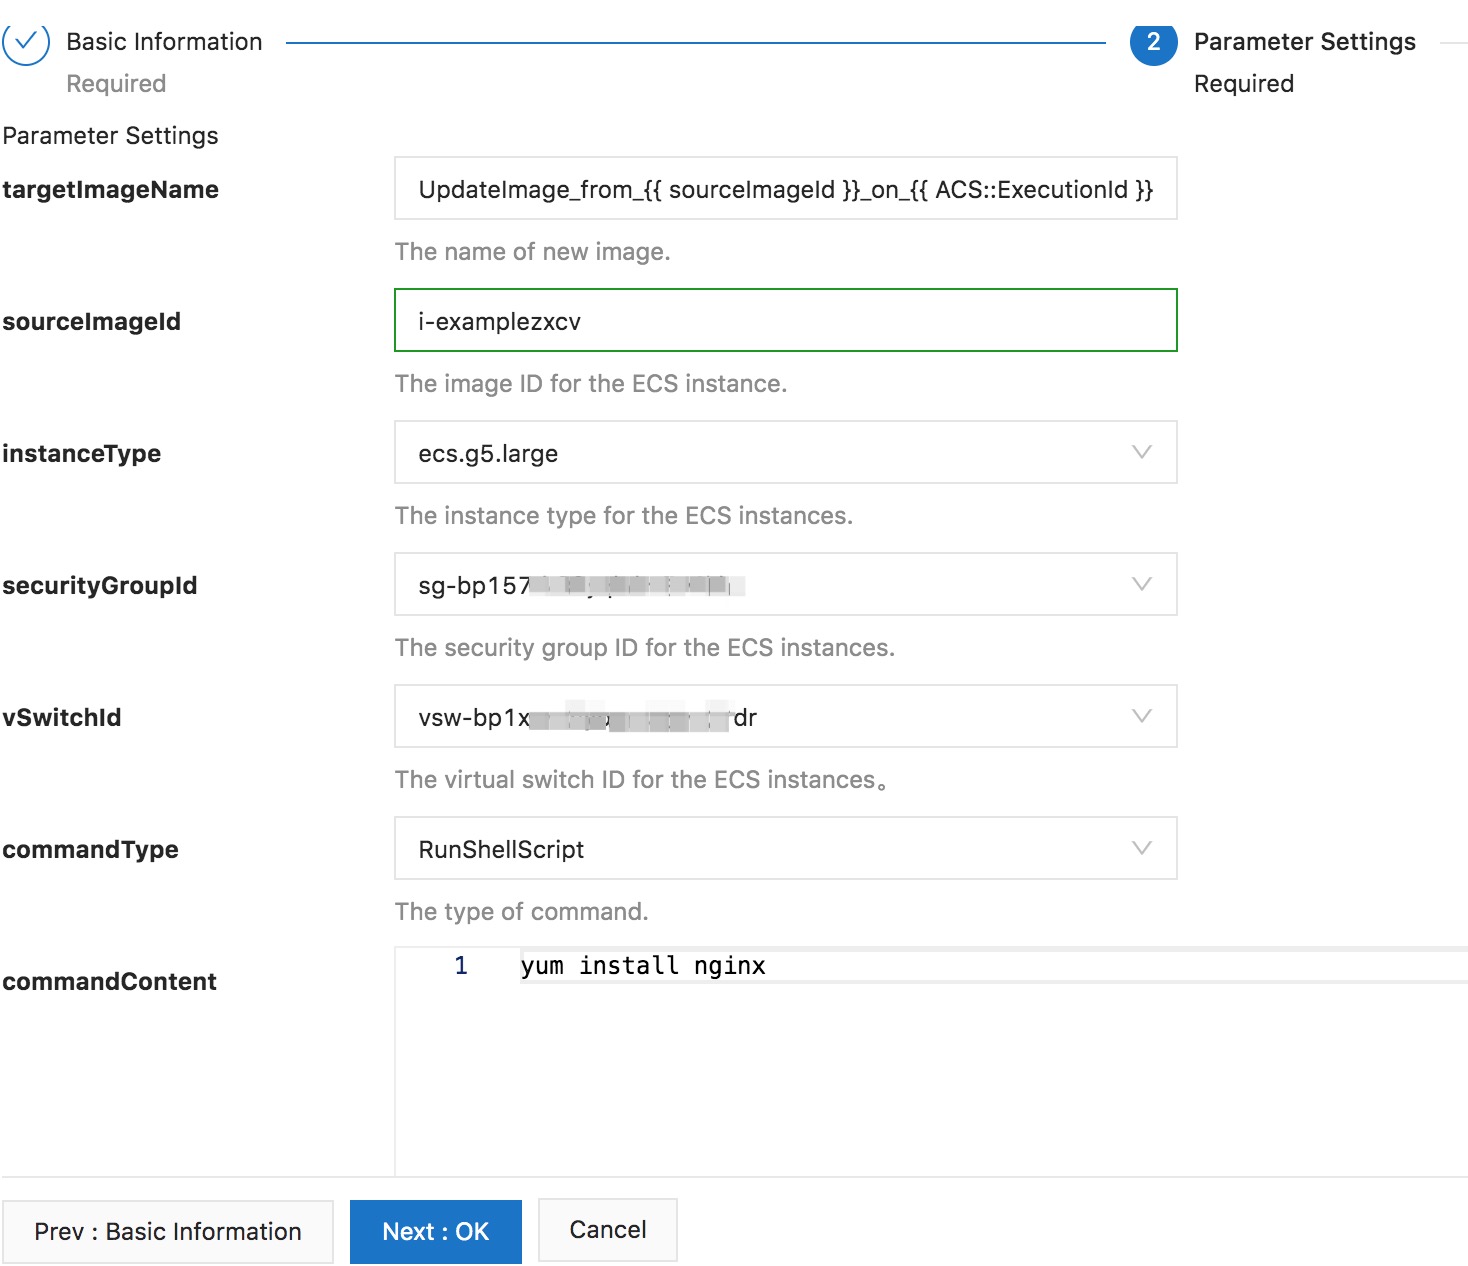
Set the following parameters:
sourceImageId: the ID of the source image to be updated.
instanceType: the type of the temporary ECS instance.
securityGroupId: the ID of the security group for the temporary ECS instance.
vSwitchId: the ID of the vSwitch for the temporary ECS instance.
commandContent: the commands to be run in the Cloud Assistant client on the temporary ECS instance for updating the image.
commandType: the type of the commands to be run. Cloud Assistant supports the following three types of commands: RunShellScript (shell commands for Linux-based ECS instances), RunBatScript (batch commands for Windows-based ECS instances), and RunPowerShellScript (PowerShell commands for Windows-based ECS instances).
targetImageName: the name of the new image.
OOSAssumeRole: the RAM role to be assumed by OOS for image updates. This parameter is valid only when the Permissions parameter is set to Specify RAM Role and Use Permissions Granted to This Role. By default, OOS uses the existing permissions of the current account.

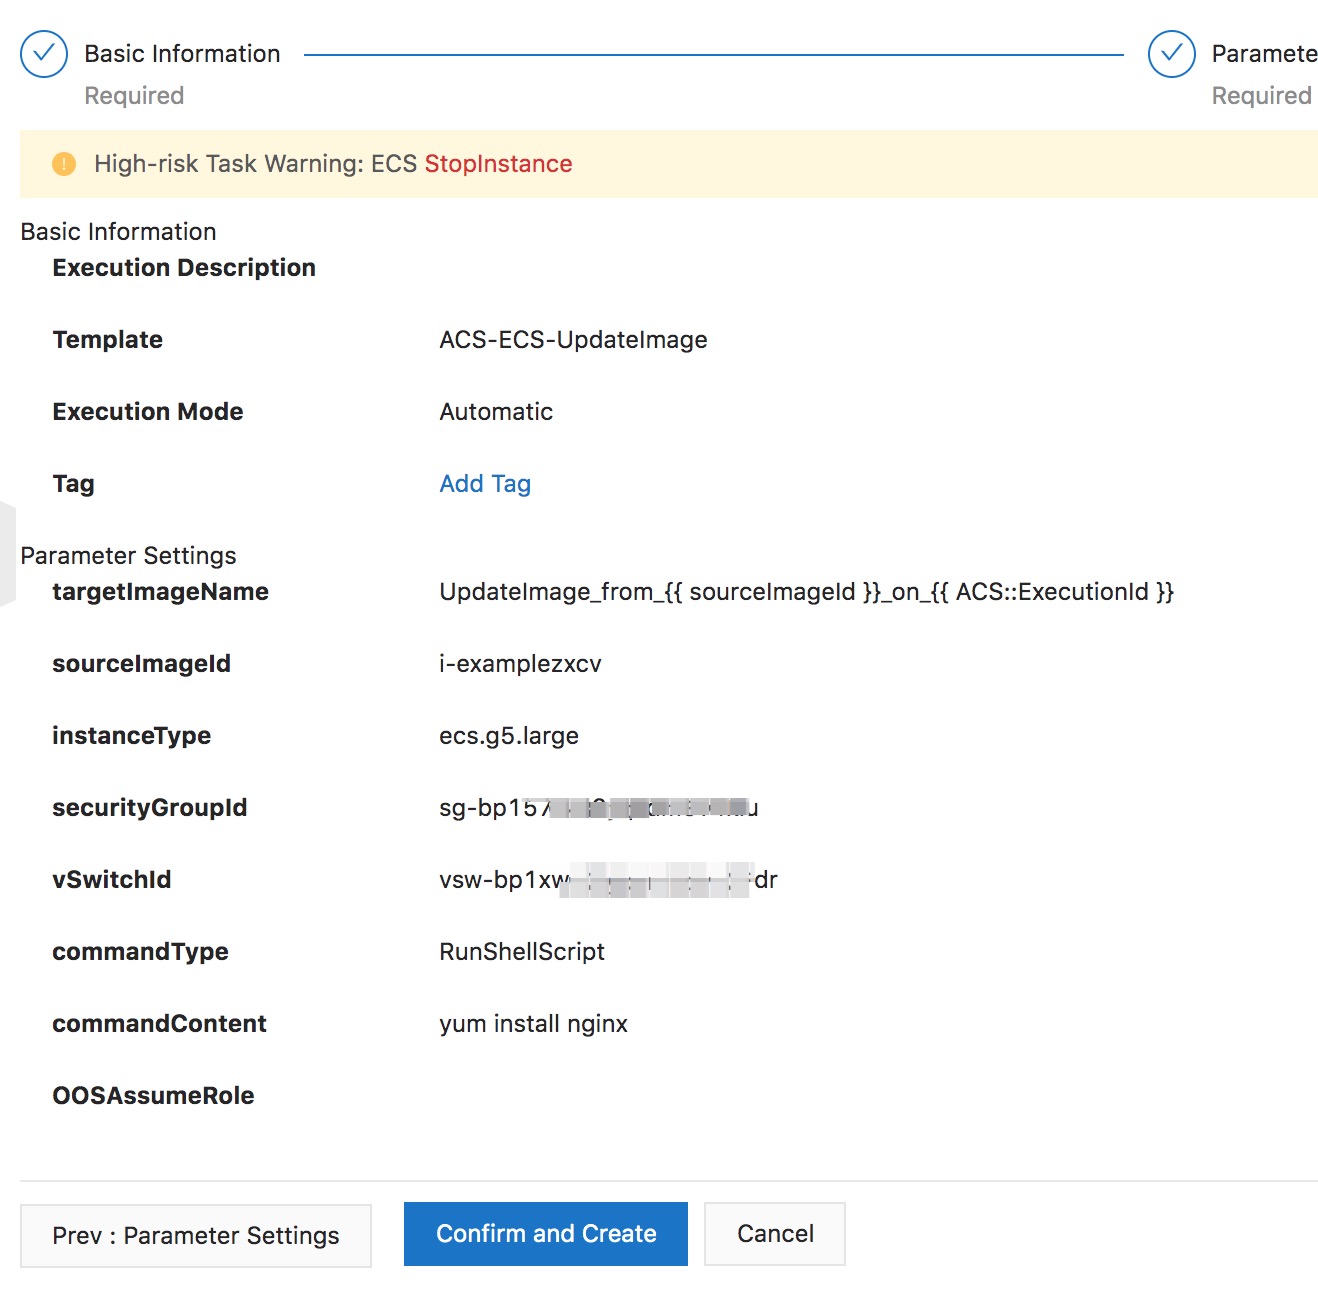
Click Next: OK. On the page that appears, preview the configuration and click Confirm and Create.

On the Executions page, you can view the created execution. If the execution status is displayed as Running, the image update is in progress.
An execution in the Success state indicates that the corresponding image is successfully updated. You can view the ID of the new image on the Execution Result tab.
To learn more about the image update process, click Details in the Actions column of an execution that has been successfully run. On the Execution Logs tab, you can view the progress and status of the execution.
Appendix 1: Public templates and logic
The public template ACS-ECS-UpdateImage contains the following code:
FormatVersion: OOS-2019-06-01
Description: Updates an existing ECS image via ECS Cloud Assistant then creates a
  ECS image.
Parameters:
  sourceImageId:
    Description: The image ID for the ECS instances, centos_6_10_64_20G_alibase_20190326.vhd,
      for example.
    Type: String
    AllowedPattern: '[A-Za-z0-9_\-\.]*'
    MinLength: 1
    MaxLength: 40
  instanceType:
    Description: The instance type for the ECS instances, ecs.g5.large, for example.
    Type: String
    AllowedPattern: ecs\.[A-Za-z0-9\.\-]*
    MinLength: 1
    MaxLength: 30
  securityGroupId:
    Description: The security group ID for the ECS instances, sg-xxxxxxxxxxxxxxxxxxxx,
      for example.
    Type: String
    AllowedPattern: sg-[A-Za-z0-9]*
    MinLength: 1
    MaxLength: 30
  vSwitchId:
    Description: The virtual switch ID for the ECS instances, vsw-xxxxxxxxxxxxxxxxxxxx,
      for example.
    Type: String
    AllowedPattern: vsw-[A-Za-z0-9]*
    MinLength: 1
    MaxLength: 30
  commandContent:
    Description: The content of command.
    Type: String
  commandType:
    Description: The type of command to run in ECS instance.
    Type: String
    AllowedValues:
    - RunBatScript
    - RunPowerShellScript
    - RunShellScript
    MinLength: 1
    MaxLength: 30
  targetImageName:
    Description: The name of image.
    Type: String
    AllowedPattern: '[A-Za-z0-9\-_]*'
    MinLength: 1
    MaxLength: 30
  OOSAssumeRole:
    Description: The RAM role to be assumed by OOS.
    Type: String
    Default: OOSServiceRole
RamRole: '{{ OOSAssumeRole }}'
Tasks:
- Name: checkNewImageName
  Action: ACS::CheckFor
  Description: Check image name is available.
  Properties:
    Service: ECS
    API: DescribeImages
    Parameters:
      ImageName: '{{ targetImageName }}'
    DesiredValues:
    - 0
    PropertySelector: TotalCount
- Name: runInstances
  Action: ACS::ECS::RunInstances
  Description: Create a ECS instance for the cloud assistant.
  Properties:
    imageId: '{{ sourceImageId }}'
    instanceType: '{{ instanceType }}'
    securityGroupId: '{{ securityGroupId }}'
    vSwitchId: '{{ vSwitchId }}'
  Outputs:
    instanceId:
      ValueSelector: instanceIds[0]
      Type: String
- Name: installCloudAssistant
  Action: ACS::ECS::InstallCloudAssistant
  Description: Install cloud assostant for ECS instance.
  OnError: deleteInstance
  Properties:
    instanceId: '{{ runInstances.instanceId }}'
- Name: runCommand
  Action: ACS::ECS::RunCommand
  Description: Run command on ECS instance.
  OnError: deleteInstance
  Properties:
    commandContent: '{{ commandContent }}'
    commandType: '{{ commandType }}'
    instanceId: '{{ runInstances.instanceId }}'
- Name: stopInstance
  Action: ACS::ECS::StopInstance
  Description: Stops the ECS instance by the instance ID.
  Properties:
    instanceId: '{{ runInstances.instanceId }}'
- Name: createImage
  Action: ACS::ECS::CreateImage
  Description: Create image with the specified image name and instance ID.
  OnError: deleteInstance
  Properties:
    imageName: '{{ targetImageName }}'
    instanceId: '{{ runInstances.instanceId }}'
  Outputs:
    imageId:
      ValueSelector: imageId
      Type: String
- Name: deleteInstance
  Action: ACS::ExecuteAPI
  Description: Deletes the ECS instance by the instance ID.
  Properties:
    Service: ECS
    API: DeleteInstance
    Risk: Normal
    Parameters:
      InstanceId: '{{ runInstances.instanceId }}'
      Force: true
Outputs:
  imageId:
    Type: String
    Value: '{{ createImage.imageId }}'
The template executes the following tasks in sequence:
Check whether the name of the new image is valid.
Create and run a temporary ECS instance. The instance is created based on the parameters that you specify. That is, the image used by the instance is the source image you want to update, and the attributes of the instance are defined based on the configured parameters.
Install the Cloud Assistant client on the temporary ECS instance if it is not installed.
Run the commands used for image updates in the Cloud Assistant client on the temporary ECS instance, and wait until the commands are successfully run.
Disable the temporary ECS instance after the commands are successfully run.
Create an image for the temporary instance after it is disabled and wait until the new image is successfully created.
Delete the temporary ECS instance.
Appendix 2: Comparison of different methods for updating images
The following table lists and compares various methods that Alibaba Cloud supports for updating images.
Method | Requirements | Advantages | Disadvantages |
Update an image by using OOS | You only need to activate OOS. No other tool is required. | - This method is secure, reliable, and officially recommended. - The operations are performed online. No installation is required. - OOS provides public templates with built-in code. - No AccessKey is required. - OOS supports custom templates. - OOS provides a flowchart for the execution process. - OOS supports batch and scheduled operations. | None. |
Create a custom image by using snapshots Create a custom image by using instances | No other tool is required. | The methods are implemented through easy and convenient operations in the ECS console. | - Instances and snapshots must be created manually. - The procedure is complicated, error-prone, and inefficient. |
Create a custom image by using Packer | You need to install Packer. | Packer is open-source and supported by various cloud service providers. | - Installation and maintenance are required. - Code writing is required. |