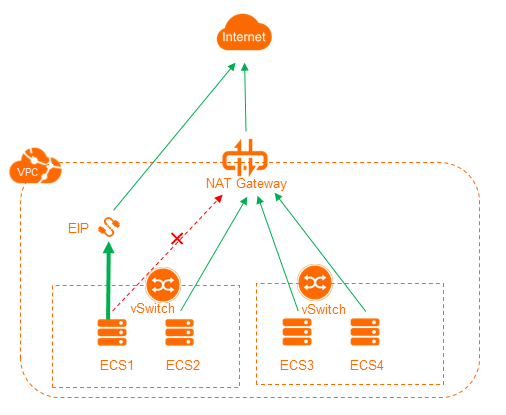
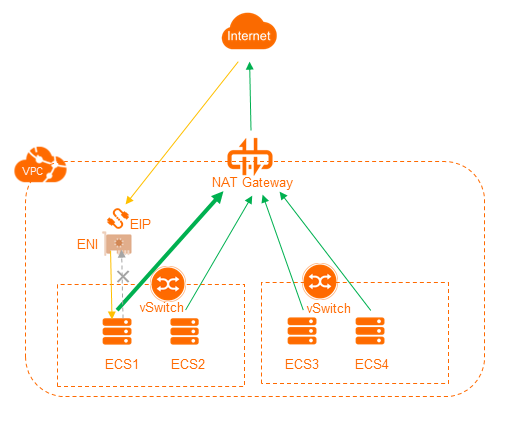
To better manage your workloads, you can configure Elastic Compute Service (ECS) instances in a virtual private cloud (VPC) to use the same NAT IP address to access the Internet. This topic describes how to configure ECS instances that are associated with elastic IP addresses (EIPs) to use the same NAT IP address to access the Internet.
Prerequisites
SNAT entries are configured for the VPC in which the ECS instances are deployed. For more information, see Create and manage SNAT entries.
Background information
NAT gateways support the SNAT feature. SNAT enables ECS instances in a VPC to access the Internet when the ECS instances are not assigned public IP addresses. In a VPC, ECS instances that are associated with EIPs preferably use the EIPs to access the Internet. ECS instances that are not associated with EIPs access the Internet through the SNAT service provided by a NAT gateway. Consequently, the ECS instances in the VPC use different public IP addresses to access the Internet, which complicates management operations.
You can configure ECS instances in the VPC to use the same NAT IP address to access the Internet by associating elastic network interfaces (ENIs) with the ECS instances.
The following steps describe how to create an ENI for the ECS instance that is associated with an EIP, associate the ENI with the ECS instance, and then associate the EIP with the ENI. This way, the ECS instance uses the ENI to receive requests from the Internet and accesses the Internet through the NAT gateway.
Step 1: Create an ENI
Log on to the ECS console.
In the left-side navigation pane, choose .
Select the region where you want to create the ENI.
NoteThe ENI and the ECS instance must belong to the same region.
On the Network Interfaces page, click Create ENI.
In the Create ENI dialog box, set the following parameters and click OK:
ENI Name: Enter a name for the ENI.
VPC: Select the VPC where the ECS instance is created.
VSwitch: Select a vSwitch in the zone where the ECS instance is deployed.
Security Group: Select a security group of the VPC.
Primary Private IP: Optional. Enter the primary private IPv4 address of the ENI. The IPv4 address must be an idle IP address within the CIDR block of the vSwitch. If you do not specify an IPv4 address, an idle private IPv4 address is automatically assigned to the ENI after the ENI is created. In this example, the primary private IP address is not specified.
Secondary Private IP Addresses: Optional. You can set this parameter based on your business requirements. In this example, Not set is selected.
For more information, see Create an ENI.
Step 2: Associate the ENI with the ECS instance
Log on to the ECS console.
In the left-side navigation pane, choose .
Select the region of the ENI.
On the Network Interfaces page, find the ENI that you want to manage and click Bind to Instance in the Actions column.
In the dialog box that appears, select the ECS instance with which you want to associate the ENI and click OK.
Step 3: Disassociate the EIP from the ECS instance
Log on to the EIP console.
Select the region of the EIP.
On the Elastic IP Addresses page, find the EIP that you want to manage and click Unbind in the Actions column.
In the message that appears, click OK.
Step 4: Associate the EIP with the ENI
Log on to the EIP console.
Select the region of the EIP.
On the Elastic IP Addresses page, find the EIP that you created and click Associate with Resource in the Actions column.
In the Associate EIP with Resource dialog box, set the following parameters and click OK:
Instance Type: Select Secondary ENI.
Resource Group: Optional. Select the resource group to which the EIP belongs. In this example, the default resource group is selected.
Mode: Optional. Select the mode in which you want to associate the EIP with the ENI. In this example, NAT Mode is selected.
Select an instance to associate: Select the secondary ENI with which you want to associate the EIP.
Step 5: Configure routes for the ENIs of the ECS instance
Log on to the ECS console.
In the left-side navigation pane, choose .
View the details of the ENIs.
Log on to the ECS instance. For more information, see Connection method overview.
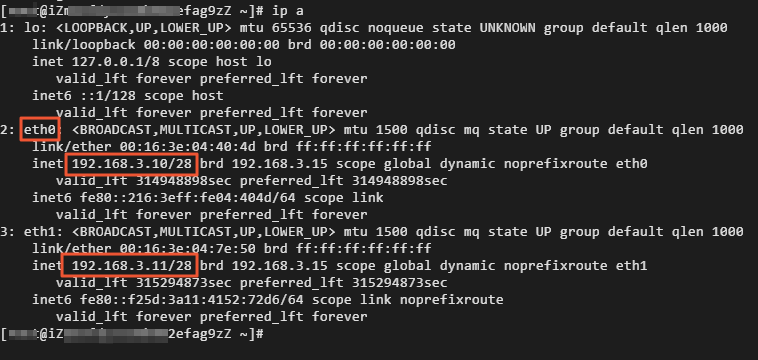
Run the following command to view the information about the ENIs with which the ECS instance is associated:
ip a
The following result is returned:
eth0 is the primary ENI. The private IP address of eth0 is 192.168.3.10.
eth1 is a secondary ENI. The private IP address of eth1 is 192.168.3.11, and the public IP address is 118.190.XX.XX.
Set the metric value of the default route for each ENI in the route table based on your business requirements.
Run the following command to view the Gateway and metric values:
route -n Note
NoteIn this example, one secondary ENI is used. The metric value of the secondary ENI is greater than the metric value of the primary ENI, which indicates that the routing priority of the secondary ENI is lower than the routing priority of the primary ENI. Therefore, you can use the default metric values. If you use multiple secondary ENIs, you must configure metric values based on your business requirements. For more information, see Configure a secondary ENI.
Create a route table and configure policy-based routing.
If you want to configure temporary policy-based routes for the ENI of the ECS instance, perform the following steps:
NoteAfter the ECS instance is restarted, the policy-based routes configured for the ENI become invalid.
Run the following command to create a route table:
ip -4 route add default via 192.168.3.13 dev eth1 table 101NoteWe recommend that you keep the name of the route table the same as the metric value of the default route of the ENI. In this example, 101 is used.
Run the following command to check whether the route table is created:
ip route list table 101The following result is returned:

Run the following command to add a policy-based route:
ip -4 rule add from 192.168.3.11 lookup 101Run the following command to query the route map:
ip rule listThe following result is returned:

If you want to add multiple routes for the ENI of the ECS instance, perform the following steps:
NoteAfter the ECS instance is restarted, the policy-based routes for the ENI remain valid.
Run the following command to open the /etc/rc.local script.
vi /etc/rc.localAt the end of the configuration file, press the i key to enter the edit mode.
Add the following information to the end of the script:
ip -4 route add default via 192.168.3.13 dev eth1 table 101 ip -4 rule add from 192.168.3.11 lookup 101NoteIn this example, one secondary ENI is used. The metric value of the secondary ENI is greater than the metric value of the primary ENI, which indicates that the routing priority of the secondary ENI is lower than the routing priority of the primary ENI. Therefore, you can use the default metric values. If multiple secondary ENIs are used, you must add the command that sets the metric value to the script. For more information about the command that sets the metric value, see Configure a secondary ENI.
Press the Esc key to exit the edit mode. Enter
:wqand press the Enter key to save and close the script.Run the following command to make the /etc/rc.d/rc.local script executable:
chmod +x /etc/rc.d/rc.localNoteThe /etc/rc.local script is a symbolic link to the /etc/rc.d/rc.local script. Therefore, you must run the preceding command to make the /etc/rc.d/rc.local script executable. ou can run the
ls -l /etc/rc.localcommand to check whether the /etc/rc.local script is a symbolic link to the /etc/rc.d/rc.local script.
Step 6: Test the network connectivity
Perform the following operations to check whether the ECS instance can use the EIP that is associated with the ENI to receive requests from the Internet. In this example, an on-premises Linux machine is used to remotely connect to the ECS instance.
To remotely connect to the ECS instance, make sure that the security group rules of the ECS instance allow network traffic on SSH port 22. For more information, see Add security group rules.
Log on to an on-premises Linux machine.
Run the
ssh <your username>@public IPcommand and enter the password of the ECS instance to check whether you can remotely connect to the ECS instance. If the following message appears, the ECS instance is connected.Welcome to Alibaba Cloud Elastic Compute Service!
Perform the following operations to check whether the ECS instance can access the Internet through the SNAT. The following example shows how to view the IP address used by the ECS instance to access the Internet.
Log on to the ECS instance.
Run the
curl https://myip.ipip.netcommand to check the EIP that the ECS instance uses to access the Internet. If the NAT IP address is the same as the one in the SNAT entry that is created for the ECS instance, it indicates that the ECS instance preferably uses the SNAT service to access the Internet.