To connect VPCs with overlapping CIDR blocks, add secondary CIDR blocks and create VPC NAT gateways. Then use address translation to resolve address conflicts.
How it works
Why address conflicts occur
When ECS instances in overlapping VPCs and vSwitches try to communicate:
If you configure the peer VPC CIDR block as the destination CIDR block, traffic matches the system route first and forwards inside the VPC. It never reaches the peer VPC.
If you configure the peer vSwitch CIDR block as the destination CIDR block, you cannot add a custom route that has the same or more specific destination CIDR block as an existing system route.

NAT-based solution
Add secondary IPv4 CIDR blocks: Add non-overlapping secondary CIDR blocks to both VPCs to provide conflict-free private IP addresses.
Translate addresses: Use a VPC NAT gateway to translate the private IP addresses of ECS instances and resolve private network address conflicts.
Connect VPCs: Attach both VPCs to a transit router and configure custom route entries to ensure correct traffic forwarding.
Traffic path example
A company in China (Hangzhou) wants to connect two existing VPCs. However, the VPC CIDR blocks overlap. To resolve this, use a VPC NAT gateway for address translation. Then configure routes so traffic goes to the VPC NAT gateways. Finally, deploy a Cloud Enterprise Network (CEN) instance or peering connection to enable private network peering.
For example, ECS_A (private IP: 192.168.0.86) accesses VPC_NATGW_B (private IP: 10.0.0.53).
Traffic from ECS_A follows the route configuration in the custom route table bound to its vSwitch and forwards to the VPC NAT gateway.
The SNAT rule configured in VPC_NAT_A transforms the packet's source IP into the NAT IP address (172.16.0.89).
The system route table of VPC_A forwards the packet to the transit router TR. TR then forwards it to VPC_B and finally to the VPC NAT gateway in VPC_B.
The DNAT rule on VPC_NATGW_B translates the destination IP address to ECS_B. Traffic then forwards to the target server, enabling communication between ECS instances.
When ECS_B sends a response packet, the session mapping table reverts the original private IP address. Then routing delivers the packet to ECS_A.

Procedure
Consider the traffic path scenario as an example.
Step 1: Configure secondary CIDR blocks
Add secondary CIDR blocks:
Go to the VPC console. In the top menu bar, select the region where your VPCs reside.
Click the target VPC ID, select the CIDR Block Management tab, and click Add Secondary IPv4 CIDR Block to add secondary CIDR blocks for VPC_A and VPC_B respectively.
Create vSwitches: Go to the Create vSwitch page.
VPC: Create vSwitches for VPC_A and VPC_B.
IPv4 CIDR: Select an added secondary IPv4 CIDR block.
Step 2: Configure VPC NAT gateways
Create VPC NAT gateways and configure SNAT and DNAT entries. This converts private IP addresses of ECS instances in each VPC to NAT IP addresses and resolves address conflicts.
Create VPC NAT gateways: Go to the VPC NAT gateway purchase page.
Region: Select the region where the VPC is located.
Network and Zone: Create a VPC NAT Gateway for each of VPC_A and VPC_B, and select the vSwitches created from secondary CIDR blocks.
Configure SNAT entries: The VPC NAT gateway translates the source IP address of packets to a NAT IP address based on the configured SNAT rules.
Go to the VPC NAT gateway list page. In the top menu bar, select the region where your VPC NAT gateways reside.
Click Actions in the SNAT Management column of the target VPC NAT instance. Click Create SNAT Entry.
SNAT Entry: This topic selects Specify VPC, and you can adjust it based on your needs.
Select NAT IP Address: Select the private IP of the VPC NAT gateway.
Configure DNAT entries: The VPC NAT gateway translates the destination IP address of packets to a NAT IP address based on the configured DNAT rules.
Go to the VPC NAT gateway list page. In the top menu bar, select the region where your VPC NAT gateways reside.
Click DNAT Management in the Actions column of the target VPC NAT gateway. Click Create DNAT Entry.
Select NAT IP Address: Select the private IP of the VPC NAT gateway.
Select Private IP Address: Select the ECS instances in the VPC that need to communicate with each other.
Port Settings: This topic uses the SSH service as the verification method for service interconnection. The SSH service uses the connection-oriented TCP protocol and operates on port 22. Therefore, configure both the frontend port and backend port of the Specific Port to 22, and select TCP as the Protocol Type.
Create a custom DNAT entry based on your needs.
Step 3: Connect the VPCs
Create VPC connections:
Supported regions and zones.
This example connects VPCs in the same account and region. For VPCs in different accounts or regions, see Inter-region VPC peering or Cross-account VPC peering.
Go to the and Cloud Enterprise Network (CEN) Management Console, click Create CEN Instance. Select Create CEN Only and OK.
After successful creation, click .
In this example, the VPCs with address conflicts are in the same region. So create an intra-region connection. For VPCs in different regions, create an inter-region connection.
You can also click the CEN instance ID. Then on the Basic Information tab, click
 under VPC to create an intra-region connection.
Network Type: Select virtual private cloud (VPC).
Region: Select the region where the VPC is located.
Resource Owner ID: Select based on the account ownership of the VPC. This topic selects Your Account.
Networks: Select VPC_A.
VSwitch: To achieve multi-zone disaster recovery, select at least two zones. You must include the vSwitch where the VPC NAT Gateway is located.
Advanced Settings: Select all.
After the creation is complete, click Continue To Create Connection to create a VPC connection for VPC_B.
Configure routes:
A NAT gateway only handles address translation. It does not control traffic flow. Routing tables in the VPC determine whether traffic goes to the NAT gateway and where traffic goes after translation.
Create custom route tables and bind them to vSwitches:
Go to the Route Tables page. In the top menu bar, select the region where your VPCs reside.
Click Create Route Table.
VPC: Create route tables for VPC_A and VPC_B, respectively.
Associated Resource Type: Select vSwitch.
On the Route Tables page, click Bind in the Associated Resource column of the target custom route table to associate the vSwitch that contains the ECS instance.
Configure a route entry: Click the target route table ID, on the Custom Route tab, click Add Route Entry, and configure the destination CIDR block and next hop.
Configure routes based on the following table to ensure correct traffic forwarding.
VPC
Route table
Destination CIDR block
Next hop
VPC_A
System route table
10.0.0.0/24
Transit router
Custom route table
10.0.0.0/24
VPC_NATGW_A
VPC_B
System route table
172.16.0.0/24
Transit router
Custom route table
172.16.0.0/24
VPC_NATGW_B
Step 4: Verify the result
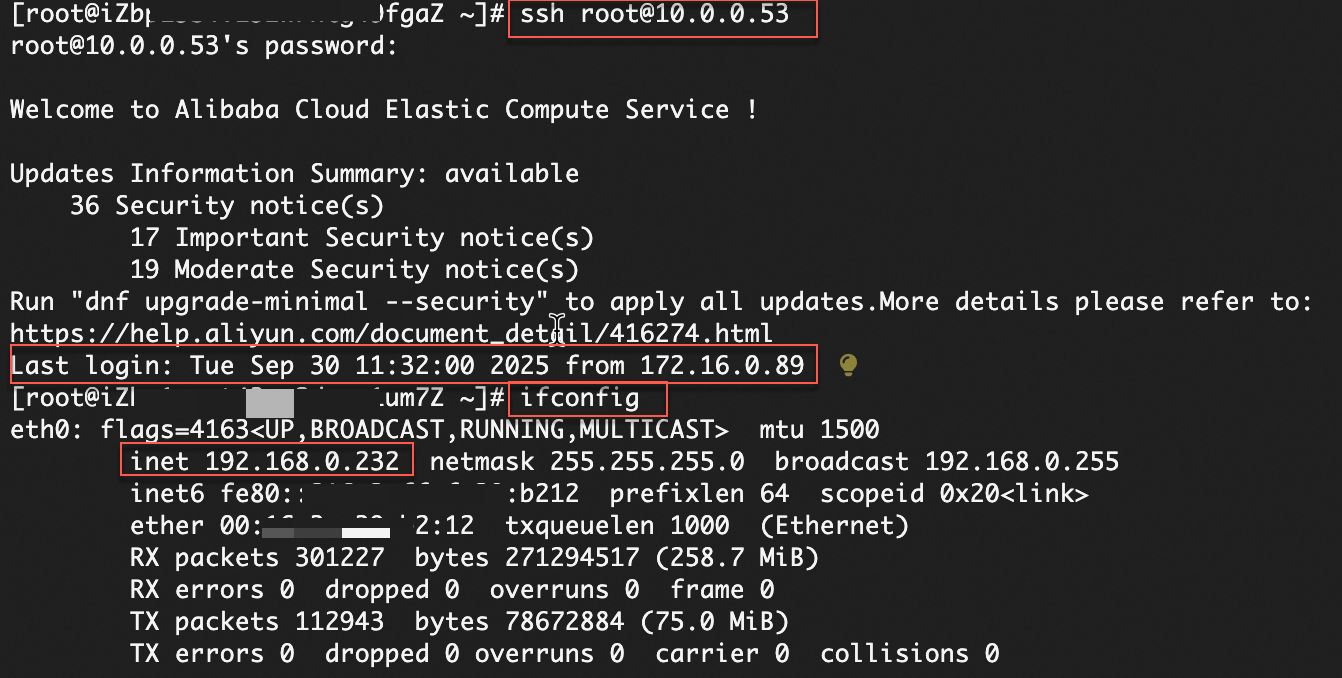
Log on to the ECS_A instance and run the following commands.
# Access the NAT IP address (10.0.0.53) of VPC_NATGW_B to remotely log on to ECS_B
# Make sure the security group of ECS_B allows requests to port 22
ssh root@10.0.0.53
# View the IP address of the network interface controller (NIC)
ifconfig
This confirms that ECS_A accesses the NAT IP address (10.0.0.53) of VPC_NATGW_B through the NAT IP address (172.16.0.89) of VPC_NATGW_A. This enables remote logon to ECS_B.
Billing information
VPC NAT gateway: Charges include the instance fee and capacity unit (CU) fee.
Cloud Enterprise Network (CEN): For intra-region connections, charges include the connection fee and traffic processing fee. For inter-region connections, additional cross-region bandwidth fees apply.