ApsaraVideo Live provides multiple access control policies for streaming domains—URL signing, referer-based hotlink protection, IP blacklist and whitelist, protocol prohibition, region blocking, and remote authentication—to prevent unauthorized use and protect your live streaming resources. Configure the policies that fit your security needs.
Overview
To secure your streaming domain and prevent unauthorized use, you can implement several access control policies. Each offers a different layer of protection:
-
URL signing: Verifies the authenticity of each request by using cryptographic signatures, which provides stronger protection than referer-based methods.
-
Referer-based hotlink protection: Controls access by using custom blacklists or whitelists to allow or deny playback requests and protect your live content.
-
IP address blacklist and whitelist: Restricts or allows access from specific IP addresses.
-
Protocol prohibition: Restricts playback protocols for your domain. Once enabled, playback URLs that use a prohibited protocol are denied.
-
Region blocking: Manages access to your streaming domain by specifying a blacklist or whitelist of regions.
-
Remote authentication: Forwards user requests to your own authentication server for validation, adding a flexible and secure layer of access control.
URL signing
How it works
URL signing coordinates authentication between ApsaraVideo Live and your business server to protect live stream resources from unauthorized access.
-
Your business server generates a signed URL that contains authentication information.
-
A user makes a stream ingest or playback request to the ApsaraVideo Live service by using the signed URL.
-
An ApsaraVideo Live edge node validates the authentication information in the signed URL, serving valid requests and denying invalid ones.
After ApsaraVideo Live authenticates your request URL, special characters in the URL, such as = and +, are escaped.
To learn more about the use cases for URL signing, the structure of a signed URL, and how the authentication works, see Signed ingest and streaming URLs.
Configure URL signing
- Log on to the ApsaraVideo Live console.
In the left navigation pane, click Domain Names. The Domain Management page appears.
Find the streaming domain that you want to configure and click Domain Settings in the Actions column.
-
Click .
-
Click the URL Signing tab, and then click Change Settings.
 Note
NoteWhen you add a domain name for the first time, URL signing is enabled by default. You can Change Settings only when this feature is enabled.
-
Configure the URL signing parameters and click OK.
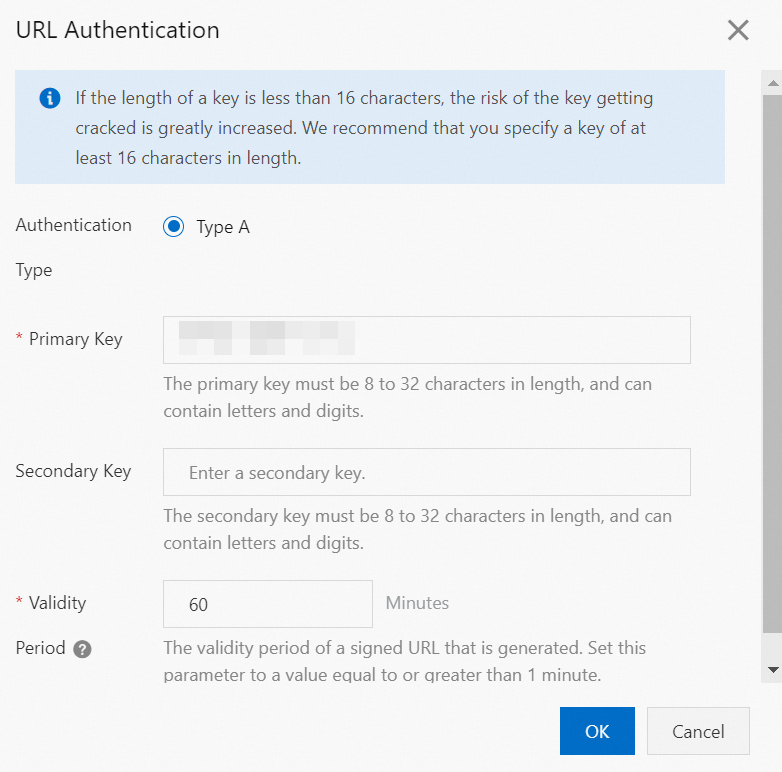
The following table describes the parameters.
Parameter
Description
Authentication Type
ApsaraVideo Live streaming domains support only Type A authentication to protect your origin resources.
NoteAn invalid URL signing request returns a 403 error. You must recalculate the signature.
-
MD5 calculation error
Example:
X-Tengine-Error:denied by req auth: invalid md5hash=de7bfdc915ced05e17380a149bd760be -
Timestamp error
Example:
X-Tengine-Error:denied by req auth: expired timestamp=1439469547
Primary Key
When you add a domain name, the console randomly generates a primary key. You can select Domain Management in the left navigation bar, select the domain name that you want to configure, and click to view the primary key on the URL Signing page. You can also enter a custom primary key.
Secondary Key
Enter a custom secondary key.
Note-
The primary and secondary keys have the same authentication power. The secondary key is primarily used for smooth key rotation.
-
If you change the primary key, signed URLs generated with the old key become invalid. To prevent service interruptions during key rotation, copy the current primary key to the secondary key field before you set the new primary key. This allows the secondary key to continue authenticating requests during the transition.
Validity Period
The period during which a signed URL can initiate a stream ingest or playback request. Because stream ingest and playback use long-lived connections, an active connection continues after the validity period expires, but new requests with the expired URL fail. Default: 1 day (1,440 minutes). Minimum: 1 minute. No upper limit.
-
Disable URL signing
-
Before you disable URL Signing, understand the risks of unauthorized traffic and sign the disclaimer agreement.
-
After you disable URL Signing, you can generate ingest or streaming URLs that never expire.
-
On the URL Signing tab, click the link to Read Disclaimer Agreement.
-
In the Disclaimer Agreement dialog box, select the check box, and click Disable URL Signing.
-
After the disclaimer agreement is signed, click OK.
-
Turn off the Signed URL switch. After the feature is disabled, you can no longer encrypt URLs by setting an authentication key.
Referer-based hotlink protection
How it works
Referer-based hotlink protection uses the HTTP Referer header to identify request sources. You configure a blacklist or whitelist, and ApsaraVideo Live edge nodes filter viewer requests accordingly. Requests that match the rules are granted access; others receive a 403 response.
-
This is an optional feature and is disabled by default.
-
The blacklist and whitelist are mutually exclusive. You can enable only one at a time.
-
After you configure this feature, ApsaraVideo Live automatically supports wildcard domains. For example, if you enter
example.com, the rule applies to*.example.com, which covers all its subdomains. -
You can choose whether to allow requests with an empty Referer field. This permits direct access to a resource URL from a browser's address bar.
-
Mobile clients often cannot retrieve a referer. By default, requests with an empty referer are allowed. If you disallow empty referer requests, you can use the ApsaraVideo Player SDK to set a referer on mobile clients.
-
If you do not allow empty referer requests, you must configure Enable HTTPS and enable forced redirection from HTTP to HTTPS (HTTP > HTTPS). Some browsers remove the Referer header when processing an HTTPS request for an HTTP resource, which would cause access to fail.
-
Procedure
- Log on to the ApsaraVideo Live console.
In the left navigation pane, click Domain Names. The Domain Management page appears.
Find the streaming domain that you want to configure and click Domain Settings in the Actions column.
-
Click .
-
Click the Referer-based Hotlink Protection tab and turn on the Referer-based Hotlink Protection switch.
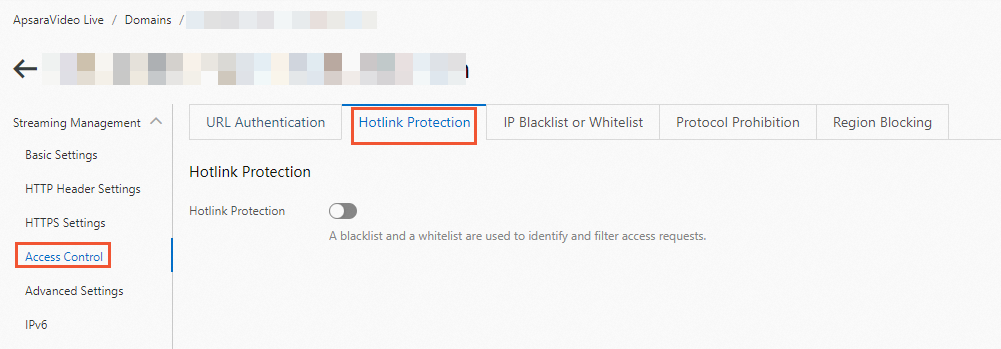
-
Configure the Type and Referrers, and then click OK.
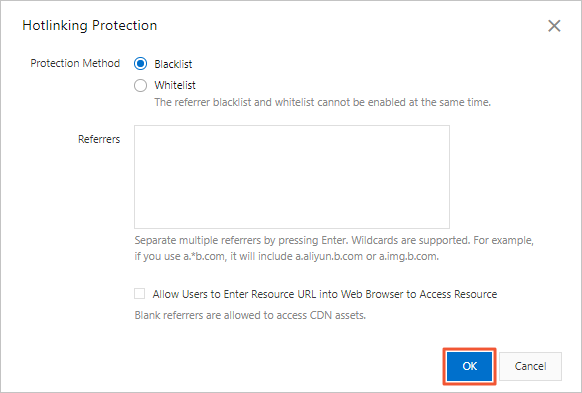
The following table describes the types of referer-based hotlink protection.
Type
Description
Blacklist
Domains on the blacklist cannot access the resource.
Whitelist
Only domains on the whitelist can access the resource. All other domains are blocked.
IP blacklist and whitelist
How it works
-
Add an IP address to the blacklist to block it from accessing the streaming domain.
-
Add an IP address to the whitelist to allow only that IP address to access the streaming domain.
-
The IP address blacklist and whitelist both support IPv6 addresses. When entering IPv6 addresses, you must use uppercase letters, such as
2001:DB8:0:23:8:800:200C:417Aor2001:0DB8:0000:0023:0008:0800:200C:417A. Abbreviated IPv6 formats, such as2001:0DB8::0008:0800:200C:417A, are not supported. -
You can add IP address ranges to the blacklist and whitelist by using CIDR notation. For example,
192.168.0.0/24indicates that the first 24 bits of the subnet mask are used for the network address, leaving 8 bits (32 - 24) for host addresses. This subnet can contain 2^8 - 2 = 254 hosts. Therefore,192.168.0.0/24represents the IP address range from192.168.0.1to192.168.0.254.
Procedure
- Log on to the ApsaraVideo Live console.
In the left navigation pane, click Domain Names. The Domain Management page appears.
Find the streaming domain that you want to configure and click Domain Settings in the Actions column.
-
Click .
-
Click the IP Blacklist or Whitelist tab and turn on the IP Blacklist or Whitelist switch.
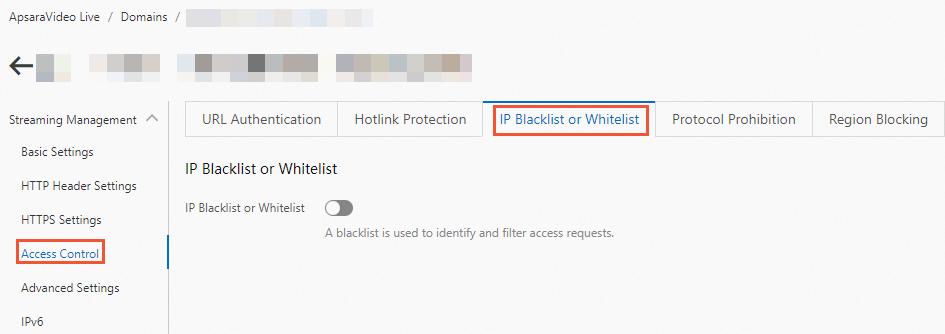
-
Configure the List Type and Rule, and then click OK.
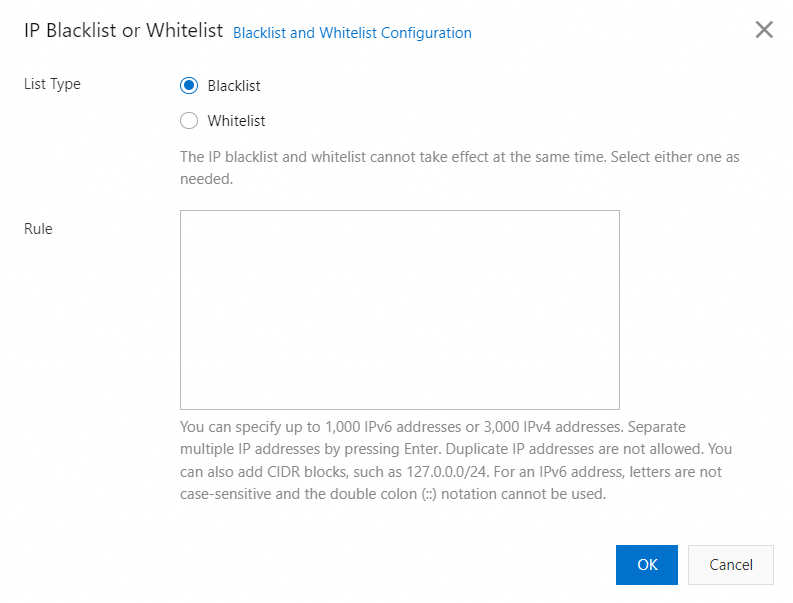
Type
Description
Blacklist
IP addresses on the blacklist cannot access the resource.
Whitelist
Only IP addresses on the whitelist can access the resource. All other IP addresses are blocked.
Protocol prohibition
How it works
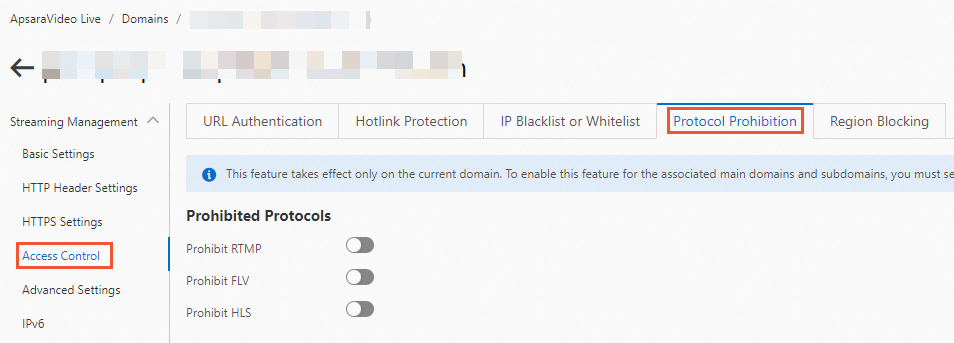
Protocol prohibition blocks playback at the protocol level for a streaming domain, including its primary and subdomains. After you enable this feature, playback URLs that use the specified protocol are denied.
You can also call the BatchSetLiveDomainConfigs API operation and pass the alilive record in the Functions parameter. For more information, see BatchSetLiveDomainConfigs.
Procedure
Log on to the ApsaraVideo Live console.
In the left navigation pane, click Domain Names. The Domain Management page appears.
Find the streaming domain that you want to configure and click Domain Settings in the Actions column.
-
Click .
-
Click the Protocol Prohibition tab, select the protocols that you want to block, and turn on the switch for each one.
Region blocking
How it works
Region blocking identifies the geographic location of client requests, allowing you to block or permit access by region. This helps mitigate malicious requests and enforce content distribution rights.
-
Region blocking is supported for the HLS, RTMP, FLV, and RTS playback protocols.
-
If you configure both domain-level and stream-level region blocking for the same region, the blacklist setting takes precedence. For example, if you configure a domain-level whitelist and a stream-level blacklist, the stream-level blacklist is enforced. If you configure a domain-level blacklist and a stream-level whitelist, the domain-level blacklist is enforced.
-
You can configure both Domain-level Region Blocking and Stream-level Region Blocking. If a conflict exists between the whitelists and blacklists, the blacklist takes precedence to determine which regions are blocked.
Domain-level region blocking
Log on to the ApsaraVideo Live console.
In the left navigation pane, click Domain Names. The Domain Management page appears.
Find the streaming domain that you want to configure and click Domain Settings in the Actions column.
-
Click .
-
On the Region Blocking tab, turn on the Domain-level Region Blocking switch. Select a Blocking Type and specify the Blocked Regions.
Parameter
Description
Blocking Type
-
Blacklist: Regions on the blacklist cannot access any resources under the streaming domain.
-
Whitelist: Only regions on the whitelist can access resources under the streaming domain. All other regions are blocked.
The blacklist and whitelist are mutually exclusive. Only one can be active at a time.
Blocked Regions
The regions to include on the blacklist or whitelist.
-
-
Click OK to save the configuration.
Stream-level region blocking
Log on to the ApsaraVideo Live console.
In the left navigation pane, click Domain Names. The Domain Management page appears.
Find the streaming domain that you want to configure and click Domain Settings in the Actions column.
-
Click
-
Click the Region Blocking tab, and then click Add Rule in the Stream-level Region Blocking section.
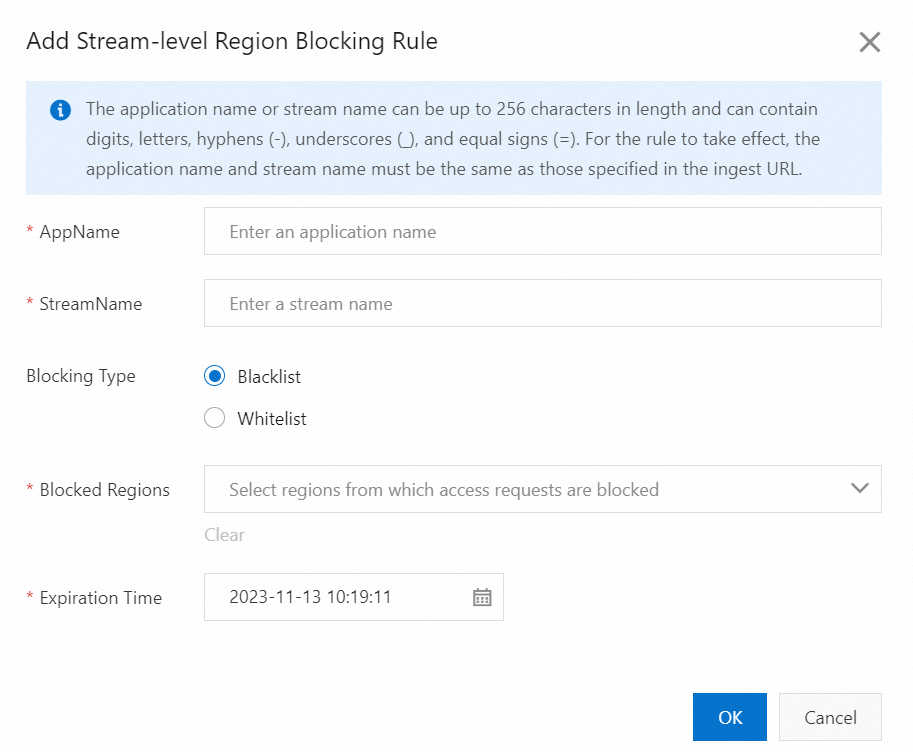
Parameter
Description
AppName
The application name of the live stream.
NoteThe AppName can be up to 256 characters long and can contain digits, uppercase and lowercase letters, hyphens (-), underscores (_), and equal signs (=). It must match the AppName in the live stream URL for the blocking rule to take effect.
StreamName
The stream name of the live stream.
NoteThe StreamName can be up to 256 characters long and can contain digits, uppercase and lowercase letters, hyphens (-), underscores (_), and equal signs (=). It must match the StreamName in the live stream URL for the blocking rule to take effect.
Blocking type
-
Blacklist: Viewers from regions on the blacklist cannot access the specified stream.
-
Whitelist: Only viewers from regions on the whitelist can access the specified stream.
NoteThe blacklist and whitelist are mutually exclusive. Only one can be active at a time.
Blocked Regions / Allowed Regions
The regions to block (blacklist) or allow (whitelist) access from.
Expiration time
The time when the rule expires. By default, a rule is valid for seven days, but you can adjust this as needed.
-
-
Click OK to save the configuration.
-
View the list of stream-level region blocking rules. After configuring a rule, you can refresh the list to check its status. You can filter the list by list type, AppName, or StreamName.
Remote authentication
How it works
Both remote authentication and URL signing protect live stream resources from unauthorized access, but they differ in their technical implementation:
-
URL signing: You configure authentication rules in the live center, which then handles the entire authentication data exchange.
-
Remote authentication: You maintain a dedicated authentication server. When a request is received, the live center forwards it to your server for validation. You are responsible for building and managing the authentication server. Remote authentication does not support the HLS protocol.
Remote authentication data flow:

|
Step |
Interaction |
|
① |
A user sends a resource access request (POST) that contains authentication parameters to the live center. |
|
② |
The live center receives the user request and forwards it to the authentication server using the POST method, either directly or after processing it based on specified rules. |
|
③ |
The authentication server validates the parameters in the request, determines the authentication result, and returns it via POST response to the live center. |
|
④ |
The live center receives the POST response from the authentication server, takes action based on the result, and returns the corresponding data to the user.
|
Procedure
- Log on to the ApsaraVideo Live console.
In the left navigation pane, click Domain Names. The Domain Management page appears.
Find the streaming domain that you want to configure and click Domain Settings in the Actions column.
-
Click .
-
Click the Remote Authentication tab, turn on the Remote Authentication switch, and configure the parameters.
NoteWhen remote authentication is enabled, every user request is forwarded to your authentication server for processing. If you expect a high volume of requests, consider the performance and capacity of your authentication server.
Parameter
Description
Authentication Server Address
The publicly accessible URL of your authentication server. The system validates the address format and value. You can set a fixed URL or build one with variable concatenation.
-
Fixed URL: Supports HTTP and HTTPS protocols. The value cannot be
127.0.0.1orlocalhost. Examples:-
http(s)://example.aliyundoc.com/auth
-
http(s)://192.0.2.1/auth
-
-
URL variable concatenation: You can generate the authentication URL by concatenating variables. For more information, see URL variable concatenation.
Request Method
The HTTP method the live center uses to send authentication requests to your server. Valid values: GET, POST. Default for new configurations: GET. For existing configurations with no recorded method, the field displays POST.
Pass Through URL Parameters
Controls which parameters from the user's request URL are included in the authentication request. You can choose to Specified Parameters Passed, Specified Parameters Not Passed, or not pass any parameters.
NoteIf you choose to Specified Parameters Passed or Specified Parameters Not Passed, enter the parameters in the input box, separated by commas (,). Example:
key1,key2,key3.HTTP Status Code to Return
The HTTP status code that your authentication server returns to the live center. You can define the status code for success or failure:
-
Successful Authentication: Enter a custom success status code. The live center allows a request only if your server returns this code. All other status codes result in the request being blocked.
For example, if you set the success code to 200, a 200 response indicates successful authentication.
-
Failed Authentication: Enter a custom failure status code. The live center blocks a request only if your server returns this code. All other status codes result in the request being allowed.
For example, if you set the failure code to 403, a 403 response indicates failed authentication.
Authentication Duration (s)
The time, in seconds, that the live center waits for a response from your authentication server after sending a request.
You can enter an integer from 0 to 30.
Retries on Timeout
The number of times the live center retries the authentication request after a timeout. If all retries fail, the system performs the action specified for Action After Timeout. You can set the action to Allow or Deny.
Action after timeout
The action the live center takes if the connection to the authentication server times out. The options are Allow and Deny.
-
Allow: The live center allows the user request.
-
Deny: The live center denies the user request and returns a failure status code, such as 403, to the user.
Asynchronous Authentication
When enabled, playback begins immediately without waiting for the authentication result. If the authentication result is later found to be an error, the stream is disconnected. This reduces time to first frame by removing synchronous authentication latency.
NoteAfter switching between synchronous and asynchronous authentication, test to ensure it works as expected.
-
-
Click OK to save the configuration.
After you configure remote authentication, you can return to the Remote Authentication tab to modify the settings or disable the feature.
URL variable concatenation
You can use variables to dynamically generate the authentication URL. The following table describes the available variables.
|
Type |
Description |
|
Numeric variables |
Numeric variables, such as For example, if the stream ingest URL is |
|
Alphabetic variables |
Variables such as For example, if the stream ingest URL is |
|
Custom variables |
Custom variables start with the prefix |
|
NGX variables |
All All values referenced by variables are processed by the URL escape function |
|
Stream name variables |
You can add parameters in the format |
If the stream ingest or stream playback URL is rtmp://domain.aliyundoc.com/app/stream?token=***&name=xrc.
The remote authentication server URL is set to http://auth.aliyundoc.com/?app=${udv_host}&streamname=${2}&appname=${1}&token=${arg_token}.
The actual authentication URL is http://auth.aliyundoc.com/?app=domain.aliyundoc.com&streamname=stream&appname=app&token=***.