This topic describes how to configure internet and VPC access for an Enterprise Dedicated Edition instance.
|
Applicable version |
Enterprise Dedicated Edition |
For security purposes, internet and VPC access are disabled by default after creating an Enterprise Dedicated Edition instance. You must manually configure network access once the instance is in the In Use state.
Configure network access
-
Log in to the console with an authorized account, select the target Enterprise Dedicated Edition instance, and then access the instance to view its current network status. On the instance details page, go to the Organization Overview tab. View the internet access domain name in the Instance Information section and the status of internet access and VPC access in the Access Network Configuration section.
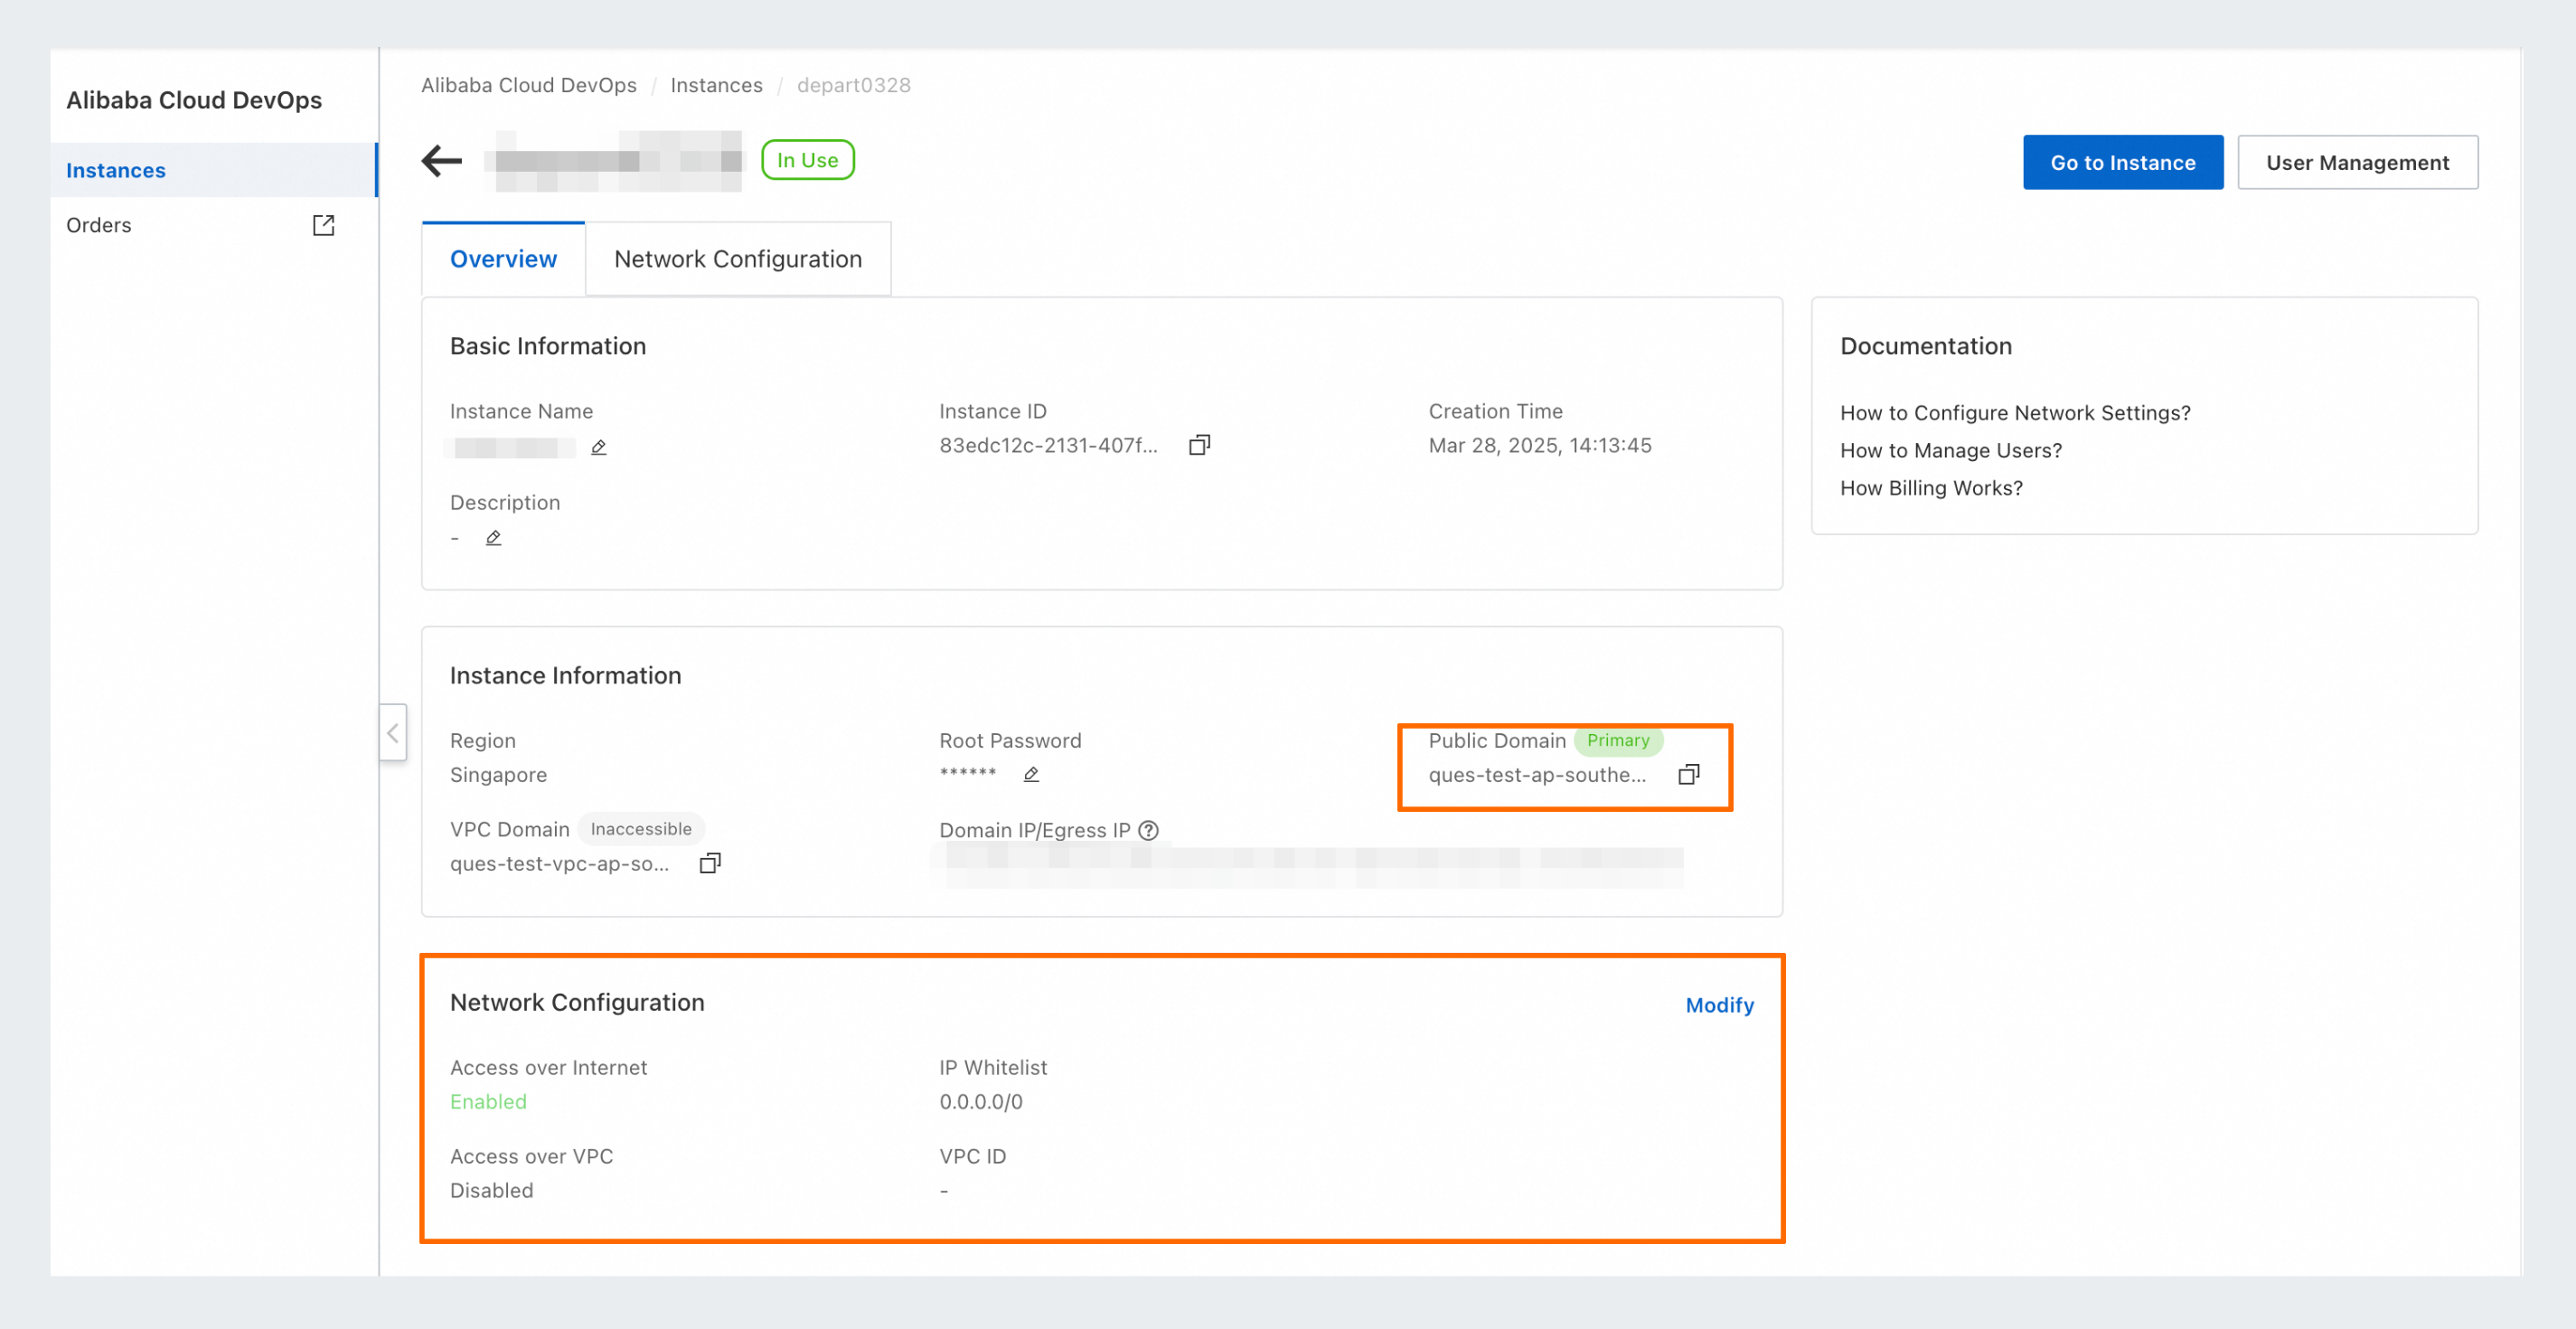
-
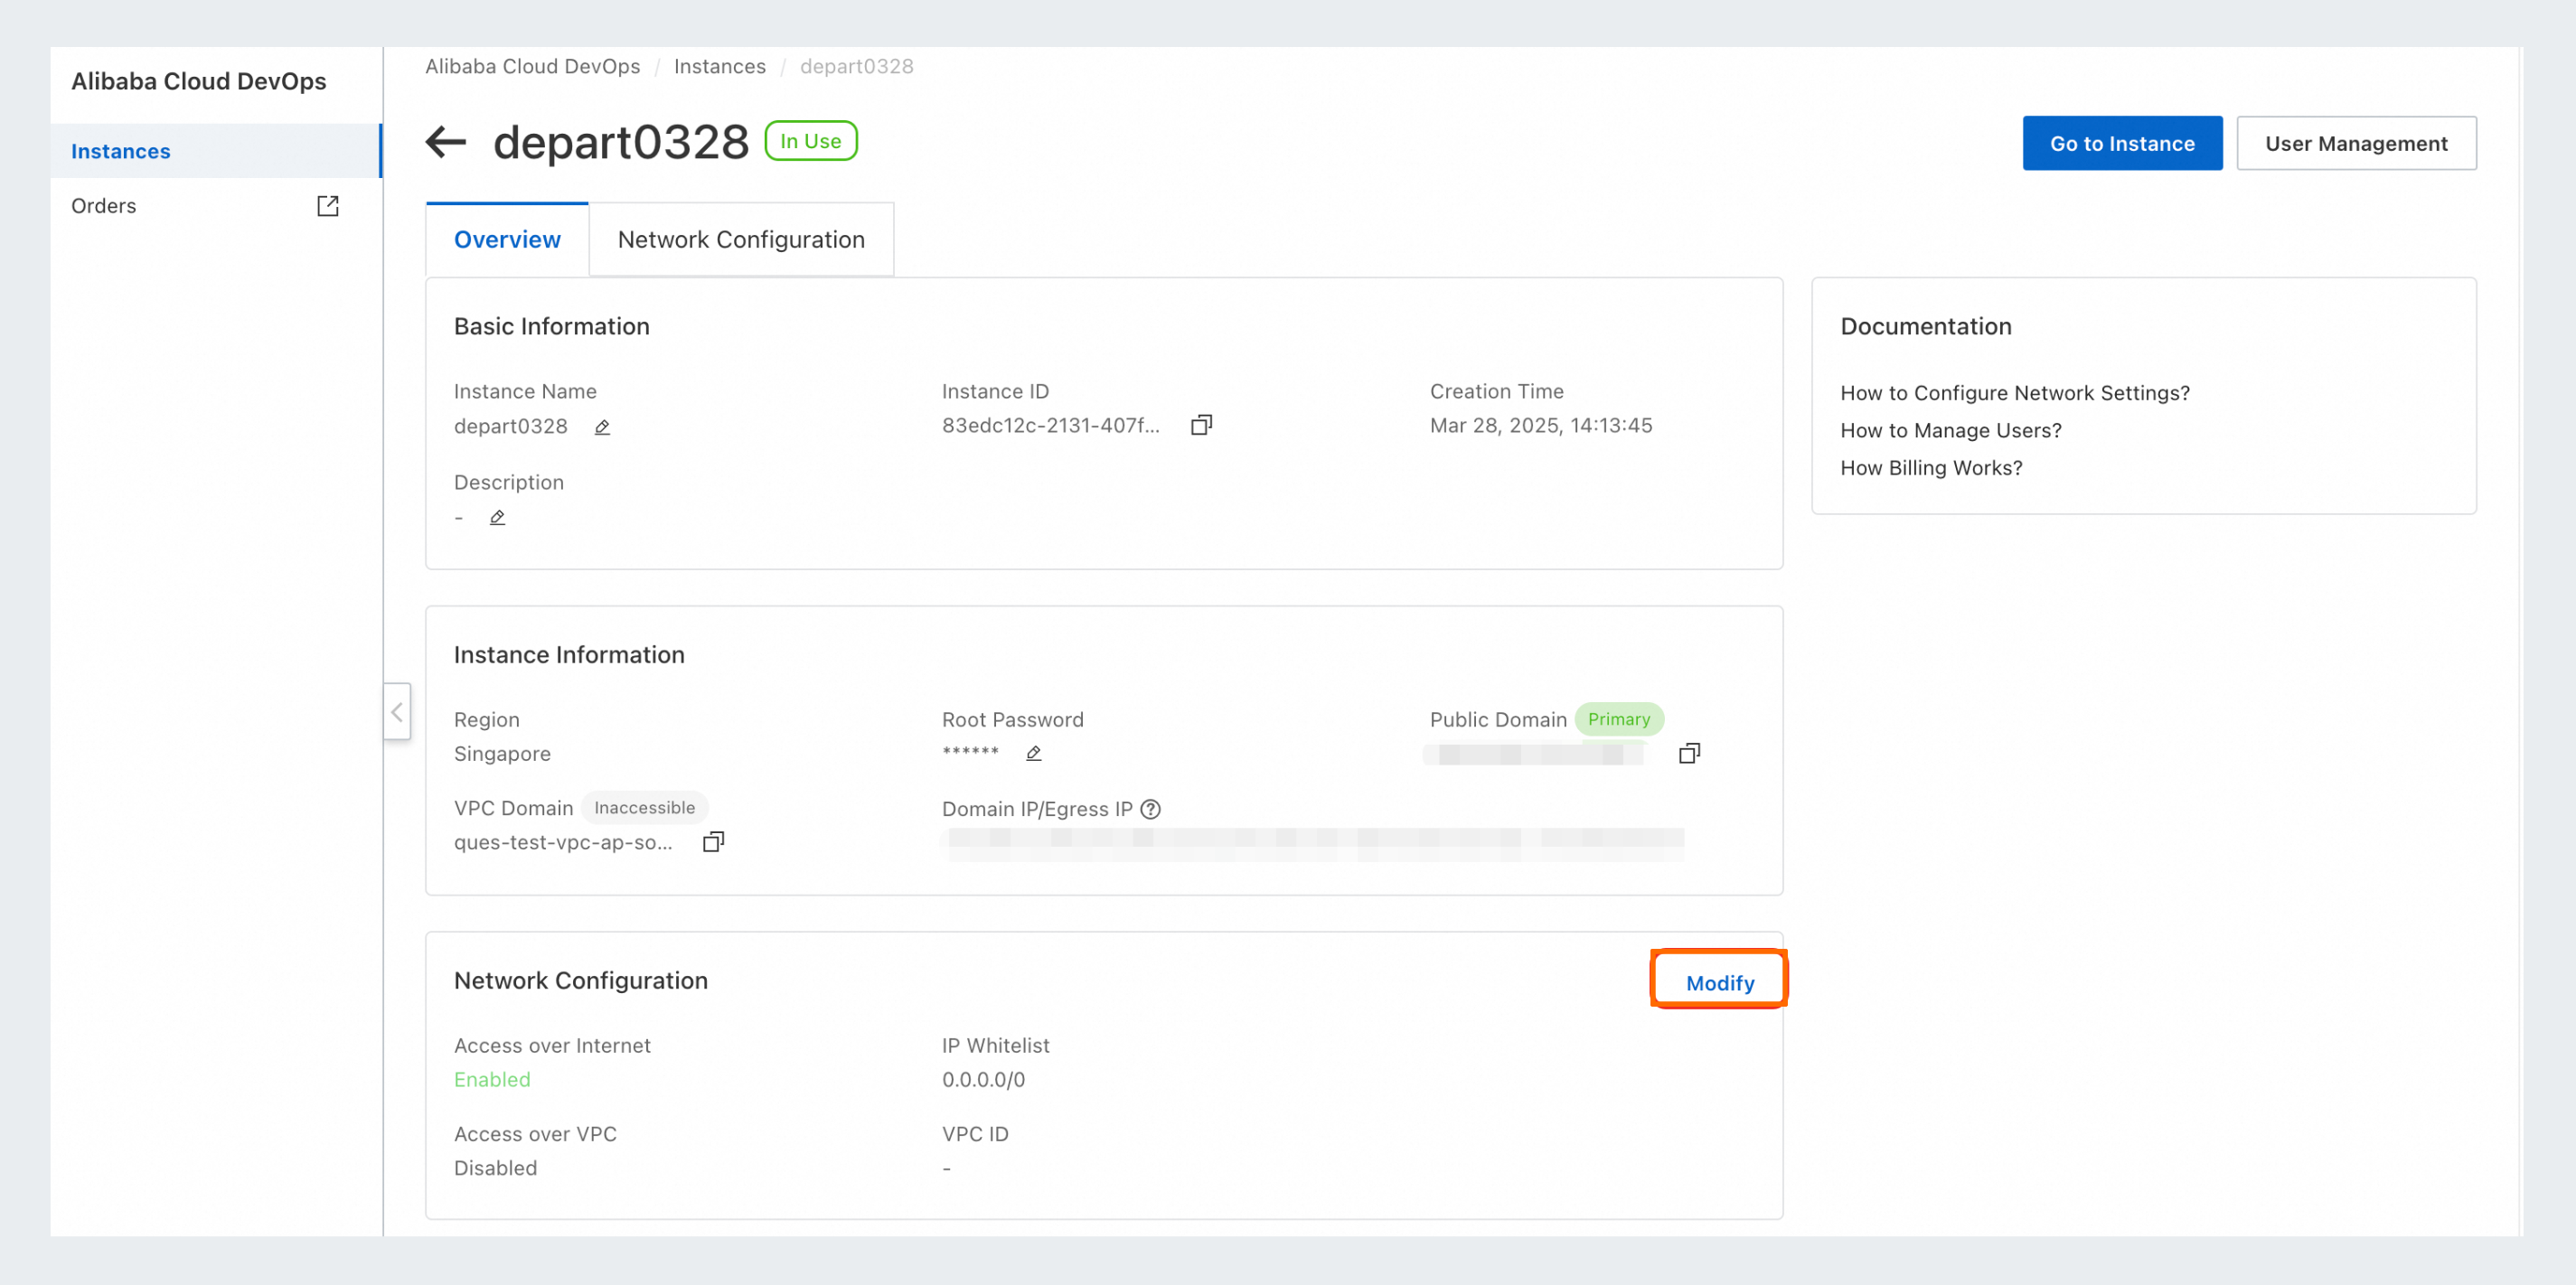
Click Go to Modify.
-
Click Modify Configuration and select internet access or VPC access. On the network configuration tab, the Access Network Configuration section shows the current network mode is Use internet access, and the internet IP whitelist is
0.0.0.0/0, which allows access from all IP addresses. The banner at the top of the page indicates that network access configuration changes take about 5 minutes to take effect.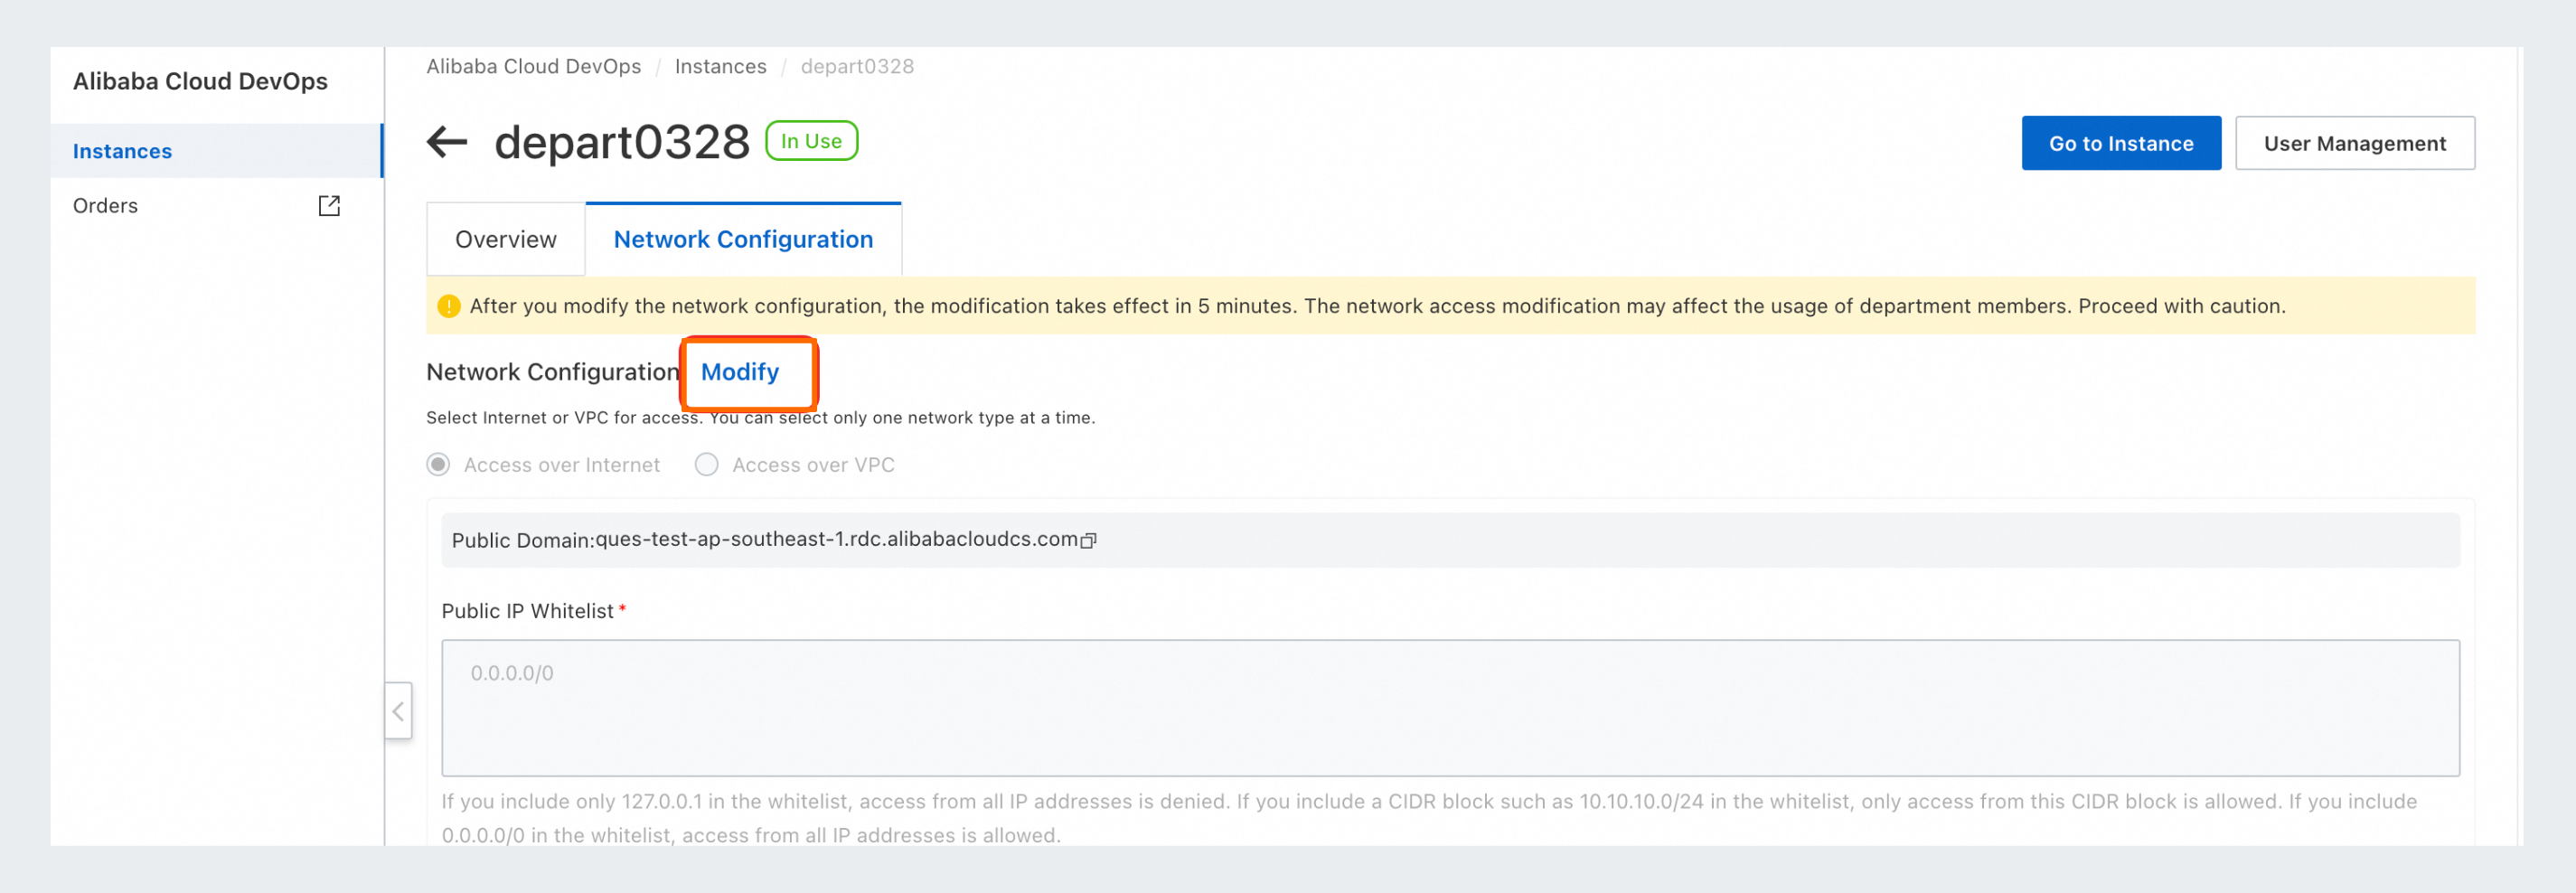
Internet access configuration
-
Select the option to enable internet access.
-
Configure the IP whitelist:
-
To enable internet access, you must configure an IP whitelist for security.
-
Enter 127.0.0.1 to allow local access only.
-
Enter an IP address range, such as 10.10.10.0/24, to allow access from that network segment.
-
Enter 0.0.0.0/0 to allow access from any IP address.
-
To add multiple IP addresses, separate them with commas. Do not add spaces before or after the commas.
-
-
Click OK to complete the internet access configuration.
You can add a maximum of 20 IP addresses or IP address ranges to the IP whitelist. The new configuration takes about five minutes to take effect. Changes to network access may affect your team members, so proceed with caution.
VPC access configuration
-
Select Use VPC access.
-
Create an endpoint: If no endpoints are available, create one by providing the required parameters. If you lack the required permissions to configure the VPC, follow the on-screen instructions to grant them before you proceed.
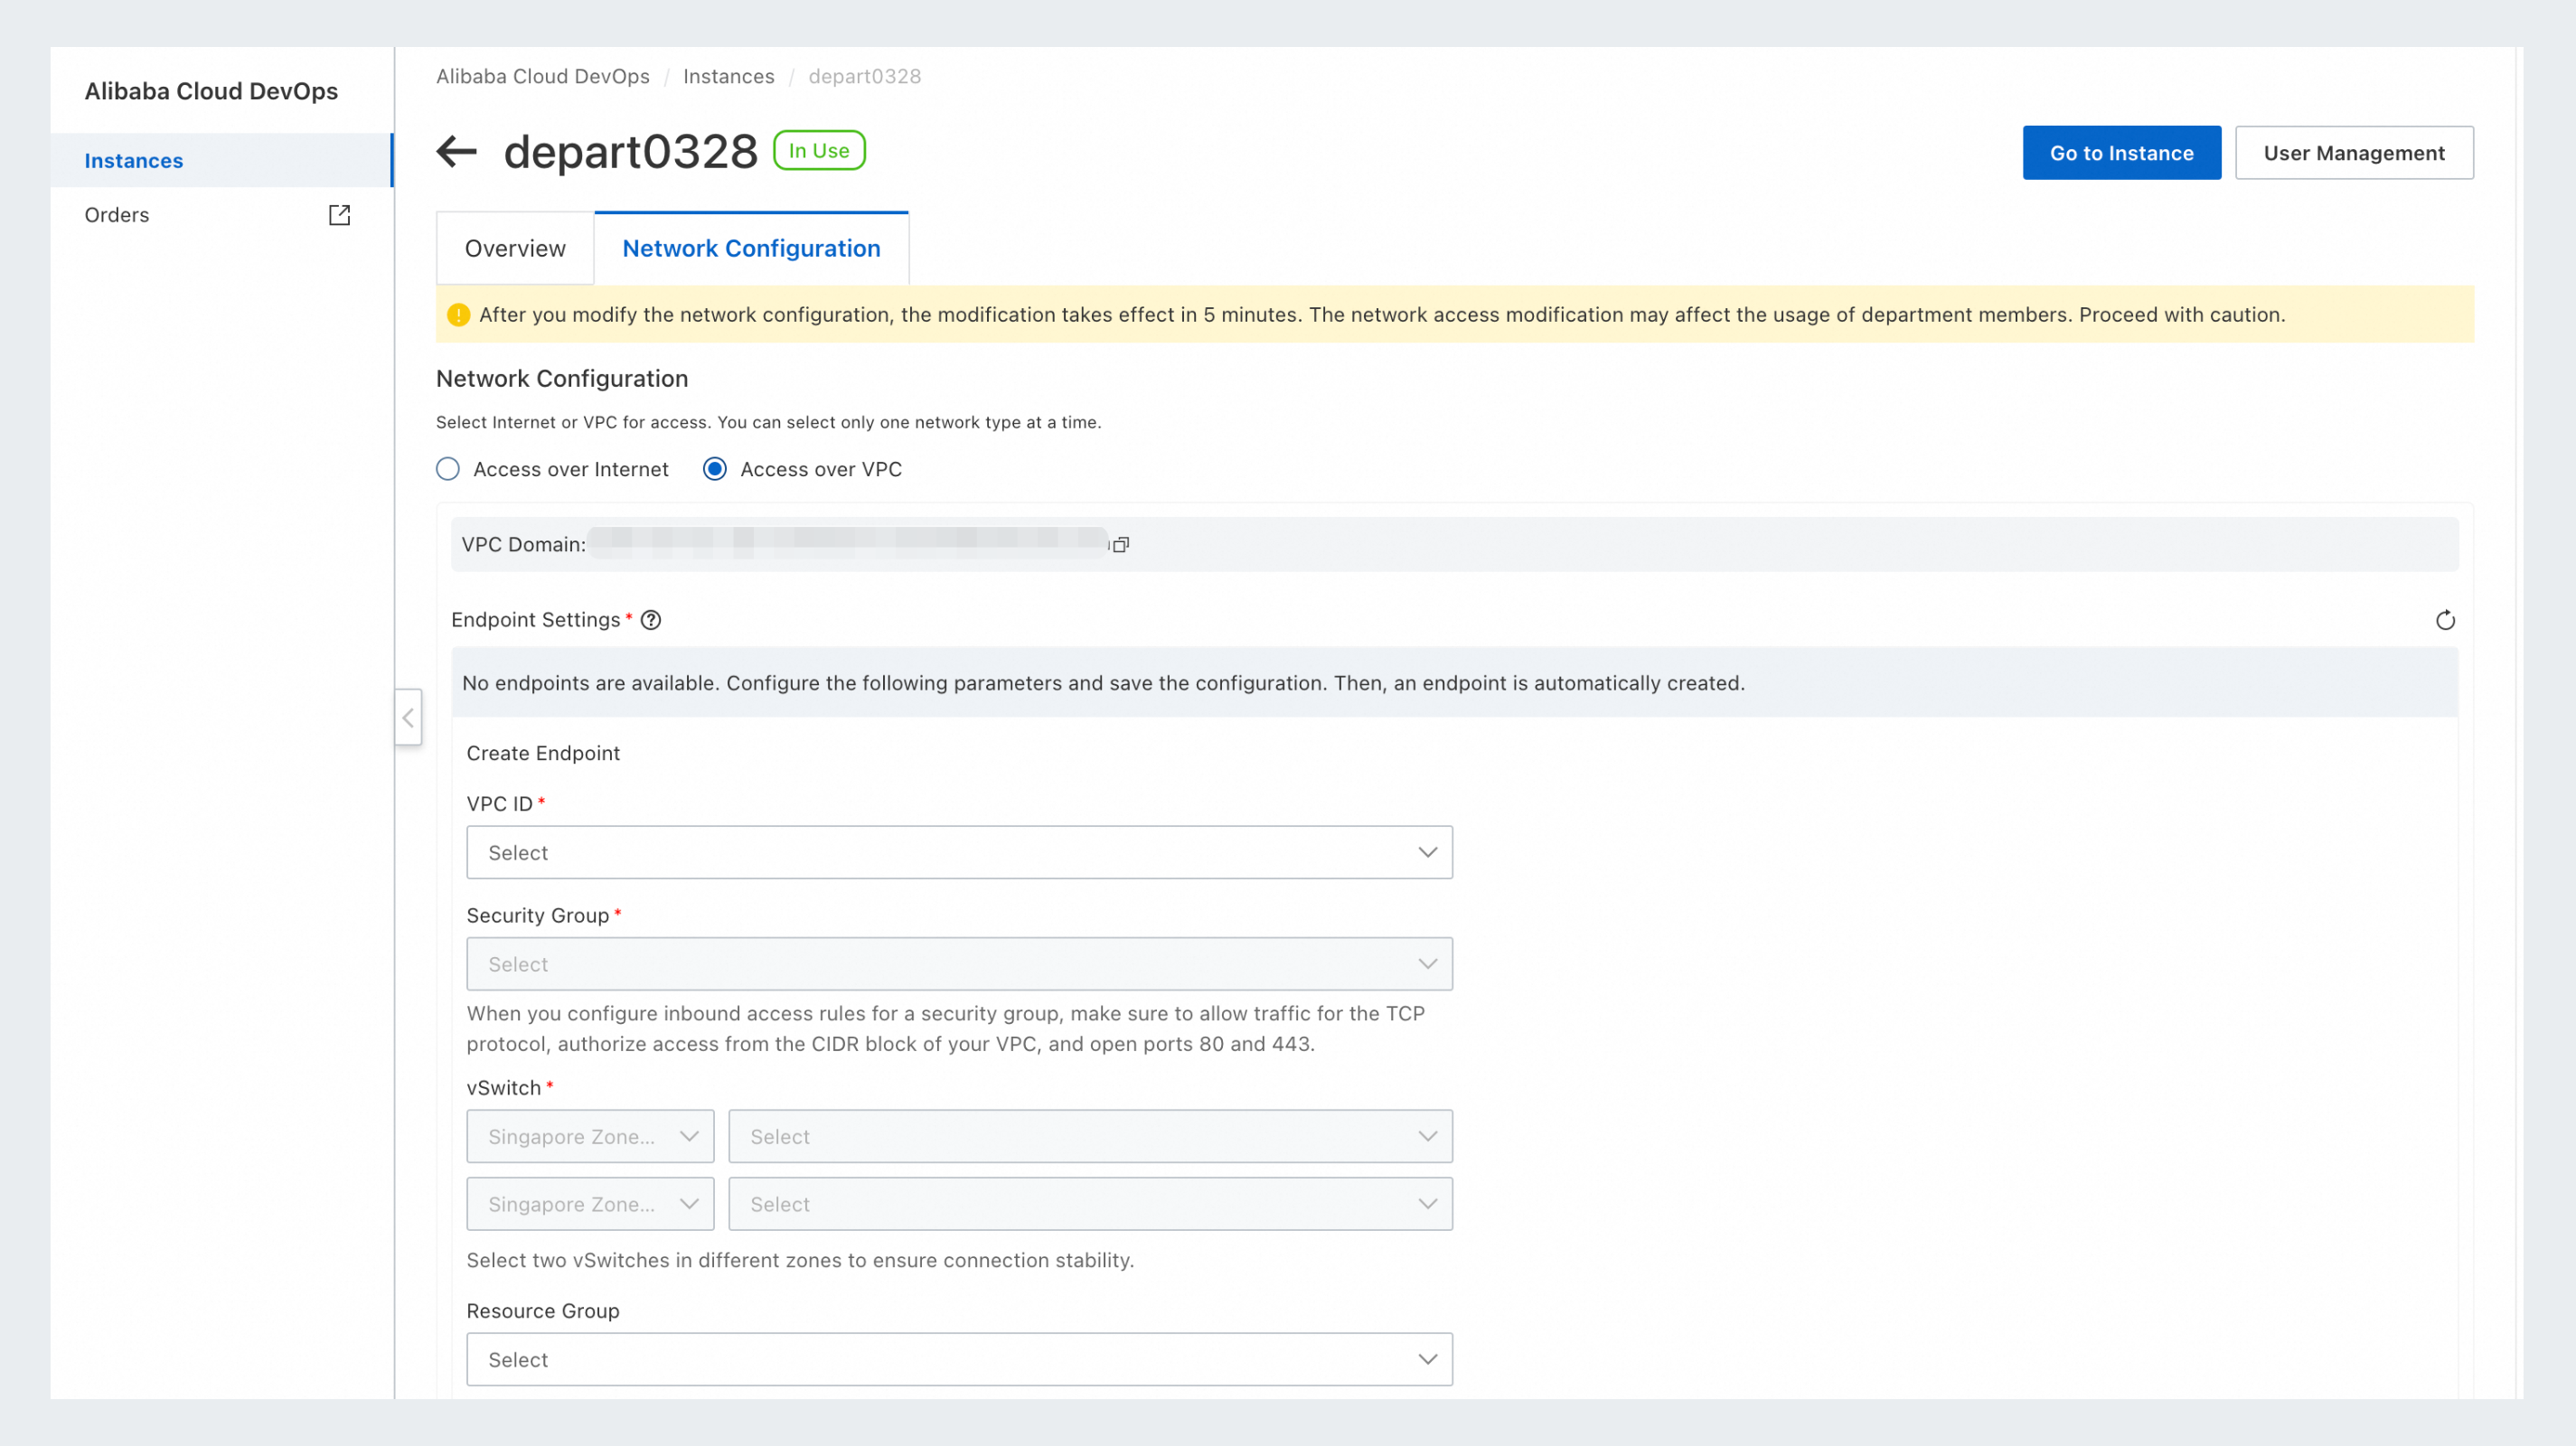
Create an endpoint
Follow the on-screen instructions to enter the following information:
-
VPC: Select your VPC. If you do not have a VPC, you can create one. For instructions, see Create and manage a VPC. Note that the availability zone of the vSwitch must match the availability zone specified on the network configuration page; otherwise, vSwitch information cannot be queried. VPC: Create a new VPC with the IPv4 CIDR block
10.0.0.0/16. vSwitch: Configure two vSwitches. For the first vSwitch, set the name to vSwitchA, select Singapore Zone A as the availability zone, and use the IPv4 CIDR block10.0.0.0/24; for the second vSwitch, set the name to vSwitchB, select Singapore Zone B as the availability zone, and use the IPv4 CIDR block10.0.2.0/24. VPC (Required): Select an existing VPC. vSwitch (Required): Select the vSwitches that correspond to Singapore Zone A and Singapore Zone B. You must select two vSwitches in different availability zones to ensure connection stability. -
security group: Select an existing security group, or create one if none exists. When you configure the inbound rules for the security group, you must allow access from the IP address range of your VPC and open ports 80 and 443. On the security group creation page, enter a Security Group Name such as
sg-20240626, and select Basic security group for Security Group Type. In the Access Rules section, on the inbound tab, click Quick Add to add rules for HTTP (80) and HTTPS (443). Set Authorization Policy to Allow and enter the IP CIDR block of your VPC for Source. Note that0.0.0.0/0allows access from any IP address. Use this setting with caution. -
resource group (Optional): Select an existing resource group.
Enable reverse access (optional)
If your Enterprise Dedicated Edition instance needs to access resources in your VPC, enable reverse access.
-
Access the enterprise user directory in your VPC.
-
Access your own database in your VPC, for example, if the Qoder CN knowledge base uses a self-managed storage service. For more information, see Switch the storage service for an enterprise knowledge base.
If you enable reverse access, do not use the 172.16.0.0/12 CIDR block for your VPC, as this can cause network conflicts.
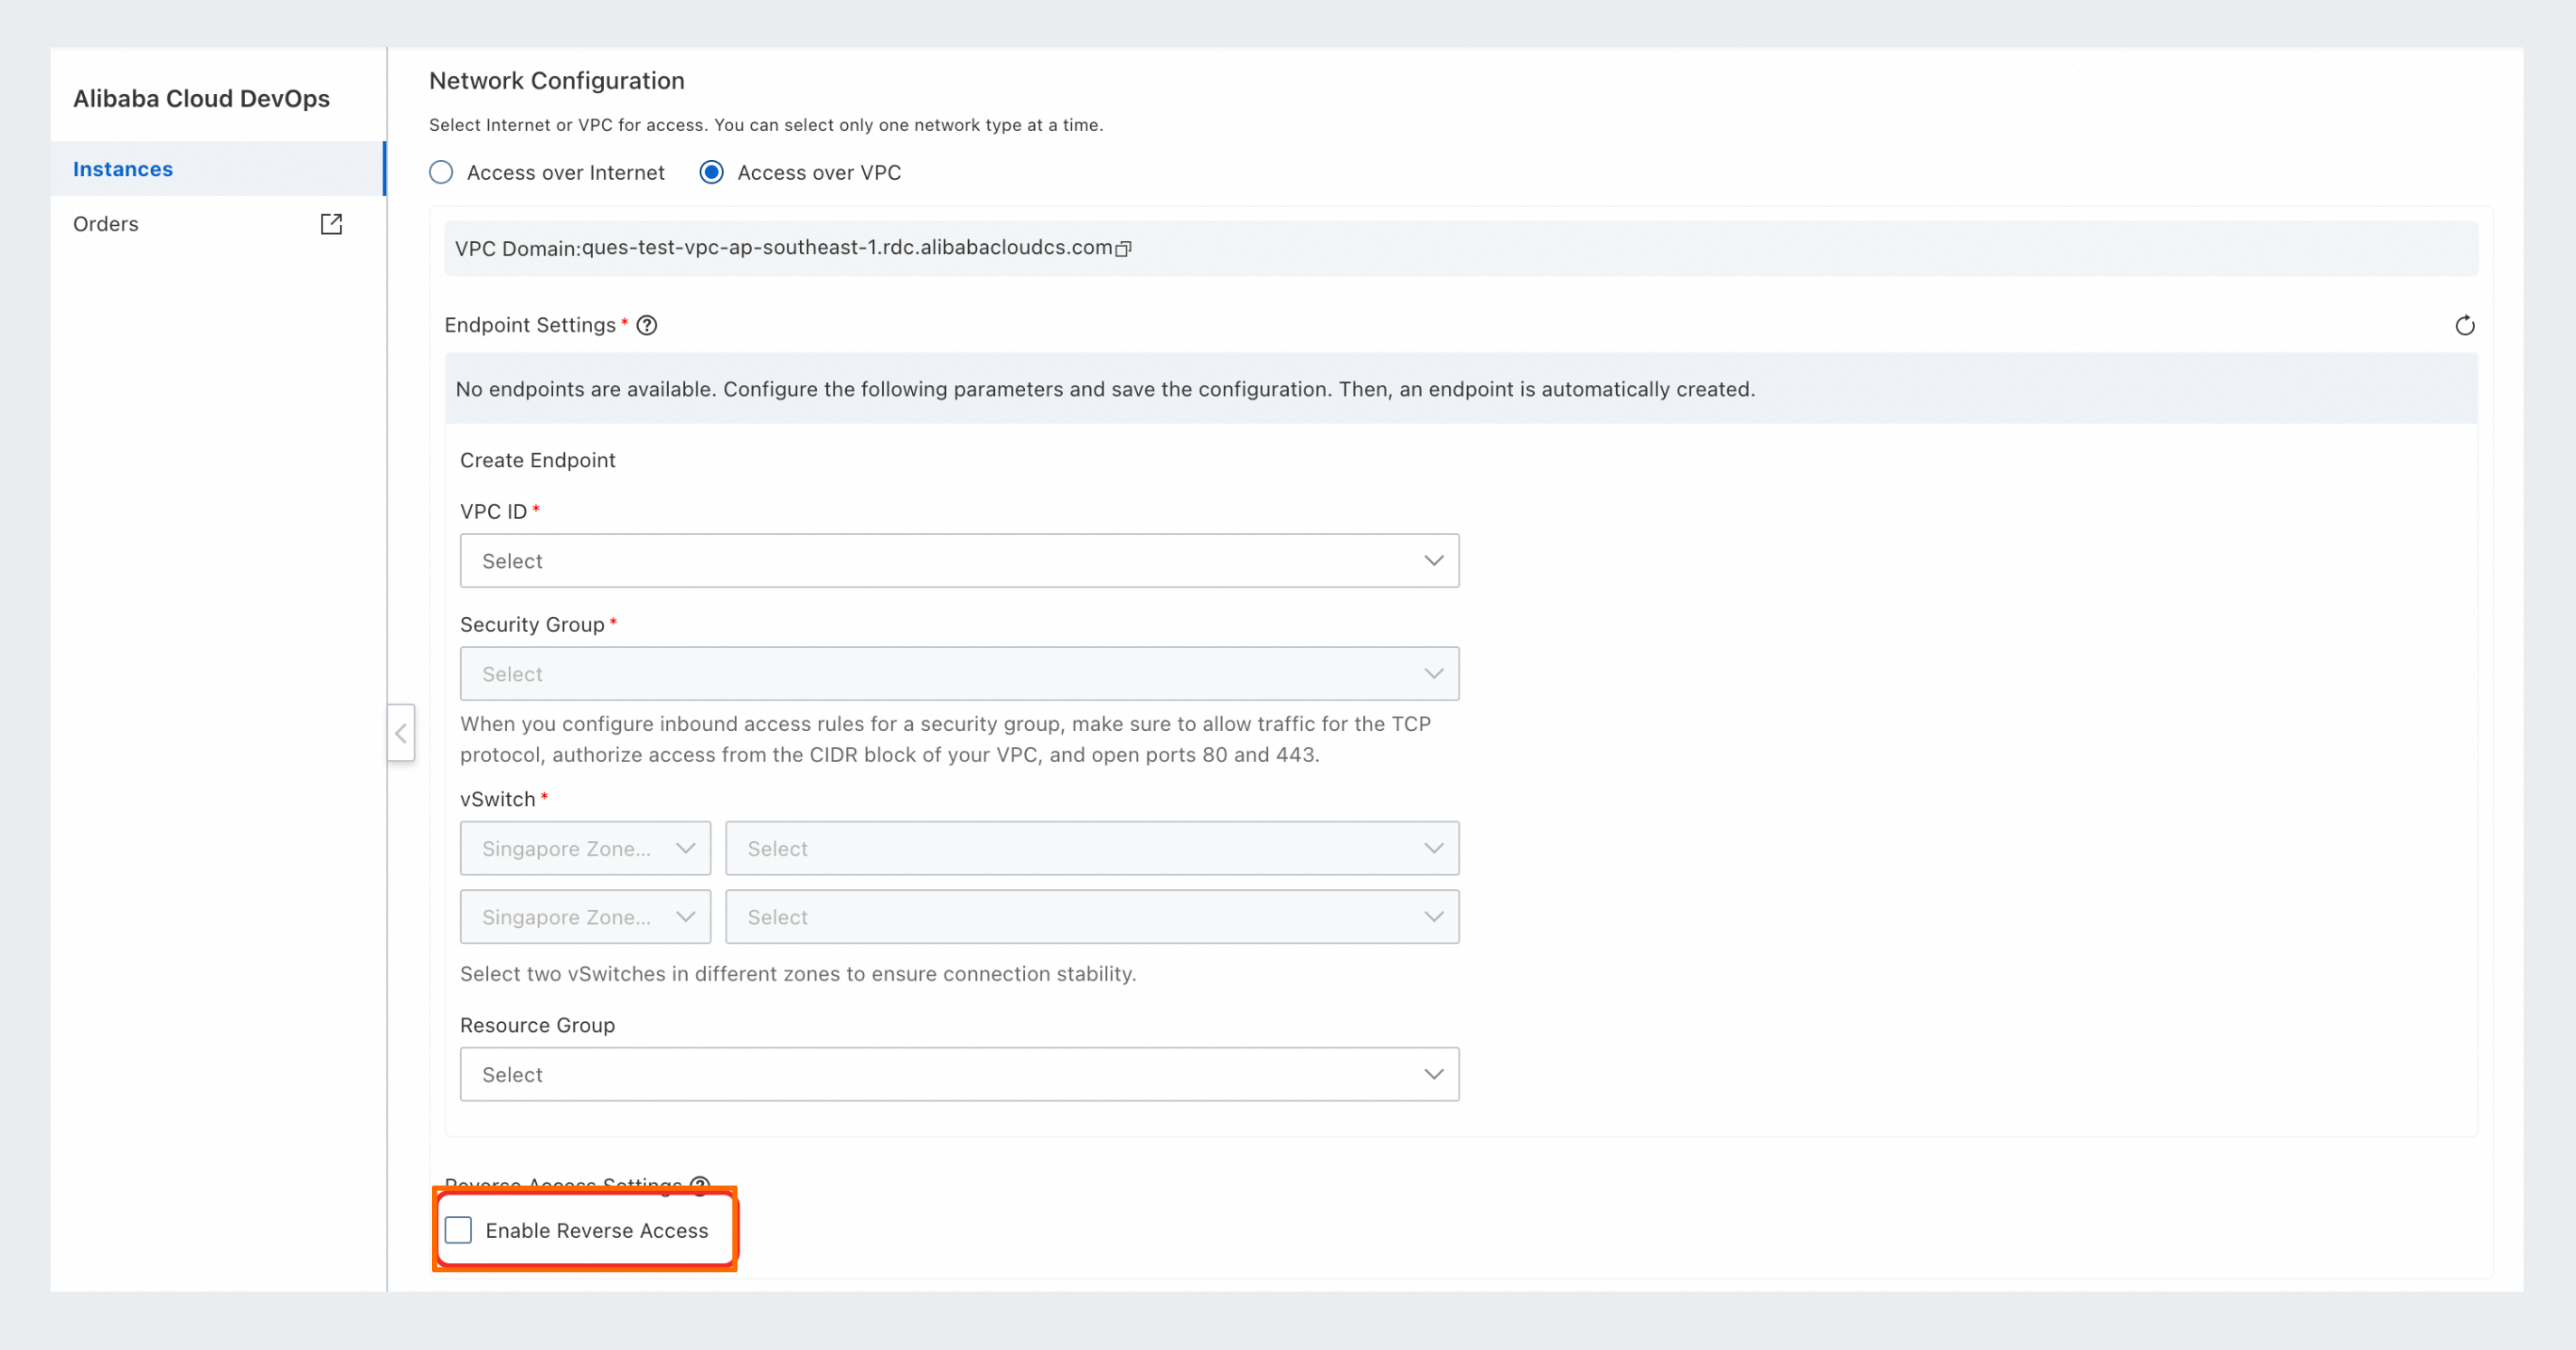
Select the Enable reverse access checkbox.
Configure security group rules for reverse access
After you enable reverse access and save the configuration, you can control which services are accessible within your VPC by configuring the inbound and outbound rules of the security group selected for the endpoint.
In the security group's rules, select Custom TCP, and add the IP addresses of target services in your VPC to the inbound and outbound rules. Open all ports for inbound rules. For outbound rules, deny access by default and open only the ports used by the target services. This method ensures secure access. For more information about how to configure inbound and outbound rules, see Add security group rules.
Billing for reverse access: When you enable reverse access, a PrivateLink connection is automatically created for each selected availability zone. The network fees generated by reverse access are billed separately by PrivateLink. For more information, see Billing.
Save the configuration
Click Save. This network change triggers an instance restart, and the instance will be temporarily unavailable. The process takes about five minutes to complete. After the configuration is saved, an endpoint is automatically created. If you enabled reverse access, a security group is also automatically created.
Before you use the instance, make sure that the private domain name is accessible. Once the instance is in the stable In Use state, check network connectivity by pinging the primary access domain name from your client.
On the Organization Management page, in the instance information, the private domain name is the current primary access domain name.
After you complete the relevant configurations, you can connect to your VPC and access the private domain name of the Instance Dedicated Edition to start working.