AgentRunTry AgentRun Now
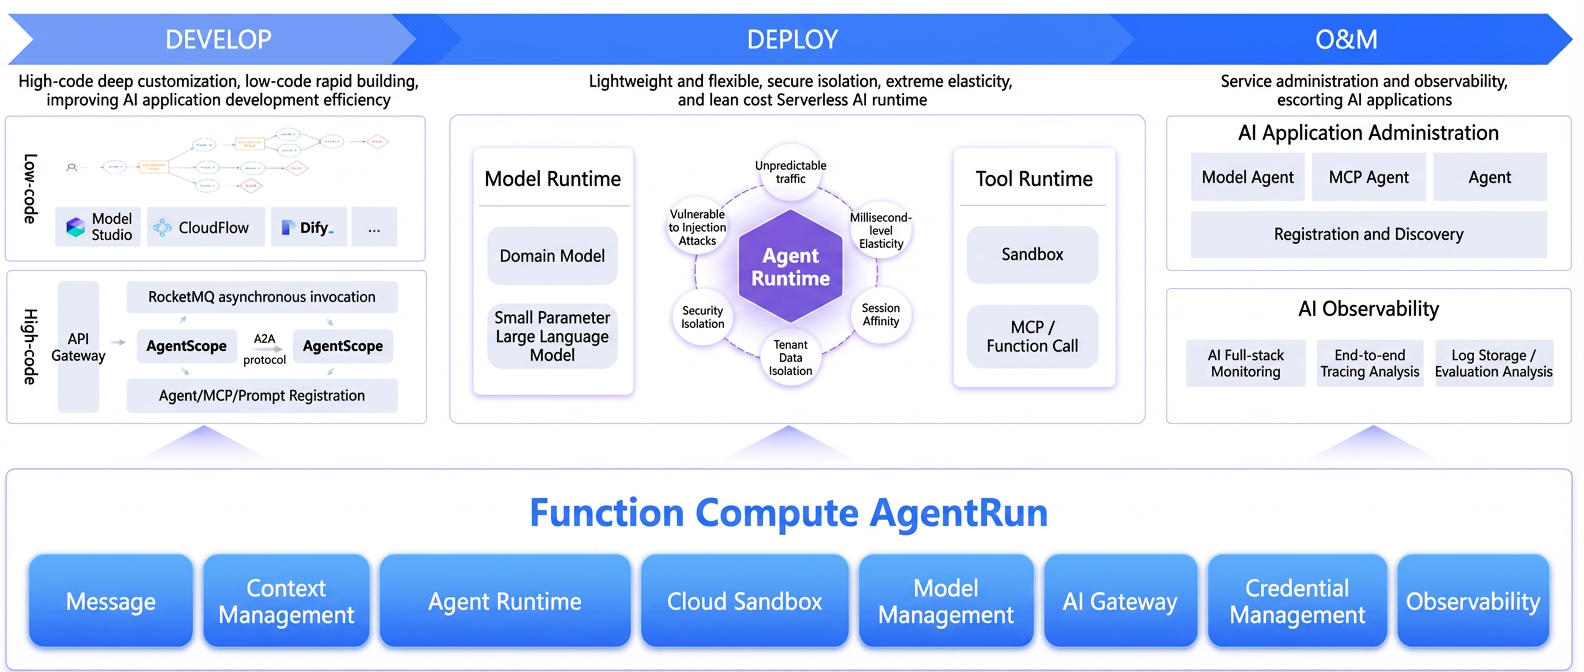
AgentRun is an all-in-one Agentic AI infrastructure platform that is code-centric, open, and composable. It provides full lifecycle management, including development, deployment, and operations, for enterprise-grade agent applications.
In essence, AgentRun combines a cloud native runtime for agent applications, a sandbox platform, model governance and a tool ecosystem, and built-in security and observability capabilities.
It enables your team to focus on business logic and agent behavior instead of building and managing the entire underlying infrastructure. With AgentRun, you get a serverless platform optimized for agent scenarios, including the execution environment, model gateway, tool invocation, logging, monitoring, and permission systems.
Capabilities
Build and evolve agent applications
-
Offers three development modes: no-code, low-code, and pro-code:
-
No-code (AI Studio): For business or operations staff to build agents through a visual interface.
-
Low-code (Quick Create Agent): Quickly build a runnable agent by selecting a model, writing a prompt, and configuring tools and a sandbox in the UI.
-
Pro-code (Create Agent with Code): Implement complex logic and achieve production-readiness by using languages like
Python,Node.js, orJavawith any framework.
-
-
Switch from low-code to pro-code with one click:
-
After you validate a prototype in the quick-create mode, you can convert it to the code mode with a single click.
-
The platform generates well-structured, maintainable code based on your current configuration, allowing you to iterate in pro-code mode without rewriting from scratch.
-
-
Provides open SDKs and APIs to enhance pro-code integration:
-
A unified HTTP API, compatible with protocols like OpenAI Chat Completions, lets you directly call agents, models, and tools from any language or backend service.
-
Multi-language SDKs for Python, Node.js, and more encapsulate authentication and call details. This enables pro-code projects to perform the following actions with minimal code:
-
Call agents hosted on AgentRun from your existing services.
-
Call the model proxy layer to use governance features like multi-model fallback and load balancing.
-
Use the serverless sandbox to perform complex tasks such as code execution and Browser Use.
-
-
-
Stay open and avoid vendor lock-in:
-
AgentRun integrates with mainstream agent frameworks like LangChain, AgentScope, CrewAI, and Google ADK. For more information, see the AgentRun SDK Documentation.
-
You can use AgentRun's capabilities selectively. For example, use only the sandbox, model proxy, or observability features and integrate them with your existing systems. This modular, plug-and-play approach eliminates the need to migrate your entire stack to a closed platform.
-
Production-grade agent runtime
-
A serverless runtime powered by Function Compute (FC):
-
Handles sparse agent invocations and traffic bursts with ease by using the elastic scaling capabilities of a serverless architecture.
-
Session affinity ensures that requests from the same session are routed to the same instance, which simplifies continuous conversations and state management.
-
Supports scale to zero. Resources are automatically released after a session becomes inactive. Billing is adjusted during this light sleep state to balance performance and cost.
-
-
Built-in multi-language and multi-type runtimes:
-
The agent runtime supports popular languages like Python, Node.js, and Java.
-
The sandbox runtime has built-in support for over 50 languages and also allows you to use a custom image.
-
You do not need to manage servers, containers, or Kubernetes clusters.
-
Unified model access and governance
-
Centralized management of large models:
-
Supports models from leading providers such as Qwen and DeepSeek, as well as open-source models.
-
Use FunModel to host open-source models as OpenAI-compatible APIs with a single click.
-
Supports vector model management for retrieval and Retrieval-Augmented Generation (RAG) scenarios.
-
-
Model governance and high availability:
-
A unified model proxy layer abstracts away the differences between various provider APIs.
-
Features built-in multi-model load balancing, fallback, concurrency control, and timeout control.
-
Supports content moderation, token-based rate limiting, automatic retries, and cost monitoring.
-
Out-of-the-box sandbox capabilities
-
Sandbox as a service:
-
Code Interpreter: Securely execute code in languages like Python, Node.js, and Java, with support for file and session management.
-
Browser Use: Provides a stable browser automation environment using the CDP over WebSocket protocol, compatible with Puppeteer and Playwright.
-
Computer/Mobile Use (Planned): Future extensions will support advanced operations like GUI interaction and remote desktop.
-
-
Enterprise-grade security and isolation:
-
Multi-level isolation at the request, instance, and session levels based on secure containers (MicroVMs).
-
Storage isolation with support for mounting Object Storage Service (OSS) or NAS.
-
The platform maintains and updates the sandbox environment, freeing developers from building, patching, and managing dependencies.
-
-
Performance features of the serverless sandbox:
-
Millisecond-level wakeup from light sleep: Briefly idle sandbox instances automatically enter a light sleep state and can be woken up in milliseconds when a new request arrives, virtually eliminating cold start delays.
-
Second-level wakeup from deep sleep: Instances with no traffic for an extended period enter a more power-efficient deep sleep mode and can still be restored within seconds, balancing cost and performance.
-
Concurrent execution of millions of sandbox templates: The underlying infrastructure supports the concurrent execution of millions of function-level sandbox templates. This capability allows large-scale, diverse sandboxes to run simultaneously on a single platform, making it ideal for enterprise scenarios with multiple teams and business lines.
-
Unified tool ecosystem and MCP support
-
Tool Hub:
-
Provides a vast collection of tools that can be deployed with one click.
-
Allows you to publish custom tools and build your own agent tool ecosystem.
-
-
Dual-protocol support for MCP and Function Call:
-
Convert anything into an MCP tool: Agents, sandboxes, and API-based tools can be converted to the MCP format with one click.
-
Supports advanced extensions like pre- and post-processing hooks, semantic analysis, and intelligent routing.
-
Compatible with most MCP and Function Call tools available on the market.
-
Package MCP tools: Aggregate multiple MCP tools and API tools into a unified MCP gateway. This exposes them through a single endpoint for simplified management and access.
-
Observability and cost analysis
-
End-to-end observability:
-
Provides end-to-end tracing based on OpenTelemetry for the entire request lifecycle, from user request to external dependency.
-
Displays key metrics such as QPS, latency distribution, and error rates.
-
-
Cost and performance assessment:
-
Token-level cost attribution: Pinpoint costs associated with specific operations like model calls, vector searches, and tool invocations.
-
Multi-dimensional analysis: Analyze costs and performance by user, session, or agent type.
-
Unified log storage and analysis: Use logs for quality assessment, security auditing, and semantic analysis.
-
Enterprise-grade security and data residency
-
Multi-layered security isolation:
-
Isolation at the request, instance, and session levels.
-
Secure isolation between the agent runtime and the sandbox runtime.
-
Connect to your VPC or IDC network to ensure your data never leaves your private environment.
-
-
Flexible deployment of data and memory:
-
Deeply integrates with open-source projects like Mem0 and RAGFlow.
-
Supports both a one-click hosted mode and the ability to connect to your existing deployments in a VPC or IDC.
-
Enterprises can choose to deploy core data on-premises while hosting general data in the cloud, balancing security and efficiency.
-
Core components and architecture
AgentRuntime
Provides a unified execution environment and lifecycle management for agents.
Key features:
-
Multiple development modes:
-
No-code (AI Studio), low-code (Quick Create Agent (No-Code)), and pro-code (Create Agent with Code).
-
-
Multi-language runtimes:
-
Python 3.10/3.12, Node.js 18/20, Java 8/11/17, and more.
-
-
Deployment methods:
-
Upload a code package (from a local machine or OSS), use the online editor, or specify a custom image.
-
-
Runtime capabilities:
-
Session affinity, serverless elasticity, and multi-instance concurrency.
-
Version management, endpoint management, and canary releases.
-
-
Integration ecosystem:
-
SDK integration, API integration (compatible with OpenAI Chat Completions), UI integration (for full-stack applications), and MCP integration.
-
Sandbox
Provides a secure, high-performance, and serverless sandbox for code execution and browser automation.
Key features:
-
Multiple sandbox types:
-
Code Interpreter and Browser Use, with future support for All-in-One, Reinforcement Learning (RL), Simulation (Sim), and more.
-
-
Isolation and elasticity:
-
Based on secure containers (MicroVMs) with multi-level isolation.
-
Supports scale to zero and elastic scheduling based on requests.
-
Millisecond-level wakeup and rapid delivery of tens of thousands of instances per minute.
-
-
Integration methods:
-
Can be integrated into an agent through SDK calls or as an MCP tool.
-
Supports both pre-built and custom images.
-
Model management
A centralized hub for accessing, managing, and governing large models.
Key features:
-
Model sources:
-
Third-party models (such as Qwen and DeepSeek), self-hosted open-source models (using frameworks such as vLLM, SGLang, Ollama, or LMDeploy), and vector models.
-
-
Model service provider plugins:
-
Centrally manage authentication credentials and connection details for various model services.
-
-
Model runtime:
-
A serverless model runtime that supports out-of-the-box usage, secondary development with DevPods, elastic GPU delivery, and scaling to zero during off-peak hours.
-
-
Model governance:
-
Multi-model load balancing, fallback, concurrency control, timeouts, and caching.
-
Content moderation, token-based rate limiting, and cost monitoring.
-
Tool management
A centralized hub for defining, invoking, and governing tools.
Key features:
-
Unified tool interface:
-
Supports both MCP and Function Call protocols.
-
Manages tool invocation logic through a unified API, which reduces development complexity.
-
-
Tool Hub ecosystem:
-
Provides a large number of common tools for one-click integration.
-
Supports publishing and sharing custom tools.
-
-
Intelligent extensions:
-
Supports advanced features like hook injection, semantic analysis, and intelligent routing.
-
Planned features include an AI-powered engine for automatically generating tool definitions and recommending tools.
-
Credential management
Centrally manages all credentials required for accessing agents, sandboxes, LLMs, and tools.
Key features:
-
Supports multiple credential types:
-
API keys, JWT, Basic Auth, AccessKey pairs (AK/SK), and more.
-
-
Dynamic credential injection:
-
Works with the AgentRun runtime to securely inject credentials at runtime.
-
-
Enable/Disable control:
-
Allows you to instantly disable credentials that are suspected of being compromised, which mitigates security risks.
-
Observability and operations
Eliminates the "black box" nature of agents by providing the insights needed to observe and optimize production workloads.
Key features:
-
End-to-end tracing:
-
Provides consistent tracing from the initial request through the gateway, agent, model, tools, and external dependencies.
-
-
AI application monitoring:
-
Build monitoring dashboards with Prometheus or ARMS to analyze model performance, token costs, GPU anomalies, and more.
-
-
Logging and evaluation:
-
Unified log storage with support for search and SQL analysis.
-
Supports secondary analysis of model call logs for quality, security, and intent evaluation.
-
Prerequisites and access methods
Service-Linked Role authorization
When you use AgentRun for the first time, you must grant permissions through a Service-Linked Role (SLR):
-
Log in to the AgentRun Console.
-
The system automatically checks for the required SLR permissions and, if they are missing, displays a dialog box to guide you through authorization. Follow the prompts to create and authorize the following roles:
-
Custom role AliyunFCFunctionAICustomRole (trusted entity:
functionai.fc.aliyuncs.com) -
Default role AliyunFCFunctionAIDefaultRole
-
Service-Linked Role AliyunServiceRoleForFC and AliyunServiceRoleForAgentRun
-
-
After authorization is complete, you can create and manage agents, sandboxes, models, and other resources.
Permissions and networking
-
You must grant your account or RAM user the necessary permissions to access resources like Function Compute (FC), sandboxes, large models, logs, OSS, and VPCs. For more information, see Authorize a RAM user to use AgentRun.
-
To access AgentRun services from within a VPC, you can configure a private endpoint by using PrivateLink. For more information, see Access AgentRun resources over PrivateLink.
-
Using the UI integration feature requires permissions related to the functionai pipeline.
Summary
AgentRun is not just an "agent development framework" or a "model invocation SDK." It is an all-in-one infrastructure platform for enterprise-grade agents that provides:
-
A serverless agent runtime and sandbox runtime.
-
A model runtime and model governance.
-
A tool/MCP ecosystem with unified invocation governance.
-
Centralized credential management and enterprise-grade security isolation.
-
End-to-end observability and cost analysis.
This enables teams to seamlessly build and evolve agent applications on a single platform—from no-code prototypes to pro-code production systems—while maintaining full control over data security and technology choices.