Configure an HTTP trigger in the Function Compute console, then invoke the function with HTTP requests.
Prerequisites
Step 1: Create a trigger
Log on to the Function Compute console. In the left-side navigation pane, click Functions.
In the top navigation bar, select a region. On the Functions page, click the function that you want to manage.
-
On the Function Details page, click the Trigger tab and then click Create Trigger.
-
In the Create Trigger panel, configure the parameters and click OK.
Configuration Item
Operation
Example
Trigger Type
Select HTTP Trigger.
HTTP Trigger
Name
Enter a custom name for the trigger.
http-trigger
Version or Alias
Defaults to LATEST. To create a trigger for a different version or alias, select it from the Version or Alias drop-down list on the Function Details page. Version management and Alias management.
LATEST
Request Method
Select the HTTP methods allowed for this trigger.
GET, POST, PUT, DELETE
Disable Internet URL
Disabled by default — the trigger is accessible from its public endpoint.
When enabled, no public endpoint is provided. Requests to it return
access denied due to function internet URL is disable. Custom domain access is unaffected.No
Authentication Method
Select how Function Compute authenticates HTTP requests:
-
No Authentication: Allows unauthenticated access. Anyone can invoke the function via HTTP.
-
Signature Authentication: Requires signature authentication. Sample code: Access an HTTP trigger endpoint with a signature.
-
Bearer Authentication: HTTP requests must be authenticated. For sample code about Basic authentication, see Configure Basic authentication for an HTTP trigger.
-
JWT Authentication: HTTP requests must be authenticated using JSON Web Token (JWT). For more information, see Configure JWT authentication for an HTTP trigger.
-
Bearer Authentication: HTTP requests must be authenticated using Bearer authentication. For more information, see Enable Bearer authentication for an HTTP trigger.
No authentication
After the trigger is created, you can modify its configurations, such as Version or Alias, Request Method, and Authentication Method.
-
Step 2: Write and deploy code
Write your function code after creating the trigger.
On the Function Details page, click the Code tab. Write code in the code editor and then click Deploy. Refer to the handler documentation for your runtime for sample code.
Step 3: Test the function
Method 1: Use the console to test the function
On the Function Details page, click the Code tab.
-
Synchronous call
Click Test Function.
-
Asynchronous invocation
Click the
 icon to the right of Test Function, select Async Invocation, and then click Test Function.
After execution completes, view the result on the Code tab.
Method 2: Use cURL to test the function
-
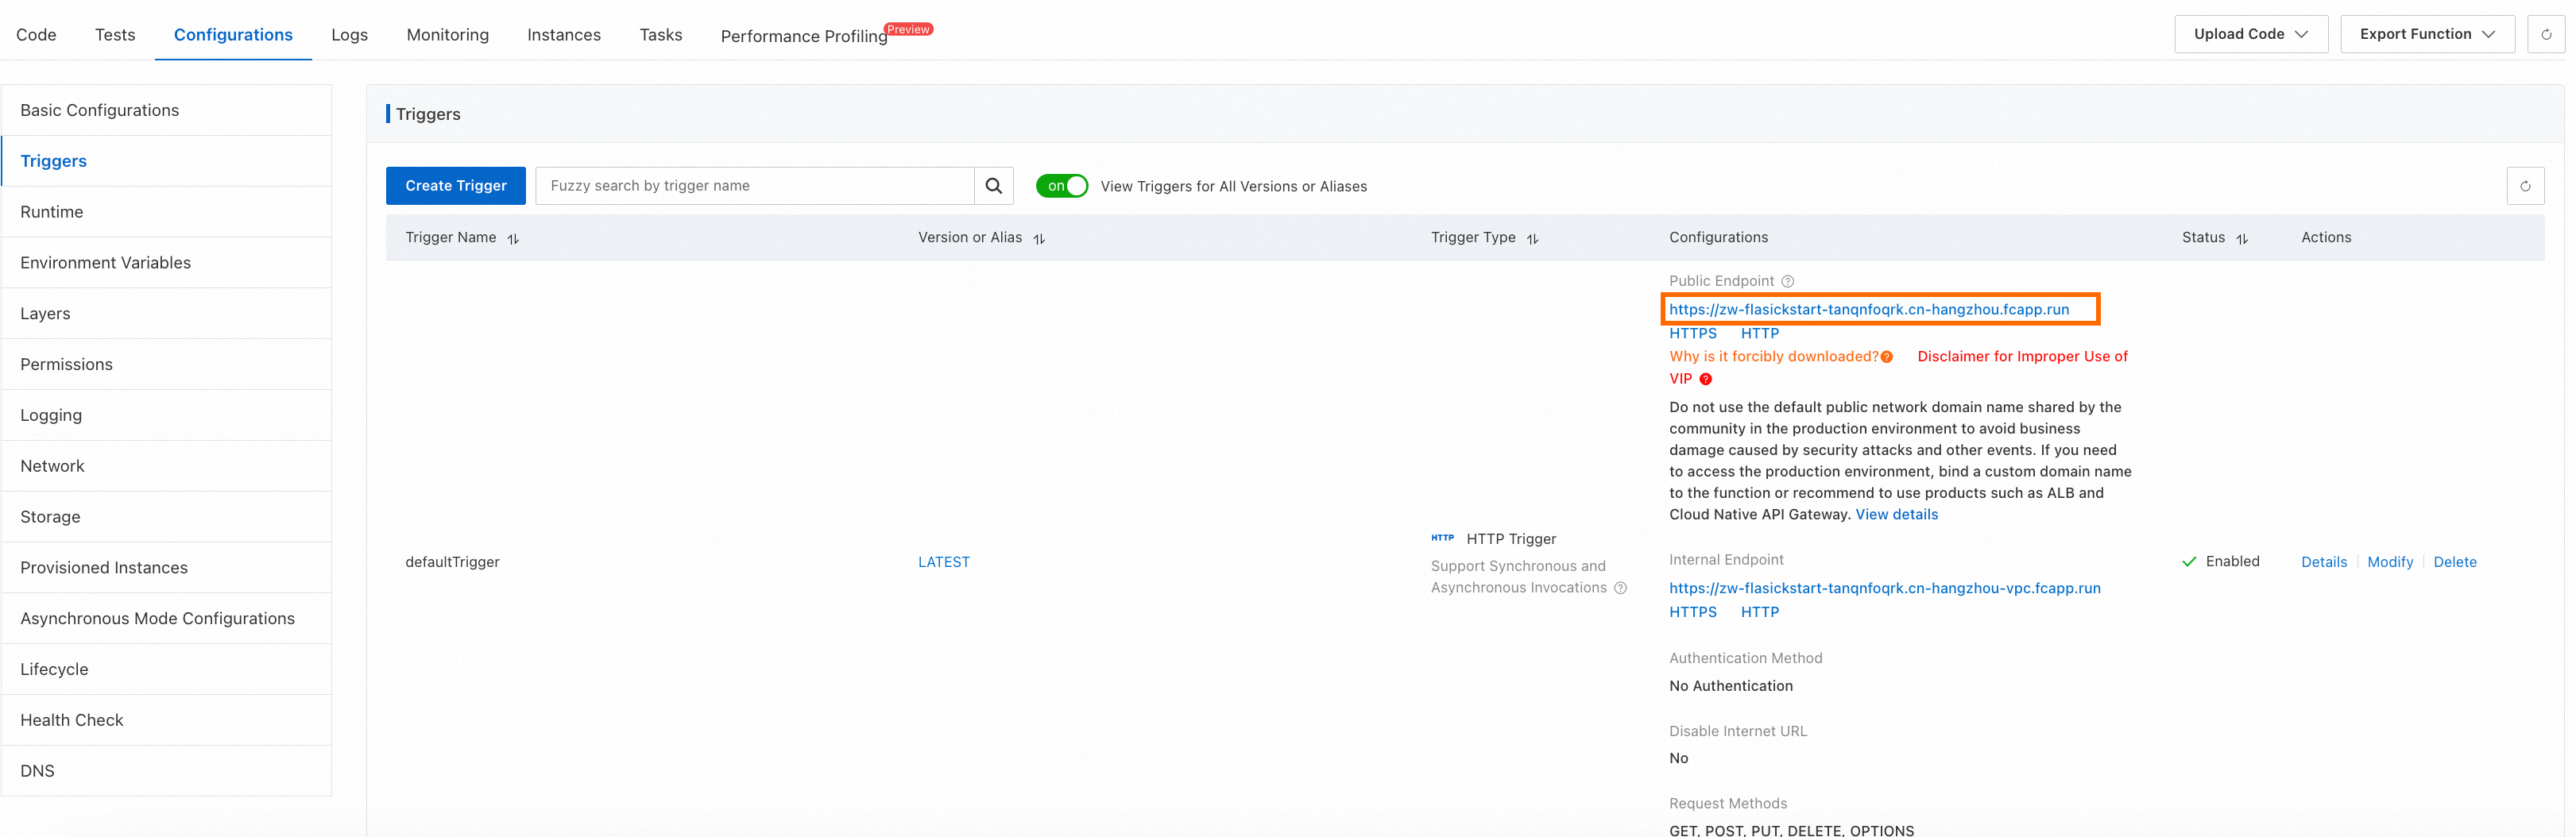
On the Function Details page, click the Trigger tab. In the Configurations column of the target HTTP trigger, obtain the public endpoint.
-
Run a cURL command on the command line to test the function.
Synchronous call
Replace
https://example.cn-shenzhen.fcapp.runwith your trigger's public endpoint, and$pathwith the API operation name.curl -v https://example.cn-shenzhen.fcapp.run/$pathNote-
Invoke a web function: Take Flask as an example. To test a Python function whose route is defined as
@app.route('/test'), replace$pathwithtest. To test a Python function whose route is defined as@app.route('/'), directly call the public endpoint of the HTTP trigger. -
Invoke an event function: Directly call the public endpoint of the HTTP trigger.
After execution, Function Compute returns the result.
Asynchronous invocation
Replace
https://example.cn-shenzhen.fcapp.runwith your trigger's public endpoint, and$pathwith the API operation name.curl -v -H "X-Fc-Invocation-Type: Async" https://example.cn-shenzhen.fcapp.run/$pathNote-
Invoke a web function: Take Flask as an example. To test a Python function whose route is defined as
@app.route('/test'), replace$pathwithtest. To test a Python function whose route is defined as@app.route('/'), directly call the public endpoint of the HTTP trigger. -
Invoke an event function: Directly call the public endpoint of the HTTP trigger.
After execution, Function Compute returns the result of receiving the request. Status code
202means the request was accepted; other codes indicate an invocation error. FAQ (Troubleshooting). -
Method 3: (Not recommended) Use a browser to test the function
-
On the Function Details page, click the Trigger tab. In the Configurations column of the target HTTP trigger, obtain the public endpoint. Enter this endpoint in the address bar of your browser and press Enter.
-
After execution completes, the browser returns a file that contains the execution result.
(Optional) Use API Gateway to protect the function
Function Compute allows anonymous access to HTTP functions by default. To prevent unauthorized access, enable identity authentication and connect your HTTP functions to API Gateway. Use API Gateway plug-ins (IP-based access control, JWT, or basic authentication) to protect your functions.
-
In the Function Compute console, find the target function. On the Function Details page, click the Trigger tab. In the Actions column of the target HTTP trigger, click Modify.
-
In the Edit Trigger pane, turn on the Disable Internet URL switch.
-
Log on to the API Gateway console and switch to the region where the HTTP function is located.
-
Create a group and an API.
An API group organizes related APIs under unified security policies and traffic controls.
-
In the API Gateway console, choose Manage APIs > API Groups in the left navigation pane. Then, click Create Group.
-
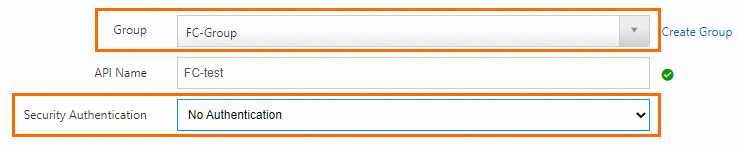
In the Create Group dialog box, select an Instances:. Set Group Name to
FC-Groupand BasePath to/. Then, click Confirm. -
In the Actions column of the target group, click Manage APIs. Then, click Create API. In the Basic Information section, configure the following parameters and click Next.
-
In the Define API Request section, set Request Path to
/, keep the default values for other parameters, and click Next.
-
In the Define Backend Service section, set Trigger Path to the private endpoint of the Function Compute trigger, which is
https://example.cn-hangzhou-vpc.fcapp.run. Configure the parameters as shown in the figure and click Next.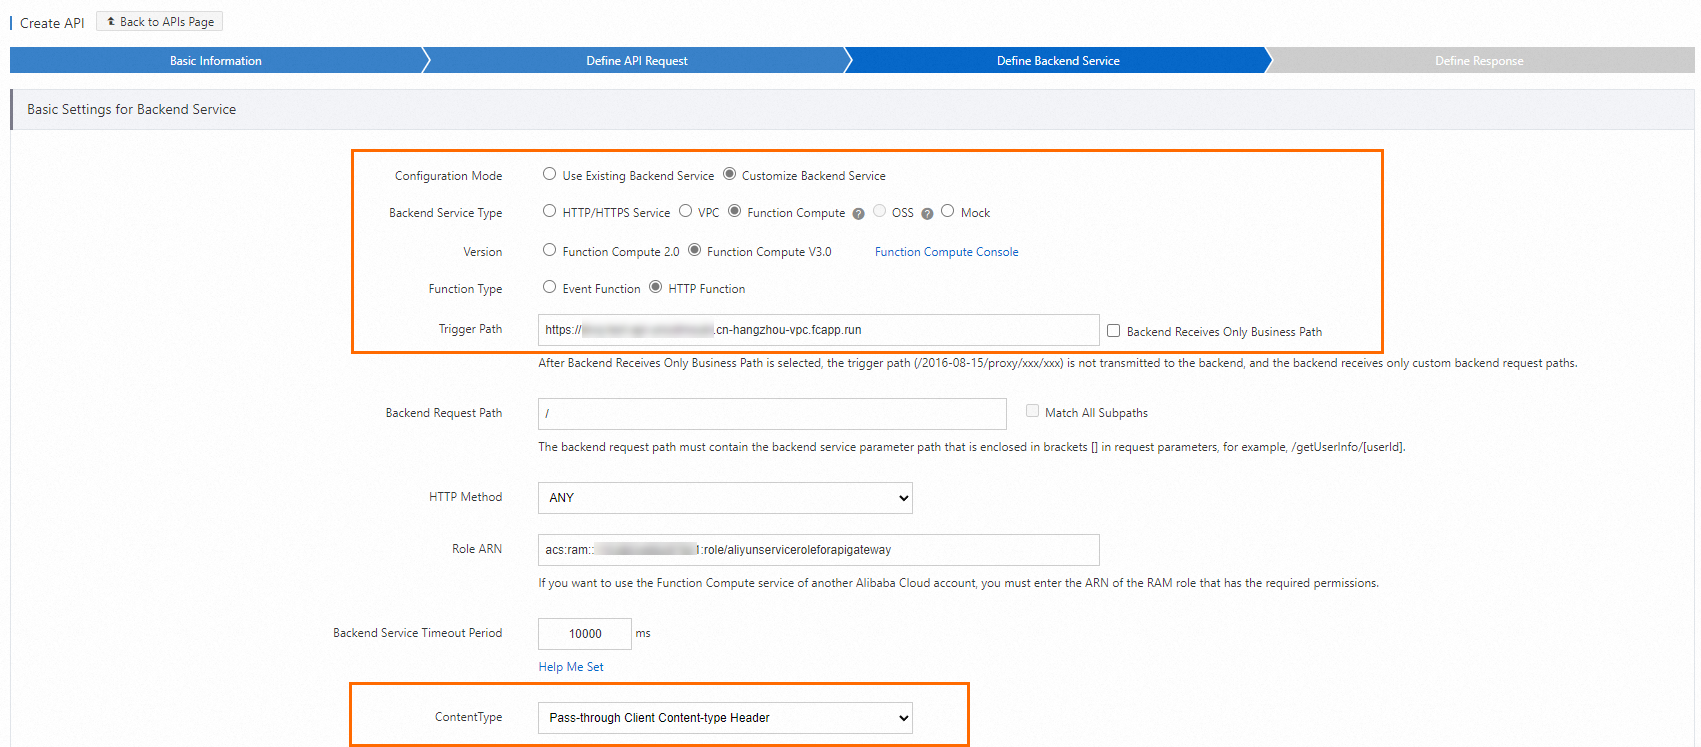
-
In the Define Response section, keep the default configurations and click Create. After the API is created, click Publish in the Actions column of the API.
-
-
Debug the API before publishing. A successful debug confirms the API Gateway-to-Function Compute connection.
-
In the API Gateway console, choose Call APIs > Debug in the left navigation pane.
-
On the Debug page, select the
FC-testAPI that you created and click Send Request. If the information shown in the following figure is returned, the configuration is successful.
-
-
Create a Backend Signature plug-in. Set
keyto yourAccessKey IDandsecretto yourAccessKey secret, then bind it to the API. Plug-in overview.
-
Resolve your domain name to the second-level domain provided by API Gateway using a CNAME record.
-
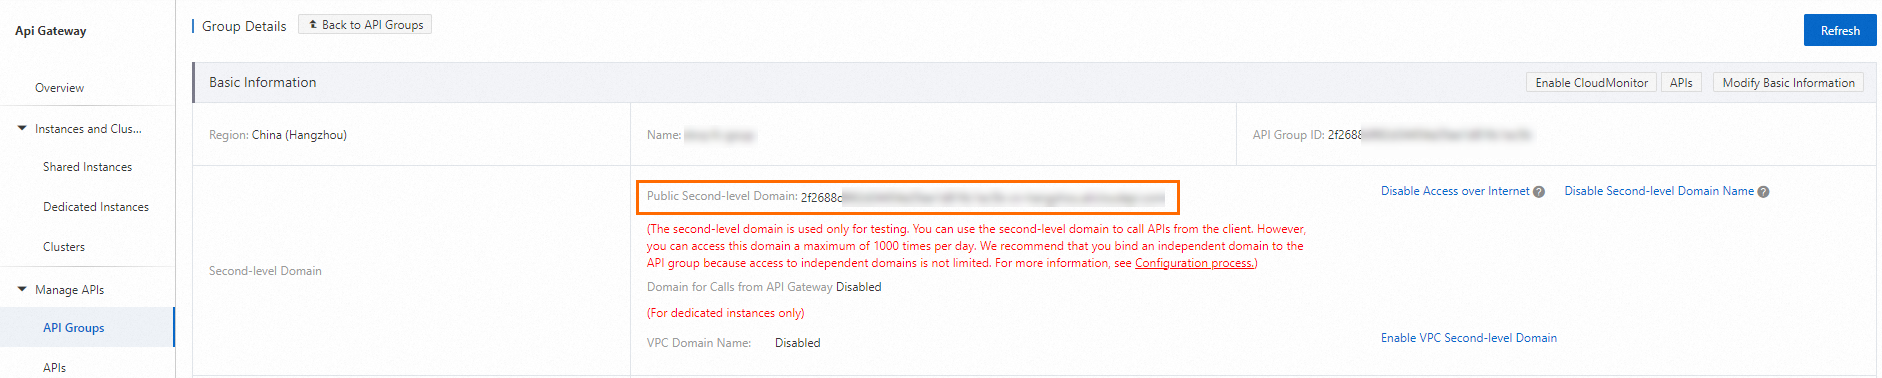
In the API Gateway console, choose Manage APIs > API Groups in the left navigation pane. Copy the public second-level domain.
-
Go to your domain name resolution management page. For Alibaba Cloud, the domain name resolution management page is at https://dnsnext.console.alibabacloud.com. On the domain name list page, find the domain name you want to manage and click the link on the domain name to go to its management page.
NoteIndependent domain names in the Chinese mainland must have an ICP filing from Alibaba Cloud or have their ICP filing transferred to Alibaba Cloud.
-
In the API Gateway console, choose Manage APIs > API Groups in the left navigation pane. Go to the Independent Domains section. At the bottom right of the page, find the button to bind a domain name. Click the button, enter your domain name, and click OK. The domain name is successfully bound.

-
After completing these steps, access your HTTP function through your custom domain. You can also bind the following plug-ins to further protect it:
Troubleshoot errors
Errors fall into two main categories.
-
Request errors: the request does not meet requirements. Returns a 4xx status code.
-
Function errors: a problem in the function code. Returns a 5xx status code.
The following table lists common error scenarios and their causes.
|
Error Type |
HTTP Status Code |
Cause Analysis |
Billed |
|
Request error |
400 |
The request exceeds the request limits. HTTP trigger overview. |
No |
|
400 |
The request is missing the Date or Authorization header required for authentication. |
No |
|
|
403 |
The Authorization signature is invalid. The signature is valid for only 15 minutes from the Date header value — a common cause is the Date in the request being more than 15 minutes from the current time. |
No |
|
|
403 |
The request method is not allowed by the trigger configuration (for example, sending POST when only GET is configured). |
No |
|
|
404 |
An HTTP request is sent to a function that does not have an HTTP trigger. |
No |
|
|
User throttling |
429 |
Request throttled. Reduce concurrency or contact the Function Compute team to increase your limit. |
No |
|
Function error |
502 |
The function response exceeds the response limits. HTTP trigger overview. |
Yes |
|
502 |
The function code has a syntax error or an exception. |
Yes |
|
|
502 |
An HTTP request is sent to a function that does not use an HTTP handler. |
Yes |
|
|
System error |
500 |
Function Compute internal error. Retry the request. |
No |
|
System throttling |
503 |
Function Compute system throttling. Retry with exponential backoff. |
No |
If the issue persists, join the DingTalk group (ID: 64970014484) to contact Function Compute engineers for support.
More information
In addition to the Function Compute console, you can configure triggers by using one of the following methods:
Use Serverless Devs tool to configure triggers. For more operations, please refer to Common Serverless Devs commands.
Use SDKs to configure triggers. For more information, see SDKs.
To modify or delete an existing trigger, see Manage triggers.