Serverless Application Center provides customizable pipeline execution capabilities. You can configure pipelines and orchestrate task flows to publish code to Function Compute. This topic describes how to manage pipelines in the console, including pipeline configuration, pipeline detail settings, and viewing pipeline execution history.
Background information
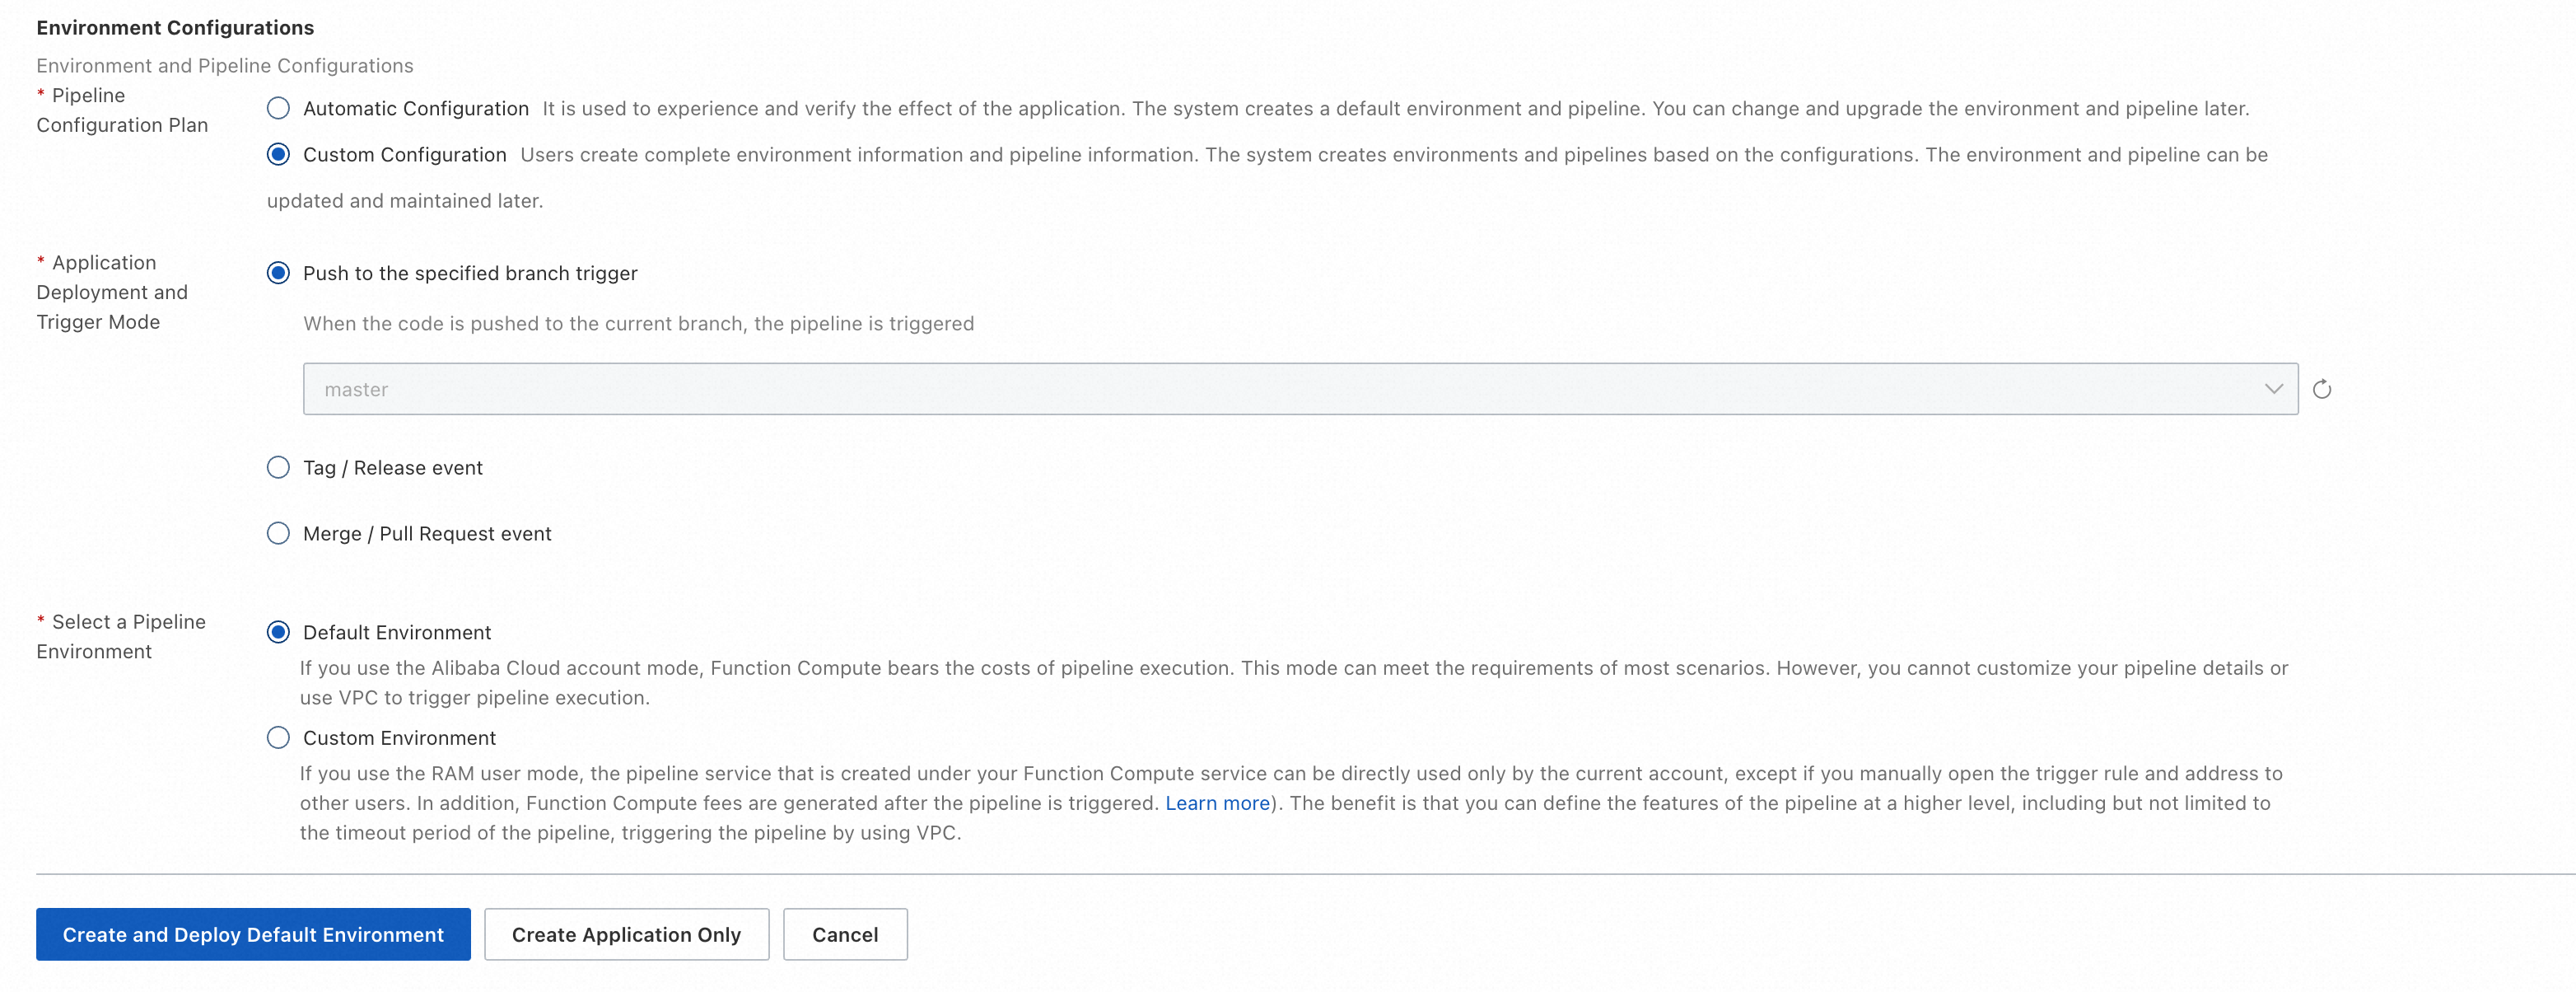
When you create an application, the platform creates a default environment for it. For this environment, you can specify a Git event trigger method for the pipeline and configure the pipeline accordingly. You can choose between automatic configuration and custom configuration. If you choose automatic configuration, the platform creates a pipeline using the default value for each configuration item. If you choose custom configuration, you can specify the Git event trigger method for the environment's pipeline and select a pipeline execution environment. Information such as Git and application details is passed to the pipeline as the execution context.
When you edit pipeline configuration items, you can configure the trigger method and execution environment. You can also configure DingTalk notifications and the resource description YAML.
Configure a pipeline when you create an application or environment
When you create an application or environment, you can specify the pipeline's Git trigger method and execution environment.
Edit a pipeline in an environment
For an existing environment, go to the Pipeline Management tab to edit the pipeline's Git event trigger method, execution environment, DingTalk notifications, and resource description YAML.
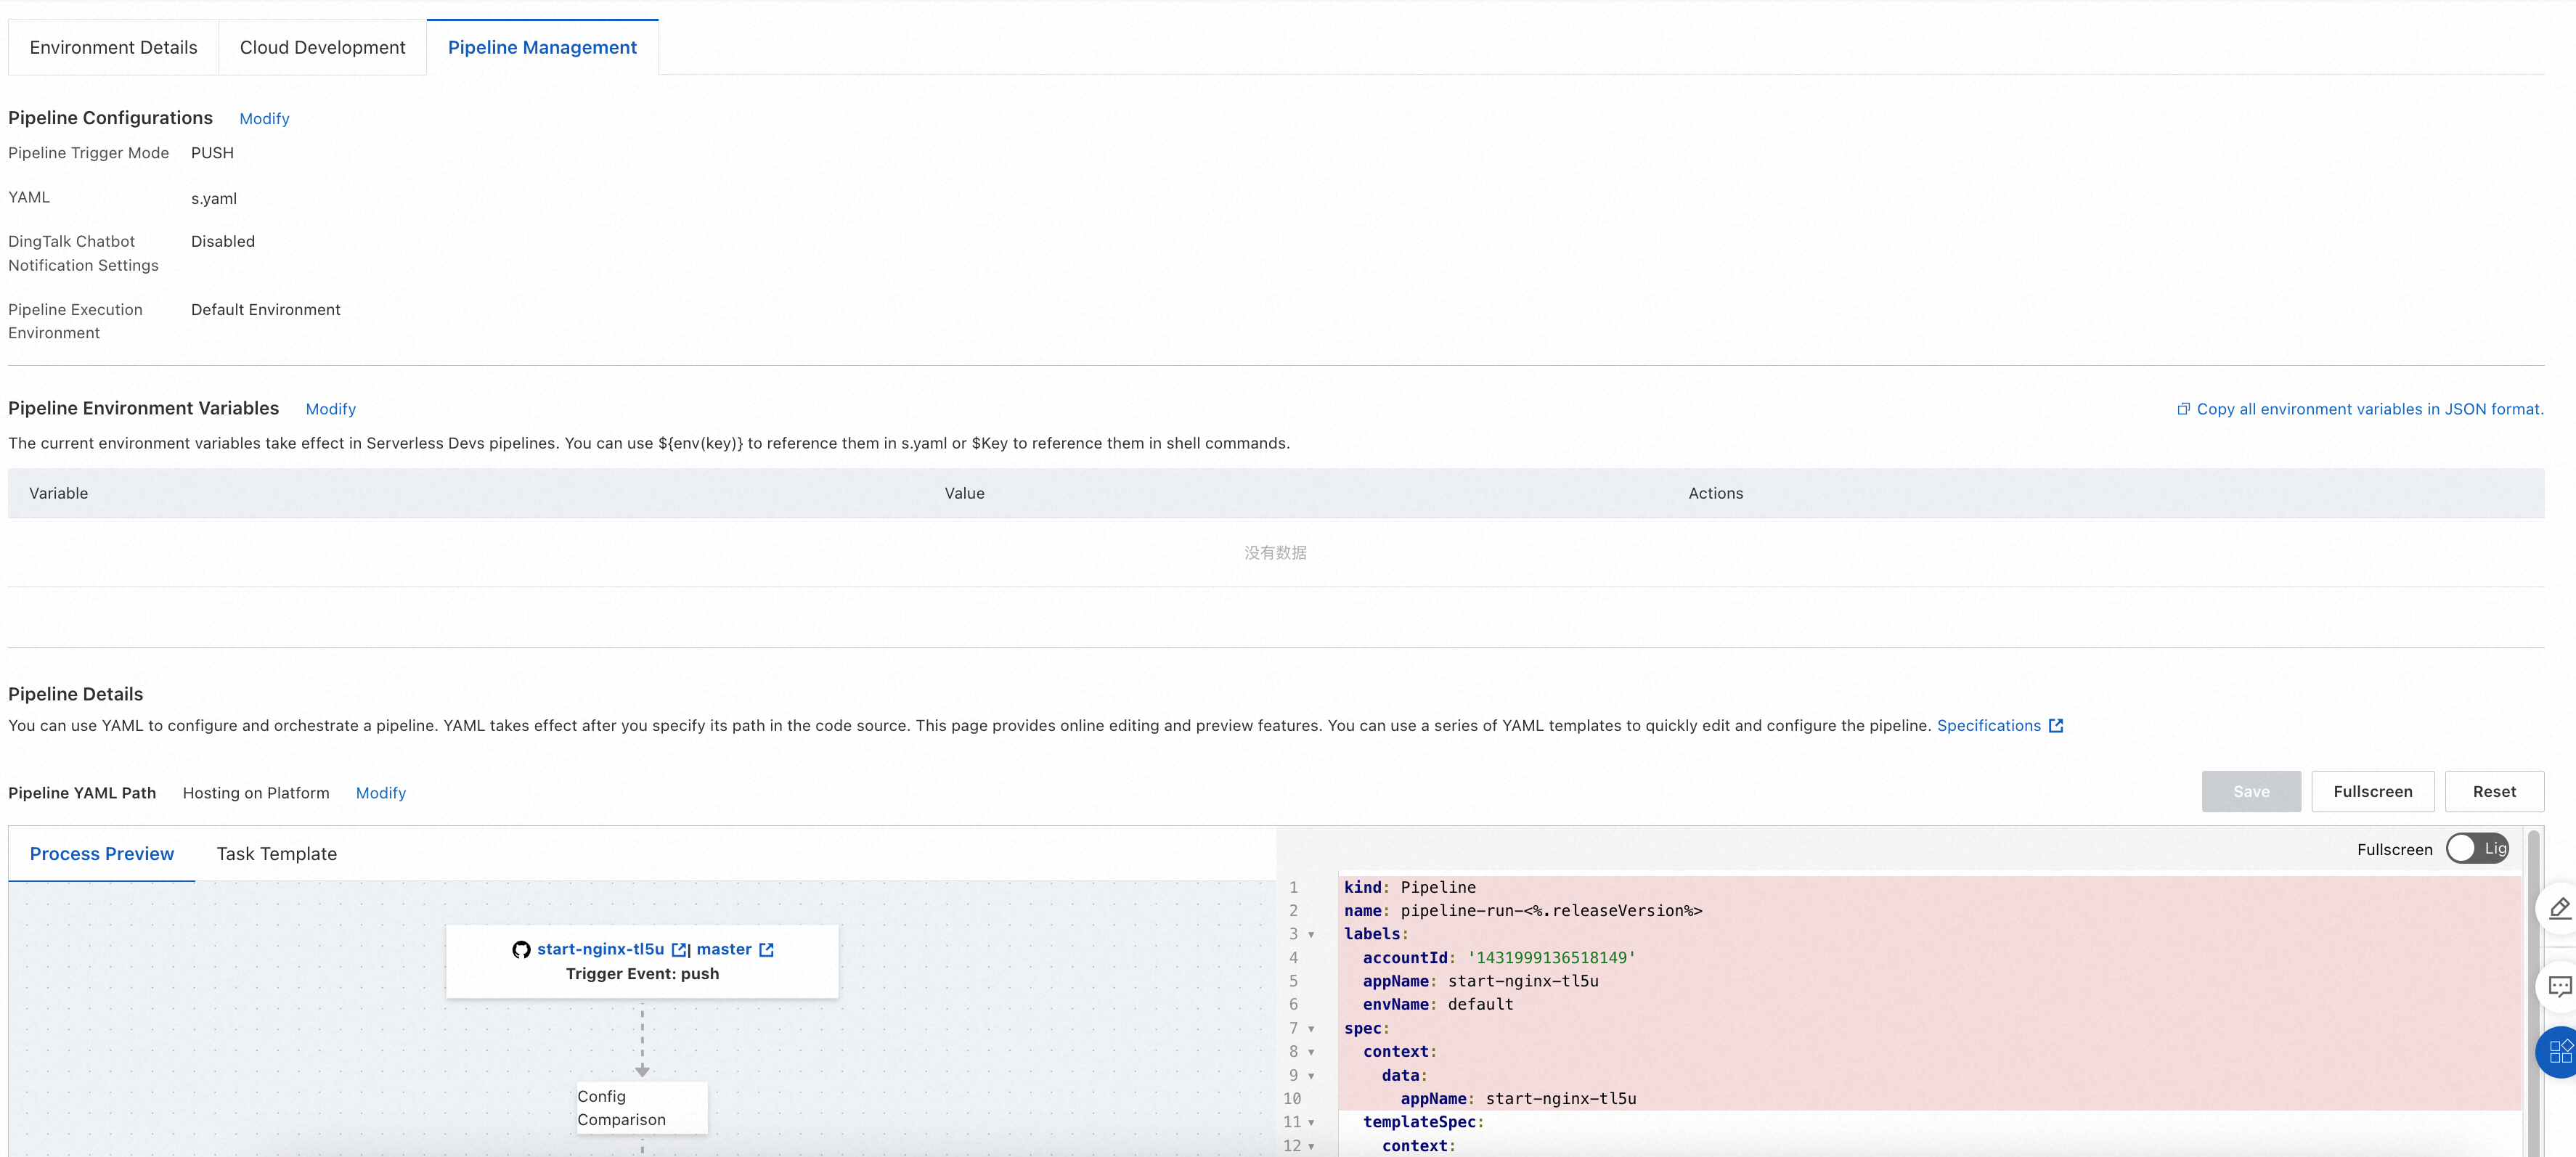
Pipeline configuration
Pipeline configuration includes four main items: pipeline trigger method, pipeline execution environment, resource description YAML, and DingTalk robot notifications. You can configure the pipeline trigger method and execution environment when you create an application or environment. After creation, you can click the edit button to configure all four items.
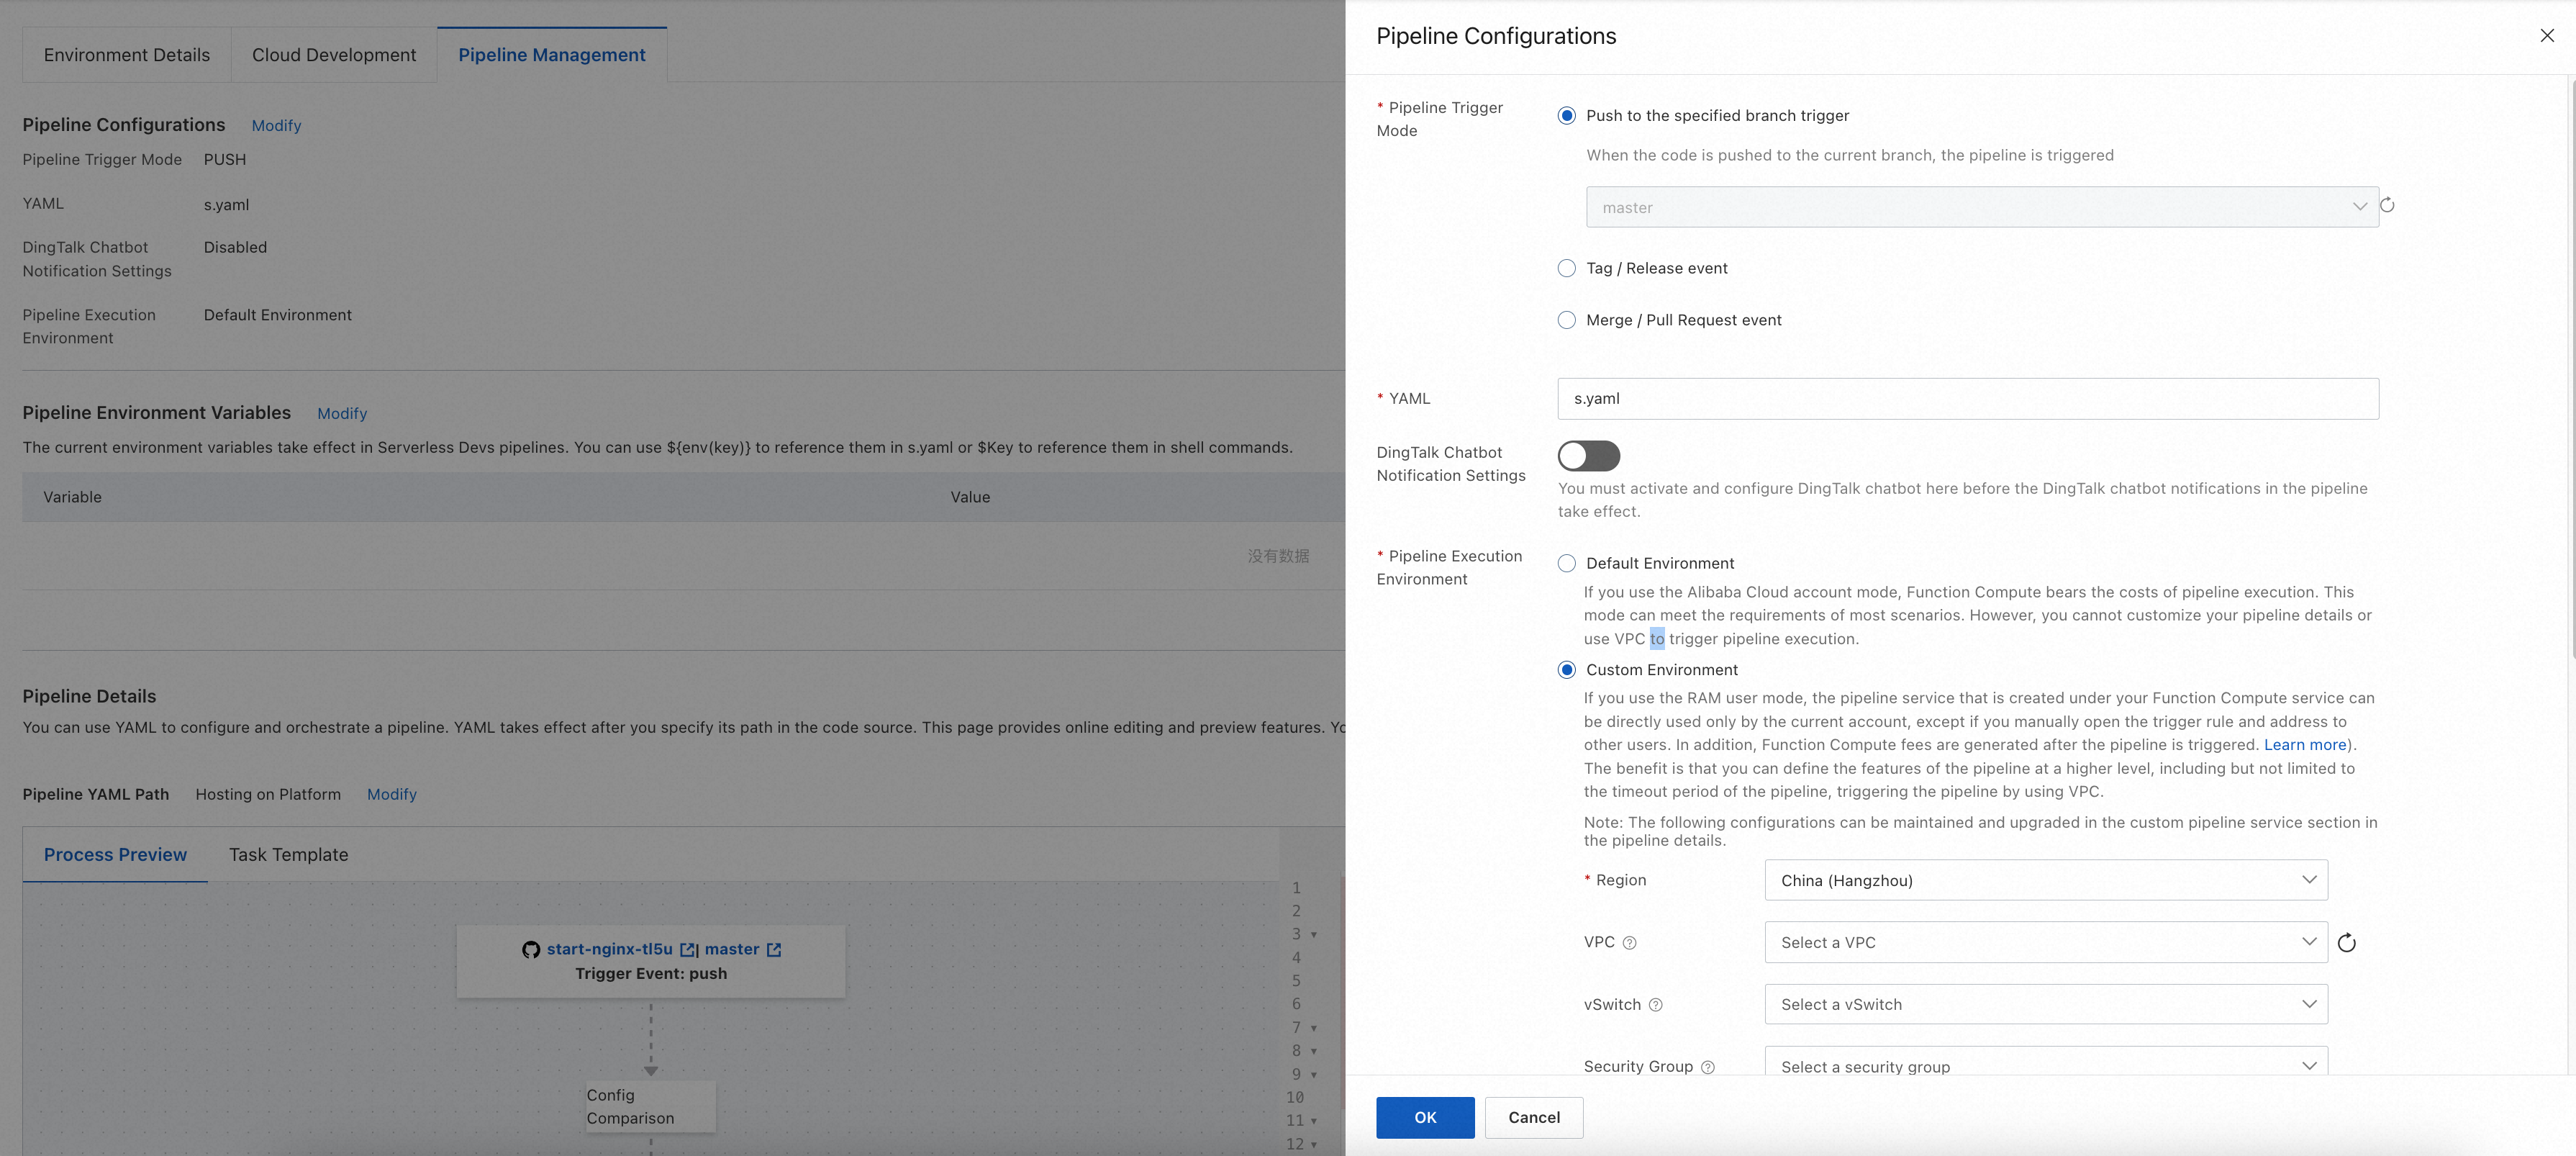
Pipeline trigger methods
Serverless Application Center lets you customize the Git events that trigger a pipeline. Serverless Application Center uses a webhook to receive Git events. When it receives an event that matches the trigger rules, it creates and runs the pipeline according to your pipeline YAML configuration. The following trigger methods are supported:
Branch trigger: The environment must be associated with a specific branch. This matches all Push events in the specified branch.
Tag trigger: Matches all Tag creation events for a specified Tag expression.
Branch merge trigger: Matches Merge/Pull Request events from a specified source branch to the target branch associated with the environment.
Pipeline execution environment
Pipeline execution environment is available in two modes: default execution environment and dedicated execution environment.
Default execution environment
In the default execution environment, the platform fully manages the pipeline resources. Alibaba Cloud Function Compute covers the costs incurred during pipeline execution, so you do not need to pay any fees. Each pipeline task runs in an independent, sandboxed container, and the platform ensures the security and isolation of your pipeline execution environment. The limits of the default execution environment are as follows:
Instance specifications: 4 vCPU, 8 GB memory.
Temporary disk space: 10 GB.
Task execution timeout: 15 minutes.
Region limits: For direct deployment from templates or from a GitHub source, use the Singapore region. For Gitee, public GitLab, or Codeup sources, use the China (Hangzhou) region.
Network limits: Fixed IP addresses and CIDR blocks are not supported. Accessing specific websites using an IP address whitelist is not supported. Accessing resources within your VPC is not supported.
Dedicated execution environment
A dedicated execution environment runs pipeline tasks under your account and provides more customization options. Based on your authorization, Serverless Application Center fully manages the tasks in the dedicated execution environment and schedules Function Compute instances in real time to run the pipeline under your account. Similar to the default execution environment, the dedicated execution environment is fully serverless, which means you do not need to manage the underlying infrastructure.
A dedicated execution environment provides the following customization options:
Region and network: You can specify the execution environment's region and VPC. This lets you access resources such as private code repositories, artifact repositories, image repositories, and private Maven servers. For more information about the supported regions, see Service endpoints.
Instance specifications: You can specify the CPU and memory specifications for the execution environment. For example, specify an instance with higher specifications to speed up builds.
NoteThe ratio of vCPU cores to memory in GB must be between 1:1 and 1:4.
Persistent storage: You can configure NAS and OSS mount settings. For example, use a NAS mount for file caching to accelerate builds.
Logs: You can specify an SLS project and Logstore to enable persistence for pipeline execution logs.
Timeout: You can customize the execution timeout for pipeline tasks. The default is 600 seconds, and the maximum is 86,400 seconds.
A dedicated execution environment runs pipeline tasks using Function Compute in your own account, which incurs charges. For more information, see Billing overview.
Resource description YAML
Serverless Application Center is deeply integrated with the Serverless Devs developer tool. You can use a Serverless Devs resource description file to declare your service's resource configuration. For more information about the YAML specification, see Serverless Devs YAML specification. The default resource description file is named s.yaml, but you can specify a different file name. After you specify a resource description file, you can use it in the pipeline in two ways:
When you use the
@serverless-cd/s-deploydeployment plugin, the plugin automatically uses the specified resource description file for deployment. This works by adding the-t/--templatecommand to the Serverless Devs operation. For example, in the following code, the specified resource description YAML file isdemo.yaml. The command executed by the plugin iss deploy -t demo.yaml.
- name: deploy
  context:
    data:
      deployFile: demo.yaml
      steps:
      - plugin: '@serverless-cd/s-setup'
      - plugin: '@serverless-cd/checkout'
      - plugin: '@serverless-cd/s-deploy'
  taskTemplate: serverless-runner-task
When you use a script for execution, you can reference the specific resource description file name with
${{ ctx.data.deployFile }}. For example, the following code runs the s plan command using the specified file if one is provided. Otherwise, it runs the s plan command using the default s.yaml file.
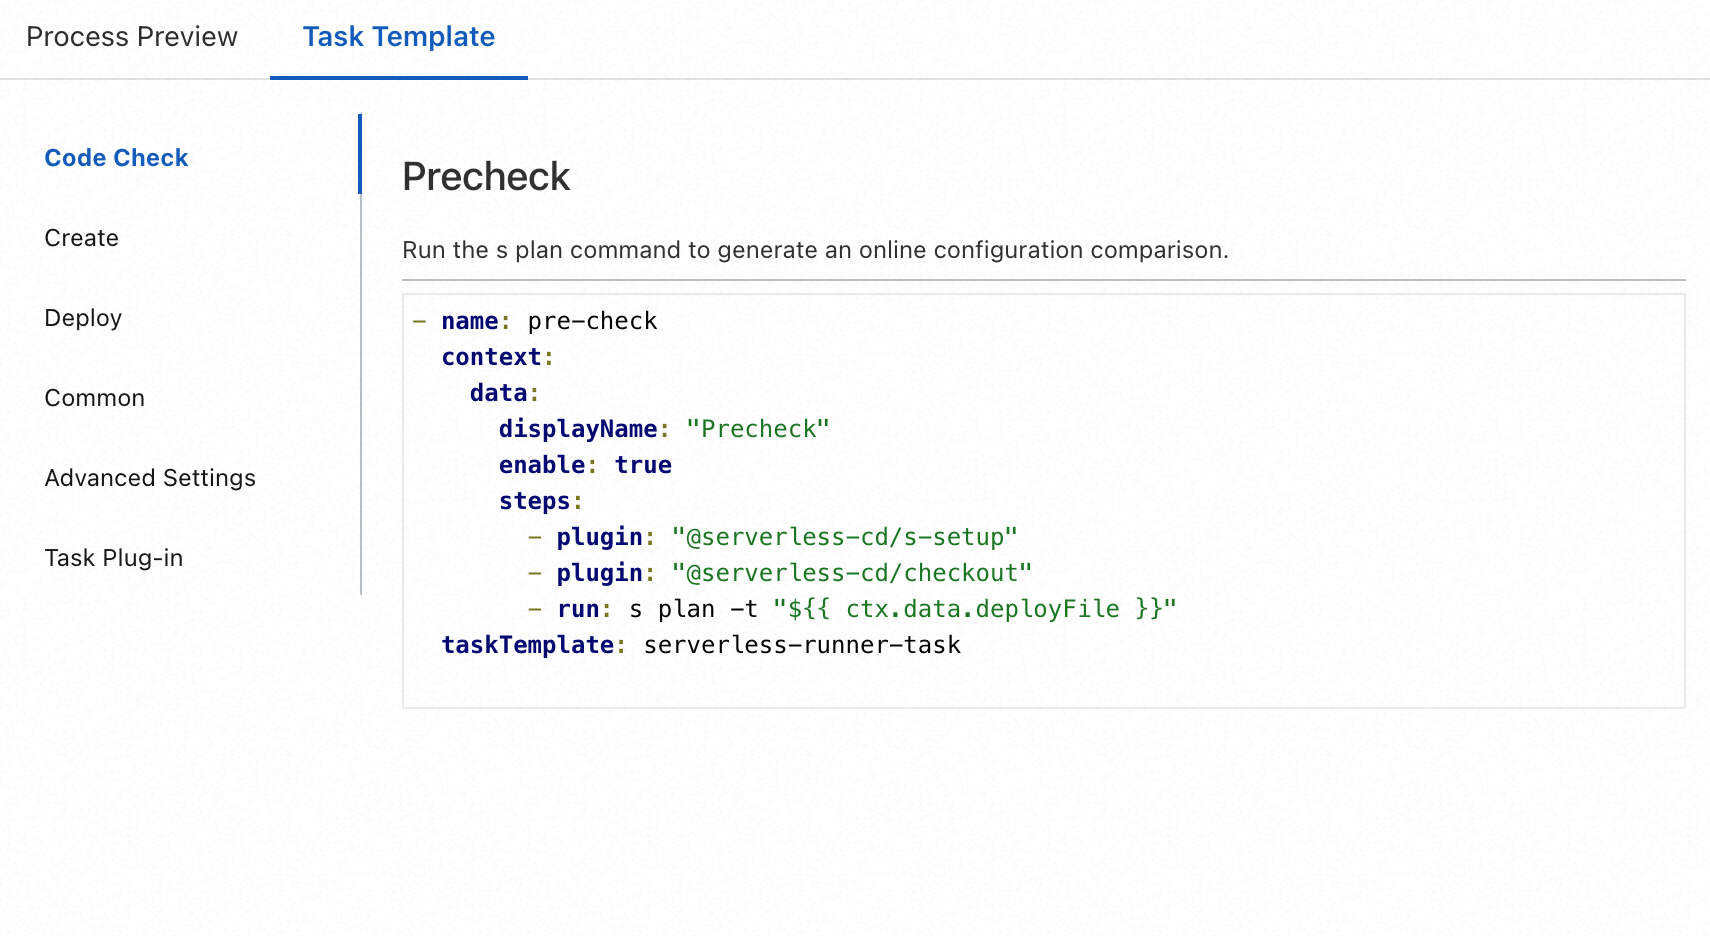
- name: pre-check
  context:
    data:
      steps:
      - run: s plan -t ${{ ctx.data.deployFile || s.yaml }}
      - run: echo "s plan finished."
  taskTemplate: serverless-runner-task
DingTalk robot notifications
After you enable this configuration, you must configure the DingTalk robot's Webhook address, Signing key, notification rules, and Custom message. You can manage all tasks that require notifications here, or you can enable notifications for each task separately in the pipeline YAML. After you complete the overall notification configuration here, you can further refine the notification settings for each task in the Pipeline details section.
Pipeline details
In the Pipeline details section, you can configure the pipeline flow and specify the details of tasks and their relationships. The platform automatically generates a default pipeline flow, which you can edit.
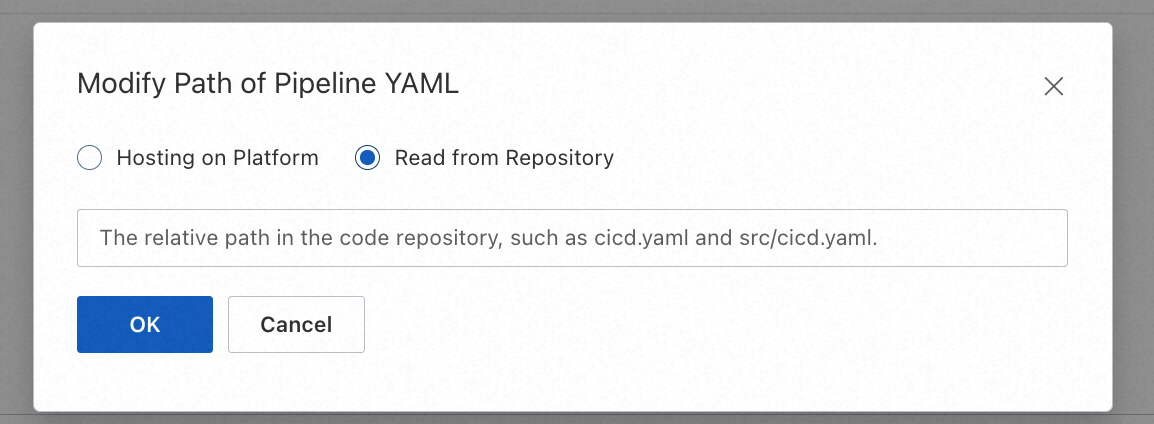
Pipelines are managed using YAML. Two configuration methods are available: Platform-hosted and Read from repository:
Platform-hosted: Predefined YAML variables are not supported. For more information, see Describe a pipeline using a YAML file.
Repository hosting supports predefined variables in YAML files.
Platform-hosted
By default, the pipeline YAML is hosted by the platform. This means the configuration is managed centrally on the platform and takes effect at the next deployment after an update.
Read from repository
The pipeline's YAML description file is stored in a remote Git repository. After you edit and save it in the console, the platform commits the changes to your Git repository in real time. This commit does not trigger a pipeline execution. When an event in your code repository triggers a pipeline, the platform creates and runs the pipeline using the YAML file from your specified Git repository.
In the upper part of the Pipeline details section, you can specify Read from repository and enter the YAML file name, as shown in the following figure.
The main body of the Pipeline details section consists of the auxiliary tools area on the left and the YAML editing area on the right:
YAML editing area: You can directly edit the pipeline YAML to modify the pipeline flow. For more information, see Describe a pipeline using a YAML file.
Auxiliary tools area: This provides tools to help you edit the YAML. It includes:
Flow preview: Provides a visual preview and simple editing capabilities for the pipeline flow.
Task templates: Provides a series of commonly used task YAML templates.
In the upper-right corner of the section are three buttons: Save, Full screen, and Reset:
The Save button saves the changes made to the YAML on the page and syncs them to the pipeline YAML.
The Full screen button expands the main editing area to full screen.
The Reset button cancels all changes made since the last time the YAML was saved, reverting it to its initial state.
If you choose to reset, all changes made since the last save will be lost. Use this with caution and make sure you have a backup.
Flow preview
The Flow preview area provides a visual preview of the pipeline flow. It also supports simple editing of basic task content and task relationships, and lets you quickly create and add tasks from templates. The flowchart has three main types of nodes: the starting code source and trigger method node, the end node, and task nodes. The nodes are connected by lines that represent dependencies. When you move the mouse over a task node, a Create task button and a Delete task button appear for easy task management.
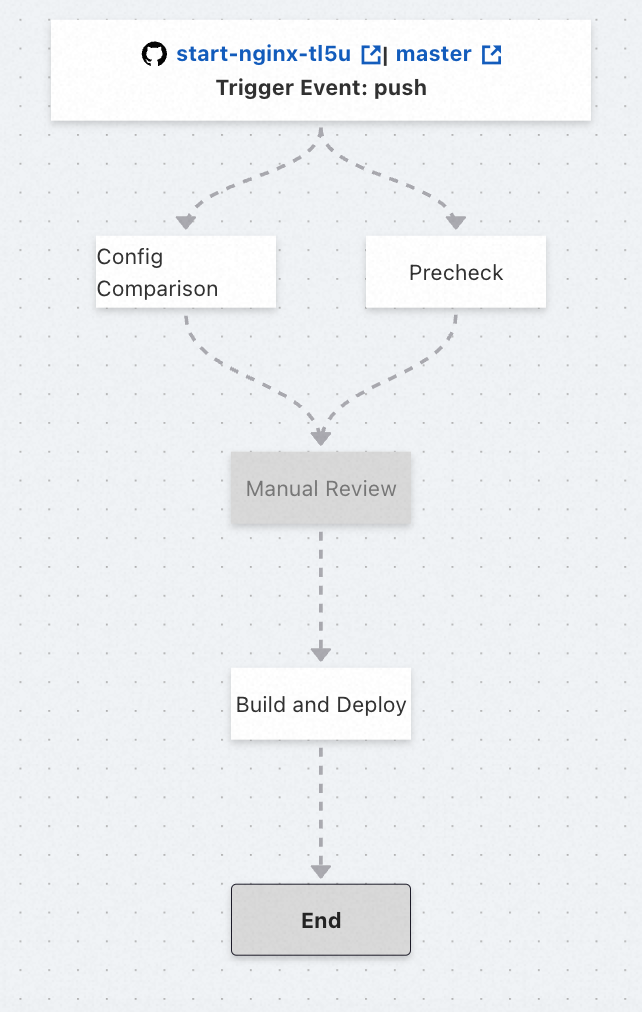
Code source and trigger method node (Start node)
Displays the current pipeline's Code source and Trigger method information. This is for display only and cannot be edited. To modify the pipeline trigger method, go to the Pipeline configuration section.
ImportantTo modify the code repository, go to the application details page. For more information, see Manage applications. Modifying the code repository will invalidate all pipelines, so proceed with caution.
End node
Marks the end of the pipeline flow, where all tasks in the pipeline are complete. This node is read-only and has no functional meaning.
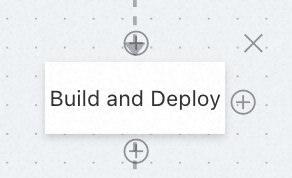
Task node
Displays and maintains basic information for a specific task. By default, the task node displays the task name. Click the node to open a pop-up where you can view and edit basic information such as the Task name, Preceding tasks, and whether to Enable task. If you do not enable a task, it will be automatically skipped during execution and appear grayed out.
Dependency
A one-way arrow that reflects the relationship between tasks. If an arrow points from Task A to Task B, it means A is a preceding task of B, B depends on A, and A is a dependency of B. Each task can depend on multiple tasks and can be a dependency for multiple tasks.
You can change dependencies by editing the Preceding tasks of the dependent task. For example, to remove B's dependency on A, click the task node for B and remove A from its list of preceding tasks.
Create task
This button is represented by a "+" icon and appears on the top, bottom, and right sides of a task node. Click the button above Task A to create a preceding task B, where A depends on B. Click the button below Task A to create a subsequent task C, where C depends on A. Click the button to the right of Task A to create a sibling task D, which has the same dependencies as A. This means D has the same preceding tasks as A, and all tasks that depend on A will also depend on D.
Delete task
This button is represented by a "×" icon in the upper-right corner of the task node and is used to delete the selected task. The platform will ask for confirmation to prevent accidental deletion.
Task templates
Task templates provide a series of YAML templates for common pipeline tasks, including templates for Code check, Build, Deploy, and General tasks. It also includes YAML templates for internal Advanced configuration and Task plugins.
You can select a template from the list, click it to view its detailed description and YAML content, and then copy and paste the YAML content into the corresponding location in your pipeline YAML.
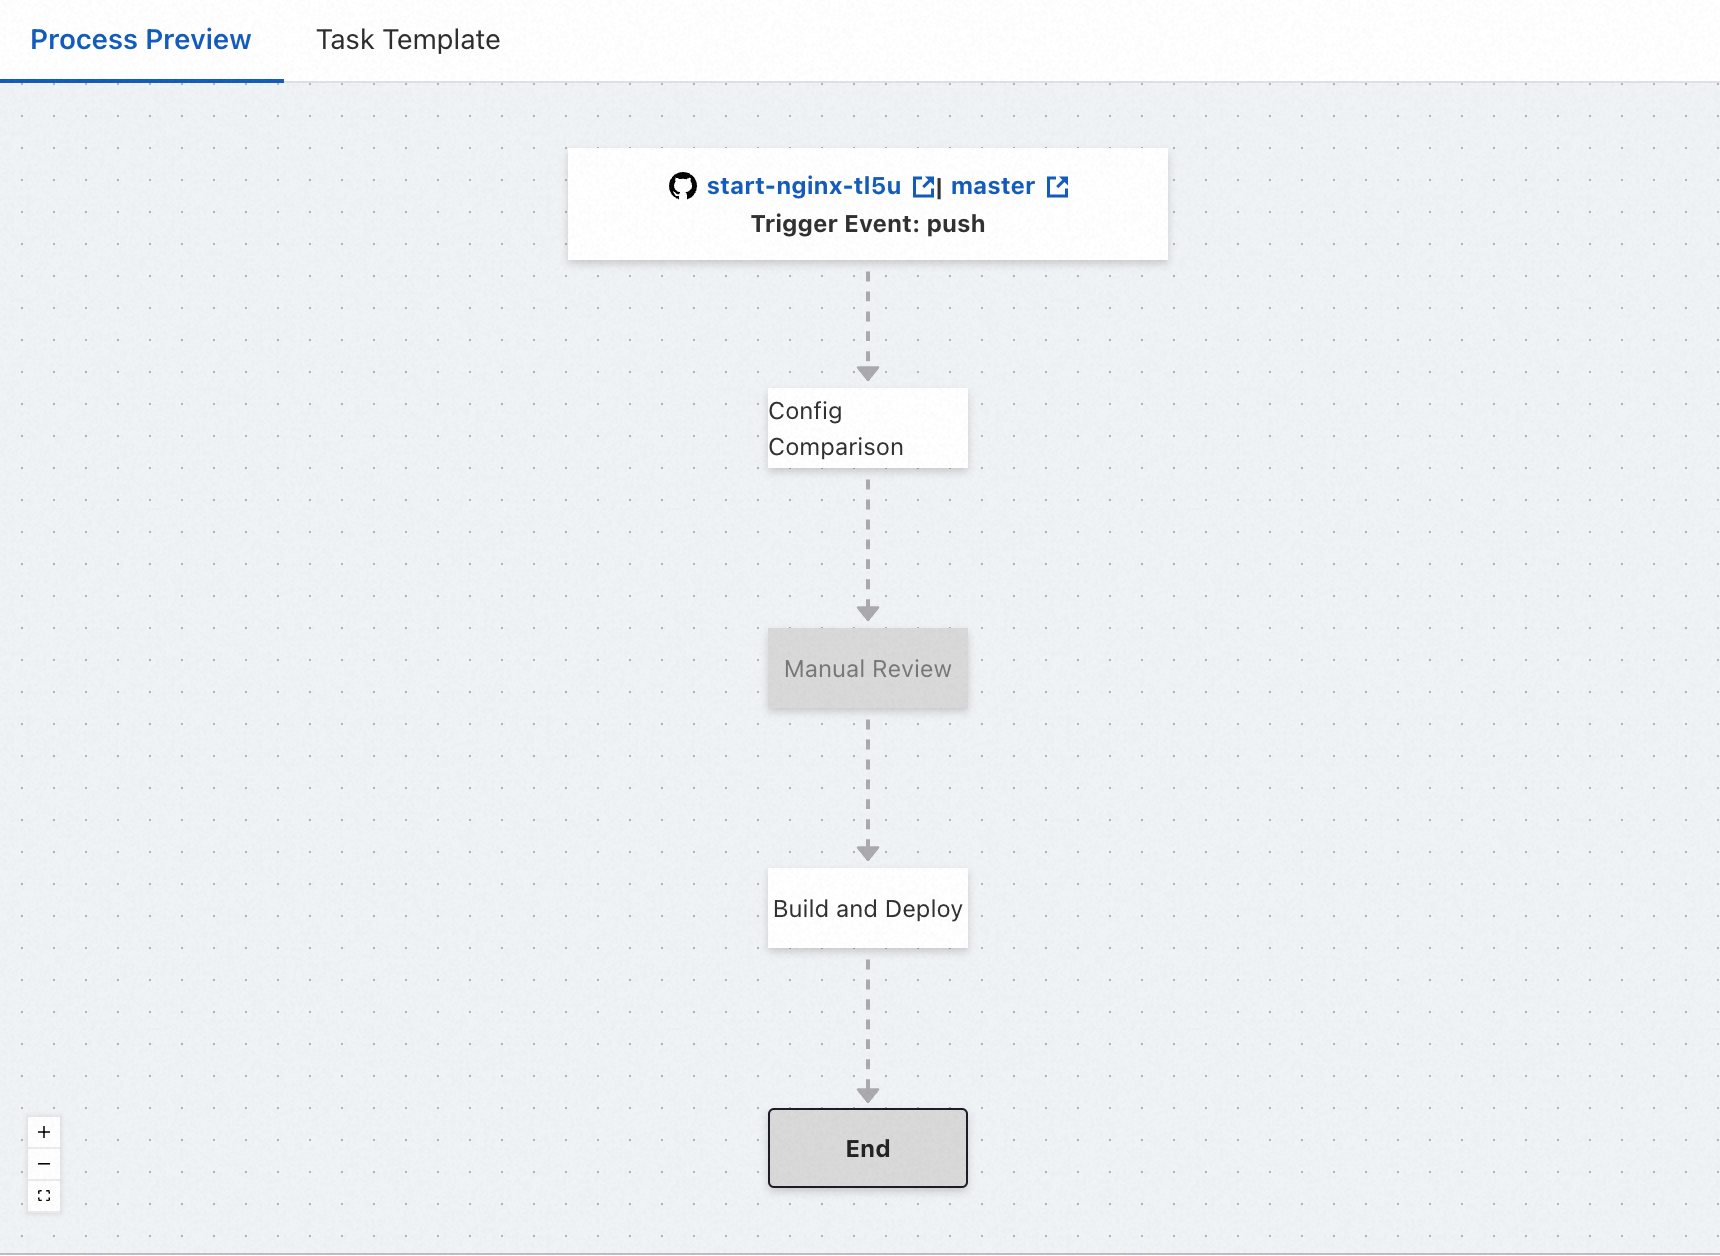
Default pipeline flow
The default pipeline flow includes three tasks that run in sequence: Online configuration comparison, Manual review, and Build and deploy. The manual review task is disabled by default and must be enabled manually.
Online configuration comparison
Checks whether the resource description file used by the pipeline is consistent with the online configuration. This helps you detect unexpected configuration changes in advance.
Manual review
To ensure a secure application release and post-release stability, you can enable a manual review mechanism at this stage. When the pipeline reaches this point, it will be blocked and wait for manual confirmation. The pipeline continues to the next step only after approval. Otherwise, the current pipeline is terminated. This task is disabled by default and must be enabled manually.
Build and deploy
Builds the application and deploys it to the cloud. By default, a full deployment is performed.
View pipeline execution history
On the details page of the specified environment, select the Pipeline management tab. In the Pipeline execution history section below, you can view the historical execution records for the specified pipeline.
You can click a specific pipeline execution version to view its details. This information lets you quickly check the execution logs and status, which helps you understand the pipeline's execution or troubleshoot problems.
Upgrade the pipeline build environment runtime
The following table lists the runtimes supported by the default pipeline build environment. The built-in package management tools include Maven, PIP, and NPM. Currently, only the Debian 10 operating system is supported as the runtime environment.
Runtime | Supported versions |
Node.js |
|
Java |
|
Python |
|
Golang |
|
PHP |
|
.NET |
|
You can set the pipeline runtime version using the pipeline runtime-setup plugin or by modifying the environment variables in the resource description file.
runtime-setup pipeline plugin (Recommended)
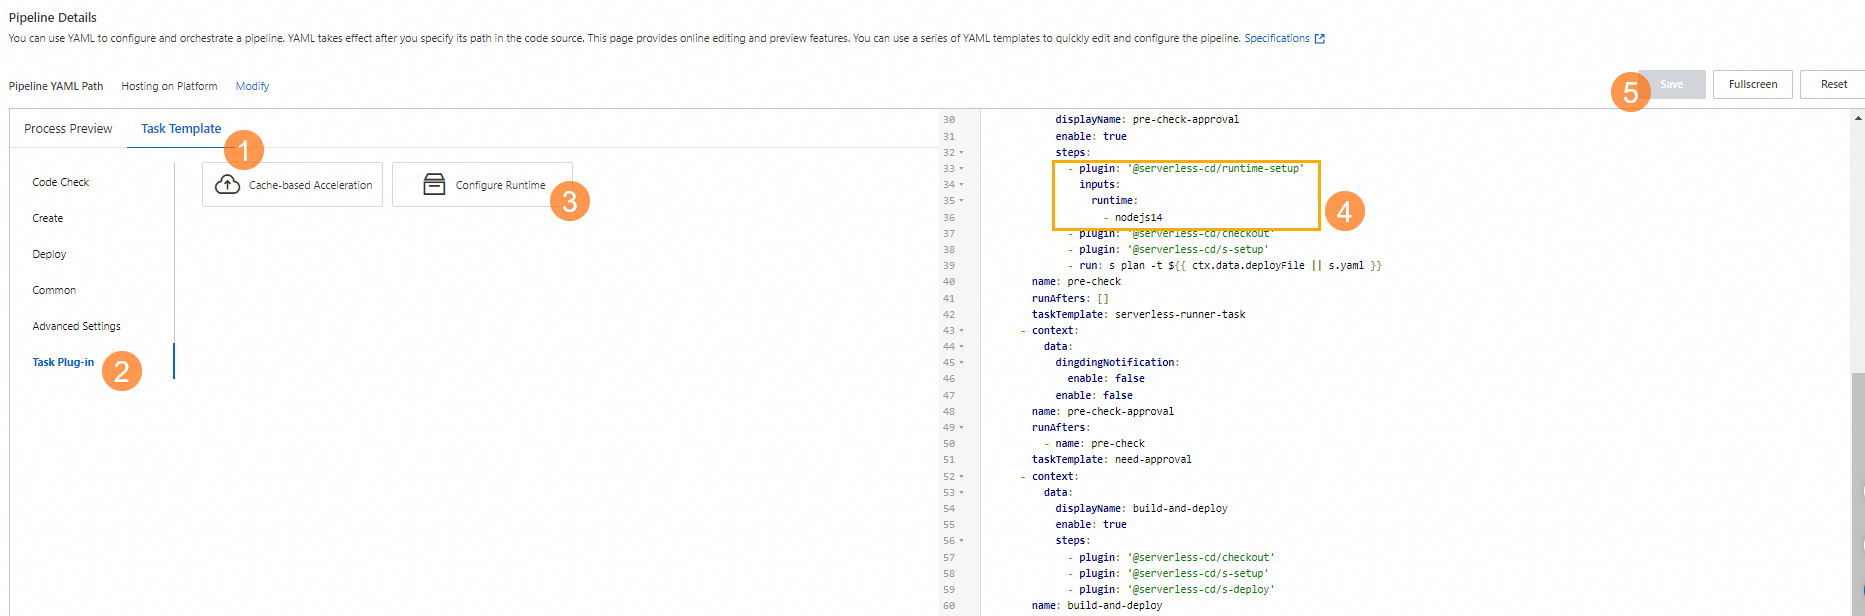
In the Function Compute console, find your application. On the Pipeline management tab, in the Pipeline details section, select a Runtime task plugin template to update the pipeline YAML on the right. The procedure is as follows: Task templates (① in the figure) -> Task plugins (② in the figure) -> Set Runtime (③ in the figure) -> Update YAML on the right (④ in the figure) -> Save (⑤ in the figure).
Place the runtime-setup plugin in the first position to ensure it takes effect for all subsequent steps.
For more information about the parameters of the runtime-setup plugin, see Initialize the runtime environment using the runtime-setup plugin.
Environment variables in the resource description file
You can also use Action hooks in the resource description file to switch the Node.js or Python version. The details are as follows.
Node.js
export PATH=/usr/local/versions/node/v14.19.2/bin:$PATH
export PATH=/usr/local/versions/node/v16.15.0/bin:$PATH
export PATH=/usr/local/versions/node/v18.14.2/bin:$PATH
export PATH=/usr/local/versions/node/v20.8.1/bin:$PATH
The following is an example.
services:
  upgrade_runtime:
    component: 'fc'
    actions:
      pre-deploy:
        - run: export PATH=/usr/local/versions/node/v18.14.2/bin:$PATH && npm run build
    props:
...
Python
export PATH=/usr/local/envs/py27/bin:$PATH
export PATH=/usr/local/envs/py36/bin:$PATH
export PATH=/usr/local/envs/py37/bin:$PATH
export PATH=/usr/local/envs/py39/bin:$PATH
export PATH=/usr/local/envs/py310/bin:$PATH
The following is an example.
services:
  upgrade_runtime:
    component: 'fc'
    actions:
      pre-deploy:
        - run: export PATH=/usr/local/envs/py310/bin:$PATH && pip3 install -r requirements.txt -t .
    props:
...