You can use the Function Compute console, SDKs, or Serverless Devs to experience best practices of GPU-accelerated instances. This topic describes how to use Serverless Devs or the Function Compute console to process raw images by using function code to perform edge detection. In this topic, Python is used as an example.
Scenarios and benefits
This section describes the benefits of GPU-accelerated instances compared with the instances with no GPU acceleration in Function Compute:
Real-time and quasi-real-time application scenarios
GPU-accelerated instances can process graphics and images several times faster and push production content to users in a more efficient manner.
Cost-prioritized image processing scenarios
Reserve GPU-accelerated instances based on their business requirements. This way, GPU-accelerated instances of Function Compute offer much higher cost efficiency than self-built GPU clusters.
Use GPU resources in 1/2 or exclusive mode through the GPU virtualization technology. This way, GPU-accelerated instances can be configured in a fine-grained manner.
Efficiency-prioritized image processing scenarios
Focus on code development and the business objectives without the need to perform O&M on GPU clusters, such as driver and CUDA version management, machine operation management, and faulty GPU management.
For more information about GPU-accelerated instances, see Instance types and instance modes.
Tutorial description
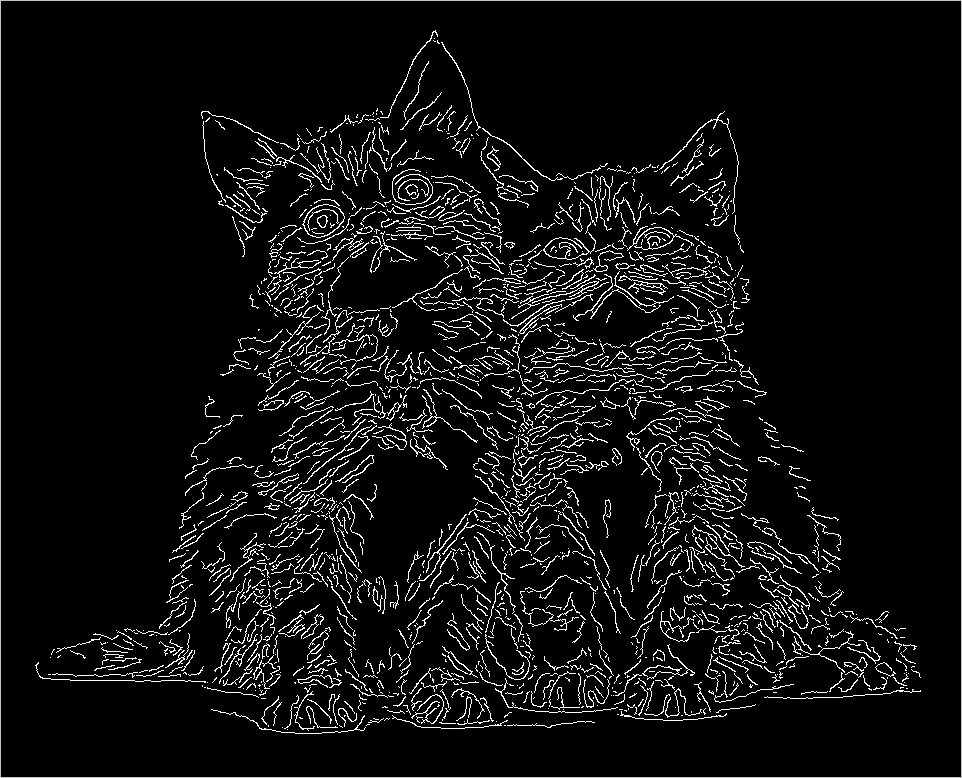
The following table shows an example of performing edge detection on a source image (left) to generate a new image (right) in Function Compute.
Source image | New image after edge detection |
|
|

Preparations
Compile OpenCV.
OpenCV must be compiled before you can use GPU acceleration. The following items describe how to compile OpenCV:
(Recommended) Use compiled OpenCV by using Docker. Download address: opencv-cuda-docker or cuda-opencv.
Manually compile OpenCV. For more information, see the compilation guide.
Upload the audio and video resources that you want to process to an Object Storage Service (OSS) bucket in the region where the GPU-accelerated instances are located. Make sure that you have the read and write permissions on the objects in the bucket. For more information about how to upload audio and video resources, see Upload objects. For more information about permissions, see Modify the ACL of a bucket.
Deploy a GPU application by using Serverless Devs
Before you start
Perform the following operations in the region where the GPU-accelerated instances reside:
Create a Container Registry Enterprise Edition instance or Personal Edition instance. We recommend that you create an Enterprise Edition instance. For more information, see Step 1: Create a Container Registry Enterprise Edition instance.
Create a namespace and an image repository. For more information, see Step 2: Create a namespace and Step 3: Create an image repository.
Procedure
Create a project.
s init devsapp/start-fc-custom-container-event-python3.9 -d fc-gpu-prjThe following sample code shows the directory of the created project:
fc-gpu-prj
├── code
│   ├── app.py        # Function code.
│   └── Dockerfile    # Dockerfile: The image Dockerfile that contains the code.
├── README.md
└── s.yaml            # Project configurations, which specify how the image is deployed in Function Compute
Go to the project directory.
cd fc-gpu-prjModify the configurations of the directory file based on your business requirements.
Edit the s.yaml file.
For more information about the parameters in the YAML file, see YAML specifications.
edition: 1.0.0
name: container-demo
access: default
vars:
  region: cn-shenzhen
services:
  customContainer-demo:
    component: devsapp/fc
    props:
      region: ${vars.region}
      service:
        name: tgpu_opencv_service
        internetAccess: true
      function:
        name: tgpu_opencv_func
        description: test gpu for opencv
        handler: not-used
        timeout: 600
        caPort: 9000
        instanceType: fc.gpu.tesla.1
        gpuMemorySize: 8192
        cpu: 4
        memorySize: 16384
        diskSize: 512
        runtime: custom-container
        customContainerConfig:
          #1. Make sure that the namespace:demo namespace and the repo:gpu-opencv-canny_s repository are created in advance in Alibaba Cloud Container Registry.
          #2. Change the tag from v0.1 to v0.2 when you update the function later and run s build && s deploy again.
          image: registry.cn-shenzhen.aliyuncs.com/demo/gpu-opencv-canny_s:v0.1
        codeUri: ./code
      triggers:
        - name: httpTrigger
          type: http
          config:
            authType: anonymous
            methods:
              - GET
Edit the app.py file.
Example:
# -*- coding: utf-8 -*-
# python2 and python3

from __future__ import print_function
from http.server import HTTPServer, BaseHTTPRequestHandler
import json
import sys
import logging
import os
import numpy as np
import cv2
import urllib.request

class MyRequest(BaseHTTPRequestHandler):
    def download(self, url, path):
        print("enter download:", url)
        f = urllib.request.urlopen(url)
        with open(path, "wb") as local_file:
            local_file.write(f.read())

    def upload(self, url, path):
        print("enter upload:", url)
        headers = {
            'Content-Type': 'application/octet-stream',
            'Content-Length': os.stat(path).st_size,
        }
        req = urllib.request.Request(url, open(path, 'rb'), headers=headers, method='PUT')
        urllib.request.urlopen(req)

    def core(self):
        msg = ""
        mode = ""
        if not cv2.cuda.getCudaEnabledDeviceCount():
            msg = "No CUDA-capable device is detected |"
            mode = "Mat"
        else:
            msg = "CUDA-capable device supported |"
            mode = "UMat"

        # Use the path of the OSS object in your Alibaba Cloud account. You must have the read and write permissions on the object.
        # Download the source image from your OSS bucket.
        path = "/tmp/target.jpg"
        self.download("https://your_public_oss/f.png", path)

        img = cv2.imread(path)

        if mode=='UMat':
            img = cv2.UMat(img)
        img = cv2.cvtColor(img, cv2.COLOR_BGR2GRAY)
        img = cv2.GaussianBlur(img, (7, 7), 1.5)
        img = cv2.Canny(img, 0, 50)
        if type(img) == 'cv2.UMat':
            img = cv2.UMat.get(img)
        cv2.imwrite(path, img)
        # Use the path of the OSS object in your Alibaba Cloud account. You must have the read and write permissions on the object.
        # Upload the new image after edge detection to the OSS bucket. Note that the name of the new image cannot be the same as the name of the source image.
        self.upload("https://your_public_oss/target.jpg", path)

        msg = msg + " process image ok!"
        data = {'result': msg}
        self.send_response(200)
        self.send_header('Content-type', 'application/json')
        self.end_headers()
        self.wfile.write(json.dumps(data).encode())

    def pong(self):
        data = {"function":"opencv_edge_canny"}
        self.send_response(200)
        self.send_header('Content-type', 'application/json')
        self.end_headers()
        self.wfile.write(json.dumps(data).encode())

    def dispatch(self):
        mode = self.headers.get('RUN-MODE')

        if mode == "ping":
            self.pong()
        elif mode == "normal":
            self.core()
        else:
            self.pong()

    def do_GET(self):
        self.dispatch()

    def do_POST(self):
        self.dispatch()

if __name__ == '__main__':
    host = ('0.0.0.0', 9000)
    server = HTTPServer(host, MyRequest)
    print("Starting server, listen at: %s:%s" % host)
    server.serve_forever()
Edit the Dockerfile file.
Example:
FROM registry.cn-shanghai.aliyuncs.com/serverless_devs/opencv-cuda:cuda-10.2-opencv-4.2
WORKDIR /usr/src/app
RUN apt-get install -y build-essential
RUN apt-get install -y python3
COPY . .
CMD [ "python3", "-u", "/usr/src/app/app.py" ]
EXPOSE 9000
Build an image.
s build --dockerfile ./code/DockerfileDeploy the code to Function Compute.
s deployNoteIf you run the preceding command repeatedly and service name and function name remain unchanged, run the
use localcommand to use local configurations.Configure provisioned instances.
s provision put --target 1 --qualifier LATESTCheck whether the provisioned instances are ready.
s provision get --qualifier LATESTIf the value of
currentis 1, the provisioned mode of GPU-accelerated instances is ready. Example:[2021-11-01T13:43:28.308] [INFO ] [S-CLI] - Start ... [2021-11-01T13:43:28.521] [INFO ] [FC] - Getting provision: tgpu_opencv_service.LATEST/tgpu_opencv_func customContainer-demo: serviceName: tgpu_opencv_service functionName: tgpu_opencv_func qualifier: LATEST resource: 188077086902****#tgpu_opencv_service#LATEST#tgpu_opencv_func target: 1 current: 1 scheduledActions: [] targetTrackingPolicies: []Invoke the function.
View the online version
FC Invoke Result:
{"function": "opencv_edge_canny"}
Perform edge detection on the image
s invoke -e '{"method":"GET","headers":{"RUN-MODE":"normal"}}'

enter download: https://your_public_oss/c1.png
enter upload: https://your_public_oss/target.jpg # View the file to check the result of edge detection.
FC Invoke Result:
{"result": "CUDA-capable device supported | process image ok!"}
Release the GPU-accelerated instances.
s provision put --target 0 --qualifier LATEST
Use the Function Compute console to deploy a GPU application
Deploy an image.
Create a Container Registry Enterprise Edition instance or Container Registry Personal Edition instance.
We recommend that you create an Enterprise Edition instance. For more information, see Create a Container Registry Enterprise Edition instance.
Create a namespace and an image repository.
For more information, see the Step 2: Create a namespace and Step 3: Create an image repository sections of the "Use Container Registry Enterprise Edition instances to build images" topic.
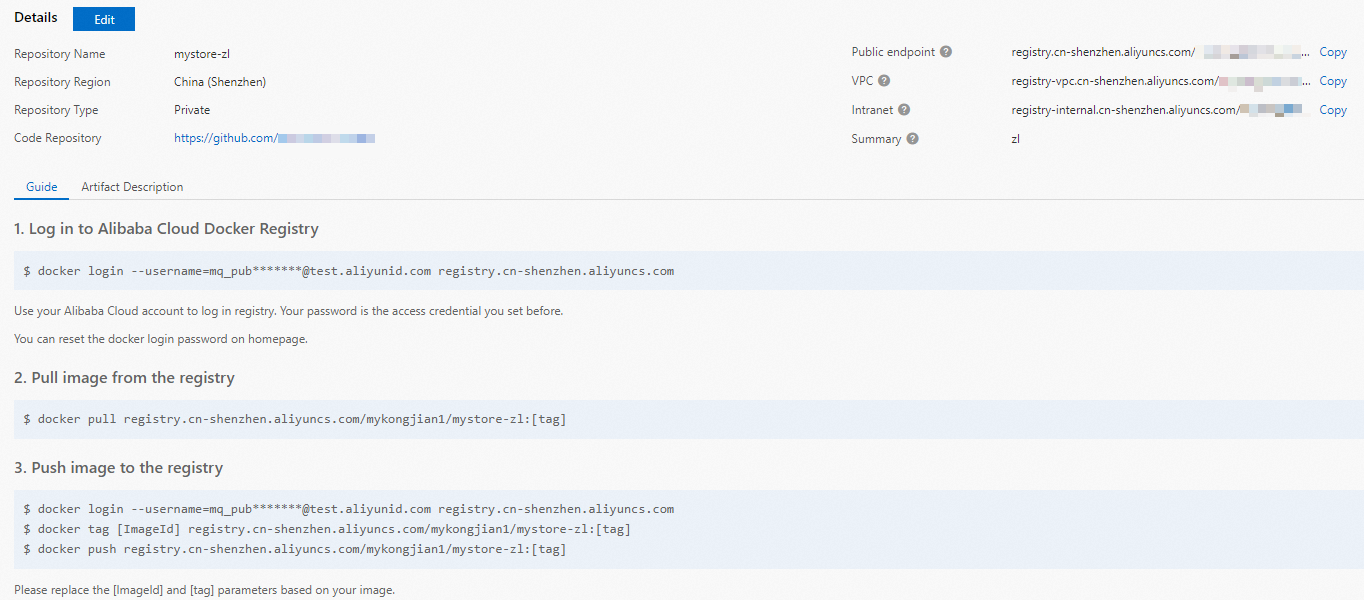
Perform operations on Docker as prompted in the Container Registry console. Then, push the preceding sample app.py and Dockerfile to the instance image repository. For more information about the files, see app.py and Dockerfile in the /code directory when you deploy a GPU application by using Serverless Devs.
Create a service. For more information, see the "Create a service“ section of the Manage services section.
Create a function. For more information, see Create a custom container function.
NoteSelect GPU Instance for Instance Type and Process HTTP Requests for Request Handler Type.
Change the execution timeout period of the function.
Find the function that you want to manage and click Configure in the Actions column.
In the Environment Variables section, change the value of Execution Timeout Period and click Save.
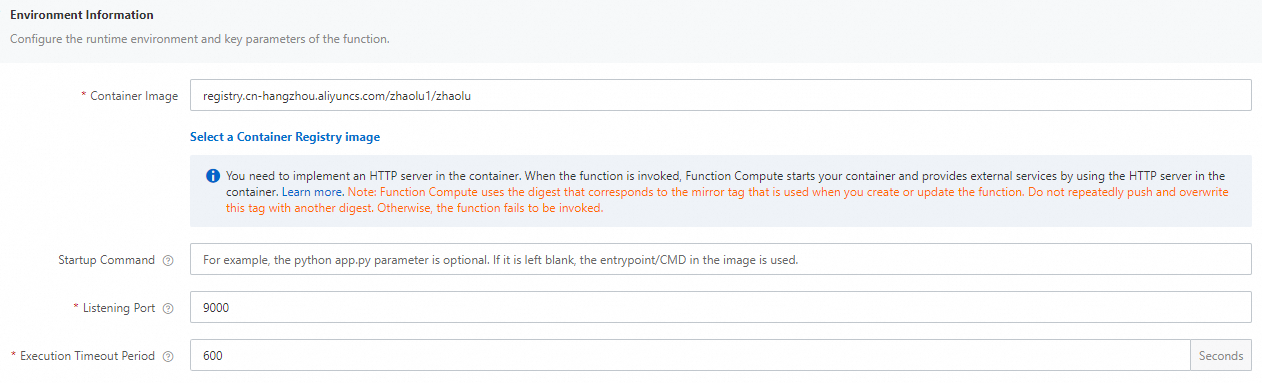
NoteTranscoding duration by using CPU exceeds the default value of 60 seconds. Therefore, we recommend that you set the value of Execution Timeout Period to a larger value.
Configure a provisioned GPU-accelerated instance.
On the function details page, click the Auto Scaling tab and click Create Rule.
On the page that appears, configure the following parameters to provision GPU-accelerated instances and click Create.
For more information about how to configure provisioned instances, see Configure provisioned instances and auto scaling rules.
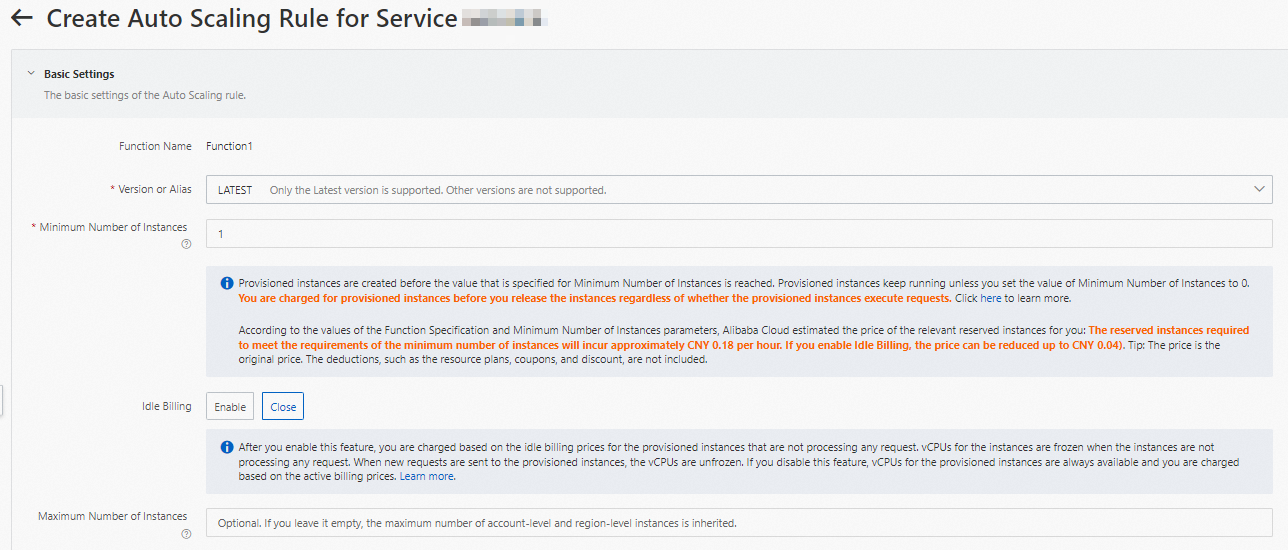
After the configuration is complete, you can check whether the provisioned GPU-accelerated instances are ready in the rule list. Specifically, check whether the value of Current Reserved Instances is the specified number of provisioned instances.
Use cURL to test the function.
On the function details page, click the Triggers tab to view trigger configurations and obtain the trigger endpoint.
Run the following command in the CLI to invoke the GPU-accelerated function:
View online function versions
curl "https://tgpu-op-console-tgpu-op-console-ajezokddpx.cn-shenzhen.fcapp.run"
{"function": "opencv_edge_canny"}
Perform edge detection on the image
curl "https://tgpu-op-console-tgpu-op-console-ajezokddpx.cn-shenzhen.fcapp.run" -H "RUN-MODE: normal"
{"result": "CUDA-capable device supported | process image ok!"}
Execution Result
You can view the image after edge detection by accessing the following domain name in your browser:
https://cri-zfen7xhpsx******-registry.oss-cn-shenzhen.aliyuncs.com/cats2.pngThis domain name is used as an example. The actual domain name prevails.