After you enable Managed Service for OpenTelemetry, Function Compute records the time consumed in the system. The time includes the cold start duration, execution time of Initializer hooks, and execution time of functions. To record the time consumed for functions on the business side, you can create custom spans. For example, you can record the time taken to access services such as ApsaraDB RDS and File Storage NAS (NAS) within functions. This topic describes how to use Serverless Devs to create a custom span.
Prerequisites
Process description
You can create custom spans based on the traces of Function Compute and connect the created spans to the traces of Function Compute. For Function Compute, Managed Service for OpenTelemetry provides the following two methods to create custom spans based on the Jaeger implementation of the OpenTracing specification:
For more information about Jaeger and OpenTelemetry, see Jaeger and OpenTelemetry.
The two methods involve the following steps:
Add Jaeger or OpenTelemetry dependencies to the function. For more information about how to install dependencies, see Install third-party dependencies for a function.
Obtain the SpanContext of the trace of Function Compute from the function, create custom spans based on the SpanContext of Function Compute, and then add instrumentation before and after the code fragments whose execution time needs to be recorded.
View the trace information on the Tracing Analysis tab of the Function Details page or in the Managed Service for OpenTelemetry console.
Use Jaeger SDK
The following topics provide the sample code that is used to create custom spans by using the Jaeger SDK in the corresponding runtime:
This section describes how to use Serverless Devs to create a custom span, and create and deploy a function in a Node.js runtime.
You can use Serverless Devs to install dependencies and package and deploy code to Function Compute. You can also package and deploy code in other ways. For more information about Serverless Devs, see What is Serverless Devs?
Create a code directory.
mkdir jaeger-demoInitialize a Node.js runtime template.
Run the following command to go to the code directory:
cd jaeger-demoRun the following command in the code directory to initialize the Node.js 12 project:
s init devsapp/start-fc-event-nodejs12A sample output is as follows:
 Serverless Awesome: https://github.com/Serverless-Devs/package-awesome

 Please input your project name (init dir) (start-fc-event-nodejs12)
Specify a name for the project, and press the Enter key.
By default, Serverless Devs generates a project named start-fc-event-nodejs12. You can modify the project name as needed. In this example, the default project name is used.
A sample output is as follows:
 Serverless Awesome: https://github.com/Serverless-Devs/package-awesome

 Please input your project name (init dir) start-fc-event-nodejs12
 file decompression completed
 please select credential alias (Use arrow keys)
❯ default
Select an alias and press the Enter key.
Specify whether to deploy the project.
Dependencies must be installed for the project in this example. Therefore, after
Do you want to deploy the project immediately? (Y/n)is returned in the command output, entern.
Run the following command to go to the code directory of the project:
cd start-fc-event-nodejs12/codeRun the following command in the code directory to initialize the package.json file:
npm init -yA sample output is as follows:
Wrote to /test/jjyy/start-fc-event-nodejs12/code/package.json:

{
  "name": "code",
  "version": "1.0.0",
  "description": "",
  "main": "index.js",
  "scripts": {
    "test": "echo \"Error: no test specified\" && exit 1"
  },
  "keywords": [],
  "author": "",
  "license": "ISC"
}
Run the following command to install Jaeger dependencies:
npm i jaeger-client --saveA sample output is as follows:
added 15 packages in 1sEdit the function code.
The following code is used:
var initTracer = require('jaeger-client').initTracer;
var spanContext = require('jaeger-client').SpanContext;


module.exports.handler = function(event, context, callback)
{
    console.log('invoking...',context.tracing);

    var config = {
        serviceName: 'e2e-test',
        reporter: {
            // Provide the traces endpoint; this forces the client to connect directly to the Collector and send
            // spans over HTTP
            collectorEndpoint: context.tracing.jaegerEndpoint,
            flushIntervalMs: 10,
        },
        sampler: {
            type: "const",
            param: 1
        },
    };
    var options = {
        tags: {
            'version': 'fc-e2e-tags',
        },
    };
    var tracer = initTracer(config, options);
    var invokSpanContextStr = context.tracing.openTracingSpanContext;
    console.log('spanContext', invokSpanContextStr);
    var invokSpanContext = spanContext.fromString(invokSpanContextStr);
    var span = tracer.startSpan("CustomSpan", {
        childOf: invokSpanContext
    });
    span.finish();
    var params = {
        openTracingSpanContext: context.tracing.openTracingSpanContext,
        openTracingSpanBaggages: context.tracing.openTracingSpanBaggages,
        jaegerEndpoint: context.tracing.jaegerEndpoint
    }
   callback(null,'success')
}
Edit the s.yaml file.
Run the following command to go to the directory of the project:
cd ..Run the following command to edit the s.yaml file:
vim s.yamlThe following sample code provides an example of the file:
edition: 1.0.0
name: hello-world-app
access: default

vars: # The global variables.
  region: "cn-hangzhou"
  service:
    name: "hello-world-service"
    description: 'hello world by serverless devs'
    tracingConfig: Enable # Enable Managed Service for OpenTelemetry.

services:
  helloworld: # The name of the service or module.
    component: fc # The name of the component. Serverless Devs can be thought of as a game console, requiring additional modules to extend its capabilities. Each component acts like a game card, enabling distinct business capabilities. By combining different components, you can unlock a wide range of functionalities for Serverless Devs, much like how a game console can play different games with different cards.
    props:
      region: ${vars.region} # For more information about how to use variables, visit: https://www.serverless-devs.com/serverless-devs/yaml.
      service: ${vars.service}
      function:
        name: "start-fc-event-nodejs14"
        description: 'hello world by serverless devs'
        runtime: nodejs12
        codeUri: ./code
        handler: index.handler
        memorySize: 128
        timeout: 60
Run the following command to install the dependencies:
s build --use-dockerA sample output is as follows:
[2021-11-12T18:33:43.856] [INFO ] [S-CLI] - Start ...
[2021-11-12T18:33:44.677] [INFO ] [FC-BUILD] - Build artifact start...
[2021-11-12T18:33:44.701] [INFO ] [FC-BUILD] - Use docker for building.
[2021-11-12T18:33:44.988] [INFO ] [FC-BUILD] - Build function using image: registry.cn-beijing.aliyuncs.com/aliyunfc/runtime-nodejs12:build-1.9.21
[2021-11-12T18:33:45.011] [INFO ] [FC-BUILD] - skip pulling image registry.cn-beijing.aliyuncs.com/aliyunfc/runtime-nodejs12:build-1.9.21...
[2021-11-12T18:33:47.915] [INFO ] [FC-BUILD] - Build artifact successfully.

Tips for next step
======================
* Invoke Event Function: s local invoke
* Invoke Http Function: s local start
* Deploy Resources: s deploy
End of method: build
Run the following command to deploy the project:
s deploy -yA sample output is as follows:
[2021-11-12T18:35:26.015] [INFO ] [S-CLI] - Start ...
[2021-11-12T18:35:26.633] [INFO ] [FC-DEPLOY] - Using region: cn-hangzhou
[2021-11-12T18:35:26.634] [INFO ] [FC-DEPLOY] - Using access alias: default
[2021-11-12T18:35:26.634] [INFO ] [FC-DEPLOY] - Using accessKeyID: yourAccessKeyID
......
 Make service fc-deploy-service success.
 Make function fc-deploy-service/event-nodejs12 success.
[2021-11-12T18:35:37.661] [INFO ] [FC-DEPLOY] - Checking Service fc-deploy-service exists
[2021-11-12T18:35:37.718] [INFO ] [FC-DEPLOY] - Checking Function event-nodejs12 exists

Tips for next step
======================
* Display information of the deployed resource: s info
* Display metrics: s metrics
* Display logs: s logs
* Invoke remote function: s invoke
* Remove Service: s remove service
* Remove Function: s remove function
* Remove Trigger: s remove trigger
* Remove CustomDomain: s remove domain


fc-deploy-test:
  region:   cn-hangzhou
  service:
    name: fc-deploy-service
  function:
    name:       event-nodejs12
    runtime:    nodejs12
    handler:    index.handler
    memorySize: 128
    timeout:    60
Verify the result.
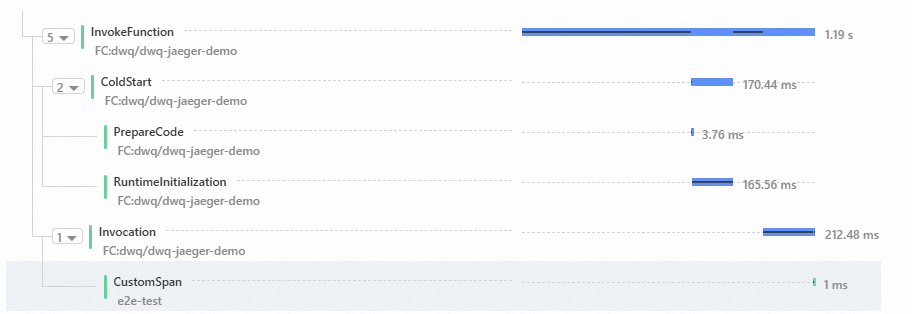
View the trace in the Function Compute console. The custom span that you created is connected to the spans of Function Compute.
Use OpenTelemetry
The following topics provide the sample code that is used to create custom spans by using OpenTelemetry in the corresponding runtime:
This section describes how to use Serverless Devs to create a custom span, and create and deploy a function in a Python runtime.
You can use Serverless Devs to install dependencies and package and deploy code to Function Compute. You can also package and deploy code in other ways. For more information about Serverless Devs, see What is Serverless Devs?
Create a code directory.
mkdir opentelemetry-demoGo to the code directory.
cd opentelemeytry-demoInitialize a Python runtime template.
Run the following command to initialize the Python 3 project:
s init devsapp/start-fc-event-python3A sample output is as follows:
 Serverless Awesome: https://github.com/Serverless-Devs/package-awesome

 Please input your project name (init dir) (start-fc-event-python3)
Specify a name for the project, and press the Enter key.
By default, Serverless Devs generates a project named start-fc-event-python3. You can modify the project name as needed. In this example, the default project name is used.
A sample output is as follows:
 Serverless Awesome: https://github.com/Serverless-Devs/package-awesome

 Please input your project name (init dir) start-fc-event-python3
 file decompression completed
 please select credential alias (Use arrow keys)
❯ default
Select an alias and press the Enter key.
Specify whether to deploy the project.
Dependencies must be installed for the project in this example. Therefore, after
Do you want to deploy the project immediately? (Y/n)is returned in the command output, entern.
Install OpenTelemetry dependencies.
Run the following command to go to the code directory:
cd start-fc-event-python3/codeCreate a requirements.txt file in the code directory, and modify the file. The file contains the following information:
opentelemetry-api==1.12.0
opentelemetry-sdk==1.12.0
opentelemetry-exporter-jaeger==1.12.0
Run the following command to edit the function code:
vim index.pyThe following code is used:
# -*- coding: utf-8 -*-
import time
from opentelemetry import trace
from opentelemetry.exporter.jaeger.thrift import JaegerExporter
from opentelemetry.sdk.resources import SERVICE_NAME, Resource
from opentelemetry.sdk.trace import TracerProvider
from opentelemetry.sdk.trace.export import SimpleSpanProcessor
from opentelemetry.trace import NonRecordingSpan

trace.set_tracer_provider(
    TracerProvider(
        resource=Resource.create({SERVICE_NAME: "my-helloworld-service"})
    )
)
tracer = trace.get_tracer(__name__)


def handler(event, context):
    init_tracer(context.tracing.jaeger_endpoint)
    span_context = get_fc_span(context.tracing.span_context)
    start_my_span(trace.set_span_in_context(NonRecordingSpan(span_context)))
    return 'hello world'


def init_tracer(endpoint):
    # create a JaegerExporter
    jaeger_exporter = JaegerExporter(
        collector_endpoint=endpoint
    )

    # Create a SimpleSpanProcessor and add the exporter to it
    span_processor = SimpleSpanProcessor(jaeger_exporter)

    # add to the tracer
    trace.get_tracer_provider().add_span_processor(span_processor)


def get_fc_span(jaeger_span_context):
    jaeger_span_context_arr = jaeger_span_context.split(":")
    tid = int(jaeger_span_context_arr[0], 16)
    sid = int(jaeger_span_context_arr[1], 16)

    span_context = trace.SpanContext(
        trace_id=tid,
        span_id=sid,
        is_remote=True,
        trace_flags=trace.TraceFlags(0x01),
    )
    return span_context


def start_my_span(context):
    with tracer.start_as_current_span(name="fc-operation", context=context):
        time.sleep(0.15)
        with tracer.start_as_current_span("child"):
            time.sleep(0.1)
After you edit the function code, enter :wq and press the Enter key to exit the editing page.
Edit the s.yaml file.
Run the following command to go to the directory of the project:
cd ..Run the following command to edit the s.yaml file:
vim s.yamlThe following sample code provides an example of the file:
edition: 1.0.0
name: hello-world-app
access: default

vars: # The global variables.
  region: "cn-hangzhou"
  service:
    name: "hello-world-service"
    description: 'hello world by serverless devs'
    tracingConfig: Enable # Enable Managed Service for OpenTelemetry.

services:
  helloworld: # The name of the service or module.
    component: fc # The name of the component. Serverless Devs can be thought of as a game console, requiring additional modules to extend its capabilities. Each component acts like a game card, enabling distinct business capabilities. By combining different components, you can unlock a wide range of functionalities for Serverless Devs, much like how a game console can play different games with different cards.
    props:
      region: ${vars.region} # For more information about how to use variables, visit: https://www.serverless-devs.com/serverless-devs/yaml#Variable value.
      service: ${vars.service}
      function:
        name: "start-fc-event-python3"
        description: 'hello world by serverless devs'
        runtime: python3.9
        codeUri: ./code
        handler: index.handler
        memorySize: 128
        timeout: 60
After you edit the code, enter :wq and press the Enter key to exit the editing page.
Install dependencies.
s build --use-dockerA sample output is as follows:
[2021-11-12T18:53:05.818] [INFO ] [S-CLI] - Start ...
[2021-11-12T18:53:06.638] [INFO ] [FC-BUILD] - Build artifact start...
[2021-11-12T18:53:06.659] [INFO ] [FC-BUILD] - Use docker for building.
[2021-11-12T18:53:06.888] [INFO ] [FC-BUILD] - Build function using image: registry.cn-beijing.aliyuncs.com/aliyunfc/runtime-python3.6:build-1.9.21
[2021-11-12T18:53:06.942] [INFO ] [FC-BUILD] - skip pulling image registry.cn-beijing.aliyuncs.com/aliyunfc/runtime-python3.6:build-1.9.21...
[2021-11-12T18:53:10.570] [INFO ] [FC-BUILD] - Build artifact successfully.

Tips for next step
======================
* Invoke Event Function: s local invoke
* Invoke Http Function: s local start
* Deploy Resources: s deploy
End of method: build
Run the following command to deploy the project:
s deploy -yA sample output is as follows:
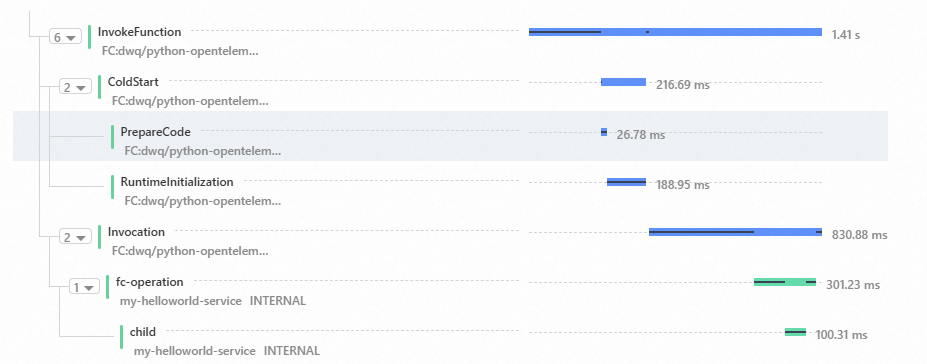
[2021-11-12T18:55:02.640] [INFO ] [S-CLI] - Start ...
[2021-11-12T18:55:03.455] [INFO ] [FC-DEPLOY] - Using region: cn-hangzhou
[2021-11-12T18:55:03.456] [INFO ] [FC-DEPLOY] - Using access alias: default
[2021-11-12T18:55:03.456] [INFO ] [FC-DEPLOY] - Using accessKeyID: yourAccessKeyID
[2021-11-12T18:55:03.457] [INFO ] [FC-DEPLOY] - Using accessKeySecret: yourAccessKeySecret
 Using fc deploy type: sdk, If you want to deploy with pulumi, you can [s cli fc-default set deploy-type pulumi] to switch.
[2021-11-12T18:55:04.142] [INFO ] [FC-DEPLOY] - Checking Service fc-deploy-service exists
[2021-11-12T18:55:04.722] [INFO ] [FC-DEPLOY] - Checking Function event-py3 exists
[2021-11-12T18:55:04.831] [INFO ] [FC-DEPLOY] - Fc detects that you have run build command for function: event-py3.
[2021-11-12T18:55:04.831] [INFO ] [FC-DEPLOY] - Using codeUri: /test/jjyy/opentelemetry-demo/start-fc-event-python3/.s/build/artifacts/fc-deploy-service/event-py3
[2021-11-12T18:55:04.835] [INFO ] [FC-DEPLOY] - Fc add/append some content to your origin environment variables for finding dependencies generated by build command.
{
  "LD_LIBRARY_PATH": "/code/.s/root/usr/local/lib:/code/.s/root/usr/lib:/code/.s/root/usr/lib/x86_64-linux-gnu:/code/.s/root/usr/lib64:/code/.s/root/lib:/code/.s/root/lib/x86_64-linux-gnu:/code/.s/root/python/lib/python2.7/site-packages:/code/.s/root/python/lib/python3.6/site-packages:/code:/code/lib:/usr/local/lib",
  "PATH": "/code/.s/root/usr/local/bin:/code/.s/root/usr/local/sbin:/code/.s/root/usr/bin:/code/.s/root/usr/sbin:/code/.s/root/sbin:/code/.s/root/bin:/code:/code/node_modules/.bin:/code/.s/python/bin:/code/.s/node_modules/.bin:/usr/local/bin:/usr/local/sbin:/usr/bin:/usr/sbin:/sbin:/bin",
  "NODE_PATH": "/code/node_modules:/usr/local/lib/node_modules",
  "PYTHONUSERBASE": "/code/.s/python"
}
 Make service fc-deploy-service success.
 Make function fc-deploy-service/event-py3 success.
[2021-11-12T18:55:10.693] [INFO ] [FC-DEPLOY] - Checking Service fc-deploy-service exists
[2021-11-12T18:55:10.737] [INFO ] [FC-DEPLOY] - Checking Function event-py3 exists

Tips for next step
======================
* Display information of the deployed resource: s info
* Display metrics: s metrics
* Display logs: s logs
* Invoke remote function: s invoke
* Remove Service: s remove service
* Remove Function: s remove function
* Remove Trigger: s remove trigger
* Remove CustomDomain: s remove domain


fc-deploy-test:
  region:   cn-hangzhou
  service:
    name: fc-deploy-service
  function:
    name:       event-py3
    runtime:    python3    handler:    index.handler
    memorySize: 128
    timeout:    60
Verify the result.
View the trace in the Function Compute console. The custom span that you created is connected to the spans of Function Compute.