A canary release deploys a new application version to a small subset of instances first, allowing you to validate it with real traffic before rolling out to the full fleet. This reduces the blast radius when updating Spring Cloud or Dubbo microservices applications in an Elastic Compute Service (ECS) cluster managed by Enterprise Distributed Application Service (EDAS).
How it works
A canary release in EDAS follows a three-phase process:
Deploy to canary group: EDAS deploys the new version to a designated instance group (the canary group).
Validate: You verify the canary group by monitoring traffic distribution and application behavior.
Roll out or roll back: If validation succeeds, EDAS deploys the update to remaining groups in configurable phases -- either automatically at set intervals or manually batch by batch. If issues occur, you stop the change and roll back.
EDAS supports two traffic routing strategies for canary validation:
| Strategy | How it works |
|---|---|
| Content-based routing | Routes specific traffic to the canary group based on request attributes such as headers, cookies, or parameters |
| Ratio-based routing | Routes a configurable percentage of all traffic to the canary group |
Supported application types
| Application type | Canary release support |
|---|---|
| Dubbo | Fully supported |
| Spring Cloud | Supported with restrictions. If your application uses Deployment.Metadata.Name or Deployment.Metadata.Uid to configure features, do not perform a canary release. These metadata fields change during a canary release, which can break features that depend on them. |
| High-Speed Service Framework (HSF) | Not supported |
Ingress applications: If you use a Server Load Balancer (SLB) instance to forward traffic directly to an ingress application, the SLB traffic forwarding policy does not follow the canary release policy.
To use canary release with an ingress application, create a client application and a server application with multiple replicas. Perform the canary release on the server application, and associate the SLB instance with the client application to handle service access.
Prerequisites
Before you begin, make sure that you have:
An application deployed in an ECS cluster with at least two instance groups that contain instances
To create instance groups and add ECS instances, see Manage an instance group in an ECS cluster in the EDAS console.
Start a canary release
Log on to the EDAS console.
In the left-side navigation pane, choose Application Management > Applications.
In the top navigation bar, select a region. In the upper part of the Applications page, select a microservices namespace from the Microservices Namespace drop-down list.
Click the name of the application that you want to update.
In the upper-right corner of the Basic Information page, click Deploy Application.
On the Select Deployment Mode page, find the Canary Release (Phased) section and click Start Deployment.
On the Canary Release (Phased) page, complete the following configuration and click OK.
Upload the deployment package
Upload the deployment package that contains the new application version.
Configure the release policy
Set up the phased rollout strategy for the canary release.
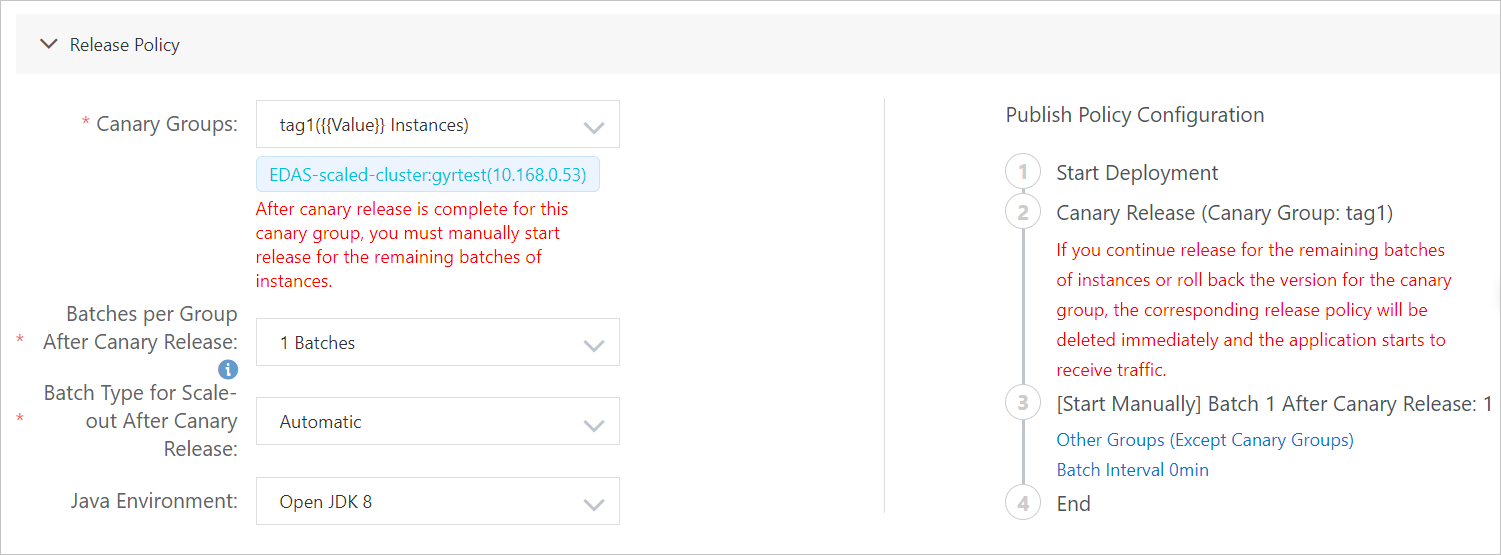
The Publish Policy Configuration section displays the canary release process based on your configuration.
| Parameter | Description |
|---|---|
| Canary Groups | The instance group where the new version is deployed first for validation. |
| Batches per Group After Canary Release | The number of phases for deploying the new version to remaining groups after the canary group is validated. All groups selected: The new version is deployed to each group based on the phase number. If a group has fewer instances than the phase number, deployment is based on the actual instance count. Specific group selected: The new version is deployed to the specified group based on the phase number. |
| Batch Type for Scale-out After Canary Release | Required when Batches per Group After Canary Release is 2 or more. Automatic: EDAS deploys each phase at the interval specified in Wait Time Before Next Batch (Do Not Wait, 1 Minutes, 2 Minutes, 3 Minutes, 4 Minutes, or 5 Minutes). Manual: You trigger each phase manually. |
| Java Environment | The Java runtime environment for the application. |
Configure canary release rules
EDAS supports two types of canary release rules: content-based routing and ratio-based routing.
Canary release by content
Route specific traffic to the canary group based on request attributes.
Click Add Policy.
In the Add a canary release by content policy panel, click + Create Inbound Traffic Rule to add a rule.
You can create multiple inbound traffic rules.

| Parameter | Description |
|---|---|
| Protocol Type | The protocol your application uses. Spring Cloud: Requires the Path parameter. Dubbo: Requires the Select Service and Method parameters. |
| Conditional Mode | How multiple conditions are evaluated. Meet All Following Conditions (AND logic) or Meet Any of Following Conditions (OR logic). |
| Conditions | The matching criteria for routing traffic. For Spring Cloud: Cookie, Header, and Parameter. For Dubbo: Parameter and Expression for Getting Parameter Values. |
Canary release by ratio
Route a percentage of all traffic to the canary group. Set the Traffic Ratio parameter to the percentage of traffic you want the canary group to receive.
Monitor and complete the release
After the canary release starts, EDAS deploys the new version to the canary group. Track the deployment progress on the Change Details page.
Verify that traffic is distributed as expected. For details, see Monitor canary traffic.
After verification succeeds, click Start Next Batch on the Change Details page to proceed with the next phase.
Repeat until all phases are complete.
Roll back the release
If an issue occurs during verification, roll back the release to restore the previous version:
Click Stop Change in the upper-right corner of the Change Details page.
After the change stops, the Basic Information tab displays a message stating that the application is in the canary release state and the change has been stopped.
Roll back the application before performing any other operations.
Do not perform other deployment operations while the application is in the canary release state. Complete the rollback first.
Verify the result
After the canary release is complete:
On the Basic Information tab, confirm that Deployment Package shows the new version.
On the Instance Information tab, confirm that all instances are in the Normal state.