By default, Elastic Container Instance (ECI) cannot access the Internet to pull public images. To pull an image from an external repository like Docker Hub, the instance must have public internet access. This topic shows how to create an ECI instance by pulling an image from Docker Hub.
Prerequisites
You have activated the ECI service and the Resource Access Management (RAM) service, and completed the required RAM role authorization.
NoteIf you use a RAM user to create an ECI instance, you must grant permissions to the user. For more information, see Grant permissions to a RAM user.
You have created a virtual private cloud (VPC) and a vSwitch in a supported region.
For information about the regions and zones that ECI supports, see Regions and zones.
To learn how to create a VPC and a vSwitch, see Create a VPC and Create a vSwitch.
NoteWe recommend that you create multiple vSwitches. When you create an ECI instance, you can select these vSwitches to deploy the instance across multiple zones. This improves the success rate of instance creation.
You have created a security group. For more information, see Create a security group.
A security group is a virtual firewall that provides stateful inspection and packet filtering. It is used to set up security domains in the cloud. An ECI instance must belong to a security group. For more information, see Configure a security group for an ECI instance.
Procedure
This section describes the key to create an ECI instance by pulling the busybox image from Docker Hub. We use default or simple options for some settings.
Go to the Elastic Container Instance buy page.
Configure basic information for the instance.
Select a billing method and instance type.
Keep the default selections. The billing method is Pay-As-You-Go and the instance type is Regular Instance.
Select a region.
Select a VPC and a corresponding vSwitch.
You can select multiple vSwitches to use the multi-zone feature. The system then creates the instance in a zone that has sufficient resources.
Select a security group. You can add security group rules to allow or deny access to the ECI instance. This includes access from the public network, private networks, or other IP addresses.
NoteTo access the ECI instance from the public network, you must open the required port in the security group. For more information, see Add a security group rule.
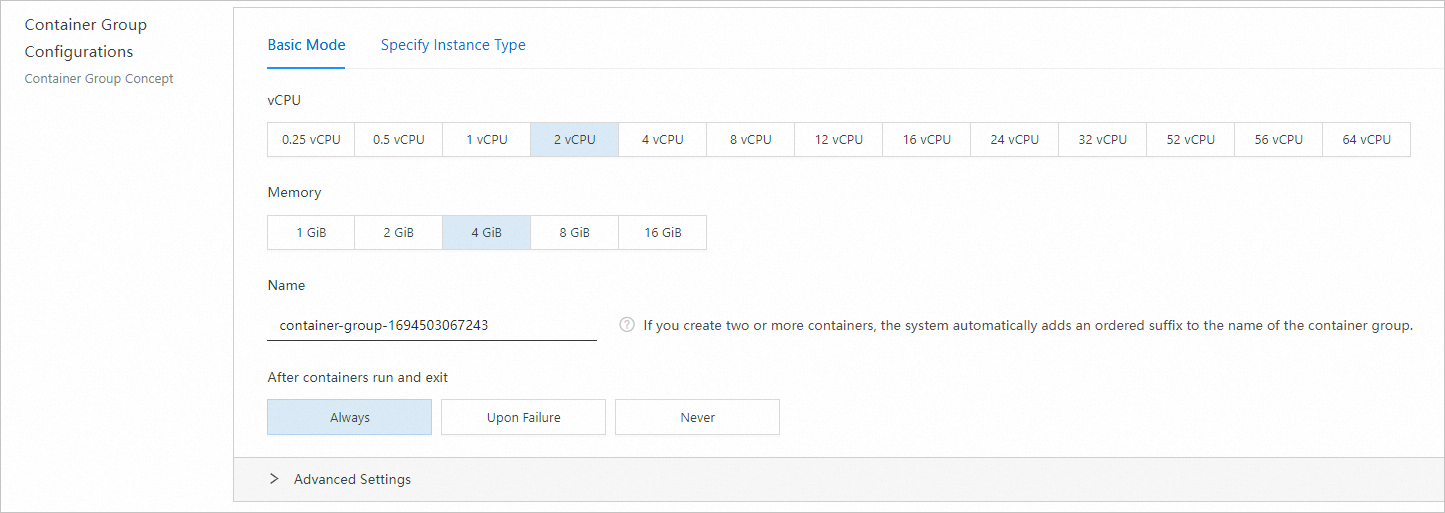
Configure the container group.
Select the specifications for the container group.
This example shows how to select vCPU and memory specifications. This method offers greater flexibility and resource availability. If your business requires special specifications, such as GPUs, you can specify an ECS instance type instead. For more information, see Create an instance by specifying an ECS instance type.
Enter a name for the container group.
Select a restart policy.
The default is Always. This means the container automatically restarts if it exits.
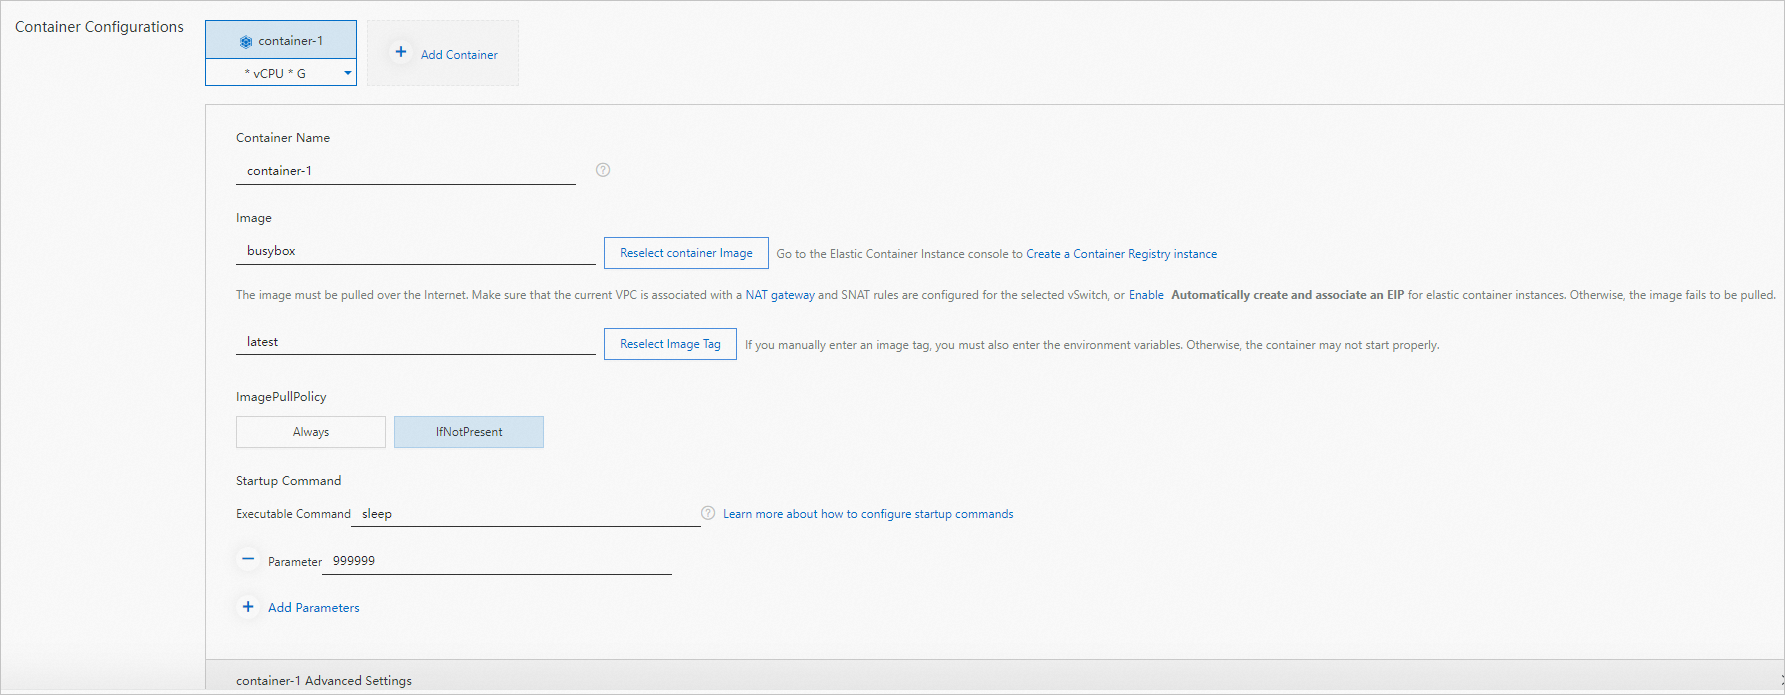
Configure the container.
Enter a name for the container.
Select an image and the corresponding image tag.
On the Docker Official Images tab, select busybox and set the version to latest.
NoteThe ImagePullPolicy defaults to IfNotPresent. This means the system first tries to use a local image. If the image is not found locally, the system pulls it from the repository.
Images from the DOCKER_HUB source are from Docker's official repository (Docker Hub) and must be pulled over the public Internet.
Set the startup command.
To ensure the Busybox container runs continuously, set a startup command. For this example, use
sleep 999999.
If your selected VPC does not have a NAT Gateway, click Next: Other Settings, and then assign an elastic IP address (EIP) to the instance.
In the EIP section, choose to Auto Create an EIP or Use Existing, depending on your needs. After an EIP is assigned, the instance can access the public internet and be accessed from the public Internet through the EIP.
Auto Create: A new EIP is created with pay-as-you-go billing. You can use a Shared Bandwidth to offset costs. You must configure a peak bandwidth.
Use Existing: You can select an existing, unassigned EIP from the drop-down list.
ImportantTo pull images from Docker Hub or other external image repositories, either create a NAT gateway and configure Source Network Address Translation (SNAT) rules for your VPC, or assign an EIP to your ECI instance. Otherwise, the image pull will fail. For more information, see Enable Internet access for elastic container instances.
Click Confirm Configuration.
Confirm the instance configuration, select the Service Agreement, and then click Confirm Order.
After the instance is created, you can view it on the Container Group page. Click the instance ID to view its details.