Auto Scaling adjusts the number of elastic container instances based on workloads and scaling policies, so your application always has enough capacity without paying for idle resources.
How it works
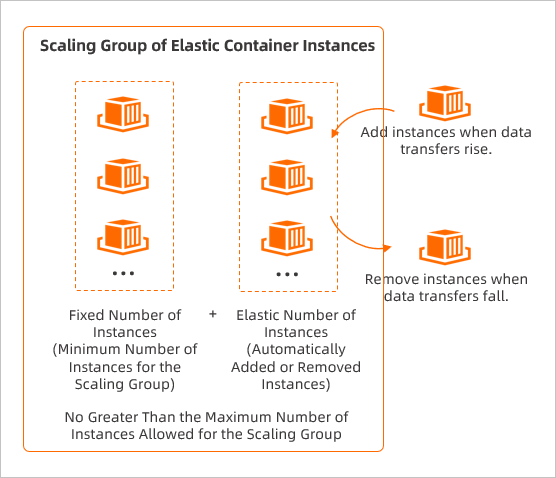
Group elastic container instances running the same service into a scaling group. Set a minimum instance count to guarantee baseline capacity and a maximum to cap costs. Auto Scaling then adds or removes instances in response to workload changes — either on a schedule or based on live metrics.
Use cases
Choose your scaling approach based on whether your traffic patterns are predictable:
-
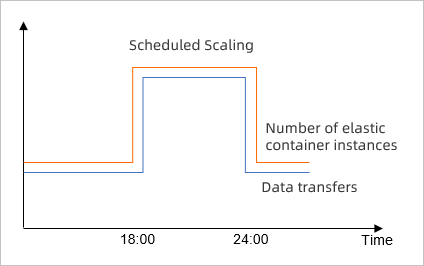
Predictable traffic — Use a scheduled task to scale out at peak start and scale in when peak ends. For example, a gaming platform that sees a sharp traffic increase from 18:00 to 24:00 every day can schedule extra instances before 18:00 and remove them after midnight.
-
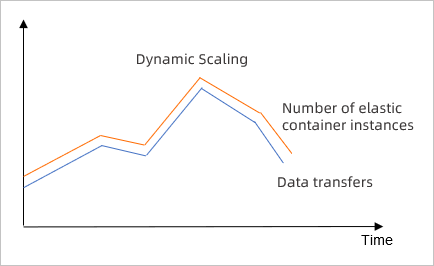
Unpredictable traffic — Use an event-triggered task to monitor a metric and scale automatically. For example, a video streaming platform with variable traffic can track CPU utilization and maintain it at 60% by scaling out when utilization climbs and scaling in when it drops.
Set up Auto Scaling for elastic container instances
Setup overview
The following figure shows the setup flow:

If you set Instance Configuration Source to Select Existing Instance when creating a scaling group, Auto Scaling automatically creates and enables a scaling configuration. Skip step 2 in that case.
Step 1: Create a scaling group
A scaling group manages elastic container instances designed for the same workload. When creating one, set:
-
The minimum number of instances — keeps baseline capacity running at all times
-
The maximum number of instances — prevents runaway costs during traffic spikes
-
The instance template and removal policy
For details, see Create a scaling group.
Step 2: Create a scaling configuration
Auto Scaling uses the scaling configuration to create new elastic container instances when scaling out. Specify the instance type, image, and other runtime settings.
Tip: Container images can be large, and pulling them at startup slows instance creation. Enable automatic image cache matching in the scaling configuration to speed up scale-out.
For details, see Create a scaling configuration of the Elastic Container Instance type.
Step 3: Enable the scaling group
Scaling events only occur in scaling groups in the Enabled state. When the scaling group has an active scaling configuration, the console prompts you to enable it. Alternatively, go to the Scaling Groups page and enable it manually.
For details, see Enable a scaling group.
Step 4: Create a scaling rule
Scaling rules define how the scaling group adjusts capacity. Choose the rule type based on your use case:
| Rule type | How it works | Use when |
|---|---|---|
| Simple scaling rule | Adds, removes, or sets instances to a fixed count | You know the exact instance count for peak and off-peak periods |
| Target tracking scaling rule | Automatically adjusts capacity to keep a metric — such as CPU utilization — close to the target value. Think of it like a thermostat: set your target, and the system does the rest. | Traffic is unpredictable and you want metric-driven automation |
For details, see Create a scaling rule.
Step 5: Execute the scaling rule
Trigger scaling rules in one of three ways:
| Method | When to use |
|---|---|
| Manual execution | Addressing one-off or temporary capacity needs |
| Scheduled task | Workload fluctuations that follow a predictable pattern — scale out before peak, scale in after |
| Event-triggered task | Workload fluctuations that are unpredictable — the system monitors a metric and triggers the rule automatically |
For details, see Execute a scaling rule. For scheduled tasks, see Scheduled tasks overview. For event-triggered tasks, see Event-triggered tasks overview.
Configuration examples
Scenario 1: Scheduled scaling for predictable peak traffic
Situation: Your application needs 10 instances for normal operations, but traffic spikes from 18:00 to 23:00 every day and requires 15 instances.
| Step | Configuration |
|---|---|
| Create a scaling group | Type: elastic container instance, minimum: 10, maximum: 20 |
| Create a scaling configuration | Specify the instance configuration source |
| Enable the scaling group | The system creates 10 instances on enable |
| Create two simple scaling rules | Rule 1: set instance count to 15 / Rule 2: set instance count to 10 |
| Create two scheduled tasks | Task 1: run Rule 1 at 17:55 every day / Task 2: run Rule 2 at 23:05 every day |
Result: 10 instances handle traffic during off-peak hours. From 18:00 to 23:00, the count increases to 15.
Scenario 2: Metric-based scaling for unpredictable traffic
Situation: Your application needs 10 instances as a baseline, but you cannot predict when or how much traffic will spike.
| Step | Configuration |
|---|---|
| Create a scaling group | Type: elastic container instance, minimum: 10, maximum: 30 |
| Create a scaling configuration | Specify the instance configuration source |
| Enable the scaling group | The system creates 10 instances on enable |
| Create a target tracking scaling rule | Monitoring metric: CPU utilization / Target value: 60% / Other parameters: defaults |
| Verify the event-triggered task | After you create the target tracking scaling rule, the system automatically creates an event-triggered task — check it to confirm the scaling trigger conditions |
Result: The system continuously monitors CPU utilization and scales in or out to keep it below 60%, while always maintaining at least 10 instances.