The cloud controller manager (CCM) allows you to integrate Kubernetes with Alibaba Cloud services, such as Classic Load Balancer (CLB) and Virtual Private Cloud (VPC). You can use the CCM to associate a CLB instance with nodes inside a Kubernetes cluster as well as an Elastic Compute Service (ECS) instance outside a Kubernetes cluster. This prevents traffic interruptions during service migrations. You can use the CCM to forward traffic to multiple Kubernetes clusters. This measure of data backup and disaster recovery ensures high availability of your services. This topic describes how to deploy the CCM in a self-managed Kubernetes cluster.
Prerequisites
A VNode is deployed in the self-managed Kubernetes cluster.
If the self-managed Kubernetes cluster is deployed in a data center, the data center is connected to Alibaba Cloud.
Background information
The CCM is a component provided by Alibaba Cloud that allows you to integrate Kubernetes with Alibaba Cloud services. The CCM provides the following features:
Manage Server Load Balancer (SLB) instances
If you set Type to LoadBalancer for a Service, the CCM automatically creates a CLB instance for the Service and configures listeners and backend vServer groups for the CLB instance. When the endpoint of an ECS instance in a vServer group for a Service is changed or the cluster nodes are changed, the CCM automatically updates the vServer groups of the CLB instance.
Enable cross-node communication
If Flannel is used as the network plug-in of a Kubernetes cluster, the CCM can enable network connections between containers and nodes and adds the CIDR block of the pod to the route table of the VPC where the cluster is deployed. This allows containers to communicate with each other across nodes. This feature is ready for use after the CCM is installed.
For more information, see Cloud Controller Manager.
The CCM is open source. For more information about the project, see cloud-provider-alibaba-cloud.
Preparations
If ECS instances are not used as the nodes in your self-managed Kubernetes cluster, skip the preparations. If ECS instances are used as the nodes in your self-managed Kubernetes cluster, perform the following operations to configure providerID of the ECS instances. This way, CCM can manage the routes of the ECS instances.
Deploy OpenKurise to use BroadcastJob.
Sample command:
helm repo add openkruise https://openkruise.github.io/charts/
helm repo update
helm install kruise openkruise/kruise --version 1.3.0
For more information, visit OpenKruise documentation.
Use BroadcastJob to configure providerID of the ECS instances.
Create a file named provider.yaml and copy the following template into the file.
apiVersion: rbac.authorization.k8s.io/v1
kind: ClusterRole
metadata:
  name: ecs-node-initor
rules:
  - apiGroups:
      - ""
    resources:
      - nodes
    verbs:
      - get
      - patch
---
apiVersion: v1
kind: ServiceAccount
metadata:
  name: ecs-node-initor
---
kind: ClusterRoleBinding
apiVersion: rbac.authorization.k8s.io/v1
metadata:
  name: ecs-node-initor
subjects:
- kind: ServiceAccount
  name: ecs-node-initor
  namespace: default
roleRef:
  kind: ClusterRole
  name: ecs-node-initor
  apiGroup: rbac.authorization.k8s.io
---
apiVersion: apps.kruise.io/v1alpha1
kind: BroadcastJob
metadata:
  name: create-ecs-node-provider-id
spec:
  template:
    spec:
      serviceAccount: ecs-node-initor
      restartPolicy: OnFailure
      affinity:
        nodeAffinity:
          requiredDuringSchedulingIgnoredDuringExecution:
            nodeSelectorTerms:
            - matchExpressions:
              - key: type
                operator: NotIn
                values:
                - virtual-kubelet
      tolerations:
      - operator: Exists
      containers:
        - name: create-ecs-node-provider-id
          image: registry.cn-beijing.aliyuncs.com/eci-release/provider-initor:v1
          command: [ "/usr/bin/init" ]
          env:
          - name: NODE_NAME
            valueFrom:
              fieldRef:
                fieldPath: spec.nodeName
  completionPolicy:
    type: Never
  failurePolicy:
    type: FailFast
    restartLimit: 3
Deploy the BroadcastJob.
kubectl apply -f provider.yaml
View the execution result of the BroadcastJob.
kubectl get pods -o wideIf all pods whose names contain create-ecs-node-provider-id reach the Completed state, the providerID of the ECS instances is configured. The following figure shows a sample output.

(Optional) Delete the BroadcastJob.
kubectl delete -f provider.yaml
Procedure
Create a ConfigMap.
Save the AccessKey pair of your Alibaba Cloud account to environment variables.
export ACCESS_KEY_ID=LTAI********************
export ACCESS_KEY_SECRET=HAeS**************************
For more information about how to obtain an AccessKey ID and AccessKey secret, see Obtain an AccessKey pair.
Run the following script to create a ConfigMap.
Create a script named configmap-ccm.sh, copy the following template into the script, and replace the region value with your actual value. Then, run the script.
#!/bin/bash

## create ConfigMap kube-system/cloud-config for CCM.
accessKeyIDBase64=`echo -n "$ACCESS_KEY_ID" |base64 -w 0`
accessKeySecretBase64=`echo -n "$ACCESS_KEY_SECRET"|base64 -w 0`

cat <<EOF >cloud-config.yaml
apiVersion: v1
kind: ConfigMap
metadata:
  name: cloud-config
  namespace: kube-system
data:
  cloud-config.conf: |-
    {
        "Global": {
            "accessKeyID": "$accessKeyIDBase64",
            "accessKeySecret": "$accessKeySecretBase64",
            "region": "cn-hangzhou"
        }
    }
EOF

kubectl create -f cloud-config.yaml
bash configmap-ccm.shAfter the script is run, a ConfigMap named cloud-config is created in the Kube-system namespace.
Deploy the CCM.
Replace
${ImageVersion}and{$ClusterCIDR}, create a file named ccm.yaml, and then copy the following template into the file.You can obtain the value of
ImageVersionbased on the update records of the CCM. For more information, see Cloud Controller Manager.You can run the
kubectl cluster-info dump | grep -m1 cluster-cidrcommand to viewClusterCIDR.
apiVersion: rbac.authorization.k8s.io/v1
kind: ClusterRole
metadata:
  name: system:cloud-controller-manager
rules:
  - apiGroups:
      - coordination.k8s.io
    resources:
      - leases
    verbs:
      - get
      - list
      - update
      - create
  - apiGroups:
      - ""
    resources:
      - persistentvolumes
      - services
      - secrets
      - endpoints
      - serviceaccounts
    verbs:
      - get
      - list
      - watch
      - create
      - update
      - patch
  - apiGroups:
      - ""
    resources:
      - nodes
    verbs:
      - get
      - list
      - watch
      - delete
      - patch
      - update
  - apiGroups:
      - ""
    resources:
      - services/status
    verbs:
      - update
      - patch
  - apiGroups:
      - ""
    resources:
      - nodes/status
    verbs:
      - patch
      - update
  - apiGroups:
      - ""
    resources:
      - events
      - endpoints
    verbs:
      - create
      - patch
      - update
---
apiVersion: v1
kind: ServiceAccount
metadata:
  name: cloud-controller-manager
  namespace: kube-system
---
kind: ClusterRoleBinding
apiVersion: rbac.authorization.k8s.io/v1
metadata:
  name: system:cloud-controller-manager
roleRef:
  apiGroup: rbac.authorization.k8s.io
  kind: ClusterRole
  name: system:cloud-controller-manager
subjects:
  - kind: ServiceAccount
    name: cloud-controller-manager
    namespace: kube-system
---
kind: ClusterRoleBinding
apiVersion: rbac.authorization.k8s.io/v1
metadata:
  name: system:shared-informers
roleRef:
  apiGroup: rbac.authorization.k8s.io
  kind: ClusterRole
  name: system:cloud-controller-manager
subjects:
  - kind: ServiceAccount
    name: shared-informers
    namespace: kube-system
---
kind: ClusterRoleBinding
apiVersion: rbac.authorization.k8s.io/v1
metadata:
  name: system:cloud-node-controller
roleRef:
  apiGroup: rbac.authorization.k8s.io
  kind: ClusterRole
  name: system:cloud-controller-manager
subjects:
  - kind: ServiceAccount
    name: cloud-node-controller
    namespace: kube-system
---
kind: ClusterRoleBinding
apiVersion: rbac.authorization.k8s.io/v1
metadata:
  name: system:pvl-controller
roleRef:
  apiGroup: rbac.authorization.k8s.io
  kind: ClusterRole
  name: system:cloud-controller-manager
subjects:
  - kind: ServiceAccount
    name: pvl-controller
    namespace: kube-system
---
kind: ClusterRoleBinding
apiVersion: rbac.authorization.k8s.io/v1
metadata:
  name: system:route-controller
roleRef:
  apiGroup: rbac.authorization.k8s.io
  kind: ClusterRole
  name: system:cloud-controller-manager
subjects:
  - kind: ServiceAccount
    name: route-controller
    namespace: kube-system
---
apiVersion: apps/v1
kind: DaemonSet
metadata:
  labels:
    app: cloud-controller-manager
    tier: control-plane
  name: cloud-controller-manager
  namespace: kube-system
spec:
  selector:
    matchLabels:
      app: cloud-controller-manager
      tier: control-plane
  template:
    metadata:
      labels:
        app: cloud-controller-manager
        tier: control-plane
      annotations:
        scheduler.alpha.kubernetes.io/critical-pod: ''
    spec:
      serviceAccountName: cloud-controller-manager
      tolerations:
        - effect: NoSchedule
          operator: Exists
          key: node-role.kubernetes.io/master
        - effect: NoSchedule
          operator: Exists
          key: node.cloudprovider.kubernetes.io/uninitialized
      nodeSelector:
        node-role.kubernetes.io/master: ""
      containers:
        - command:
          -  /cloud-controller-manager
          - --leader-elect=true
          - --cloud-provider=alicloud
          - --use-service-account-credentials=true
          - --cloud-config=/etc/kubernetes/config/cloud-config.conf
          - --configure-cloud-routes=true
          - --route-reconciliation-period=3m
          - --leader-elect-resource-lock=endpoints
          # replace ${cluster-cidr} with your own cluster cidr
          # example: 172.16.0.0/16
          - --cluster-cidr=${ClusterCIDR}
          # replace ${ImageVersion} with the latest release version
          # example: v2.1.0
          image: registry.cn-hangzhou.aliyuncs.com/acs/cloud-controller-manager-amd64:${ImageVersion}
          livenessProbe:
            failureThreshold: 8
            httpGet:
              host: 127.0.0.1
              path: /healthz
              port: 10258
              scheme: HTTP
            initialDelaySeconds: 15
            timeoutSeconds: 15
          name: cloud-controller-manager
          resources:
            requests:
              cpu: 200m
          volumeMounts:
            - mountPath: /etc/kubernetes/
              name: k8s
            - mountPath: /etc/ssl/certs
              name: certs
            - mountPath: /etc/pki
              name: pki
            - mountPath: /etc/kubernetes/config
              name: cloud-config
      hostNetwork: true
      volumes:
        - hostPath:
            path: /etc/kubernetes
          name: k8s
        - hostPath:
            path: /etc/ssl/certs
          name: certs
        - hostPath:
            path: /etc/pki
          name: pki
        - configMap:
            defaultMode: 420
            items:
              - key: cloud-config.conf
                path: cloud-config.conf
            name: cloud-config
          name: cloud-config
Run the following command to deploy the CCM:
kubectl create -f ccm.yaml
Verify the result
Create a Service with Type=LoadBalancer and the endpoints of the Service.
Create a file named ccm-test.yaml and copy the following template into the file.
Replace the image address with the address of the region where the VNodes reside to prevent image download failures.
apiVersion: v1
kind: Service
metadata:
  name: nginx
  namespace: default
  annotations:
    service.beta.kubernetes.io/alibaba-cloud-loadbalancer-address-type: "intranet"
spec:
  ports:
  - port: 80
    protocol: TCP
    targetPort: 80
  selector:
    app: nginx
  type: LoadBalancer
---
apiVersion: apps/v1
kind: Deployment
metadata:
  name: test-nginx
spec:
  replicas: 2
  selector:
    matchLabels:
      app: nginx
  template:
    metadata:
      labels:
        app: nginx
    spec:
      containers:
      - name: nginx
        image: registry-vpc.cn-beijing.aliyuncs.com/eci_open/nginx:1.14.2
Run the following command to create a Service and Deployment:
kubectl create -f ccm-test.yamlAfter the Service and Deployment are created, the CCM automatically creates a CLB instance for the Service and configures listeners and backend vServer groups for the CLB instance.
Check whether the Service works as expected.
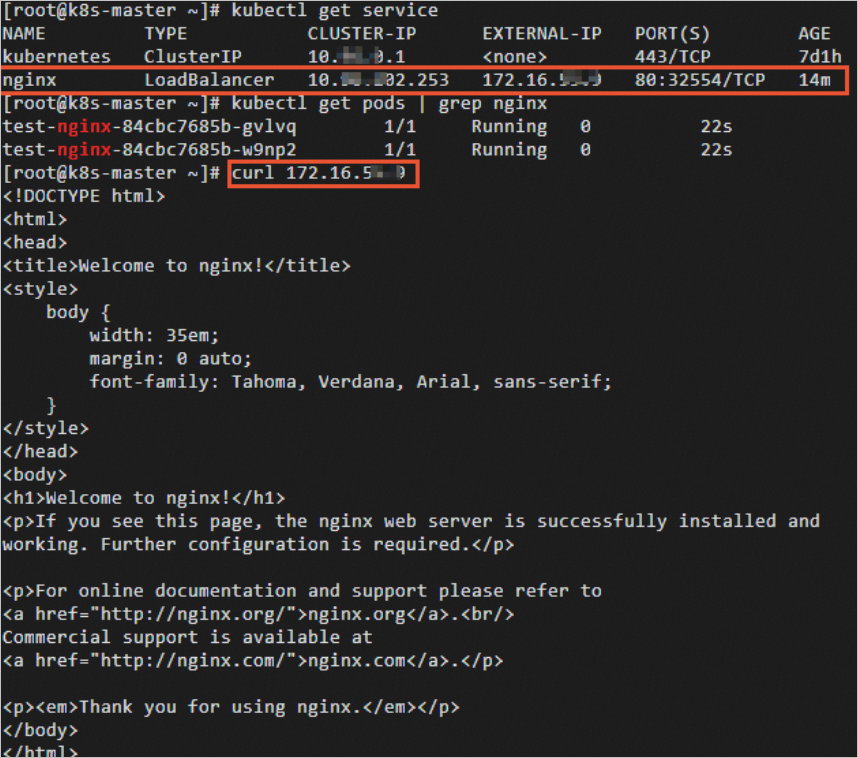
Run the curl command to access the address of the Service. The backend NGINX service can be accessed over the address of the Service, as shown in the following figure.
For more information about how to use a Service, visit CCM usage.