This topic describes how to create and manage Windows instances in the Elastic Compute Service (ECS) console. In this topic, Internet Information Services (IIS) is configured for an ecs.g6.large instance that runs a Windows Server 2016 operating system.
Prerequisites
Create an account and complete the account information.
Create an Alibaba Cloud account. For more information, see Create an account.
Complete account verification before you can purchase ECS instances in the Chinese mainland. For more information, see FAQ about real-name registration on the Alibaba Cloud international site (alibabacloud.com).
(Optional) Alibaba Cloud provides default virtual private clouds (VPCs). If you do not want to use the default VPC in the region where you want to create an ECS instance, create a VPC and a vSwitch.
For more information, see Create a VPC with an IPv4 CIDR block.
(Optional) Alibaba Cloud provides default security groups. If you do not want to use the default security group in the region where you want to create an ECS instance, create a security group.
For more information, see Create a security group.
Step 1. Create an ECS instance
In the ECS console, go to the Custom Launch tab of the instance buy page.
On the Custom Launch tab, configure the parameters.
The following table describes only some of the parameters. For parameters that are not described in this topic, use the default values.
Section
Parameter
Example
Description
Basic configurations
Billing Method
Pay-as-you-go
The pay-as-you-go billing method allows more flexible operations. For more information, see Billing overview.
Region
China (Hangzhou)
After the instance is created, you cannot directly change the region. Proceed with caution.
Network and Zone
Network Type: VPC
VPC: [Default]vpc-bp1opxu1zkhn00g****
Zone and vSwitch: Select a zone and a vSwitch based on your business requirements.
Select an existing VPC based on your business requirements. VPCs whose names contain the [Default] prefix are automatically created in the ECS console. After the instance is created, you cannot directly change the zone. Proceed with caution.
Instances & Images
Instance
Instance Family: General-purpose Type g6
Instance Type: ecs.g6.large
Available instance types are determined by the region that you select and the resource inventory in the region.
You can go to the Instance Types Available for Each Region page to view the instance types available in each region.
Image
Type: Public Image
Version: Windows Server 2016 Datacenter 64-bit
After the instance is started, the operating system and application data of the image are copied to the system disk.
Bandwidths & Security Groups
Public IP Address
Select Assign Public IPv4 Address.
If you select Assign Public IPv4 Address, the system assigns a public IPv4 address to the instance.
Bandwidth Billing Method
Pay-by-traffic
If you select Pay-by-traffic, you are charged based on the amount of traffic that is transmitted over the Internet. For more information, see Public bandwidth.
Bandwidth
5 Mbit/s
None.
Security Group
[Default]sg-bp1bhjjsoiyx44hd****
Select an existing security group based on your business requirements. Security groups whose names contain the [Default] prefix are automatically created in the ECS console.
Management
Logon Credential
Custom Password
In this topic, Custom Password is selected. You must specify a password for connecting to and logging on to the instance.
Logon Username
administrator
For Windows instances, the default logon username is administrator. By default, when you use the administrator account to log on to the instance, you have the administrative permissions and can create other accounts on the instance.
WarningTo prevent data loss caused by accidental operations, exercise caution when you use the administrator account to perform operations, such as resizing disks, managing spanned volumes or the registry, and installing system updates.
To prevent the usage of the instance from being affected, we recommend that you do not rename, delete, or disable the administrator account.
Logon Password
Ecs123456
If you set Logon Credential to Custom Password, you must configure the Logon Password and Confirm Password parameters. When you connect to the instance, you must use the
administratorusername and the password that you specify in this section.Tag
ECS:Documentation
If you create multiple instances, we recommend that you add tags to facilitate management.
Read and select ECS Terms of Service and Product Terms of Service. Then, click Create Order.
In the Success message, click Console to go to the instance list and view the instance creation progress.
If the instance is in the Running state, the instance is created. Copy the public IP address of the instance for use to connect to the instance.
Step 2: Add security group rules
If you did not add rules to the default security group or if you added the instance to a new security group when you created the instance, perform the following steps:
Click the instance ID to go to the Instance Details page.
Click the Security Groups tab and then click the ID of a security group to go to the security group details page.
In the Access Rule section, click the Inbound tab.
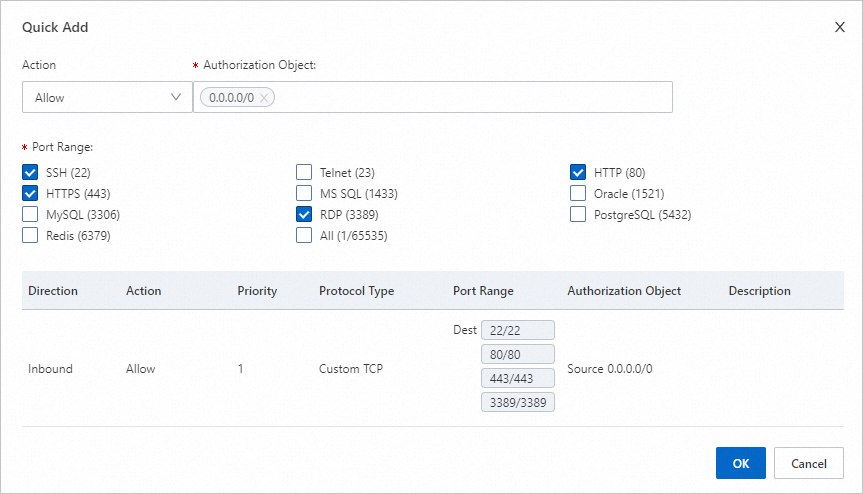
Click Quick Add to add security group rules as described in the following table. For parameters that are not described in this topic, use the default values.

Action
Port range
Authorization object
Allow
SSH 22
RDP 3389
HTTP 80
HTTPS 443
0.0.0.0/0
NoteIn the Port Range section, select the ports that must be open for the applications that run on the instance. For example, select HTTP (80) that is used in Step 4: Configure IIS.
0.0.0.0/0 indicates all CIDR blocks. If you know the IP address of the requester, we recommend that you set Authorization Object to a specific IP address range that contains the IP address.
Click OK.
Step 3: Connect to the ECS instance
Go back to the instance list and find the instance to which you want to connect. In this topic, the EcsQuickStart instance is used. In the Actions column, click Connect.
In the Remote connection dialog box, click Sign in now in the Workbench section.
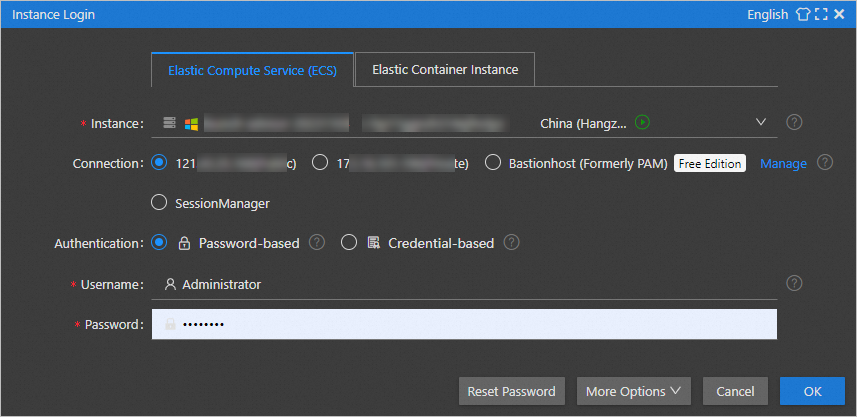
In the Instance Login dialog box, configure the parameters and click OK.
Username: Enter administrator.
Password: Enter the password that you specified when you configured Logon Password in the Logon Credential section during ECS instance creation.

If an error occurs, check whether port 3389 is open. If the port is not open, perform the operations that are described in Step 2: Add security group rules to make port 3389 open.
Step 4: Configure IIS
On the ECS instance, start Command Prompt.
Enter powershell to switch to PowerShell.
Install IIS and the management tools.
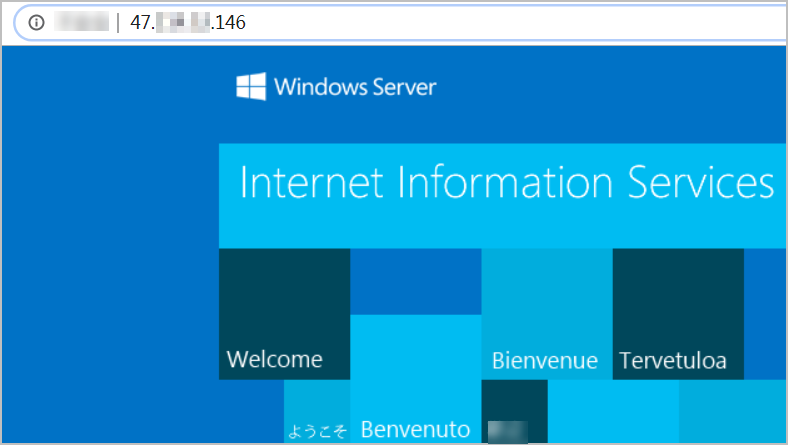
Install-WindowsFeature -name Web-Server -IncludeAllSubFeature -IncludeManagementToolsAfter IIS is installed, open a web page in the current browser, enter the public IP address of the instance in the address bar, and then press the Enter key.
http://<Public IP address of the instance>
Step 5: (Optional) Resolve a domain name
Direct access to IIS by using the public IP address of the instance may compromise server security. If you already have a domain name or if you want to register a domain name, perform the following steps:
Register a domain name.
For more information, see Register a domain name on Alibaba Cloud.
Apply for an Internet Content Provider (ICP) filing for the domain name.
If the website to which the domain name points is hosted on an ECS instance in a region inside the Chinese mainland, you must apply for an ICP filing for the domain name.
Resolve the domain name to point to the public IP address of the instance.
Domain name resolution is a prerequisite for using domain names to access your website. For more information, see Get started with Alibaba Cloud DNS.
Use the resolved domain name to access IIS. Example: https://ecs-quickstarts.info.
Step 6: (Optional) Release the ECS instance
You can release the instance if you no longer need it. After the instance is released, billing for the instance stops, and data of the instance is lost and cannot be restored.
The operations in this section apply only to pay-as-you-go instances.
Go back to the instance list and find the instance that you want to release. In this topic, the EcsQuickStart instance is used.
In the Actions column, choose .
In the Release dialog box, set Release Mode to Release Now and click Next.
Confirm the instance that you want to release and select I am aware of the instances and their associated resources to be released and understand the data risks. Click OK.
Step 7: View bills
In the top navigation bar of the ECS console, choose .
In the left-side navigation pane, choose . Then, click the Billing Details tab.
Set Instance Name to EcsQuickStart and click Search.
References
For information about the ECS instance families that are available for purchase, see Overview of instance families.
For information about the methods for creating ECS instances, see Creation methods.
For information about the concepts related to images, see Image overview.
For information about the concepts related to security groups, see Overview.
For information about the concepts related to VPCs, see What is a VPC?
For information about the common operations of ECS, see Quick reference.
For information about the API operations that are provided by ECS, see List of operations by function.
 > Instance Status > Release