This topic describes how to install the xdragon_hardware_detect_plugin monitoring plug-in. The methods in this topic apply to Elastic Compute Service (ECS) bare metal instances that are equipped with local disks.
Prerequisites
You can install the monitoring plug-in on an ECS bare metal instance only when the instance meets the following requirements:
The instance is located in the China (Beijing), China (Shanghai), China (Hangzhou), China (Shenzhen), or China (Zhangjiakou) region.
The instance runs a Linux operating system.
To install the monitoring plug-in on multiple instances at a time by using CloudOps Orchestration Service (OOS) and use a tag to select ECS bare metal instances, the tag must be bound to the instances. For more information, see Create or add a tag.
Cloud Assistant Agent is installed on the instance. For more information, see Install Cloud Assistant Agent.
NoteBy default, Cloud Assistant Agent is pre-installed on ECS instances that are created from public images on and after December 01, 2017.
Background information
If you are using an ECS bare metal instance that is equipped with a local disk, you must monitor and diagnose the health status of the local disk by using the xdragon_hardware_detect_plugin plug-in.
The xdragon_hardware_detect_plugin plug-in can check the health status of local disks on ECS bare metal instances on a regular basis. If an exception occurs to a local disk, the plug-in automatically reports the exception as a system event of the local disk. The corresponding system event code is SystemMaintenance.ReInitErrorDisk. For more information, see O&M scenarios and system events for instances equipped with local disks.
Install the monitoring plug-in on multiple instances at a time by using OOS
OOS can automatically install the xdragon_hardware_detect_plugin monitoring plug-in by using a public template.
Log on to the OOS console.
In the top navigation bar, select the region and resource group to which the resource belongs.

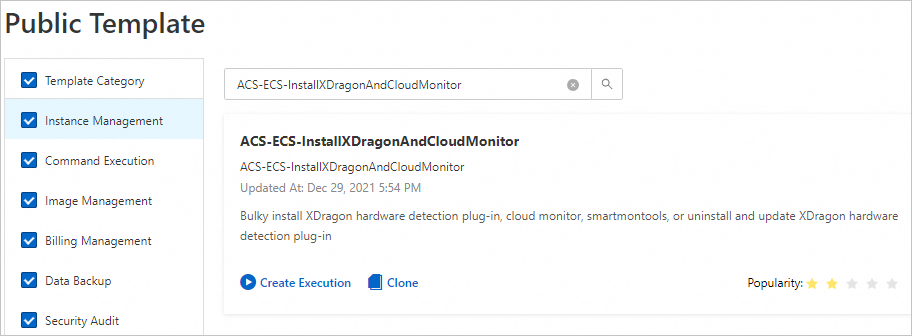
In the left-side navigation pane, choose . On the Public Template page, enter ACS-ECS-InstallXDragonAndCloudMonitor to search for the template that is used to install the monitoring plug-in, and click Create Execution.
On the Create Task page, configure the following settings:
In the Basic Information step, set Execution Mode to Automatic, retain the default values for other parameters, and then click Next Step: Parameter Settings.
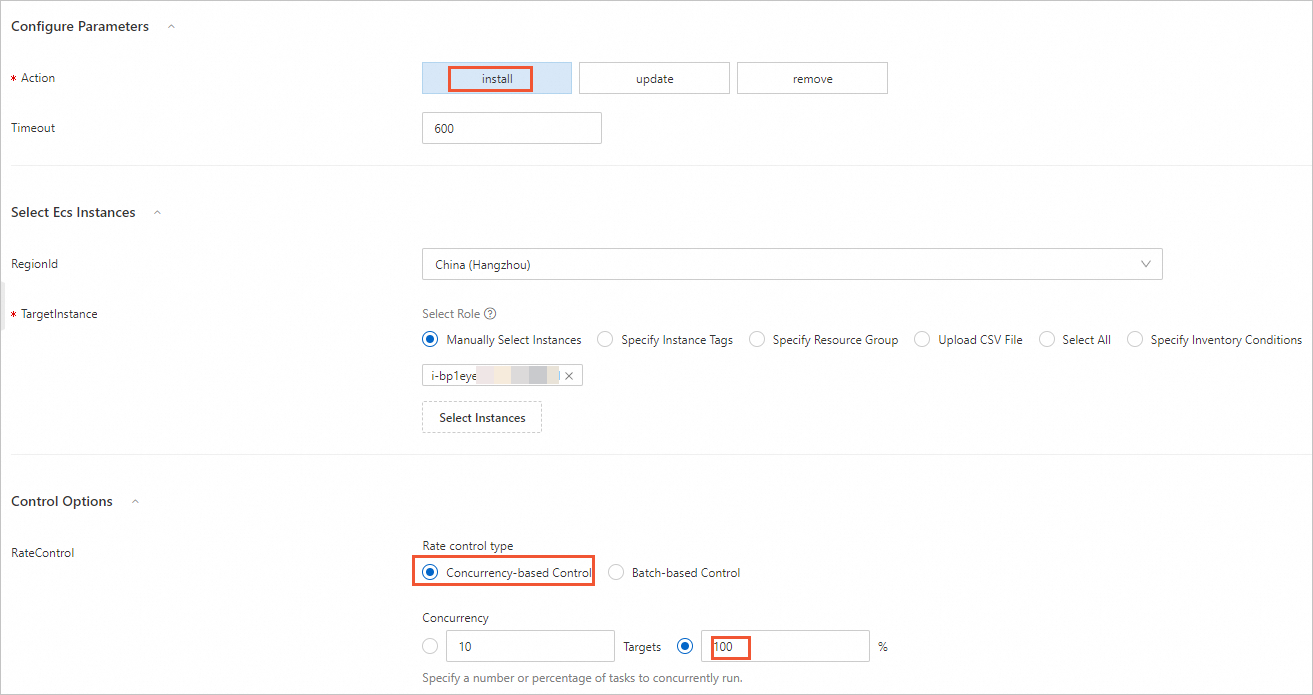
In the Parameter Settings step, configure the following parameters, retain the default values for other parameters, and then click Next Step: OK.
Action: Select install to install the plug-in.
NoteYou can use this template to install, update, or uninstall the monitoring plug-in. Configure the Action parameter based on your business requirements.
TargetInstance: Select one or more ECS bare metal instances on which you want to install the monitoring plug-in.
RateControl: Select a rate control type and configure related parameters. In this example, select Concurrency-based Control, select % for Concurrency, and then set Concurrency to 100%.
Confirm the task settings and click Create.
After the task is created, you can view the execution results on the Task Execution Management page.
If Success is displayed in the Execution Status column corresponding to the O&M task, the O&M task is completed.
If Failed is displayed in the Execution Status column corresponding to the O&M task, you can click Details in the Actions column. Click Log in the Output section. Then, you can analyze and adjust the execution content based on the log information.
Manually install the monitoring plug-in
You can perform the following operations to download and install the xdragon_hardware_detect_plugin monitoring plug-in by using the aliyun_installer tool provided by Cloud Assistant Agent:
Connect to an ECS bare metal instance as a root user.
(Optional) Run the
aliyun_installer -hcommand to view the help information of the tool.Run the following aliyun_installer command to install the xdragon_hardware_detect_plugin monitoring plug-in:
aliyun_installer -i xdragon_hardware_detect_plugin -e 1.0.0Save and run the shell script that is used to install the special version of the CloudMonitor agent. For information about the shell script, see the sample script in the following section.
bash <nameOfTheScript>.shNoteBefore you install the CloudMonitor agent, you must install the xdragon_hardware_detect_plugin monitoring plug-in. If you install the CloudMonitor agent before you install the monitoring plug-in, run the
/usr/local/cloudmonitor/CmsGoAgent.linux-amd64 restartcommand to restart the CloudMonitor agent.Run the
smartctl -Vcommand to check whether the local disk monitoring and analysis tool smartctl is installed on the instance.If the version number of the smartctl tool is displayed in the command output, the tool is installed on the instance.
(Optional) If the version number of the smartctl tool is not displayed in the command output, install the tool by running one of the following commands.
For CentOS:
yum install smartmontoolsFor Ubuntu:
apt update && apt install smartmontoolsFor information about the installation methods for other Linux distributions, visit smartmontools document.
Sample shell script for manually installing the special version of the CloudMonitor agent:
#!/bin/bash
echo "installing cms agent"

if [ -z "${CMS_HOME}" ]; then
  CMS_HOME="/usr/local/cloudmonitor"
  [[ ! -z "`egrep -i coreos /etc/os-release`" ]] && CMS_HOME="/opt/cloudmonitor"
fi

if [ `uname -m` = "x86_64" ]; then
    ARCH="amd64"
else
    ARCH="386"
fi

VERSION="2.1.57"
ELF_NAME=CmsGoAgent.linux-${ARCH}
DOWNLOAD_PATH="cms-go-agent/${VERSION}/${ELF_NAME}"
DEST_UPDATE_FILE="$CMS_HOME/${ELF_NAME}"

current_cms_version="0"
# xdragon always x86 arch, judge version
if [ -f /usr/local/cloudmonitor/CmsGoAgent.linux-amd64 ]; then
    current_cms_version="$($DEST_UPDATE_FILE version)"
fi

if [ $current_cms_version = "2.1.57" ]; then
    echo "CmsGoAgent already installed"
    echo "Installation success."
    exit 0
fi

if [ -z "${REGION_ID}" ]; then
  REGION_ID="$(wget -q --timeout=1 -t 1 -O - 'http://100.100.100.200/latest/meta-data/region-id')"
fi


if [ -d $CMS_HOME ] ; then
  if [ -f $CMS_HOME/wrapper/bin/cloudmonitor.sh ] ; then
    $CMS_HOME/wrapper/bin/cloudmonitor.sh remove;
    rm -rf $CMS_HOME;
  elif [ -f $DEST_UPDATE_FILE ]; then
    $DEST_UPDATE_FILE stop
    #$DEST_UPDATE_FILE uninstall
    ps aux | grep -v grep | grep $ELF_NAME
  fi
fi

download()
{
  if [ -z "${REGION_ID}" ]; then
    echo "networkType is classic"
    OSS_URL="http://cms-agent-cn-hangzhou.oss-cn-hangzhou-internal.aliyuncs.com/$DOWNLOAD_PATH"
  else
    echo "networkType is vpc, REGION_ID: $REGION_ID"
    if [[ "$REGION_ID" = "cn-shenzhen-finance-1" ]]; then
      OSS_URL="http://cms-download.aliyun.com/$DOWNLOAD_PATH"
      CMS_PROXY="szcmsproxy.aliyun.com:3128"
    elif [[ "$REGION_ID" = "cn-shanghai-finance-1" ]]; then
      OSS_URL="http://cms-agent-$REGION_ID.oss-$REGION_ID-pub-internal.aliyuncs.com/$DOWNLOAD_PATH"
    elif [[ "$REGION_ID" = "ap-south-1" ]]; then
      OSS_URL="http://cms-download.aliyun.com/$DOWNLOAD_PATH"
      CMS_PROXY="cmsproxy-ap-south-1.aliyuncs.com:8080"
    elif [ "$REGION_ID" = "ap-southeast-3" -o "$REGION_ID" = "me-east-1" -o "$REGION_ID" = "cn-chengdu" ]; then
      OSS_URL="http://cms-download.aliyun.com/$DOWNLOAD_PATH"
    else
      OSS_URL="http://cms-agent-$REGION_ID.oss-$REGION_ID-internal.aliyuncs.com/$DOWNLOAD_PATH"
    fi
  fi
  echo download from "$OSS_URL"
  wget -q -e "http_proxy=$CMS_PROXY" "$OSS_URL" -O "$DEST_UPDATE_FILE" -t 3 --connect-timeout=2
  if [ $? != 0 ]; then
    echo "download fail, retry..."
    CMS_PROXY="vpc-opencmsproxy.aliyun.com:8080";
    OSS_URL="http://cms-download.aliyun.com/$DOWNLOAD_PATH"
    wget -q -e "http_proxy=$CMS_PROXY" "$OSS_URL" -O "$DEST_UPDATE_FILE" -t 3 --connect-timeout=2
  fi
  if [ $? != 0 ]; then
    echo "download fail, retry..."
    CMS_PROXY="opencmsproxy.aliyun.com:8080";
    OSS_URL="http://cms-download.aliyun.com/$DOWNLOAD_PATH"
    wget -q -e "http_proxy=$CMS_PROXY" "$OSS_URL" -O "$DEST_UPDATE_FILE" -t 3 --connect-timeout=2
  fi
}

mkdir -p $CMS_HOME && \
chown -R root:root $CMS_HOME && \
download && \
chmod a+x $DEST_UPDATE_FILE
$DEST_UPDATE_FILE check
RC=$?
if [ ${RC} -ne 0 ]; then
    echo CmsGoAgent install failed, your platform is not supported
    exit ${RC}
fi

$DEST_UPDATE_FILE install >/dev/null 2>&1 || true
$DEST_UPDATE_FILE start
ps aux | grep -v grep | grep $ELF_NAME

ACT_VERSION=`$DEST_UPDATE_FILE version`
if [ -n "$ACT_VERSION" ]; then
    echo CmsGoAgent v$ACT_VERSION installed
else
    echo CmsGoAgent install failed
    exit 1
fi
Results
After the xdragon_hardware_detect_plugin monitoring plug-in is installed, you can view it in the /usr/local/xdragon_hwqc directory. You can run the aliyun_installer -d xdragon_hardware_detect_plugin command to update the plug-in. You can run the aliyun_installer -u xdragon_hardware_detect_plugin command to uninstall the plug-in.
What to do next
You can call an ECS API operation to isolate a damaged local disk on a physical machine that hosts an ECS bare metal instance. After the local disk is isolated, the instance remains on the physical machine. For more information, see O&M scenarios and system events for instances equipped with local disks.