GitLab is a Git-based code hosting and collaboration platform that provides a full range of DevOps capabilities from code management to continuous integration and continuous deployment (CI/CD). This topic describes how to deploy GitLab on a Linux Elastic Compute Service (ECS) instance to build a code hosting platform.
Quick deployment
Click here to go to Terraform Explorer, where you can view and run Terraform code to automatically deploy a GitLab code hosting platform on an ECS instance.
Prerequisites
An ECS instance is created and meets the following requirements:
Operating system: The ECS instance runs a Linux operating system. For information about the supported operating systems, see Supported operating systems.
-
A public IP address is automatically assigned to the ECS instance. Alternatively, an elastic IP address (EIP) is associated with the ECS instance. For instructions on how to enable public bandwidth, see Enable public bandwidth.
-
An inbound rule is added to a security group of the ECS instance to open ports 80, 443, and 22. For information about how to add a security group rule, see Add a security group rule. For information about ports, see Common ports.
The instance type of the ECS instance is suitable for the size of your team and the expected workload. We recommend that you use an instance type that has at least 4 vCPUs and 8 GiB of memory. For more information, see GitLab installation requirements and Running GitLab in a memory-constrained environment.
ImportantIf you use an instance type that has less than 4 vCPUs and 8 GiB of memory, the installation process may remain in the Installing state for an extended period of time or even fail. Upgrade the instance type before you install GitLab. For information about how to upgrade the instance type, see Configuration change overview.
Install GitLab
GitLab editions include Enterprise Edition, Community Edition, and JiHu Edition. JiHu GitLab is an enterprise-level GitLab edition released in the Chinese mainland, Hong Kong (China), and Macao (China). All JiHu GitLab servers are located in China.
Method 1: Use an installation package
The commands used to install GitLab and the supported operating systems vary based on the GitLab edition. The following section describes how to install GitLab Community Edition and JiHu GitLab.
If an ECS instance runs Alibaba Cloud Linux 3, you can use an installation package to install only JiHu GitLab on the instance. To install GitLab Community Edition in Alibaba Cloud Linux 3, use a Docker image.
CentOS 7.x
Connect to the ECS instance on which you want to install GitLab.
For more information, see Connect to Linux.
Add the GitLab package repository.
curl -sS https://packages.gitlab.com/install/repositories/gitlab/gitlab-ce/script.rpm.sh | sudo bashInstall the dependencies that are required by GitLab.
sudo yum install -y curl python3-policycoreutils openssh-serverInstall GitLab Community Edition.
sudo EXTERNAL_URL=<Public IP address of the GitLab server> sudo yum install -y gitlab-ceIn the preceding command, replace
<Public IP address of the GitLab server>with the public IP address of the ECS instance on which you want to install GitLab.ImportantIf you use an instance type that has less than 4 vCPUs and 8 GiB of memory, the installation process may remain in the Installing state for an extended period of time or even fail. Upgrade the instance type before you install GitLab. For information about how to upgrade the instance type, see Configuration change overview.
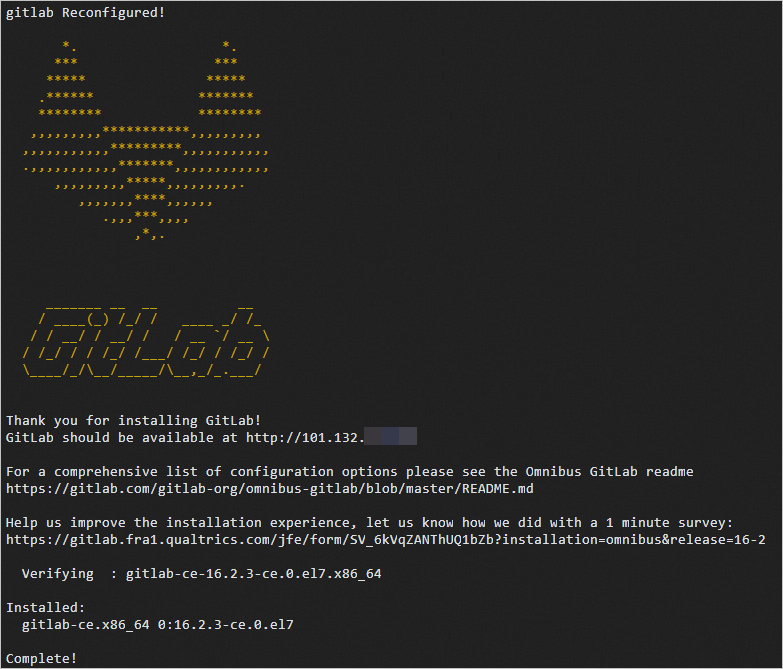
The following command output indicates that GitLab is installed.
Ubuntu
Connect to the ECS instance on which you want to install GitLab.
For more information, see Connect to Linux.
Install the dependencies that are required by GitLab.
sudo apt-get update
sudo apt-get install -y curl openssh-server ca-certificates tzdata perl
Add the GitLab package repository.
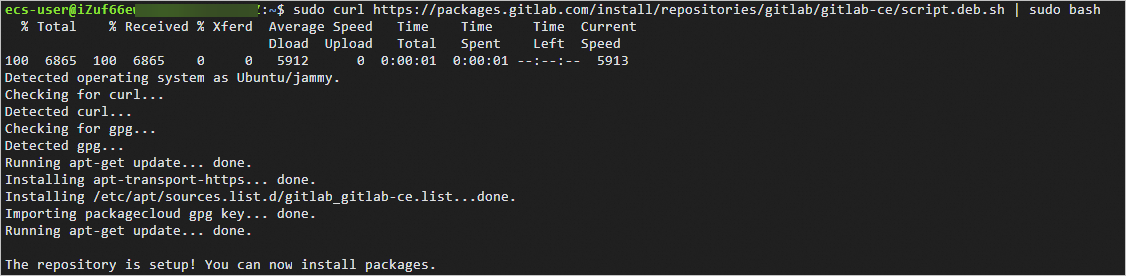
sudo curl https://packages.gitlab.com/install/repositories/gitlab/gitlab-ce/script.deb.sh | sudo bashNote
The GitLab package repository may fail to be added due to network issues. If this issue occurs, we recommend that you re-add the GitLab package repository.
The following command output indicates that the GitLab package repository is added.
Refresh the software package list.
sudo apt-get updateInstall GitLab.
sudo EXTERNAL_URL=<Public IP address of the GitLab server> apt-get install -y gitlab-ceIn the preceding command, replace
<Public IP address of the GitLab server>with the public IP address of the ECS instance on which you want to install GitLab.Important
If you use an instance type that has less than 4 vCPUs and 8 GiB of memory, the installation process may remain in the Installing state for an extended period of time or even fail. Upgrade the instance type before you install GitLab. For information about how to upgrade the instance type, see Configuration change overview.
The following command output indicates that GitLab is installed.

For information about the operating systems supported by JiHu GitLab, see Supported operating systems.
Alibaba Cloud Linux 3 or CentOS 7.x
Connect to the ECS instance on which you want to install GitLab.
For more information, see Connect to Linux.
Install the dependencies that are required by GitLab.
sudo yum install -y curl python3-policycoreutils openssh-serverAdd the GitLab package repository.
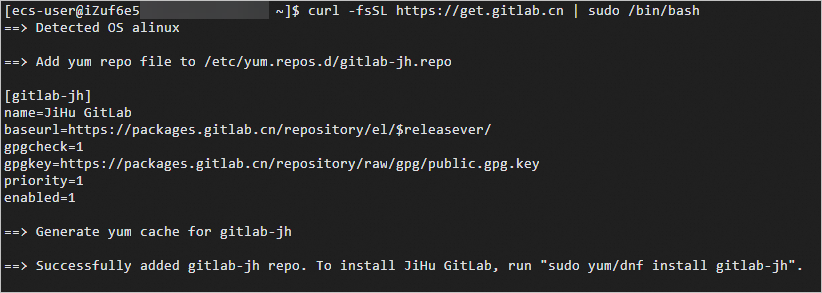
curl -fsSL https://get.gitlab.cn | sudo /bin/bashNoteThe GitLab package repository may fail to be added due to network issues. If this issue occurs, we recommend that you re-add the GitLab package repository.
The following command output indicates that the GitLab package repository is added.
Install GitLab.
sudo EXTERNAL_URL=<Public IP address of the GitLab server> yum install -y gitlab-jhIn the preceding command, replace
<Public IP address of the GitLab server>with the public IP address of the ECS instance on which you want to install GitLab.ImportantIf you use an instance type that has less than 4 vCPUs and 8 GiB of memory, the installation process may remain in the Installing state for an extended period of time or even fail. Upgrade the instance type before you install GitLab. For information about how to upgrade the instance type, see Configuration change overview.
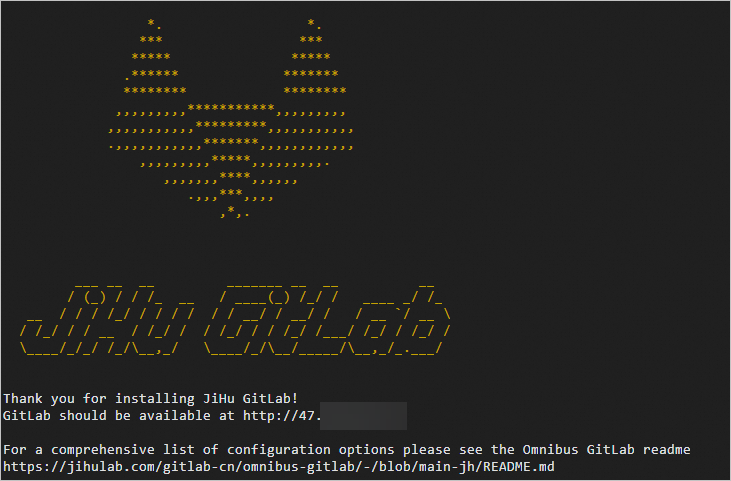
The following command output indicates that GitLab is installed.
Ubuntu
Connect to the ECS instance on which you want to install GitLab.
For more information, see Connect to Linux.
Install the dependencies that are required by GitLab.
sudo apt-get update
sudo apt-get install -y curl openssh-server ca-certificates tzdata perl
Add the package repository used to install JiHu GitLab.
curl -L get.gitlab.cn | bash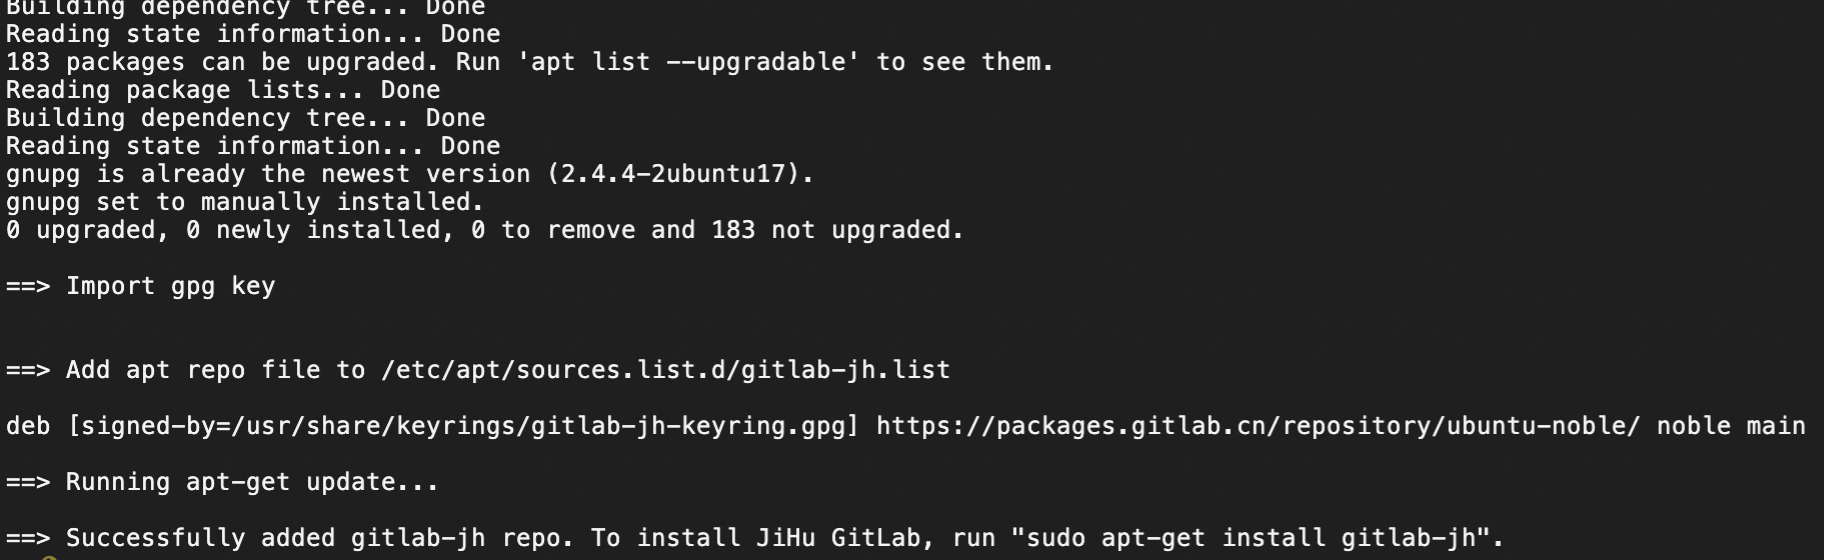
Install GitLab.
sudo EXTERNAL_URL=<Public IP address of the GitLab server> apt-get install -y gitlab-jhIn the preceding command, replace
<Public IP address of the GitLab server>with the public IP address of the ECS instance on which you want to install GitLab. Sample command:sudo EXTERNAL_URL=101.132.XX.XX apt-get install -y gitlab-jhImportantIf you use an instance type that has less than 4 vCPUs and 8 GiB of memory, the installation process may remain in the Installing state for an extended period of time or even fail. Upgrade the instance type before you install GitLab. For information about how to upgrade the instance type, see Configuration change overview.
The following command output indicates that GitLab is installed.
Method 2: Use a Docker image
Connect to the ECS instance on which you want to install GitLab.
For more information, see Connect to Linux.
Install Docker. For more information, see Install and use Docker and Docker Compose.
Create a directory to store GitLab data, including GitLab configurations, logs, and data files.
sudo mkdir -p /srv/gitlabConfigure the
$GITLAB_HOMEenvironment variable.export GITLAB_HOME=/srv/gitlabInstall the GitLab container image.
GitLab Community Edition
sudo docker run --detach \
  --hostname gitlab.example.com \
  --publish 443:443 --publish 80:80 --publish 2222:22 \
  --name gitlab \
  --restart always \
  --volume $GITLAB_HOME/config:/etc/gitlab \
  --volume $GITLAB_HOME/logs:/var/log/gitlab \
  --volume $GITLAB_HOME/data:/var/opt/gitlab \
  --shm-size 256m \
  gitlab/gitlab-ce:latest
Container parameter
Host parameter description
hostname
The hostname. We recommend that you specify the public IP address of the ECS instance for this parameter.
publish 443:443
Maps port 443 of the host to port 443 of the container to allow HTTPS access. If an error message appears indicating that the host port is already used, replace port 443 of the host with a non-standard port, such as port 8443 in
publish 8443:443.NoteIf you replace port 443 of the host with a non-standard port, such as port 8443, you must add an inbound rule to a security group of the ECS instance to open the non-standard port. For more information, see Add a security group rule.
publish 80:80
Maps port 80 of the host to port 80 of the container to allow HTTP access. If an error message appears indicating that the host port is already used, replace port 80 of the host with a non-standard port, such as port 8080 in
publish 8080:80.NoteIf you replace port 80 of the host with a non-standard port, such as port 8080, you must add an inbound rule to a security group of the ECS instance to open the non-standard port. For more information, see Add a security group rule.
publish 2222:22
Maps port 2222 of the host to port 22 of the container to allow SSH. When you perform Git operations to clone, push, and pull code, you must use SSH.
NoteThe default port of SSH on an ECS instance is port 22.
After you replace the default SSH port with a non-standard port, such as port 2222, you must add an inbound rule to a security group of the ECS instance to open the non-standard port and change the SSH port number in the gitlab.rb file.
The following table describes the path mappings between the ECS instance and the container.
ECS instance path
Container path
Description
$GITLAB_HOME/data/var/opt/gitlabStore application data.
$GITLAB_HOME/logs/var/log/gitlabStore GitLab log files.
$GITLAB_HOME/config/etc/gitlabStore GitLab configuration files.
JiHu GitLab
sudo docker run --detach \
  --hostname gitlab.example.com \
  --publish 443:443 --publish 80:80 --publish 2222:22 \
  --name gitlab \
  --restart always \
  --volume $GITLAB_HOME/config:/etc/gitlab \
  --volume $GITLAB_HOME/logs:/var/log/gitlab \
  --volume $GITLAB_HOME/data:/var/opt/gitlab \
  --shm-size 256m \
  registry.gitlab.cn/omnibus/gitlab-jh:latest
Container parameter
Host parameter description
hostname
The hostname. We recommend that you specify the public IP address of the ECS instance for this parameter.
publish 443:443
Maps port 443 of the host to port 443 of the container to allow HTTPS access. If an error message appears indicating that the host port is already used, replace port 443 of the host with a non-standard port, such as port 8443 in
publish 8443:443.NoteIf you replace port 443 of the host with a non-standard port, such as port 8443, you must add an inbound rule to a security group of the ECS instance to open the non-standard port. For more information, see Add a security group rule.
publish 80:80
Maps port 80 of the host to port 80 of the container to allow HTTP access. If an error message appears indicating that the host port is already used, replace port 80 of the host with a non-standard port, such as port 8080 in
publish 8080:80.NoteIf you replace port 80 of the host with a non-standard port, such as port 8080, you must add an inbound rule to a security group of the ECS instance to open the non-standard port. For more information, see Add a security group rule.
publish 2222:22
Maps port 2222 of the host to port 22 of the container to allow SSH. When you perform Git operations to clone, push, and pull code, you must use SSH.
NoteThe default port of SSH on an ECS instance is port 22.
After you replace the default SSH port with a non-standard port, such as port 2222, you must add an inbound rule to a security group of the ECS instance to open the non-standard port and change the SSH port number in the gitlab.rb file.
The following table describes the path mappings between the ECS instance and the container.
ECS instance path
Container path
Description
$GITLAB_HOME/data/var/opt/gitlabStore application data.
$GITLAB_HOME/logs/var/log/gitlabStore GitLab log files.
$GITLAB_HOME/config/etc/gitlabStore GitLab configuration files.
View the status of the container.
sudo docker ps -aIf the container is in the healthy state, the GitLab container is started.

Go to the GitLab website
Enter the URL of the GitLab website in the address bar of a web browser. URL:
http://${Public IP address of the ECS instance}.ImportantIf you use a Docker image to install JitLab and replace the default HTTP port 80 of the host with a non-standard port, add the non-standard port number to the end of the URL.
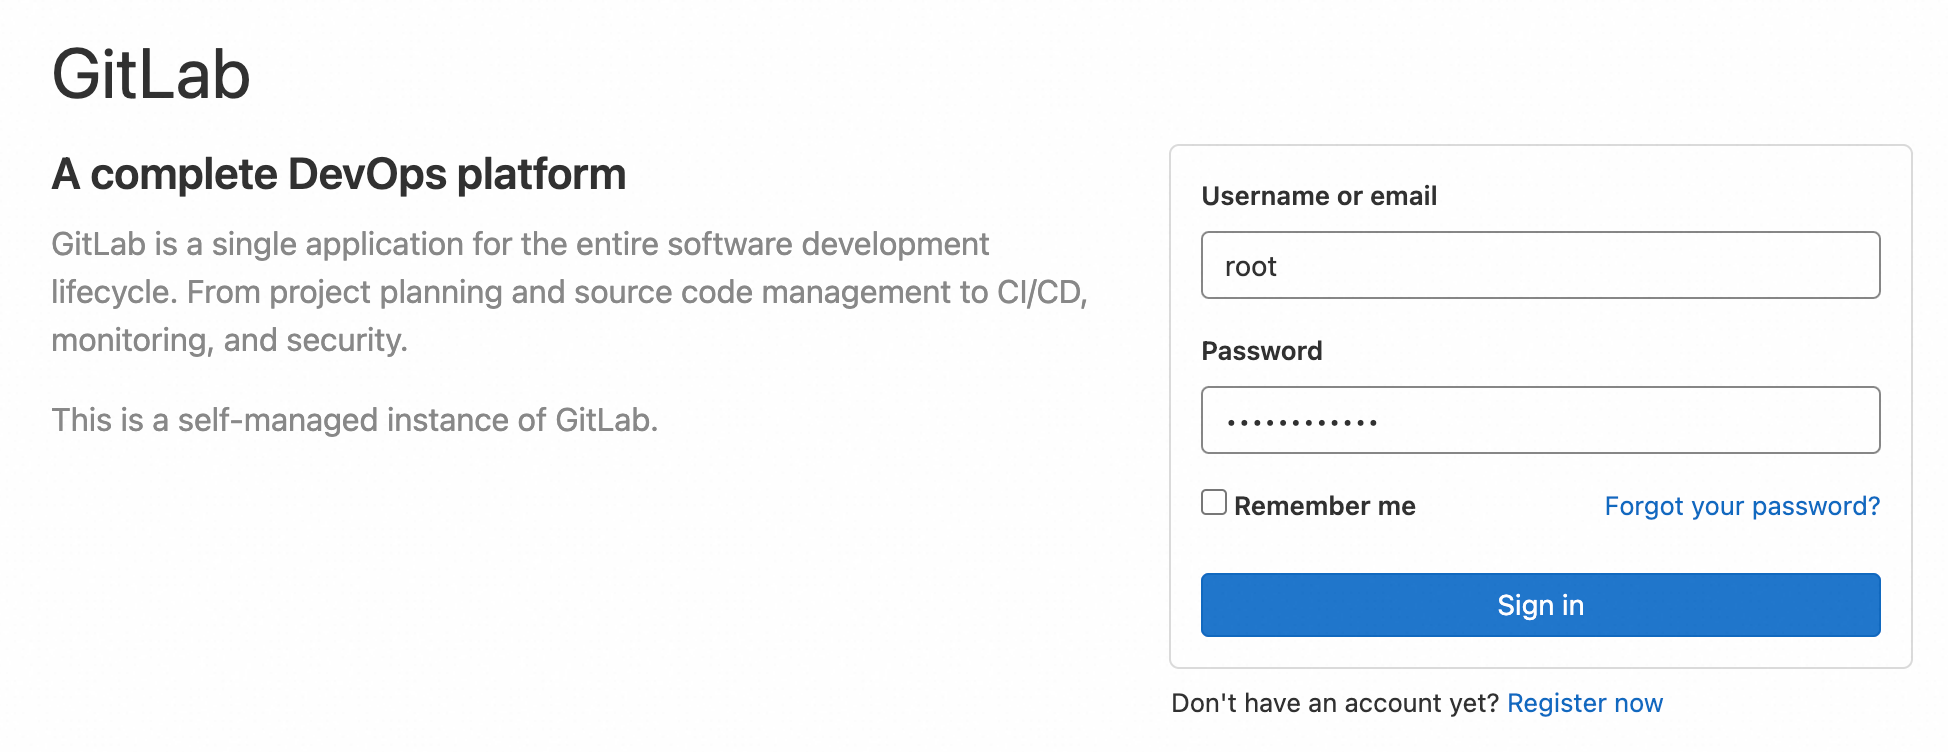
The first time you log on to the GitLab website, enter
rootas the username. To obtain the password of the GitLab website, run one of the following commands on the ECS instance based on the installation method of GitLab:If you install GitLab by using a Linux installation package, run the
sudo cat /etc/gitlab/initial_root_passwordcommand.If you install GitLab by using a Docker image, run the
sudo docker exec -it gitlab grep 'Password:' /etc/gitlab/initial_root_passwordcommand.
The following command output is returned. Obtain the initial password of the GitLab website from the value of the
Passwordparameter. Important
For security purposes, the file that records the initial password will be automatically deleted in 24 hours. The first time you log on to the GitLab website, we recommend that you change the initial password. For information about how to change the password, see Reset user passwords.
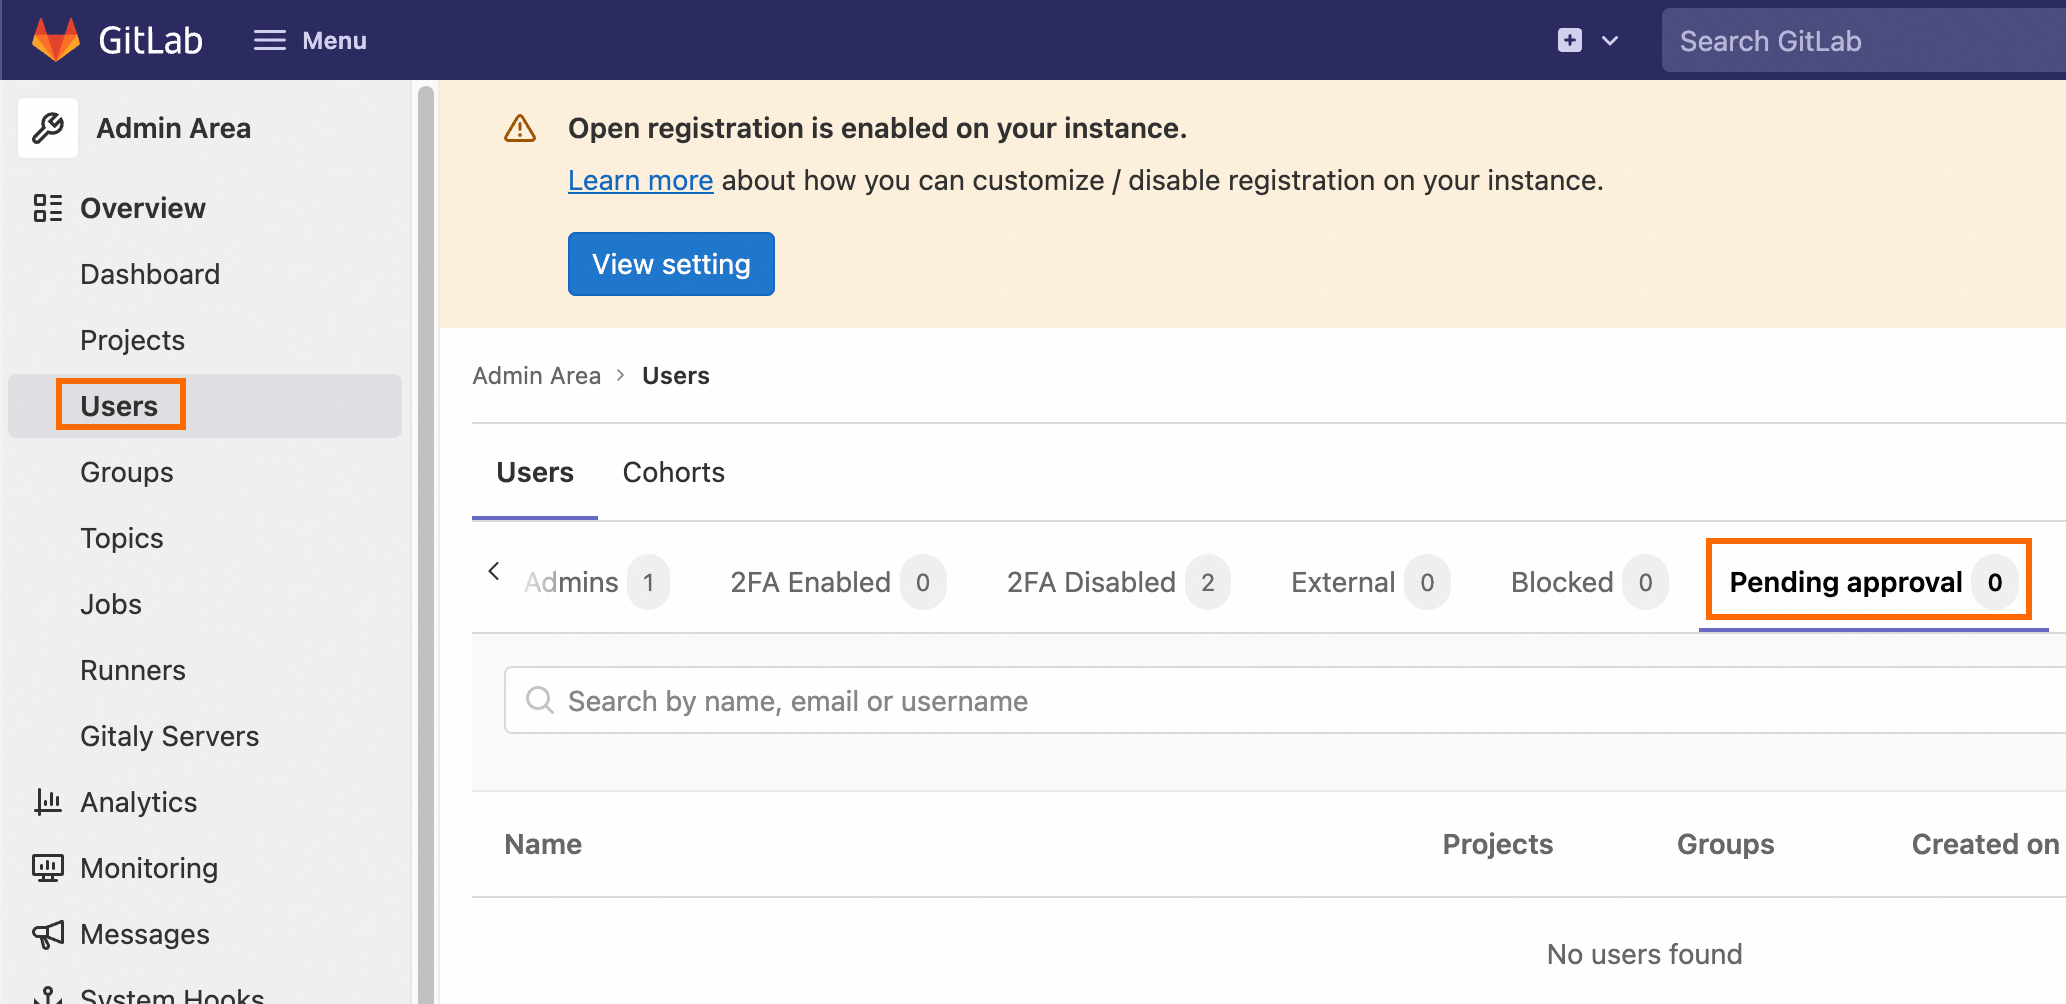
Go to the Admin page.
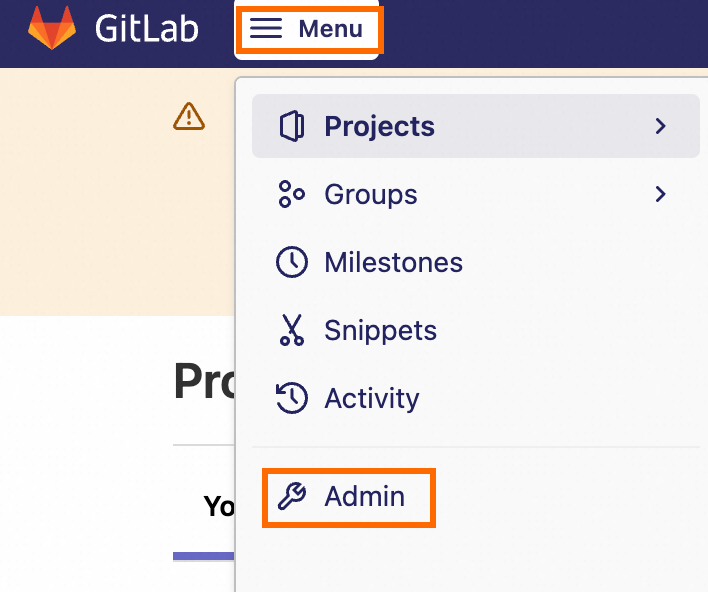
On the Users > Pending approval page, approve the applications for new users. For information about other operations, such as managing projects and users, see GitLab Admin area.
The following example describes how to upload a file to the repository of a GitLab project. For more information about GitLab operations, such as common GitLab commands, data backup, configuration options, user management, integration with other services, and troubleshooting, see JiHu GitLab and GitLab Community Edition.
Register a user and configure password-free logon
Go to the GitLab website. Click Register now below Sign in to create a user. After the application is approved by the GitLab administrator, log on to the GitLab website as the new user.
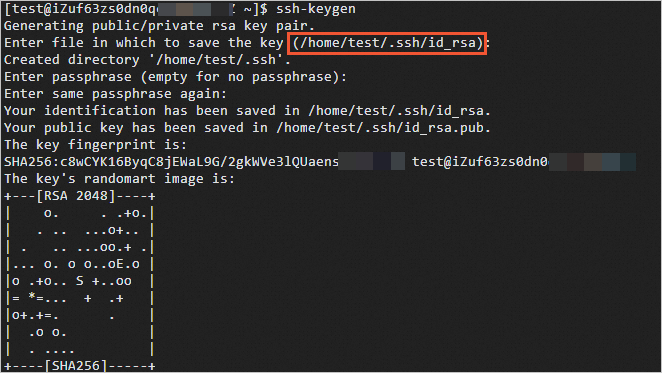
Generate a key pair file on your on-premises device.
ssh-keygenWhen the key pair file is being generated, you are prompted to specify a password and the path in which you want to store the key pair file. You can specify a path or press the Enter key to use the default path
.ssh/id_rsain the current user directory. Example:/home/test/.ssh/id_rsa.The following command output is returned.
View the content of the
id_rsa.pubpublic key file. Copy the content for subsequent use.cat ~/.ssh/id_rsa.pubThe following command output is returned:
ssh-rsa AAAAB3NzaC1yc2EAAAADAQABAAABAQDQVwWjF3KXmI549jDI0fuCgl+syJjjn55iMUDRRiCd/B+9TwUda3l9WXH5i7RU53QGRCsDVFZxixLOlmXr9E3VSqkf8xXBnHs/5E2z5PIOCN0nxfB9xeA1db/QxPwK4gkHisep+eNHRn9x+DpCYDoSoYQN0nBg+H3uqfOqL42mJ+tqSfkyqbhjBf1kjtDTlBfVCWtI0siu7owm+c65+8KNyPlj5/0AyJ4Aqk1OX2jv+YE4nTipucn7rHwWuowasPU86l+uBsLNwOSb+H7loJvQyhEINX2FS1KnpRU+ld20t07n+N3ErfX5xBAGfxXpoN9BKKSP+RT7rvTeXTVE**** test@iZuf63zs0dn0qccsisy****Add an SSH key. Add the obtained public key to your GitLab account for password-free authentication.
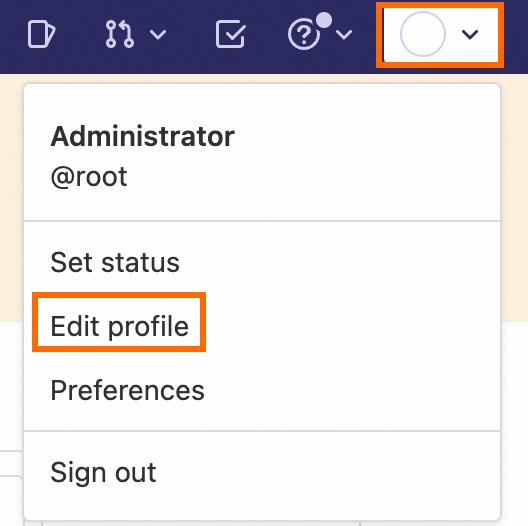
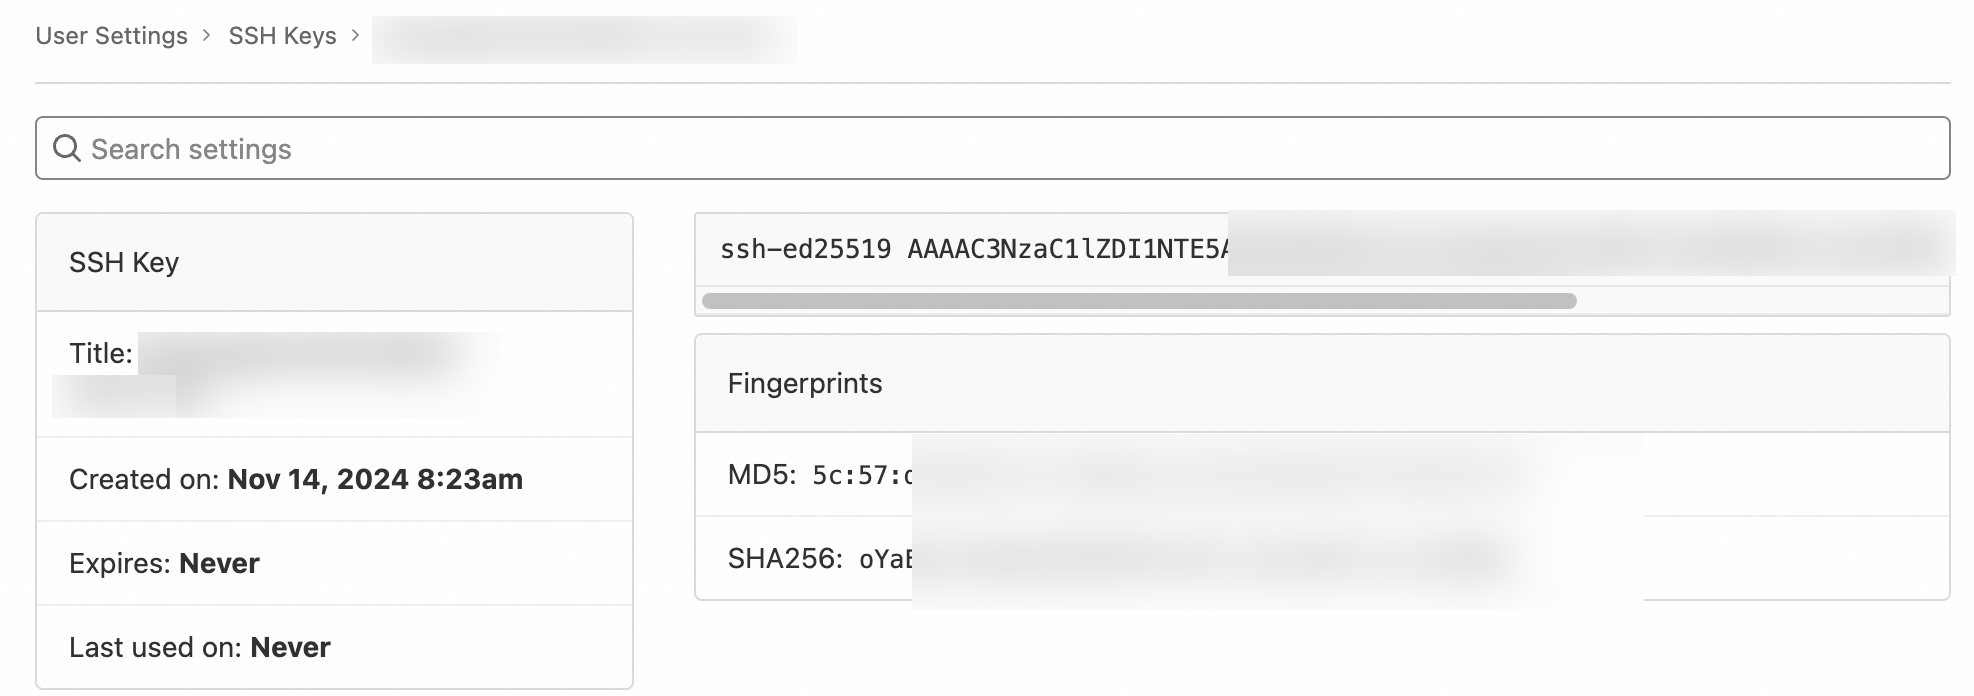
Click the profile picture in the upper-right corner of the page and click Edit profile.
In the left-side navigation pane, click SSH Keys. Paste the content of the
id_rsa.pubpublic key file to theKeyfield and then click Add key.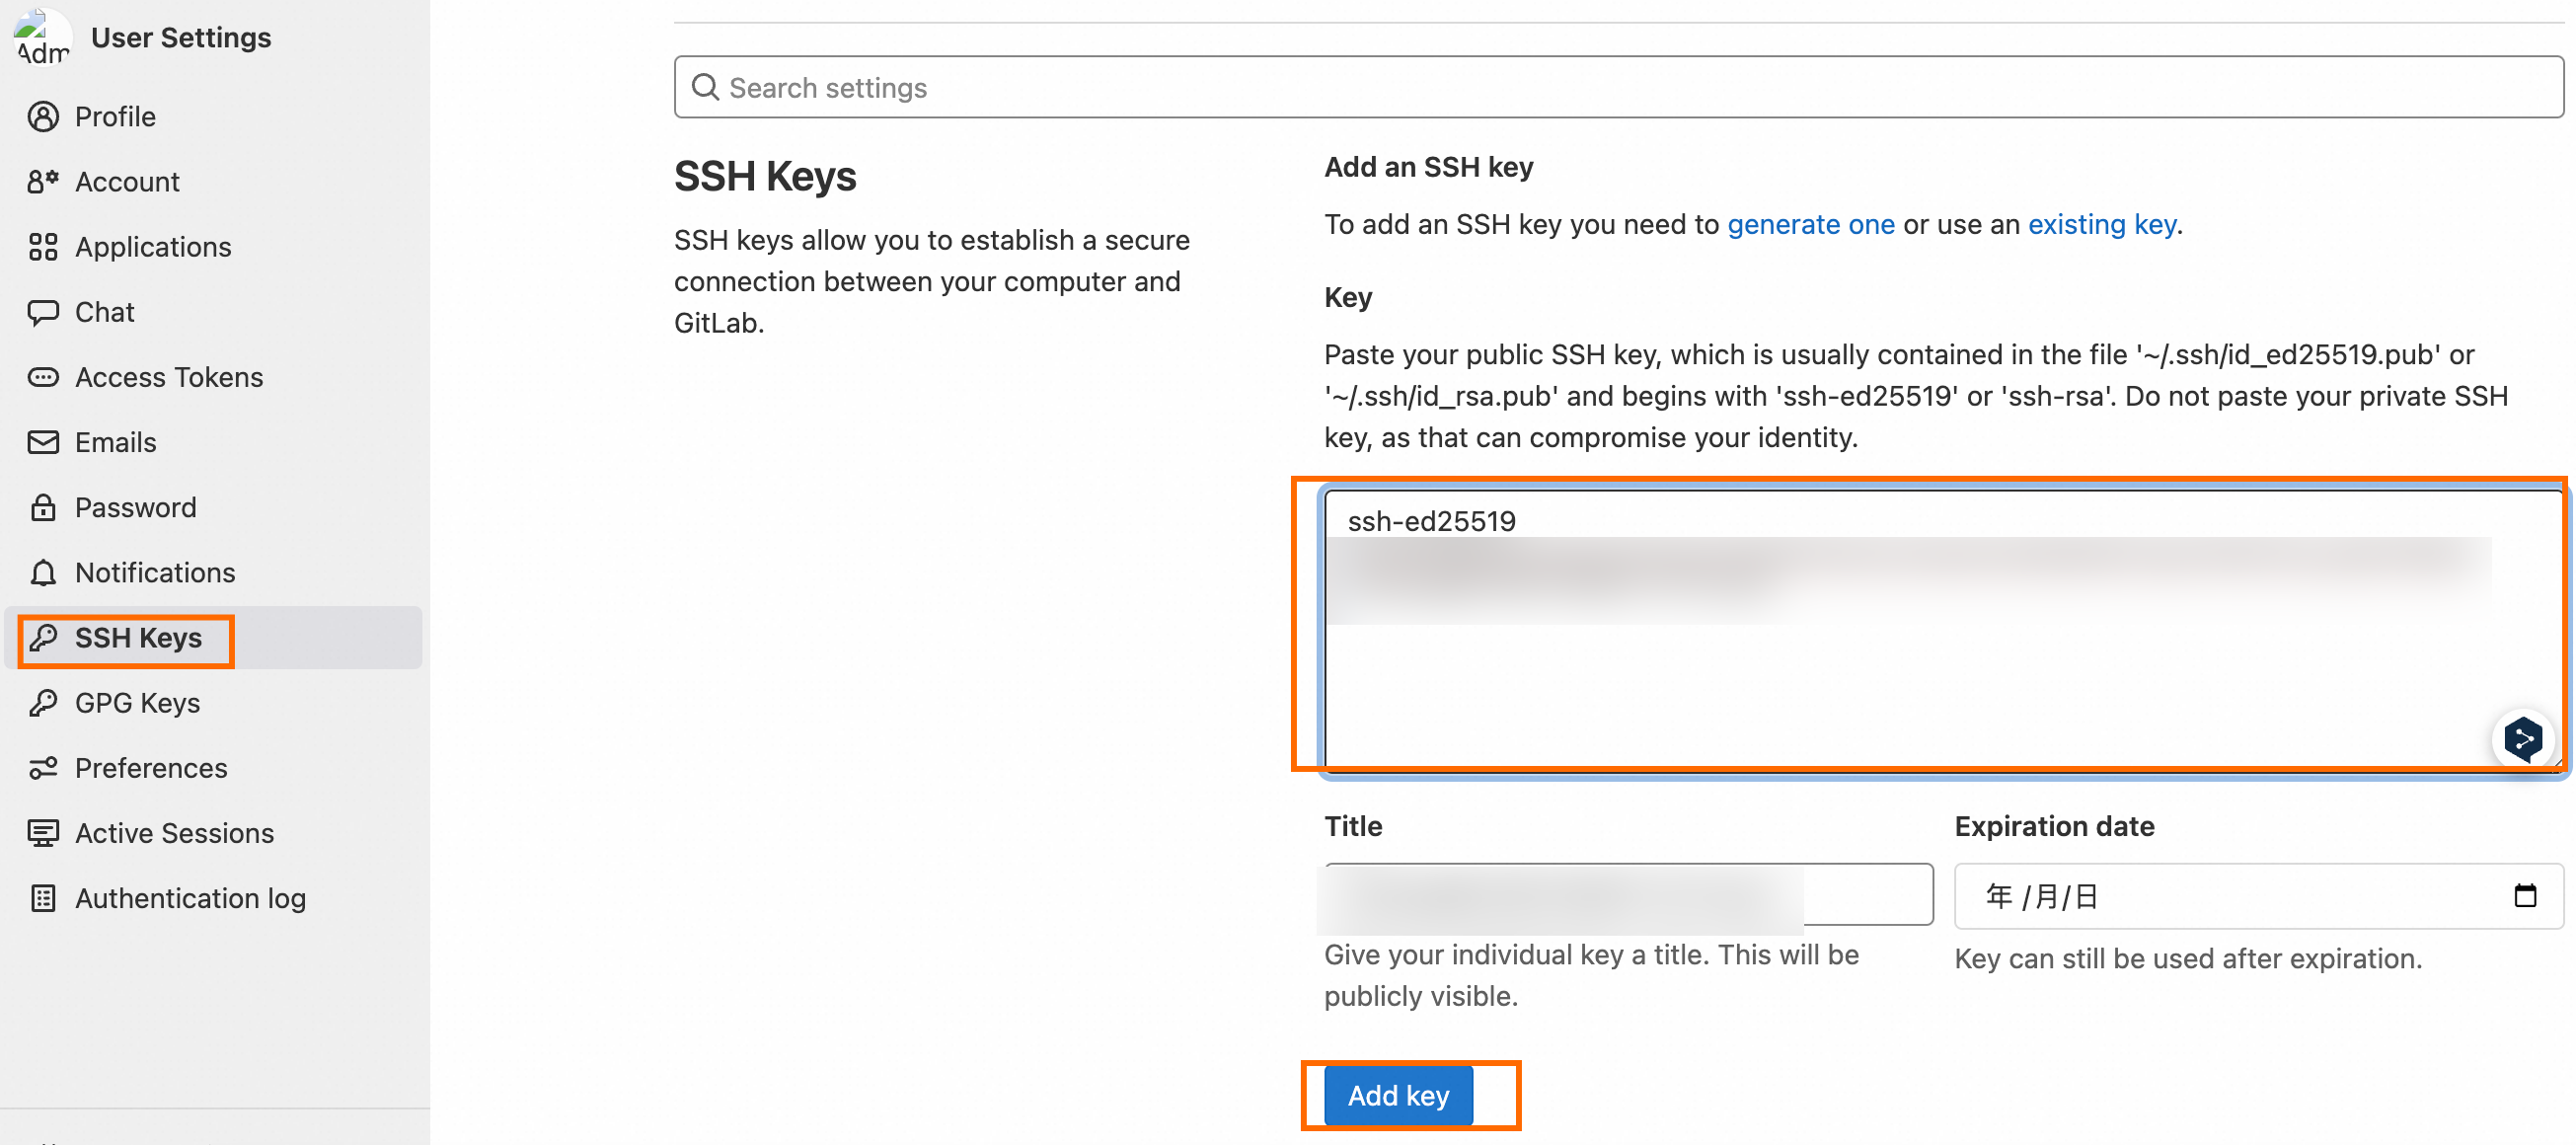
The following page shows that the SSH key is added.
Create a project and configure code hosting
Create a project
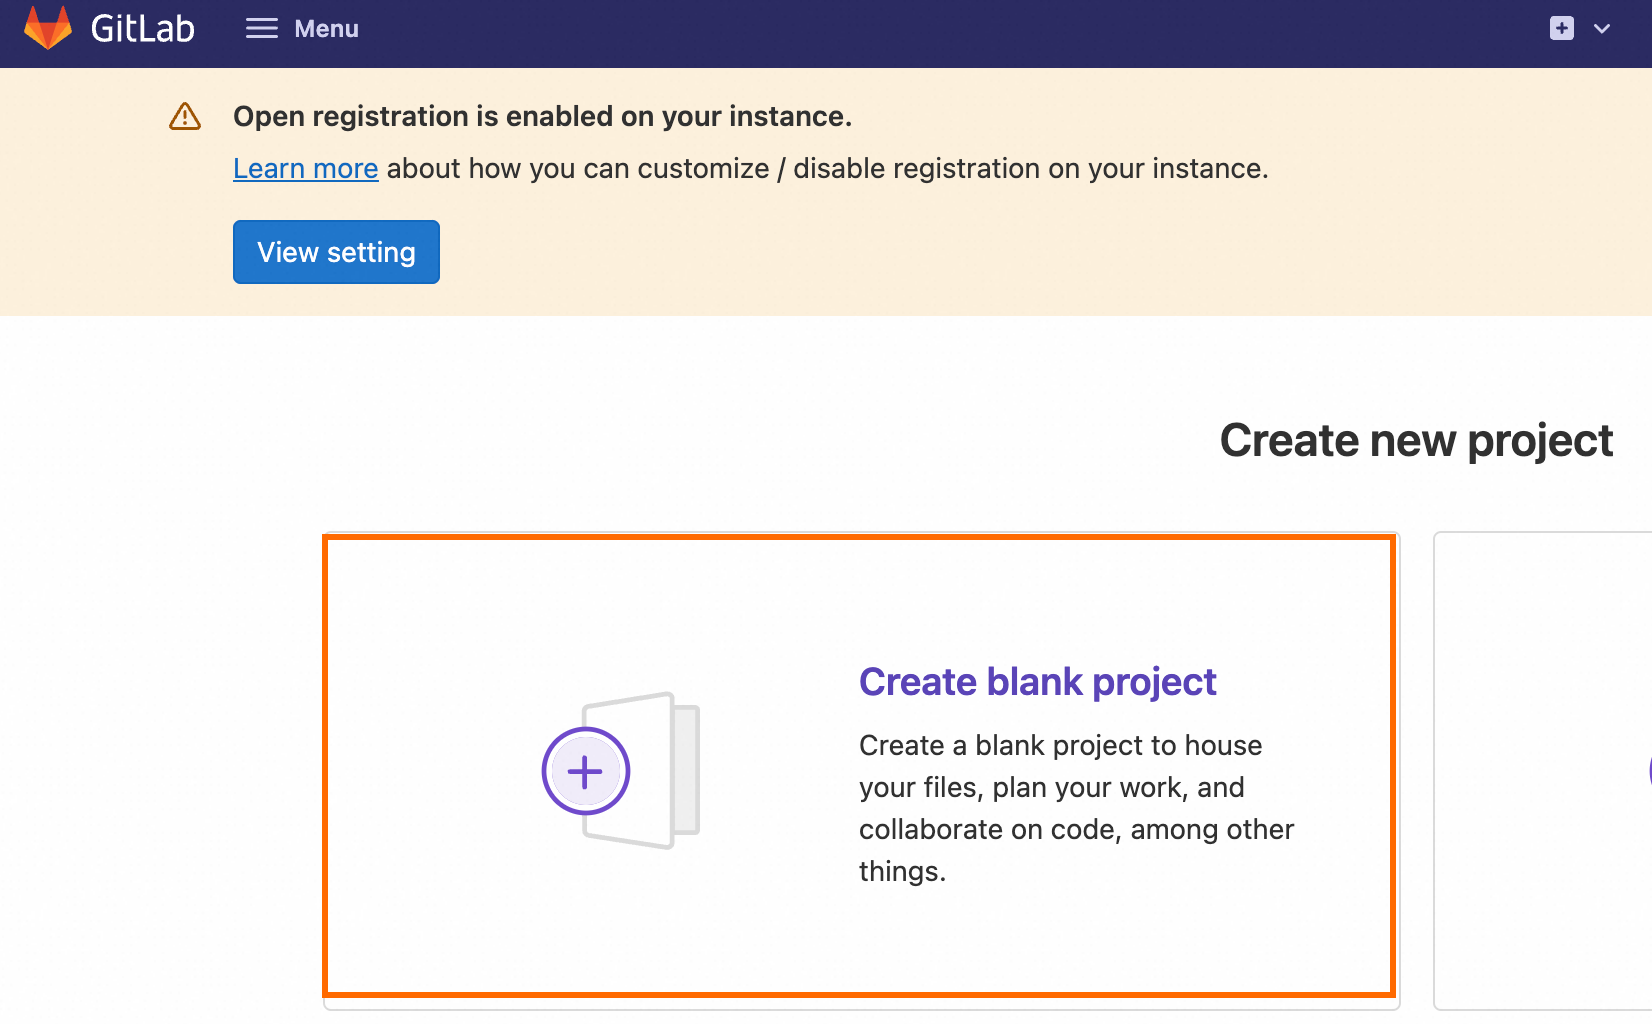
On the GitLab homepage, click New Project on the right side and then click Create blank project.
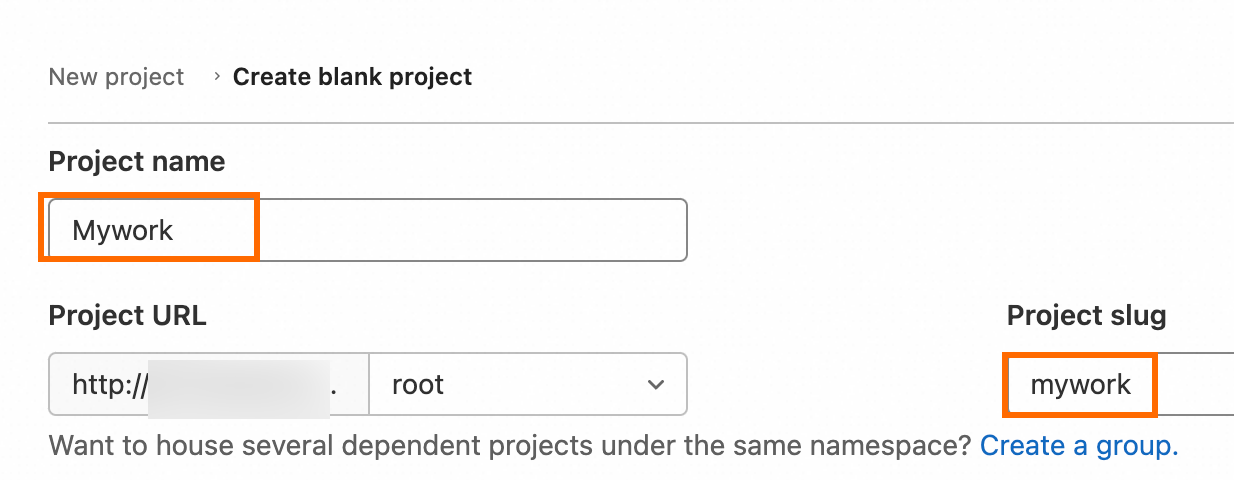
Click Create blank project, configure the Project name and Project URL parameters, and then click Create project in the lower part of the page. In this example, a project named mywork is created.
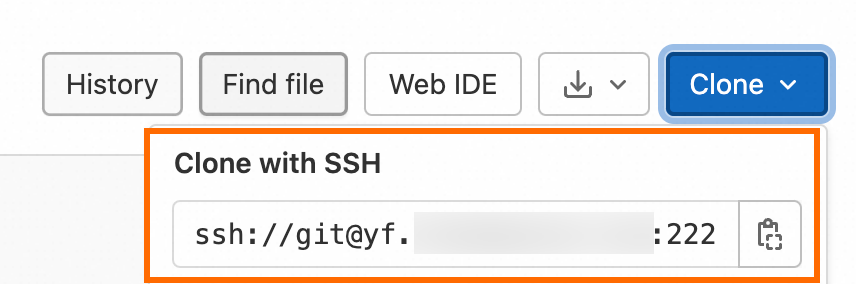
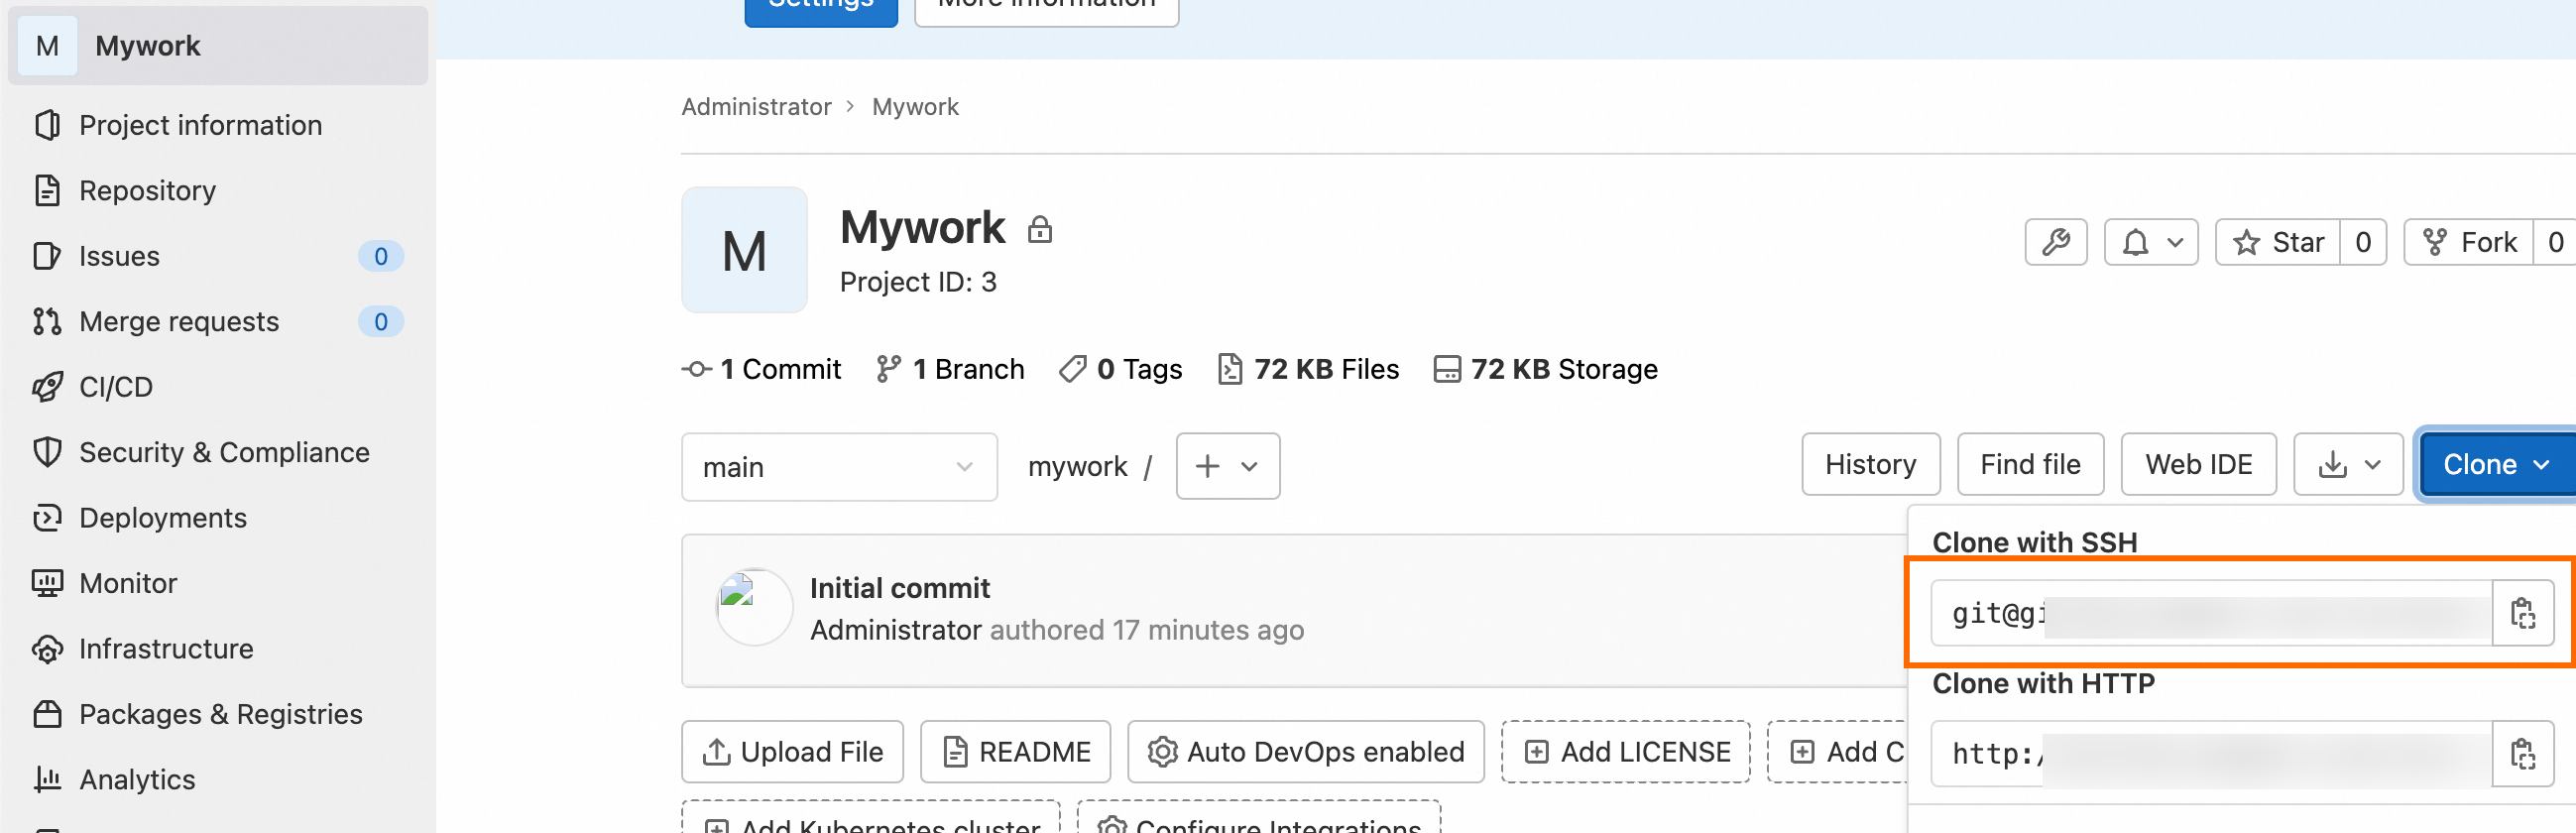
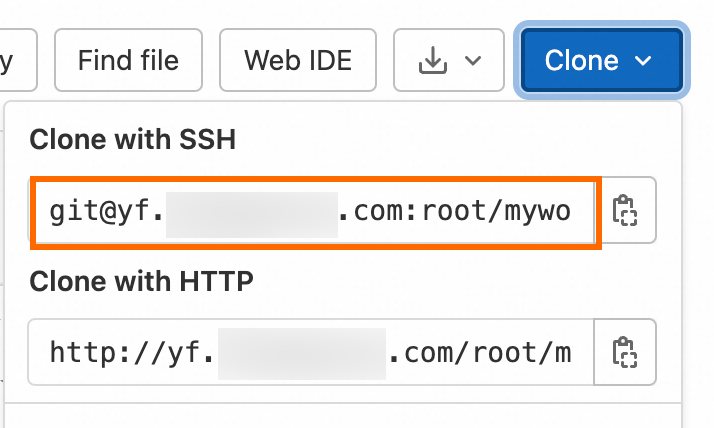
Go to the project page and copy the SSH clone URL in the Clone with SSH field. This URL is required when you perform clone operations.
Clone the project repository on the ECS instance to your on-premises device
Install the Git client on your on-premises device.
sudo yum install gitConfigure a Git user on your on-premises device.
Specify a username for the Git user.
git config --global user.name "testname"Specify an email address for the Git user.
git config --global user.email "abc@example.com"
Clone the project to an on-premises directory.
Enter
git cloneand paste the SSH clone URL to the git clone command. Git automatically creates a folder with the same name as the project repository and downloads files from the project repository to the folder.git clone ${SSH clone URL}If you use a Docker image to install GitLab, the SSH clone URL must contain
ssh://and the SSH port of the host specified in the docker run command, as shown in the following sample code.ImportantIf the SSH clone URL that you obtained on the project page is not in the preceding format and you do not want to directly modify the URL, you can modify the
gitlab_rails['gitlab_shell_ssh_port']parameter. This way, you can obtain the URL in the correct format on the project page. For information about how to modify the parameter, see the What do I do if port 22 is already used when I use Docker to start GitLab? section of this topic.git clone ssh://git@{IP domain name}:{SSH port}/root/mywork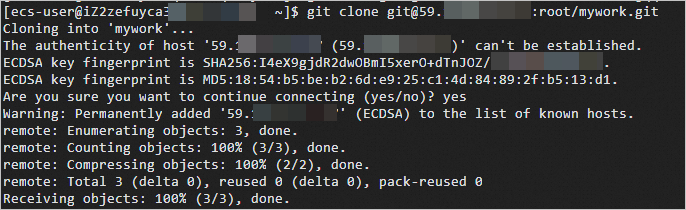
Access the on-premises project directory.
cd mywork/View the name of the current branch. The default value is
main, which is the name of the main branch.git branch
Create a branch and make changes
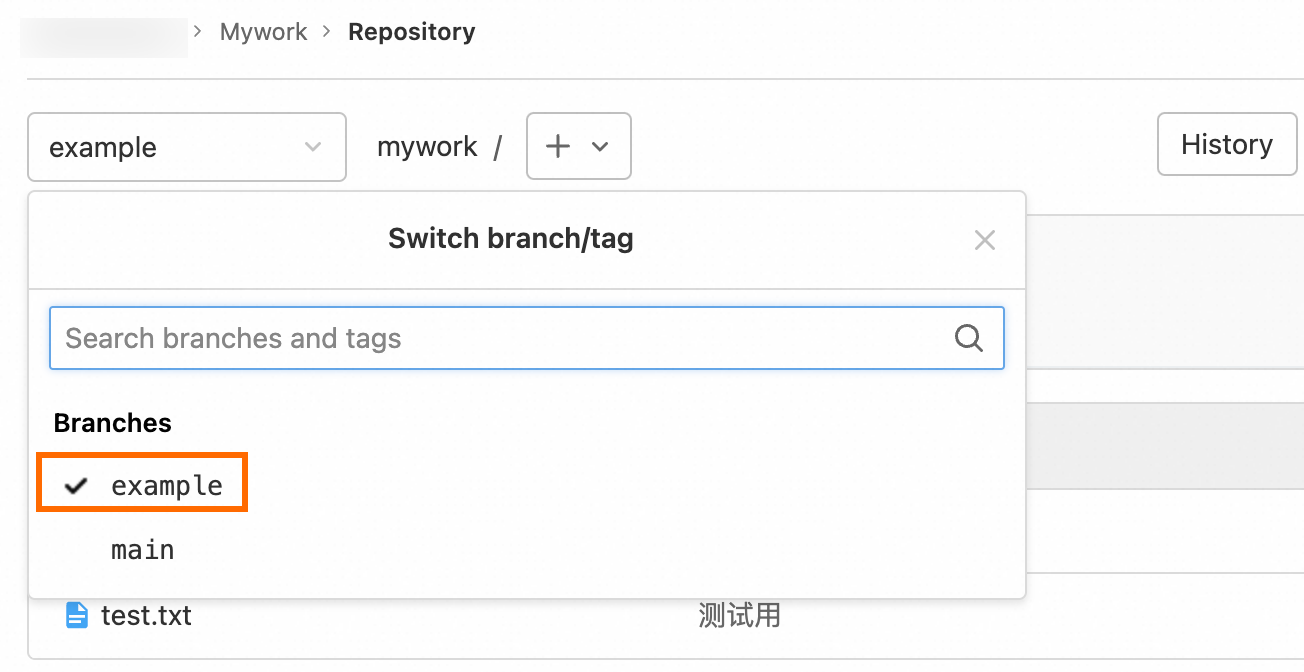
Create a branch on the on-premises device to facilitate file operations.
Create a branch named
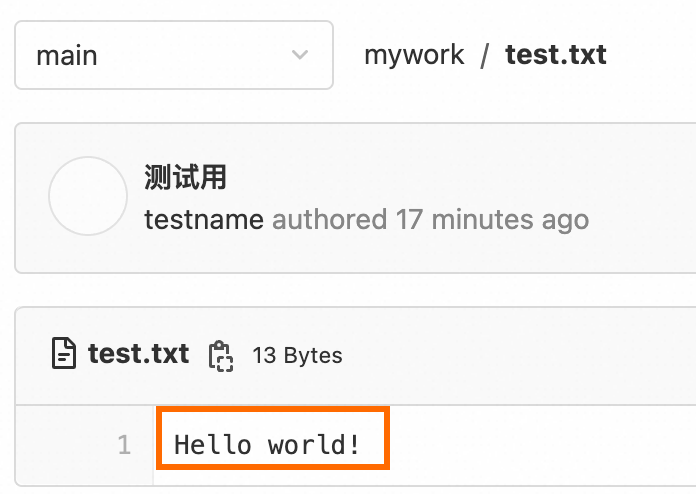
example.git checkout -b exampleCreate a file named
test.txtand writeHello World!to the file. The file will be uploaded to the GitLab website.echo "Hello World!" > test.txt
Commit and push changes
To push the on-premises example branch to the project repository on the ECS instance for saving, perform the following steps:
Add the
test.txtfile to the staging area.git add test.txtConfirm the file changes.
git statusThe following output is returned:
On branch example
Changes to be committed:
  (use "git restore --staged <file>..." to unstage)
        modified:   test.txt
Submit the staging file named
test.txt.git commit -m "For testing"The
examplebranch can be used only on the on-premises device. To allow other users to access the example branch, push the branch to the project repository on the ECS instance.git push origin exampleAfter the example branch is pushed to the project repository on the ECS instance, other users can view the branch.
Merge changes
Merge changes from the example branch into the main branch on your on-premises device, and then push the merged main branch to the project repository on the ECS instance. Perform the following steps:
Switch to the on-premises
mainbranch.git checkout mainMerge the on-premises
examplebranch into themainbranch.git merge examplePush the merged on-premises main branch to the project repository on the ECS instance.
git pushThe on-premises changes are synchronized to the
mainbranch of the project repository on the ECS instance.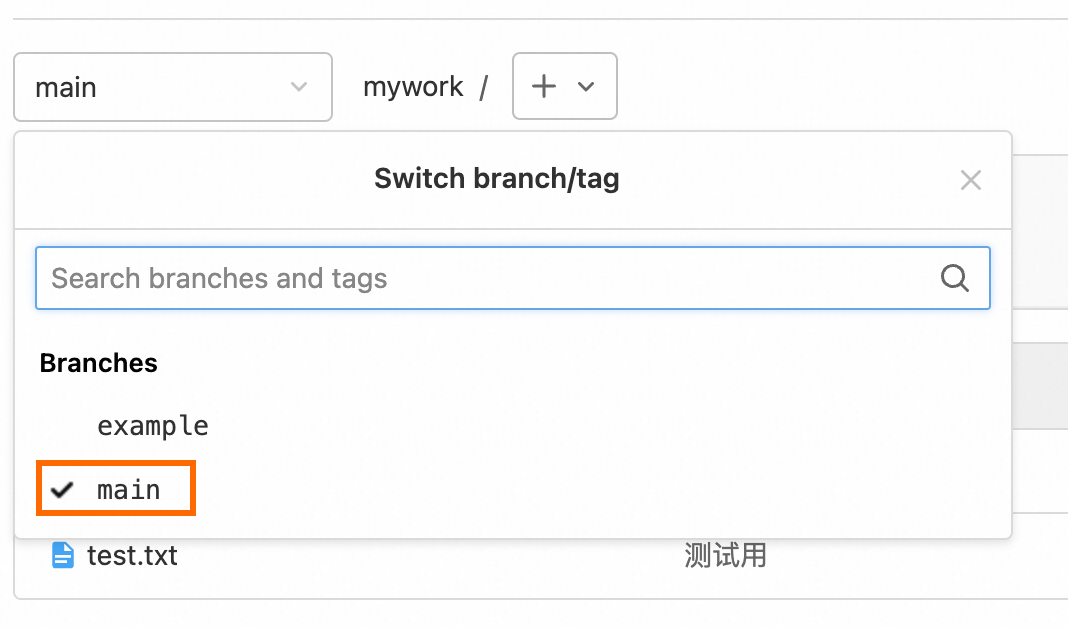
What to do next
Configure email notifications
Back up data in the project repository
Resolve the domain name of the GitLab website
If you allow users to access the GitLab website by using the public IP address of the ECS instance, the security of the instance is compromised. If you have a domain name or want to register a domain name for the GitLab website, perform the following steps:
Register a domain name.
For more information, see Register a domain name on Alibaba Cloud.
Apply for an Internet Content Provider (ICP) filing for the domain name.
If the website of your domain name is hosted on an ECS instance that is located in a Chinese mainland region, apply for an ICP filing.
Resolve the registered domain name. After you configure domain name resolution settings, external users can visit the GitLab website by using the domain name.
Domain name resolution is a prerequisite if you want to use the domain name to access the GitLab website. For more information, see Get started.
Enable HTTPS-encrypted access. Use free services such as Let's Encrypt for free automatic HTTPS or paid services such as SSL Certificates Service.
Add a security group rule. Add an inbound rule to a security group of the ECS instance. For security purposes, we recommend that you allow only authorized IP addresses to access specific ports.
Package installation: port 443 (HTTPS)
Docker image installation: the host HTTPS port specified in the docker run command
Modify the external_url parameter in the gitlab.rb file. The following figure shows the configuration result.
Package installation: Configure the external URL for GitLab.
Docker image installation: Edit the configuration file.
FAQ
What do I do if the ECS instance becomes unresponsive or fails to connect?
What do I do if port 22 is already used when I use Docker to start GitLab?
By default, an ECS instance uses port 22 for SSH. If you use a Docker image to install GitLab, you must replace port 22 of the host with a different port and modify the gitlab_rails['gitlab_shell_ssh_port'] parameter. Perform the following steps:
Specify a non-standard port, such as port 2222, when you start Docker. Example:
publish 2222:22.Modify the GitLab configuration file.
Run the
sudo docker exec -it gitlab /bin/bashcommand to start a session.Edit the
/etc/gitlab/gitlab.rbfile.Set the
gitlab_rails['gitlab_shell_ssh_port']parameter to 2222.Run the
gitlab-ctl reconfigurecommand to reconfigure GitLab.
Open the project page and verify the configurations.