You can configure security group rules for Elastic Compute Service (ECS) instances that are deployed in the classic network and belong to different security groups to establish interconnection between the instances over the internal network in different scenarios, such as building internal websites or application services and deploying database clusters or application systems. This topic describes four methods that you can use to configure internal network-based interconnection between ECS instances in the classic network.
Method 1: Configure security group rules to allow access from the IP addresses of ECS instances
Scenario
This method is suitable if you want to interconnect a small number of ECS instances in the classic network.
Advantages and disadvantages
Advantages: This method involves simple and clear security group rules that use IP addresses as authorization objects.
Disadvantages: When you attempt to interconnect a large number of ECS instances over the internal network, you are limited to up to 200 rules per security group and burdened by a high maintenance workload.
Procedure
Find an ECS instance in the classic network that requires interconnection with other ECS instances over the internal network and click the ID of the instance.
On the Instance Details page, click the Security Groups tab.
Find the security group that you want to manage and click Configure Rules in the Actions column.
Click the Inbound tab.
Click Add Rule and then configure the following parameters to create a security group rule:
Action: Select Allow.
Priority: Specify a value based on your business requirements. Default value: 1.
Protocol Type: Select a protocol type from the drop-down list based on your business requirements.
Port Range: Specify a port range based on your business requirements.
Authorization Object: Enter the private IP address of another ECS instance in the classic network in the following CIDR block format: a.b.c.d/32. The subnet mask must be /32.
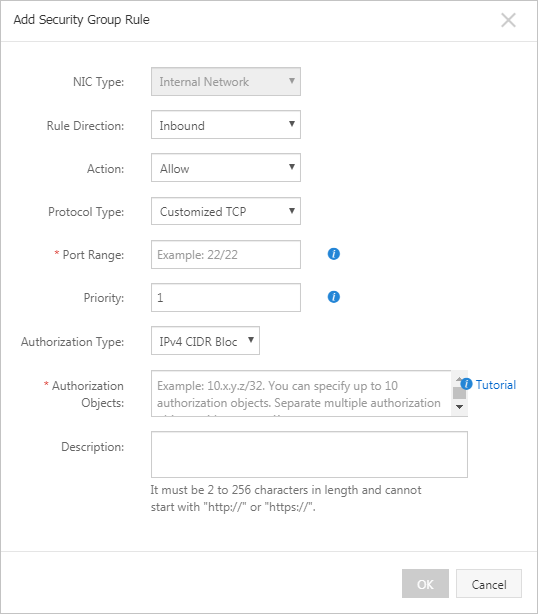
Click Save.
Method 2: Add ECS instances to the same security group
Scenario
If your application architecture is simple, you can add all ECS instances to the same basic security group.
By default, instances in the same basic security group can access each other over the internal network.
Advantages and disadvantages
Advantages: This method involves simple and clear security group rules.
Disadvantages: This method is applicable only to a simple network architecture. If your network architecture is changed, you may need to use a different method.
Procedure
For information about the procedure, see Manage ECS instances in security groups.
Method 3: Add ECS instances to a security group created only for interconnection
Scenario
You can add ECS instances to a basic security group that is created only to establish interconnection between ECS instances. This method is suitable for a multi-layer network architecture.
Advantages and disadvantages
Advantages: This method is easy to implement and can quickly establish interconnection between ECS instances. You can use this method in complex network architectures.
Disadvantages: You must add ECS instances to additional security groups. The security group rules that are associated with the ECS instances may be complex.
Procedure
Create a basic security group that has a custom name, such as interconnection, in the classic network. You do not need to create security group rules in the new security group. For more information, see Create a security group.
Add the ECS instances in the classic network that require interconnection to the new security group. The new security group allows the ECS instances to communicate with each other over the internal network. For more information, see Manage ECS instances in security groups.
Method 4: Configure security group rules to allow access from security groups
Scenario
You can configure security group rules to allow access between the security groups of ECS instances that require interconnection over the internal network. This method is suitable for a multi-layer network architecture.
Advantages and disadvantages
Advantages: This method is easy to implement and can quickly establish interconnection between ECS instances. You can use this method in complex network architectures.
Disadvantages: You must add ECS instances to multiple security groups. The security group rules that are associated with the ECS instances may be complex.
Procedure
Find an ECS instance in the classic network that requires interconnection with other ECS instances over the internal network and click the ID of the instance.
On the Instance Details page, click the Security Groups tab.
Find the security group that you want to manage and click Configure Rules in the Actions column.
Click the Inbound tab.
Click Add Rule and then configure the following parameters to create a security group rule:
Action: Select Allow.
Priority: Specify a value based on your business requirements. Default value: 1.
Protocol Type: Select a protocol type from the drop-down list based on your business requirements.
Port Range: Specify a port range based on your business requirements.
Authorization Object:
To allow access from a security group in the same account as the current security group, enter the ID of the security group.
To allow access from a security group in a different account, enter the ID of the account and ID of the security group in the <Account ID>/<Security group ID> format.
Click Save.