If you set the IP address acquisition method to Static and specify an IP address that is different from the IP address displayed in the Elastic Compute Service (ECS) console for a Linux instance when you modify the network interface controller (NIC) configuration file of the instance, issues may occur, such as network connection failures, ineffectiveness of security group rules, and increased difficulty in managing the instance. This topic describes how to resolve the issue that the IP address of a Linux instance in the NIC configuration file is different from the IP address of the instance displayed in the ECS console.
Problem description
You specified a static IP address for a Linux instance in the NIC configuration file of the instance, but the specified IP address is different from the IP address of the instance displayed in the ECS console.
Solution
Step 1: Obtain the IP address of the Linux instance displayed in the ECS console
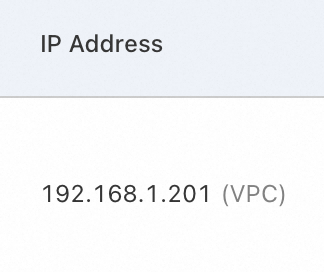
Obtain the private IP address of the Linux instance in the ECS console. For more information, see the View the IP addresses of ECS instances section of the "IP addresses" topic.
Step 2: Modify the NIC configuration file of the Linux instance
Red Hat Enterprise Linux (RHEL) series
The following procedure applies to the following operating system distributions: Alibaba Cloud Linux 2, Alibaba Cloud Linux 3, CentOS 6, CentOS 7, CentOS 8, Red Hat 6, Red Hat 7, Red Hat 8, Red Hat 9, Anolis 7, Anolis 8, Fedora 33, Fedora 34, and Fedora 35.
In this example, Alibaba Cloud Linux 3.2 is used.
In this example, the primary NIC named eth0 is used. Replace the NIC name with the actual NIC name.
Connect to the Linux instance.
For more information, see Use Workbench to connect to a Linux instance over SSH.
View the subnet mask.
Run the following command to view the routing information:
route -nThe sample command output shown in the following figure indicates the routing information of the Linux instance.
The subnet mask (Genmask) is 255.255.255.0.
The default gateway (Gateway) is 192.168.1.253.

Run the following command to modify or create the NIC configuration file:
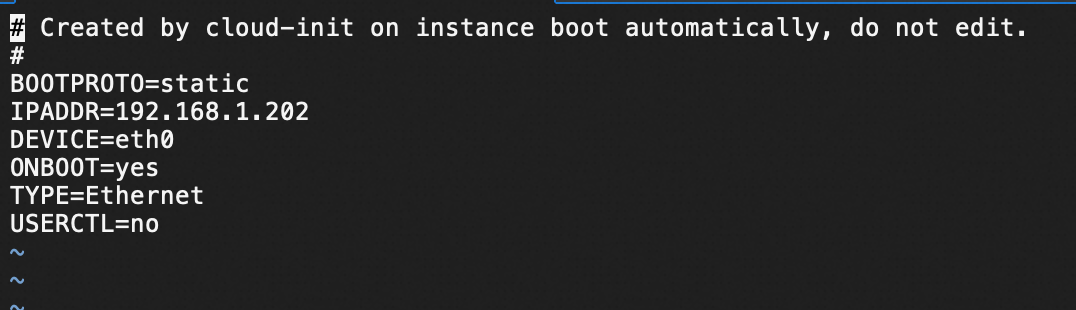
sudo vi /etc/sysconfig/network-scripts/ifcfg-eth0Use Static as the method for obtaining an IP address and configure the primary private IPv4 address and subnet mask of the NIC.
Sample code:
DEVICE=eth0
TYPE=Ethernet
#The method used to obtain an IP address, which is set to Static.
BOOTPROTO=static

#The IPv4 address and subnet mask that require manual configuration.
IPADDR=<Replace the value of this parameter with the actual IPv4 address>
NETMASK=<Replace the value of this parameter with the actual subnet mask>
Example:
DEVICE=eth0
TYPE=Ethernet
#The method used to obtain an IP address, which is set to Static.
BOOTPROTO=static

#The IPv4 address and subnet mask that require manual configuration.
IPADDR=192.168.1.201
NETMASK=255.255.255.0
Ubuntu 22, Ubuntu 24, and Debian 12
Connect to the Linux instance.
For more information, see Use Workbench to connect to a Linux instance over SSH.
View the subnet mask.
Run the following command to view the routing information:
route -nThe sample command output shown in the following figure indicates the routing information of the Linux instance.
The subnet mask (Genmask) is 255.255.255.0.
The default gateway (Gateway) is 192.168.1.253.
Run the following command to disable the network configuration feature of cloud-init.
ImportantThe /etc/netplan/50-cloud-init.yaml network configuration file is automatically generated by
cloud-initwhen the Linux instance starts. Before you can modify the network configuration file, you must disable the network configuration feature of cloud-init. For more information, see the cloud-init automatically initializes network configurations section of the "Secondary private IP addresses" topic.sudo vim /etc/cloud/cloud.cfg.d/99-disable-network-config.cfgAdd the following configuration to the /etc/cloud/cloud.cfg.d/99-disable-network-config.cfg configuration file:
network: {config: disabled}Run the following command to open the /etc/netplan/50-cloud-init.yaml network configuration file and configure the NIC:
sudo vim /etc/netplan/50-cloud-init.yamlExample:
network:
    version: 2
    ethernets:
        eth0: #The name of the NIC.
            dhcp4: false #By default, Dynamic Host Configuration Protocol (DHCP) is enabled to automatically assign IP addresses. If you set this parameter to false, you must manually configure IP addresses for the NIC.
            match:
                macaddress: 00:16:3e:16:43:xx #Replace the value of this parameter with the actual MAC address of the NIC.
            set-name: eth0
            addresses:
                    - 192.168.1.201/24 #Replace the value of this parameter with the actual primary private IPv4 address of the NIC.
            routes:
              - to: default
                via: 192.168.1.253 #Replace the value of this parameter with the actual default gateway address.
Ubuntu 18 and Ubuntu 18 20
Connect to the Linux instance.
For more information, see Use Workbench to connect to a Linux instance over SSH.
View the subnet mask.
Run the following command to view the routing information:
route -nThe sample command output shown in the following figure indicates the routing information of the Linux instance.
The subnet mask (Genmask) is 255.255.255.0.
The default gateway (Gateway) is 192.168.1.253.
Run the following command to disable the network configuration feature of cloud-init.
ImportantThe /etc/netplan/50-cloud-init.yaml network configuration file is automatically generated by
cloud-initwhen the Linux instance starts. Before you can modify the network configuration file, you must disable the network configuration feature of cloud-init. For more information, see the cloud-init automatically initializes network configurations section of the "Secondary private IP addresses" topic.sudo vim /etc/cloud/cloud.cfg.d/99-disable-network-config.cfgAdd the following configuration to the /etc/cloud/cloud.cfg.d/99-disable-network-config.cfg configuration file:
network: {config: disabled}Run the following command to open the /etc/netplan/50-cloud-init.yaml network configuration file and configure the NIC:
sudo vim /etc/netplan/50-cloud-init.yamlExample:
network:
    version: 2
    ethernets:
        eth0: #The name of the NIC.
            dhcp4: false #By default, DHCP is enabled to automatically assign IP addresses. If you set this parameter to false, you must manually configure IP addresses for the NIC.
            match:
                macaddress: 00:16:3e:16:43:xx #Replace the value of this parameter with the actual MAC address of the NIC.
            set-name: eth0
            addresses:
                    - 192.168.1.201/24 #Replace the value of this parameter with the actual primary private IPv4 address of the NIC.
            gateway4: 192.168.1.253 #Replace the value of this parameter with the actual default gateway address.
Step 3: Restart the network service
Restart the network service to allow the new configurations to take effect.
The following table describes the commands used to restart the network service. Specific commands require an instance restart, which may cause service interruptions. We recommend that you restart the network service during off-peak hours.
Operating system | Command used to restart the network service |
|
or |
|
|
|
|
|
|
|
|