This guide explains how to test TCP and UDP port connectivity on a Linux Elastic Compute Service (ECS) instance.
Test TCP port connectivity
Select a method based on the status of the port that you want to test:
If the port is already listening, see Method 1: Use Telnet to test a port with an active listener.
If the port is not listening, see Method 2: Start a listener on a port and test its connectivity.
Method 1: Test a listening port with Telnet
Connect to your Linux instance.
For more information, see Connect to a Linux instance using Workbench.
Run the following command to test port connectivity.
For example, to test port
1234on the server at121.11.XX.XX, runsudo telnet 121.11.XX.XX 1234.# Replace [$Host] with the IP address of the target server and [$Port] with the port number to test. sudo telnet [$Host] [$Port]A successful connection returns output similar to the following. The exact output may vary across Linux distributions, but a message containing
Connected to ...indicates success.NoteIf the test fails, ensure the target server's security group rules allow inbound traffic on the test port. To allow access, add a security group rule. For more information, see Add a security group rule.
Trying 121.11.XX.XX...
Connected to 121.11.XX.XX.
Escape character is '^]'.
Method 2: Create a temporary listening port to test
This method requires two instances: a server and a client. The test verifies port connectivity on the server instance.
Server: The instance where a new port will listen for connections.
Client: The instance that connects to the server's port for testing.
Connect to your Linux instance.
For more information, see Connect to a Linux instance using Workbench.
On the server instance, run the following command to check the installed Python version.
python -VIf the command returns a version number, Python is installed.
If Python is not installed, see Deploy a Python environment to install it.
On the server instance, run the following command to create a temporary listening port with Python's built-in web server.
For example, to create a listener on port
1234with Python 3.x, runsudo python3 -m http.server 1234.Python 2
# Replace [$Port] with the port number to test.
sudo python -m SimpleHTTPServer [$Port]
Python 3.x
# Replace [$Port] with the port number to test.
sudo python3 -m http.server [$Port]
Output similar to the following confirms the listener is active.
Serving HTTP on 0.0.0.0 port 1234 ...NoteAfter the test is complete, press
Ctrl+Cto stop the listening process.On the client instance, run the following command to test the server's new listening port.
For example, to test port
1234on the server at121.11.XX.XX, runsudo telnet 121.11.XX.XX 1234.# Replace [$Host] with the server IP address and [$Port] with the port number to test. sudo telnet [$Host] [$Port]A successful connection returns output similar to the following. The exact output may vary across Linux distributions, but a message containing
Connected to ...indicates success.NoteIf the test fails, ensure the server's security group rules allow inbound traffic on the test port. To allow access, add a security group rule. For more information, see Add a security group rule.
Trying 121.11.XX.XX...
Connected to 121.11.XX.XX.
Escape character is '^]'.
Test UDP port connectivity
This method requires two instances: a server and a client. The test verifies port connectivity on the server instance.
Server: The instance where UDP port connectivity will be tested.
Client: The instance that sends data to the server's port for testing.
Connect to your Linux instance.
For more information, see Connect to a Linux instance using Workbench.
On both the server and client instances, run the following command to check if the
nc(ornetcat) utility is installed.which ncIf the command returns a path, such as
/usr/bin/nc, the utility is installed./usr/bin/ncNoteIf the command is not found, install the utility by using a package manager such as
yumorapt-get. For example:sudo yum install -y nc.On the server instance, run the following command to listen on the test UDP port.
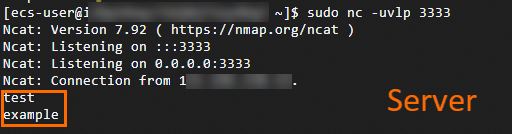
For example, on UDP port
3333, runsudo nc -uvlp 3333.# Replace [$Port] with the port number to test. sudo nc -uvlp [$Port]The command starts a listener on the specified port and returns output similar to the following.
Ncat: Version 7.92 ( https://nmap.org/ncat )
Ncat: Listening on :::3333
Ncat: Listening on 0.0.0.0:3333
On the client instance, run the following command to connect to the test port on the server.
For example, to connect to UDP port
3333on the server at111.22.XX.XX, runsudo nc -u 111.22.XX.XX 3333.# Replace [$Host] with the server IP address and [$Port] with the port number to test. sudo nc -u [$Host] [$Port]Once the command is running, type a test string (e.g., "test") and press Enter. If the same string appears in the server terminal, the port connection is successful.
NoteIf the test fails (the server does not receive the data), ensure the server's security group rules allow inbound traffic on the test port. To allow access, add a security group rule. For more information, see Add a security group rule.