Disclaimer: This article may contain information about third-party products. Such information is for reference only. Alibaba Cloud does not make any guarantee, express or implied, with respect to the performance and reliability of third-party products, as well as potential impacts of operations on the products.
Introduction
This topic describes how to query and analyze the overall load of a Linux instance.
Background
Alibaba Cloud reminds you that:
- Before you perform operations that may cause risks, such as modifying instance configurations or data, we recommend that you check the disaster recovery and fault tolerance capabilities of the instances to ensure data security.
- If you modify the configurations and data of instances including but not limited to ECS and RDS instances, we recommend that you create snapshots or enable RDS log backup.
- If you have authorized or submitted security information such as the logon account and password in the Alibaba Cloud Management console, we recommend that you modify such information in a timely manner.
Query and analyze the overall load of Linux instances
If the overall load of a Linux instance is too high, the instance may encounter crashes or stalling. Refer to the following steps for overall troubleshooting.
- Check whether server processes and services occupy too much memory or whether the memory is not properly released, resulting in memory overflow and system downtime.
- Check whether there is a cron (scheduled task) in the system configuration such as
/var/spool/cron. - Check whether the parameters of the Web server exceed the performance of the server. For example, if the maximum number of connections is too high,
- Check whether the number of processes is very high. As a result, the service is paralyzed and the machine simulates death.
- Check for exception records in the system log.
- Check the disk for damaged blocks.
- Check whether there are processes or services that consume excessive resources instantly.
- Check for suspicious processes and symptoms of attacks or intrusions.
Use the sar tool to view the resource usage of Linux instances
sar is an abbreviation for System Activity Reporter (System Activity Report). After sampling the system state, the sar tool expresses the current running state of the system by calculating the data and the ratio. Its characteristic is that it can continuously sample the system and obtain a large amount of sampling data. Its sampling data and analysis results can be stored in files, requiring a small load.
sar is a comprehensive performance analysis tool for Linux. It monitors and reports system activities from multiple perspectives, including file read /write status, system call usage, serial port, CPU efficiency, memory usage, and IPC activity.
Install the sar tool
If your operating system does not have the sar tool installed by default, follow these steps to install it.
- Log on to the Linux instance and run the following command to install the sar tool:
yum install sysstat
- Run the following command to start the service:
/etc/init.d/sysstat start
View CPU load
Run the following command to check the CPU load:
sar -u 1 5
The following command output is returned.
Linux 3.10.0-123.9.3.el7.x8664 (iZ23pddtofdZ)     07/04/2016     _x86_64    (1 CPU)
10:16:35 AM     CPU     %user     %nice   %system   %iowait    %steal     %idle
10:16:36 AM     all     14.14      0.00      1.01      0.00      0.00     84.85
10:16:37 AM     all     14.14      0.00      0.00      1.01      0.00     84.85
10:16:38 AM     all      0.00      0.00      1.01      0.00      0.00     98.99
10:16:39 AM     all      0.00      0.00      0.00      0.00      0.00    100.00
10:16:40 AM     all      1.00      0.00      0.00      0.00      0.00     99.00
Average:        all      5.86      0.00      0.40      0.20      0.00     93.54
Note:
- % user: Percentage of CPU time consumed in user mode.
- % nice: The percentage of CPU time consumed in user mode by a process whose process priority is changed through nice.
- % system: Percentage of CPU time consumed in system mode.
- % iowait: the percentage of time that the CPU consumed to wait for disk I/O that causes the idle state.
- % steal: the portion of time that is spent waiting for additional virtual CPUs by using OS virtualization technologies such as Xen.
- % idle: the percentage of CPU idle time.
View average load
Run the following command to check the average load:
sar -q 1 60
The following command output is returned.
sar -q 1 6Linux 3.10.0-123.9.3.el7.x8664 (iZ23pddtofdZ)     07/04/2016     _x86_64    (1 CPU)
10:23:13 AM   runq-sz  plist-sz   ldavg-1   ldavg-5  ldavg-15   blocked
10:23:14 AM         0       142      0.00      0.01      0.05         0
10:23:15 AM         0       142      0.00      0.01      0.05         0
10:23:16 AM         0       142      0.00      0.01      0.05         0
10:23:17 AM         0       142      0.00      0.01      0.05         0
10:23:18 AM         0       142      0.00      0.01      0.05         0
10:23:19 AM         0       142      0.00      0.01      0.05         0
Average:            0       142      0.00      0.01      0.05         0
Note: After specifying the-q parameter, you can view information such as the number of processes in the queue, the size of processes in the system, and the average load. Compared with other commands, this command displays metrics over time.
- runq-sz: the length of the run queue, that is, the number of processes waiting to run.
- plist-sz: the number of processes and threads in the process list.
- ldavg-1: the average system load over the last minute.
- ldavg-5: the average system load in the last 5 minutes.
- ldavg-15: the average system load in the last 15 minutes.
View memory load
Run the following command to check the memory load:
sar -r 1 3
The following command output is returned.
sar -r 1 3
Linux 3.10.0-123.9.3.el7.x8664 (iZ23pddtofdZ)     07/04/2016     _x86_64    (1 CPU)
10:27:34 AM kbmemfree kbmemused  %memused kbbuffers  kbcached  kbcommit   %commit  kbactive  kbinact  kbdirty
10:27:35 AM    275992    740664     72.85    181552    315340    362052     35.61    471216   115828       60
10:27:36 AM    276024    740632     72.85    181552    315340    362052     35.61    471220   115828       64
10:27:37 AM    276024    740632     72.85    181552    315340    362052     35.61    471220   115828       64
Average:       276013    740643     72.85    181552    315340    362052     35.61    471219   115828       63
Note:
- kbmemfree: This value is basically the same as the free value in the free command, which excludes buffer and cache space.
- kbmemused: This value is basically the same as the used value in the free command. It includes buffer and cache space.
- % memused: the physical memory usage. It is the percentage of kbmemused and the total memory (excluding Swap memory).
- kbbuffers and kbcached: These two values are consistent with the buffer and cache values in the free command.
- kbcommit: the memory required by the current system, that is, the memory required to ensure an overflow, that is, the RAM plus Swap memory.
- % commit: This value is the percentage of kbcommit and total memory (including Swap memory).
View the state of the page Exchange
Run the following command to check the memory load:
sar -W 1 3
The following command output is returned.
Linux 3.10.0-123.9.3.el7.x8664 (iZ23pddtofdZ) 07/04/2016 _x86_64 (1 CPU)
10:28:59 AM pswpin/s pswpout/s
10:29:00 AM 0.00 0.00
10:29:01 AM 0.00 0.00
10:29:02 AM 0.00 0.00
Average: 0.00 0.00
Note:
- pswpin/s: the number of Swap pages per second from Swap partitions to the system.
- pswpout/s: the number of Swap pages switched from the system to Swap per second.
Parameters of the sar Command are described as follows, which are case-sensitive.
- -A: summarizes all reports
- -a: reports file read and write usage
- -B: Report on the usage of attached caches
- -b: Report on cache usage
- -c: report usage of system calls
- -d: report disk usage
- -g: Report the usage of serial port
- -h: Reports statistics on buffer usage.
- -m: Report the usage of IPC message queues and Semaphore
- -n: reports the usage of named caches.
- -p: reports the usage of paging activities.
- -q: Average length of report run queue and exchange queue
- -R: report the activity of the process
- -r: report unused memory pages and hard disk blocks
- -u: reports CPU utilization
- -v: reports the status of the process, i node, file, and lock table
- -w: report the status of system exchange activity
- -y: report TTY device activity status
Use htop to view system load
htop is an interactive process viewer in the Linux, which allows users to perform interactive operations, scroll through the process list horizontally or vertically, and support mouse operations. Users can install htop to monitor the load of the server.
- Linux htop tool does not exist by default, you can run the following command to install it:
yum install htop
- After the installation is successful, you can start htop monitoring tool by executing htop command on the command line.
- The interface after htop is started is shown in the following figure. In the result, the usage of CPU, memory, and Swap Swap space is displayed on the left. The task, load, and startup duration are displayed on the right. The real-time status of processes is displayed on the main part, and the function keys from F1 to F10 are displayed on the bottom.

- The F1 to F10 function keys are described below.
Function key Corresponding function Description F1 Invoke htop Help View htop help documentation F2 Htop Setup Menu htop configuration menu F3 Search for a Process Search process F4 Incremental process filtering Process filter F5 Tree View Show tree structure F6 Sort by a column Select sort by F7 Nice - (change priority) To increase the priority of the corresponding process, you can decrease the nice value. F8 Nice + (change priority) You can add the nice value to reduce the priority of the corresponding process. F9 Kill a Process End a specified process F10 Quit htop End htop -
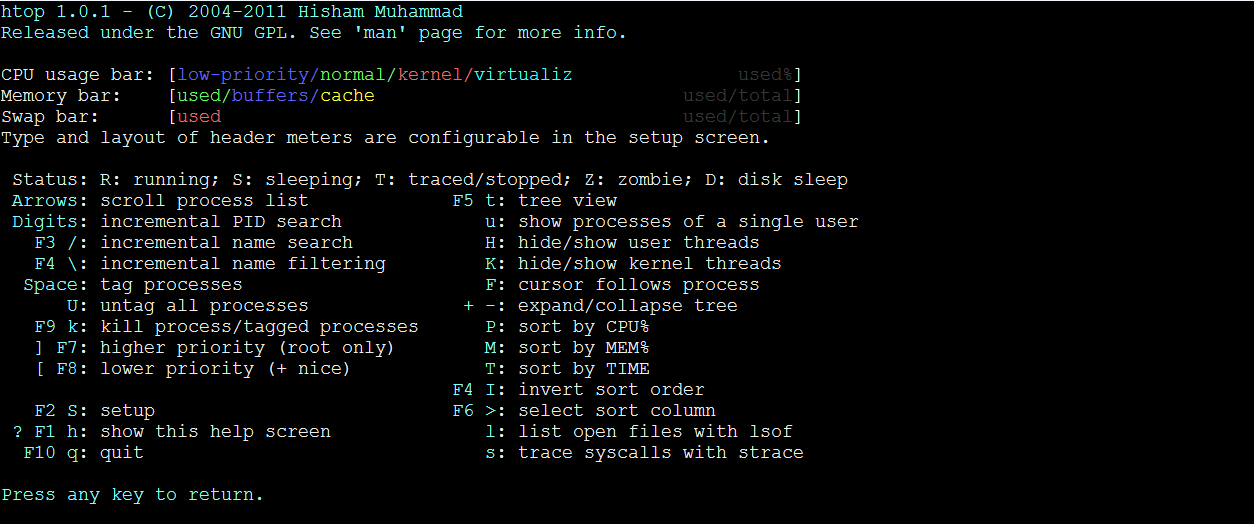
In the htop navigation bar, you can move the pointer over a project, move the pointer over a project, move the pointer over a project, or click the corresponding project or PgDn key. You can also enable or disable the Home or End button to move fields. The following figure shows the shortcut keys.
-
Space: Mark or unmark one or more processes.
-
s: Select a process and press the s key. Use strace to track the system calls of the processes.
-
l: The file opened by the process is displayed. If lsof is installed, press this key to display the files opened by the process.
-
M: sorts the results by Memory usage.
-
P: Sort by CPU usage.
-
T: The table is sorted by Time + usage.
-
F: tracks processes. If the sorting order causes the selected process to move freely on the list, make the selected process follow you. This watch a process very useful. In this way, the user can make a specific process always visible on the screen. Use the arrow keys to stop the function.
-
K: shows or hides kernel threads.
-
H: shows or hides user threads.
-
Ctrl and L: refresh the interface
-
- Click Help or press F1 to view the built-in Help information.

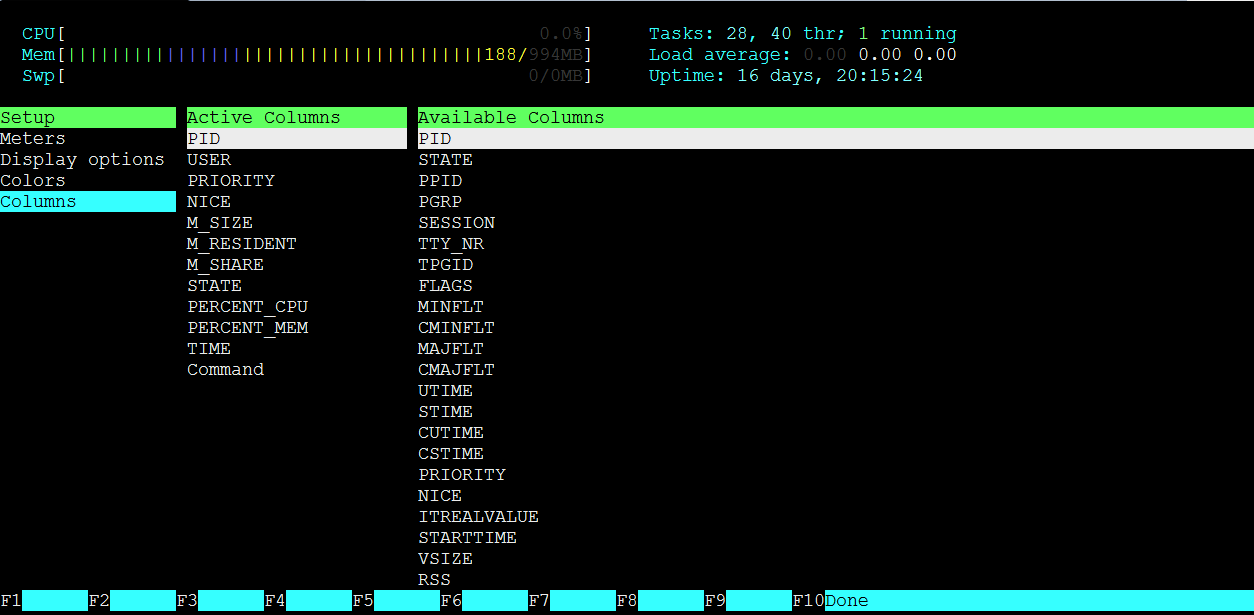
- Click Setup or press F2 to go to the htop configuration page. For example, the last item adjusts the display of Columns to customize the fields with data and information in the htop process list.

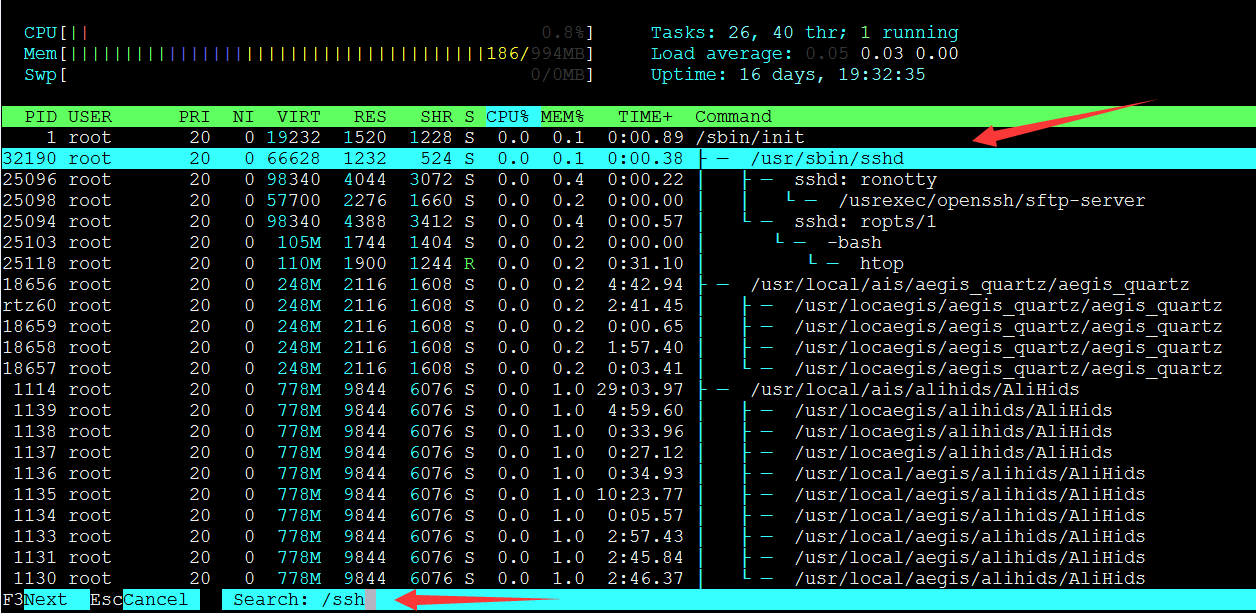
- Click Search or press F3 or enter
/, you can then search by entering a process name, such as searching for an ssh process.
- Enter
tor press F5 to display the tree structure, which is similar to the display effect of pstree. You can see the tree structure of all program executions.
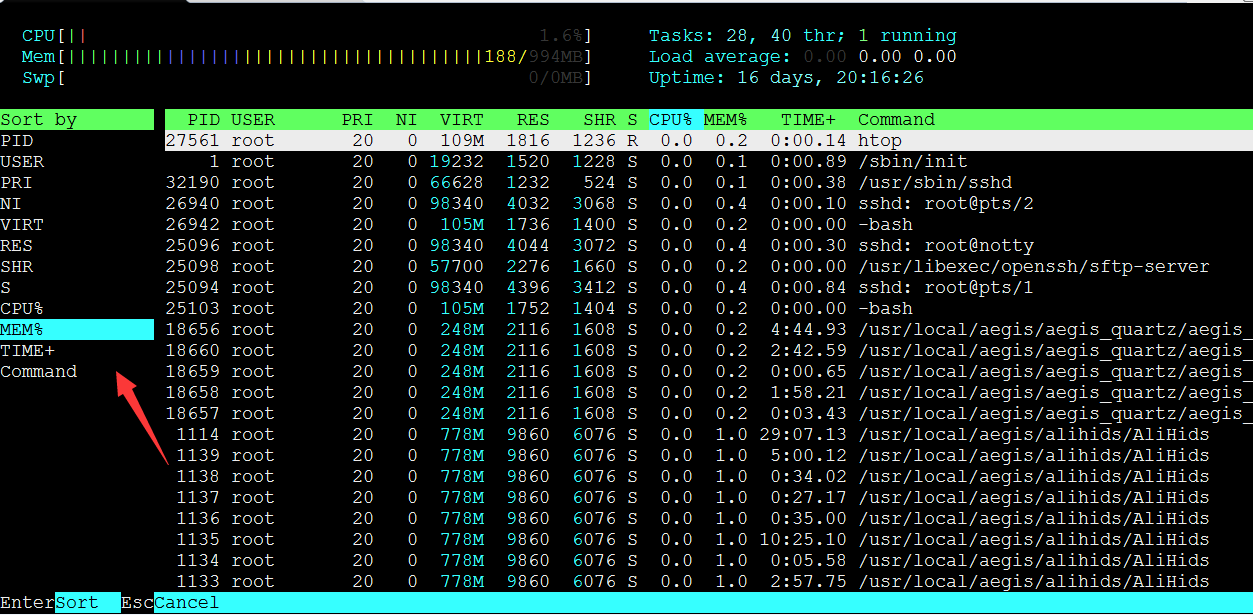
- By F6, you can choose which column to sort by, the most commonly used sorting contents are CPU and Memory.

- The F1 to F10 function keys are described below.
Application scope
- ECS